Virtualization via Zones
Enter the Zone
OpenSolaris, like Linux, is an ambitious open source kernel and operating system project that provides an excellent platform for building and running applications. Originally created and maintained by Sun Microsystems, now owned by Oracle, OpenSolaris [1] runs on a variety of PC-based hardware. One of the most compelling features of OpenSolaris is its built-in virtualization capability known as zones.
Virtualization experts measure efficiency in terms of performance and virtual machine density. Zones, the most efficient virtualization method available today, offer the best values of both measurements. Zone performance is native, and zone density can run into the hundreds of instances per host server. Often referred to as containers, zones are an expanded type of chroot jail. Like jails, zones provide a secure and isolated environment from which you may run processes, applications, and services. All zones on an OpenSolaris system refer to a single running kernel, therefore they all must be compatible with that kernel.
Although it is possible to install certain Linux distributions (Red Hat and CentOS) into an OpenSolaris zone, it's recommended that you stick with OpenSolaris (and the same version of OpenSolaris) for all zones. For those who connect to zones via their IP address or hostname, a zone appears to be a standalone system. The casual user will never will never notice a difference when in a zone and a physical system or a fully virtualized system. Each zone may have its own administrator, its own root password, and its own set of unique users.
Zone Requirements
To run an OpenSolaris zones host system, you need a few prerequisites. To start, you need the latest OpenSolaris version installed on compatible PC hardware. If it works with Linux, it will likely work with OpenSolaris. Many enterprise zone hosts use 2GB of RAM as a standard, which is enough to start your system and run it efficiently with as many zones as you can manage. Remember that you're not installing fully virtualized "machines" and foreign operating systems so you don't need a lot of RAM.
Each zone needs sufficient disk space and "sees" all space as belonging to itself, so you need to remain as aware of disk space as you would on any system running several apps. Logs and home directories use large amounts of disk space on any system, virtual or physical.
Contemporary dual-core and quad-core systems will run a zones host without issue. Unless you want to run specialized Linux distributions on your host, you have no special CPU requirements. Linux distributions only work on Intel architecture systems.
The final requirement is ZFS [2]. The "Z" filesystem, another compelling feature of OpenSolaris, is a powerful and self-managing filesystem that's easy to use, highly scalable, and reliable. Although you can install and use UFS (Unix Filesystem) on OpenSolaris, zones must use ZFS.
Command-Line Zone Creation
Two simple bits of information about OpenSolaris zones can save hours of frustration and Googling. The first: You must use ZFS for zones. The second: You have to create the directory in which your zones live before creating any zones.
For simplicity, the example system's name is opensolaris. All zone management commands require root privilege, therefore you'll see the # prompt before all commands. Assume you have to have root access unless otherwise noted.
Begin by creating the zones directory. Although you can name this parent directory anything you want, zones seems appropriate for this tutorial:
root@opensolaris:~# mkdir /zones
Creating a new zone is simple. OpenSolaris only needs a small amount of information. The new zone, minimally, requires a name, a zonepath (the zone's root directory), and a network interface setup (IP address, physical binding, and default router).
Although you can add several other attributes and parameters, they aren't necessary under most circumstances. In this example (Listing 1), you'll add a description of the zone, but it's an optional setting.
Listing 1: Create a Zone Named web1
01 root@opensolaris:~# zonecfg -z web1
02
03 web1: No such zone configured
04 Use 'create' to begin configuring a new zone.
05 zonecfg:web1> create
06 zonecfg:web1> set zonepath=/zones/web1
07 zonecfg:web1> set autoboot=true
08 zonecfg:web1> add net
09 zonecfg:web1:net> set address=192.168.1.40/24
10 zonecfg:web1:net> set physical=e1000g1
11 zonecfg:web1:net> set defrouter=192.168.1.254
12 zonecfg:web1:net> end
13 zonecfg:web1> add attr
14 zonecfg:web1:attr> set name=comment
15 zonecfg:web1:attr> set type=string
16 zonecfg:web1:attr> set value="Apache Web Server 1"
17 zonecfg:web1:attr> end
18 zonecfg:web1> verify
19 zonecfg:web1> commit
20 zonecfg:web1> exit
The next step after configuration is to install the zone, which takes the information from your configuration file (/etc/zones/web1.xml), creates default directories, sets up links, and copies files into the zone to create the new system's layout (Listings 2 and 3). The installation also creates the zone's chrooted directory /zones/web1 and sets the appropriate permissions (root:root 700 (drwx——)).
Listing 2: Zone Installation
01 # zoneadm -z web1 install
02
03 A ZFS file system has been created for this zone.
04    Publisher: Using opensolaris.org (http://pkg.opensolaris.org/release/).
05        Image: Preparing at /zones/web1/root.
06        Cache: Using /var/pkg/download.
07 Sanity Check: Looking for 'entire' incorporation.
08   Installing: Core System (output follows)
09 DOWNLOAD                                    PKGS       FILES     XFER (MB)
10 Completed                                  20/20   3021/3021   42.55/42.55
11
12 PHASE                                        ACTIONS
13 Install Phase                              5747/5747
14   Installing: Additional Packages (output follows)
15 DOWNLOAD                                    PKGS       FILES     XFER (MB)
16 Completed                                  37/37   5598/5598   32.52/32.52
17
18 PHASE                                        ACTIONS
19 Install Phase                              7329/7329
20
21         Note: Man pages can be obtained by installing SUNWman
22  Postinstall: Copying SMF seed repository ... done.
23  Postinstall: Applying workarounds.
24         Done: Installation completed in 411.387 seconds.
25
26   Next Steps: Boot the zone, then log into the zone console
27              (zlogin -C) to complete the configuration process
01 # zoneadm -z web1 boot
Listing 3: Interactive Configuration Session
01 # zlogin -C web1
02 [Connected to zone 'web1' console]                   69/69
03 Reading ZFS config: done.
04 Mounting ZFS filesystems: (6/6)
05
06 What type of terminal are you using?
07  1) ANSI Standard CRT
08  2) DEC VT100
09  3) PC Console
10  4) Sun Command Tool
11  5) Sun Workstation
12  6) X Terminal Emulator (xterms)
13  7) Other
14 Type the number of your choice and press Return: 2
15
16 Creating new rsa public/private host key pair
17 Creating new dsa public/private host key pair
18 Configuring network interface addresses: e1000g1.
19
20 Host name for e1000g1:1: web1
21
22 Configure Kerberos Security: No
23
24 Name service: DNS
25
26 Domain name: blah.com
27
28 Server's IP Address: 192.168.1.254
29
30 Use NFSv4: Yes
31
32 Continents and Oceans: Americas
33
34 Location: US
35
36 Time zones: Central
37
38 Root password: xxxxxxxx
The zone, web1, is running and operational, and you can SSH to it from the host system or any other system. If you can't login, you'll have to allow root user logins or create a user account in the web1 zone.
System accounts, but not user accounts, make the transition from host to zone. But, how do you do that if you cannot log in as root or as any other user? OpenSolaris has a solution: Zone Login.
Zone Login (zlogin)
Three zone-related commands must be familiar to you. The first of these, zlogin, allows logins to any zone as root without a password:
# zlogin web1
root@web1:~#
Once you've logged in as the root user to the web1 zone, you can create a user account that's allowed to SSH to the zone. Additionally, you can log in as any configured user within a zone with the (-l) switch:
# zlogin -l khess web1
khess@web1:~$
With zlogin, you can also run a command within a zone without entering it,
# zlogin web1 uname -a
SunOS web1 5.11 snv_111b i86pc i386 i86pc
which is handy for those of you who like to create automation scripts.
Zone Configuration (zonecfg)
The zonecfg command creates zones, but it also allows you to edit any of your zone parameters. zonecfg is interactive. When you begin a zonecfg session, you identify the zone by name and then make your changes once you've entered into the session. For example, if you need to change the IP address of the zone you created, you'd enter into a zonecfg session to do so (Listing 4).
Listing 4: Change the IP Address of web1 Zone
01 # zonecfg -z web1
02 zonecfg:web1> select net address=192.168.1.40/24
03 zonecfg:web1:net> set net address=192.168.1.50/24
04 zonecfg:web1:net> end; verify; commit; exit
Also, you can add or delete parts of a zone configuration with zonecfg (see Listing 5).
Listing 5: Add and Delete Parts of web1 Zone
01 # zonecfg -z web1
02 zonecfg:web1> remove net address=192.168.1.50/24
03 zonecfg:web1:net> end; verify; commit; exit
04
05 # zonecfg -z web1
06 zonecfg:web1> add net
07 zonecfg:web1:net> set address=192.168.1.30/24
08 zonecfg:web1:net> set physical=e1000g1
09 zonecfg:web1:net> set defrouter=192.168.1.254
10 zonecfg:web1:net> end; verify; commit; exit
Zone Administration (zoneadm)
Once you've created a zone, the zoneadm command allows you to administer and control it, by listing, booting, rebooting, verifying, installing, uninstalling, cloning, moving, readying, attaching, and detaching zones.
Note: Any user may list zones but all other operations require root privilege.
$ zoneadm list
global
web1
web2
This list is incomplete. Another zone, web3, exists.
To see the complete list and current status, you have to use explicit switches (-c, for configured, or -v, for verbose). The verbose switch shows running zones only:
$ zoneadm list -c
global
web1
web2
web3
The use of both switches shows a full picture of your zones and their status (Listing 6).
Listing 6: List of Zones and Current Status
01 $ zoneadm list -cv
02   ID NAME             STATUS     PATH                           BRAND    IP
03    0 global           running    /                              native   shared
04    1 web1             running    /zones/web1                    ipkg     shared
05    2 web2             running    /zones/web2                    ipkg     shared
06    - web3             installed  /zones/web3                    ipkg     shared
The web3 zone is installed but not running. To boot the web3 zone, issue the following command:
# zoneadm -z web3 boot
Listing 7 shows the new zone status.
Listing 7: List of Zones with New Status
01 # zoneadm list -cv
02  ID NAME             STATUS     PATH                           BRAND    IP
03    0 global          running    /                              native   shared
04    1 web1            running    /zones/web1                    ipkg     shared
05    2 web2            running    /zones/web2                    ipkg     shared
06    5 web3            running    /zones/web3                    ipkg     shared
To shutdown a zone, issue the halt option:
# zoneadm -z web3 halt
Halting a zone places it into the installed state and has the effect of powering off a running system. The preferred method of shutting down a zone is to issue the zlogin command with the shutdown option:
# zlogin web3 shutdown
Moving a zone from one location to another is often necessary because of space limitations, hardware changes, or system disaster. The zoneadm command makes it simple to perform a move and maintain zone integrity:
# zoneadm -z web3 halt
# zoneadm -z web3 move /zones2/web3
# zoneadm -z web3 boot
(See Listing 8 status report.)
Listing 8: Zone Status
01 # zoneadm list -cv
02   ID NAME             STATUS     PATH                           BRAND    IP
03    0 global           running    /                              native   shared
04    1 web1             running    /zones/web1                    ipkg     shared
05    2 web2             running    /zones/web2                    ipkg     shared
06    7 web3             running    /zones2/web3                   ipkg     shared
Webmin Zone Creation
If you've used Linux for a while and experienced frustration with command lines, Gnome, KDE, or other desktop interface applications, or lack thereof, you've probably discovered Webmin [3]. Webmin is the web-based management interface for Linux and other operating systems, including OpenSolaris. Included in Webmin for OpenSolaris, is a Solaris Zones module [4].
The Solaris Zones module lives in the Webmin System group. No setup is required for this module because zones are a default feature of OpenSolaris. When you select the Solaris Zones module from the list, you're placed onto the zones list page.
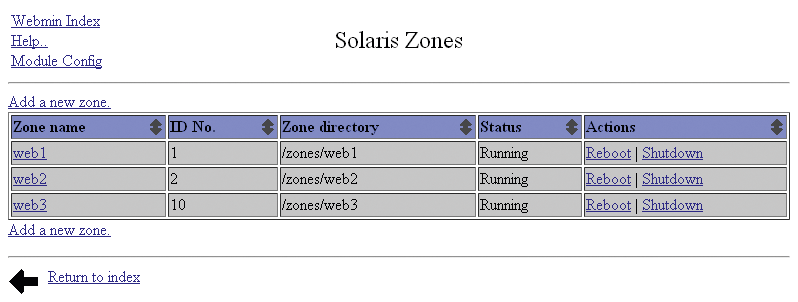
Here, you can view your current zones, add new ones, and reboot and shut down running zones. Also, you can boot or uninstall halted zones (see Figure 1).

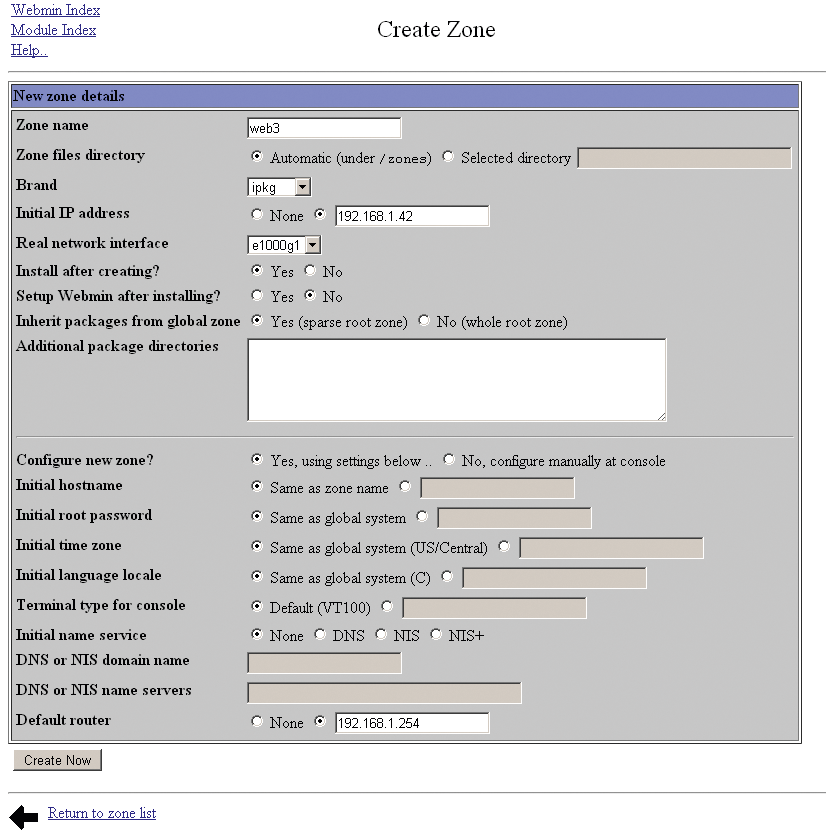
To add a new zone in Webmin, click the Add a new zone link to go to the configuration page shown in Figure 2. On this screen, you'll enter the vital information for your new zone: zone name, zones directory, IP address, network interface, install, name service, and default router.

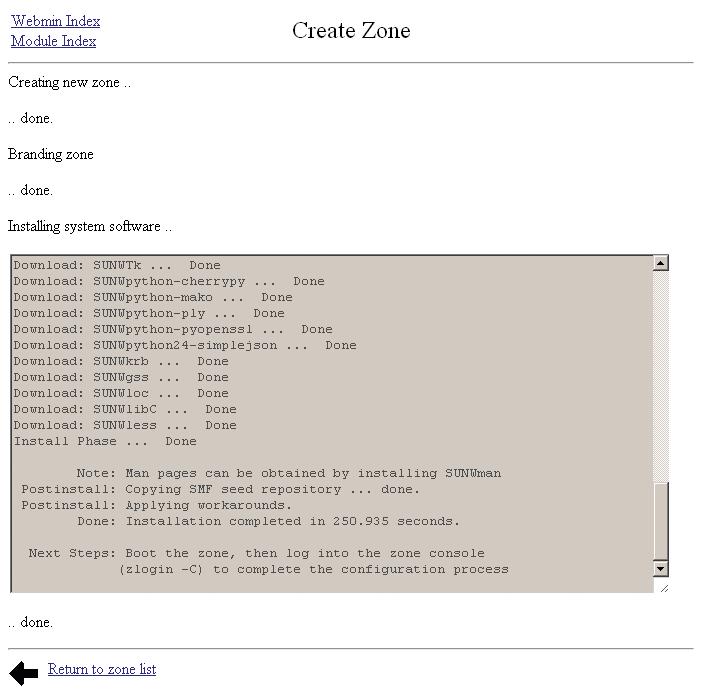
When you've completed your zone configuration, click the Create Now button to begin the new zone creation and installation process. See Figure 3 for the completed zone information. Note that the created and installed zone is ready for interactive configuration via zlogin -C web3.

Figure 4 shows the updated zones list after adding the web3 zone. The page looks a bit minimalist, but from this page, you can boot, shutdown (halt), uninstall, reboot, and reconfigure your zones.

Webmin gives you a rich and complete web interface with which to interact with your zones. Once you discover its simple design and easy-to-use controls, you might decide that the command-line configuration is too slow and prone to human error for continued use. However, if you want to automate zone creation or interaction, the command line is your best friend.
The End Zone
If, after this introduction to OpenSolaris zones, you're still not convinced to dedicate physical resources to an unfamiliar technology, you might want to know that it's trivial to install OpenSolaris into a virtual machine.
For best results, use Oracle's VirtualBox and use a virtual hard disk at least as large as 20GB. To create zones, you can create a separate virtual hard disk. Remember to set up ZFS on your zones area.
OpenSolaris isn't Linux, nor does it aspire to be. As a powerful, free, high-performance operating system, it is another choice with capabilities, features, and limitations of its own.
At the very least, OpenSolaris is a fine teaching tool. Your experience with it as a learning tool will transfer perfectly to Oracle's Solaris on SPARC hardware.
