Finding cracks with Nmap, Portbunny, and Nessus
Inspector
If you want to keep one step ahead of the attackers, it is a good idea to identify and remove potential vulnerabilities and security holes on your network. The popular Nmap port scanner scans your system to reveal possible open ports that might be vulnerable to attack. Many system administrators use Nmap to reveal possible gaps in the security system before they are discovered by intruders. However, the details of how a tool like Nmap works are less well known. This article takes a close look at Nmap and also introduces an alternative to Nmap known as Portbunny. You'll also learn how to look for security problems with Nessus. Any discussion of security scanning and packet filtering requires some basic knowledge of network ports and Transport Layer protocols [1] [2]. For additional background on these topics, see the box titled "Ports."
Port Scanners
Nmap [3], which recently went to version 5.0, is the Swiss army knife of port scanners. Portbunny [4] is a relatively new tool, with its sights on Nmap thanks to its fast processing speed. Although the older version of Nmap is included with all major distributions, the Nmap project also offers packages and the source code on its website. The project has also developed a GUI for the scanner under the name of Zenmap (Figure 2). The advantage of Zenmap is its advanced reporting functionality.

The easiest approach to port scanning involves setting up a TCP connection to every single port. If you launch Nmap without root privileges as a normal user, the program will automatically select the connect scan method. If you want to use this scanning method as the root user, you need to tell the program to do so by setting the -sT switch. Optionally, you can tell the application which range of ports to scan by setting the -p parameter.
Nmap will accept both IP addresses and domain names as targets. Thus, you could launch a connection scan of ports 0 through 1023 in the lemon.com domain by entering nmap -sT -p 0-1023 www.lemon.com. To scan a whole network, enter the netmask after the IP address. For example, the command line nmap -sT 192.168.1.0/24 would scan all computers with the addresses 192.168.1.1 through 192.168.1.254. If you press a key while the scan is running, the program displays progress information for the current scan.
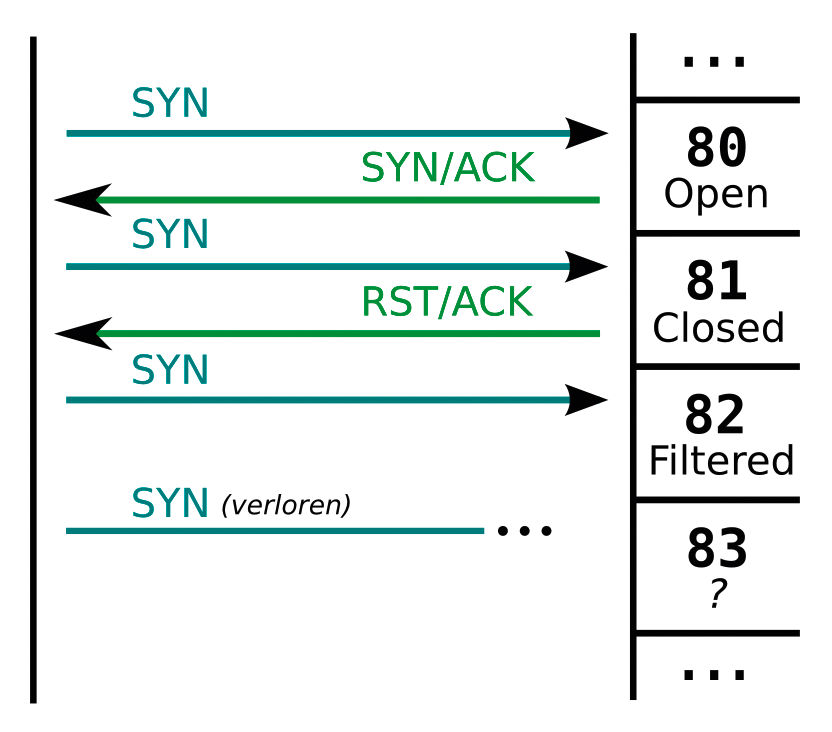
SYN or half-open scanning (Figure 3) is an alternative approach. In this case, Nmap does not actually open a TCP connection but simply requests a port open by sending a SYN package to the port in question. The program then evaluates the response, which is either a SYN-ACK or a RST-ACK packet. If you launch Nmap with root privileges, the scanner will default to this mode. You can select it manually by setting the -sS switch, as in nmap -sS www.lemon.com.

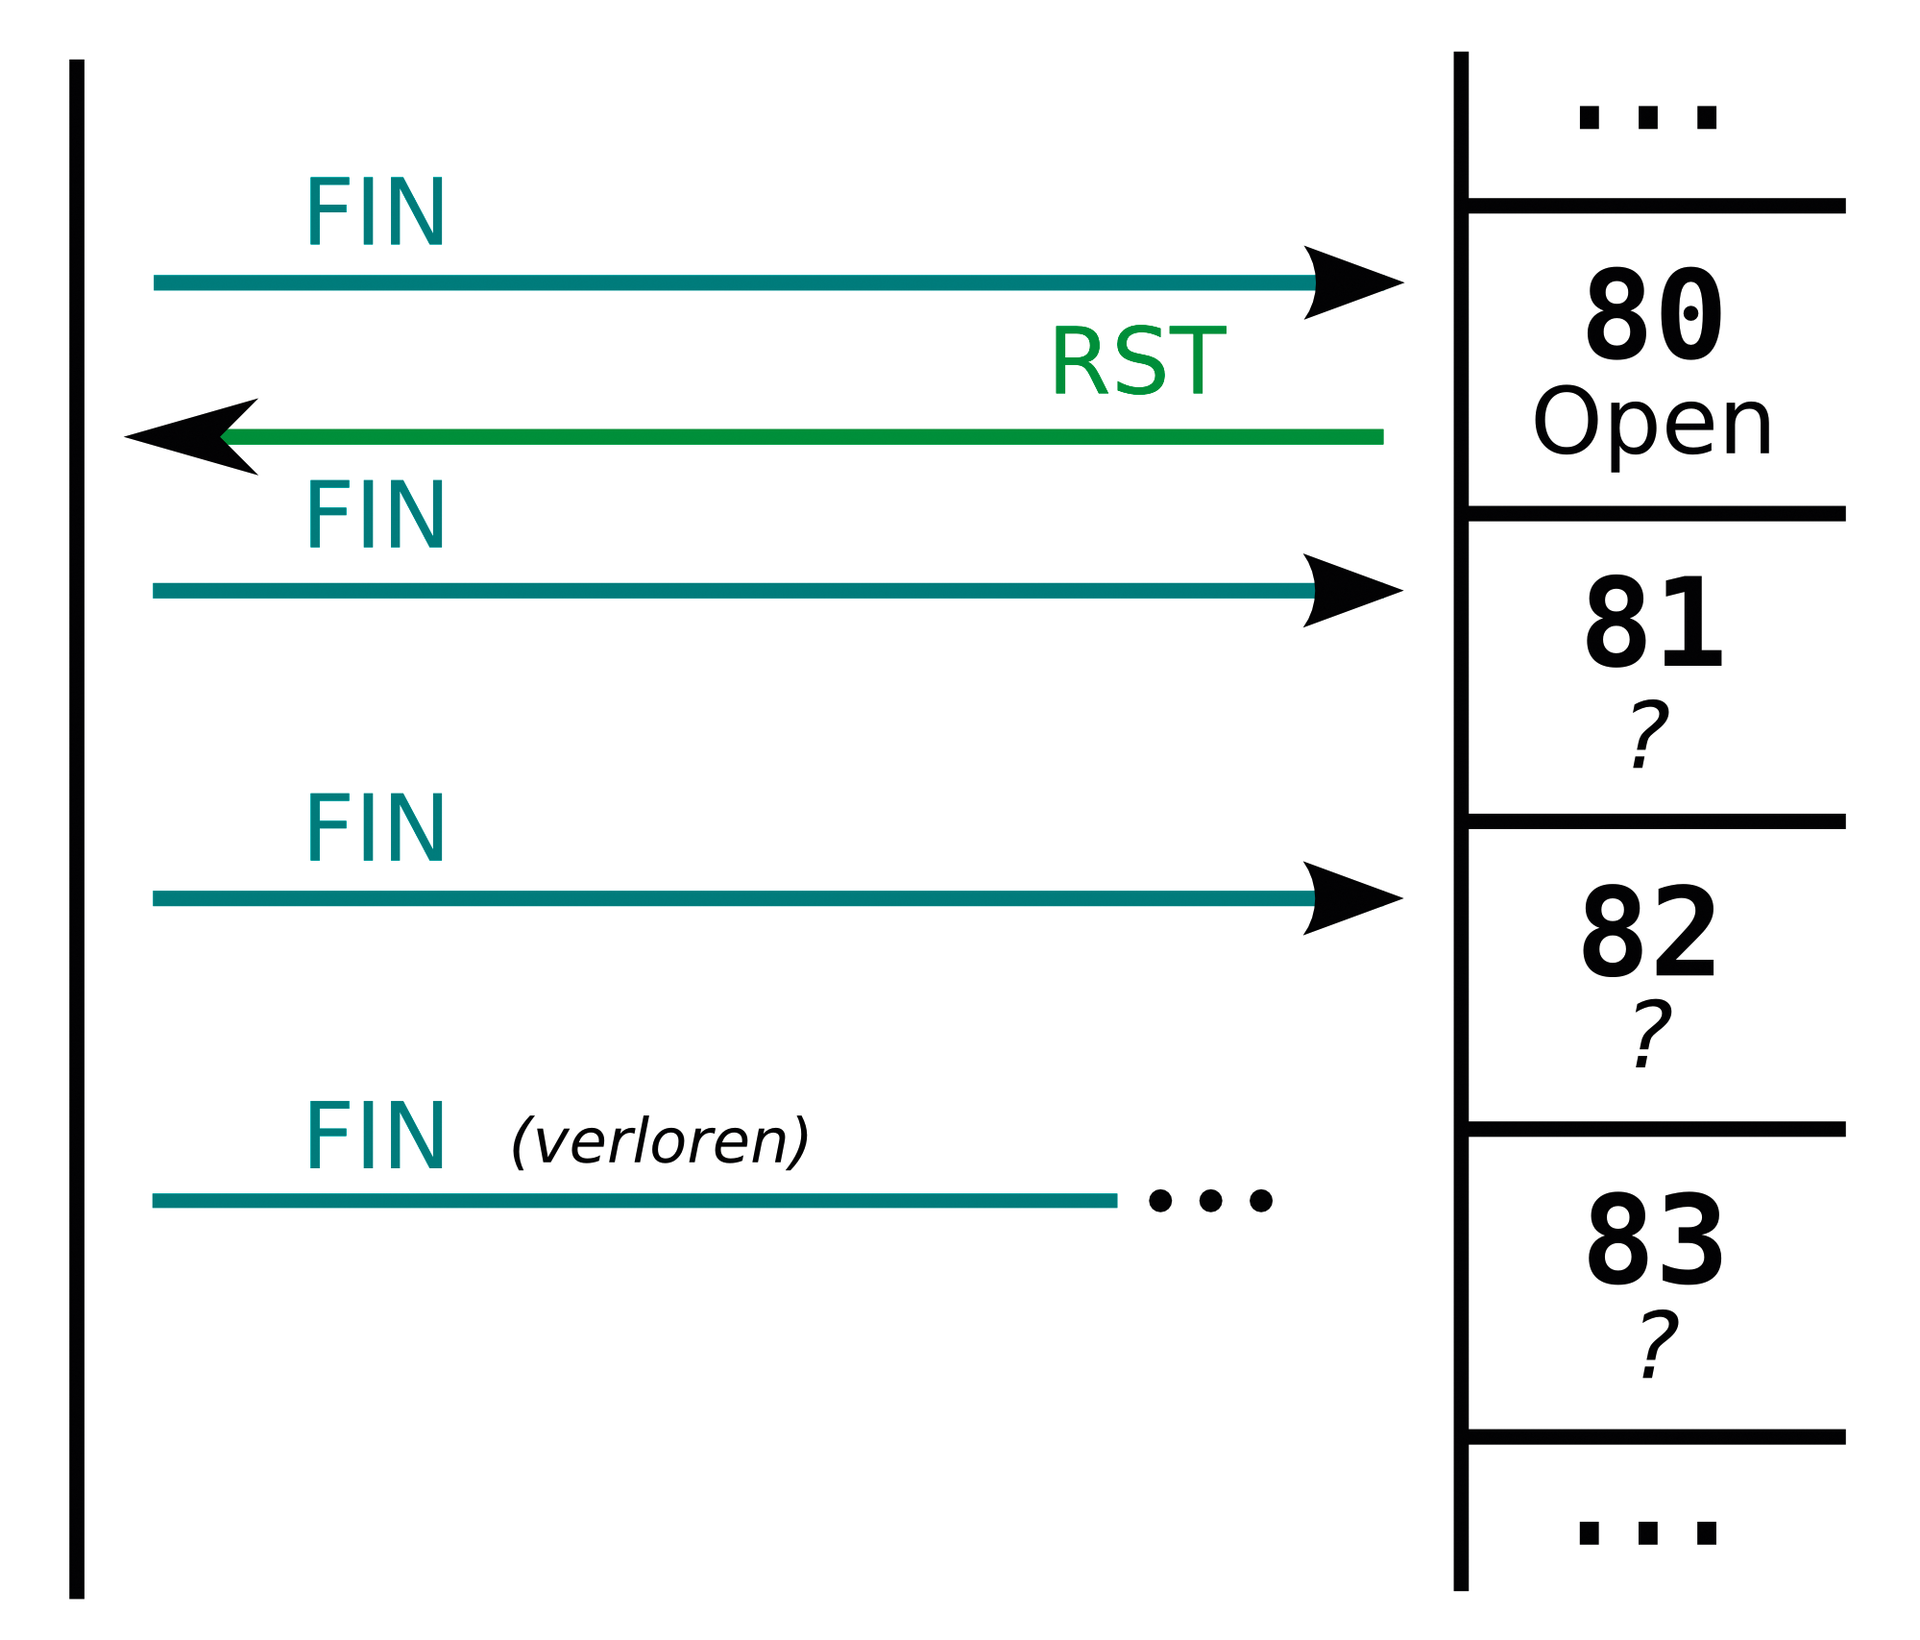
If a closed port receives a packet with a FIN flag set (this would normally close an open connection), the TCP specification requires it to respond with a RST packet. Port scanners exploit this feature to detect closed ports on the system. However, it is impossible to distinguish between open and filtered ports because the scanner will not receive a response in either case. You can use Nmap's -sF parameter to launch a FIN scan (Figure 4). This only makes sense for systems that are not hiding behind a firewall – where the filtered status is not an option.

If you send a TCP packet with the ACK flag set to a port, the port will respond with RST whether it is open or closed. The ACK scan is thus only useful for finding out whether a port is filtered. The trick is to monitor the window size, which tells you the cache usage status on the target system. Some operating systems set the window size to 0 for a closed port and to greater than 0 for an open port. Some systems do exactly the opposite. If Nmap tells you that just a couple of ports are closed, while the rest are open, you can assume that the purportedly "closed" ports are open and vice versa. The -sW tells Nmap to perform a window scan.
Crafty
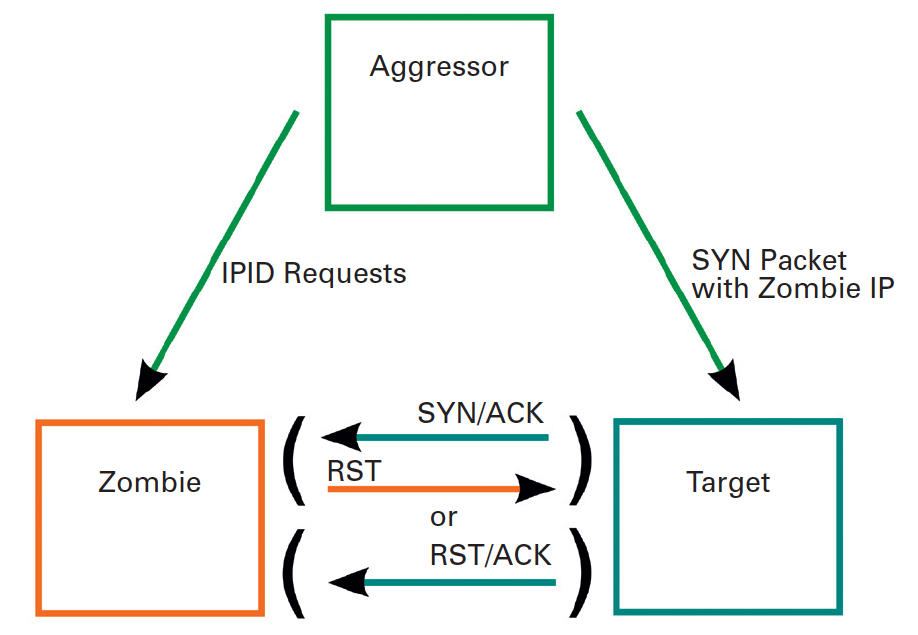
Every port scan sends its own IP address to the target system. To avoid this, you can tell Nmap to perform an idle scan (Figure 5). To do so, you need the IP address of an older, unpatched system – such as an older, inactive network printer on an internal network. The scan relies on the fact that the IPID (a numeric field in the IP packet header) rises linearly on older systems and is thus predictable.

At the start of the scan, Nmap sends a packet to this system (which is also known as a zombie) and receives the current IPID in return. The scanner then sends a SYN packet to the target address, entering the zombie's IP address as the source. From the target's point of view, the request appears to come from the zombie.
Depending on whether the port in question is open or closed, it will respond by sending a SYN/ACK (open) or a RST/ACK (closed) to the zombie. The zombie is totally unaware of the transaction and will respond by sending a RST packet to the target if it receives a SYN/ACK. On the other hand, if the zombie receives a RST/ACK, it will just ignore the whole thing and not respond.
Sending the RST packet to the target system increments the zombie's IPID. The scanner then sends another packet to the zombie and receives the current IPID in return. If this has increased by 2 since the initial request, the attacker knows that the zombie has sent another packet in the meantime – the RST packet. The attacker can then assume that the port on the target system is open. If the zombie's IP has only increased by 1, the zombie has not sent any other packets in the meantime. The Nmap command line for this is:
# nmap -sI zombie_IP target_IP
All the port scans referred to thus far rely on TCP services. But some services, such as VoIP, DNS, or media streaming use UDP. The difficulty here is that UDP ports do not necessarily respond even if they are open. This makes it more difficult to distinguish ports that are closed or not responding. Nmap lets you launch a UDP scan by setting the -sU switch.
One difficulty that all port scans have in common is choosing the right speed. Too rapid a succession of packets could overload the network and falsify the results.
To avoid this, Nmap throttles the speed if it notices that packets are not providing responses. If the tool encounters a series of filtered ports, it drops its speed to a minimum – this means that a scan can take a long while to complete. The alternative scanner known as Portbunny attempts to solve this problem.
Portbunny
The Portbunny port scanner was designed as a kernel module and thus only needs the current kernel headers for the install. The front end also requires a recent version of Python. The sources for the current version are available from the project homepage. To unpack the archive and compile the source code, use make followed by sudo make install.
Portbunny only supports SYN scans. To provide more control over the speed, and to keep it high despite closed ports, Portbunny adds a couple of packets that are guaranteed not to provoke a response to its data stream. This allows the program to determine whether packets are not being returned because of excessive network traffic or because the ports are filtered.
At the start of a scan, the tool individually decides which packets to inject into the data stream for each target. The options include SYN requests to popular ports, such as 80 (HTTP) or 22 (SSH), and pings. If Portbunny does not register a response to a port request, but the trigger packet reaches the target, it tags the port as filtered. Using Portbunny is just as easy as using Nmap. The scanner will accept both domains and IP addresses with netmasks as targets. A standard command line that would scan ports 1 through 1023 is portbunny www.lemon.com -p 1-1023.
Security Scanners
In contrast to port scanners, security scanners work at the Application Layer. In other words, they typically use defused exploits (see the "Exploits" box) to ascertain the vulnerability of an application. This approach returns comprehensive details that can help the administrator keep the security of the system up to high standards.
The most widespread application of this type is Nessus [5]. It acts as a server that controls clients. Like a virus scanner, Nessus works with pattern files that are continually updated by the manufacturer and available to private users free of charge.
Up to version 2.2.11, Nessus was GPL'd and thus available without any restrictions. Tenable, the company that maintains Nessus, has continued development behind closed doors since version 3.0. The vendor still provides free downloads of the vulnerability scanner for various platforms and operating systems.
Private users can also download the latest Nessus plugins, the basic building blocks of the scanner, free of charge. Commercial users pay an annual charge of US$ 1,200. (If you are looking for an alternative to Nessus, the Metasploit Framework [6] is an open source, but far more complicated, security scanner – see the "Metasploit" box.)
Installing Nessus
The Nessus security scanner is available for Windows, Mac OS, Linux, BSD, and Solaris 10. I'll focus on how to install Nessus on Linux – the steps for other systems are similar. On the vendor's download page [7], click Select a Product to Download in the drop-down box, then select Nessus for Linux, and finally accept the usage agreement by clicking I accept. You can skip the registration form for the time being by clicking Click here to download Nessus directly. The list includes packages for various distributions. Choose the version that matches your distribution, then repeat the process (apart from selecting NessusClient 4.0.2 for Linux in the drop-down box). You can follow the normal steps to install the two packages. Both the server and the client, install in /opt/nessus/. If you will not be using the scanner frequently, it makes sense to remove Nessus from the runlevel to prevent it from launching whenever you boot your machine. On Debian-based systems, you can run the rcconf program to do this. Users with openSUSE can launch the YaST module. Before you can use Nessus, you need to launch it manually by typing sudo /etc/init.d/nessusd start.
Before you use Nessus for the first time, you need to create a Nessus user. To do so, enter sudo /opt/nessus/sbin/nessus-adduser and follow the instructions. You can enter any name as a login; it can even be the name of an existing Linux account. When asked about Authentication, accept the default response of pass for the password and then go on to define your password. The program will then ask if you want to restrict the new user. Say no to this by pressing Ctrl+D.
In theory, Nessus is now ready for use. But to get the latest plugins, you need to register – there is no charge for doing so. Go to the registration page [8] and enter a working email address. Tenable will send a registration code to your address within a matter of seconds. Then type /opt/nessus/bin/nessus-fetch --register your_registration_code to pass the information in to the program. If you run Nessus permanently as a background daemon, it will retrieve the latest plugins every 24 hours. As an alternative, you can type sudo /opt/nessus/sbin/nessus-update-plugins to update your plugins manually.
The Client
Working as a non-privileged user, you can launch the Nessus client in a terminal window by typing /opt/nessus/bin/NessusClient. In the client window, click the Connect button on the lower left and select localhost from the list. Press Edit to edit the entry. Leave the defaults for the hostname and port (localhost and 1241) and enter the name of the user you created previously and the matching password for Login. Then click Save to save your settings. When you get back to the menu, select localhost and then press Connect. The program window now shows two panels: Scan and Report. In the first, you can enter new scans; in the second, you can view the results.
The Scan tab has two columns. On the left, configure the hosts to scan; on the right, define the scan rules. Click the button with the plus sign below the left column and, in the dialog box that appears, enter the IP address of the scan target for Host name (Figure 6). For an initial test, you could use your own router, or any PC on your local network. If you prefer to start by scanning your whole network, press the radio button for Subnet and enter your network address for Network – for example, 192.168.1.0. Provide the matching Netmask (255.255.255.0 in this example) and then click Save.

You can click the + button repeatedly to add more hosts to the left-hand column. To start a normal scan, simply select the required ports and the Default Scan Policy on the right. Then press Scan Now to confirm your selection. The client automatically goes to the Report tab. The two-panel view gives you a list of scanned hosts on the left. Clicking the plus sign to the left of an entry opens a tree view with all the open ports. You can then select a port for a specific host to view more detailed information.
The service name that Nessus pins to each port does not tell you the program listening on the port. Nessus simply shows you the standard service for the port. However, Nessus will show you the service that is using the port in the detailed view on the right.
A couple of minutes, or even hours, can pass before a scan completes, depending on the scope and network speed. The client shows the results of the current scan in the bottom right corner of the window, where you can interrupt or stop the scan at any time. Nessus processes the results in real time. After identifying a service, Nessus checks the host for known vulnerabilities. If it finds any, it will display them in the detailed view. Nessus highlights critical vulnerabilities in red and medium-severity vulnerabilities in yellow. The window has a short description of each vulnerability it detects, and it also points you to more sources on the web (Figure 7).

New Rules
To add a new scan policy, go to the Scan tab and click the + button in the right-hand column. In the first section, Edit Policy, you can define a name for the new rule. Options lets you specify how many tests Nessus should start simultaneously. The default values are typically fine. If your system is over- or underworked, modify the values to reflect this.
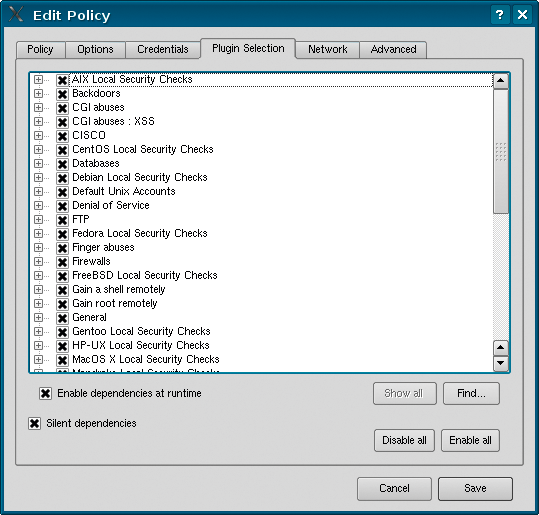
Credentials lets you decide whether to test hosts for remote exploits only, or for local vulnerabilities, too. This option requires an SSH daemon on the computer. Select SSH settings in the drop-down box and type the username and password, or key, for the computer you want to scan. The Plugin Selection tab lets you specify which plugins the program should use for the scan (Figure 8).

For example, if you know the target system is running Linux, disable the plugins for Windows, Solaris, and Mac. However, this will not save all that much time because Nessus preselects the plugins to use in advance. For example, if the target host is not running a web service, Nessus will not try a CGI scan.
Sessions
To avoid losing hosts, policies, and scan reports, Nessus lets you store sessions. Clicking File | Save as… tells the client to save a file with the .nessus extension: You can open the file later via File | Open… . If you prefer to just save the results, click Export in Report. Nessus will then create an HTML page with the results.
The filtering tool is a useful feature if you are scanning whole networks; for example, you can tell Nessus to inform you of critical and medium-severity vulnerabilities only (Figure 9). To set up the filtering tool, click the Filter… button. Leave the default (any) setting in the Only show vulnerabilities… drop-down box. In the menu below, select Medium for Plugin severity is. Clicking the + button lets you add more filter rules or select Plugin severity is in combination with High.

