
Create your own turnkey solutions
Appliance Apps
Open source tools make it possible to create powerful software solutions and distribute them effectively. Unfortunately, many open source solutions consist of complex software stacks that are hard to configure and manage. With a software appliance, you can roll up the entire stack, from the kernel and system libraries, all the way to pre-configured databases and userland software, into a turnkey system.
Like a toaster or coffee maker, a software appliance does one thing, and does it well. Also like a toaster, a software appliance serves its role right out of the box, in a simple and convenient way that does not demand extensive knowledge of the internal design.
For some appliances, you will have to provide a complete stack – all the way from the kernel to the userland applications. Other times, you need provide only the operating system, and the rest is supplied by a pre-configured installer. In all cases, however, software appliances greatly simplify installing and configuring an application or platform.
Finding Stacks and Pre-Made Appliances
If you're looking for software appliances for standard open source tools like a Ruby on Rails stack or applications like the Drupal content management system (CMS), the odds are you'll find one. Many Linux Live CD distributions serve as software appliances in some sense. If you're looking for a Live CD distribution, I recommend checking DistroWatch [1].
One of the oldest and best-known LAMP distributions is XAMPP [2]. XAMPP provides your basic LAMP stack (Apache, MySQL, PHP, Perl). It runs on most Linux distributions and is an easy way to get a working LAMP stack without figuring out which packages you might need to install or keep updated. Although I don't recommend using this for production, it is a good way to get a basic LAMP stack for testing and development on your local system.
Another free source of virtual appliances is the VMware Virtual Appliance Marketplace [3]. This site has tons of pre-rolled virtual appliances for VMware – everything from simple pre-installs of Ubuntu to full-on application stacks like Zimbra Collaboration Suite appliances. However, not all of the appliances in the VMware marketplace are going to be free software, or even free as in beer. Depending on the appliance, you might need to purchase a license to get an appliance running, but it's a good place to scout out appliances that will run on VMware.
If you want to run some of your applications in the cloud, JumpBox [4] is a newer company trying to build a business around supported virtual appliances that run on VMware ESX and ESXi, as well as VirtualBox and other virtualization products that support the Open Virtualization Format (OVF). Additionally, these appliances can easily be deployed to Amazon EC2, so you can run your app "in the cloud," if you like. Note that JumpBox only releases some of their appliances for free. To get the full range of their appliance library, you need a subscription starting at US$ 49 a month.
BitNami Installers and Images
Probably the best source of pre-made stacks and appliances is the BitNami [5] family of installers and appliances. BitNami is a project sponsored by BitRock, a company that makes tools to create software appliances. The BitRock tools to generate BitNami stacks are not open source, but the BitNami installers are composed of open source software and released under the Apache license.
BitNami's offerings are multi-platform and really easy to install. They range from infrastructure stacks for things like Django, JRuby, and LAPP (Apache, PHP, and PostgreSQL) to more than 30 application stacks for everything from Alfresco to WordPress. Most of the installers support not only Linux, but also Mac OS X, Solaris, and Windows. BitNami also offers virtual machine images for most of the applications based on openSUSE or Ubuntu, so you have your choice of operating system.
Like JumpBox, BitNami also provides cloud images that can be deployed on Amazon EC2 or GoGrid [6]. Presumably, you could also launch the images on Eucalyptus for a private cloud, but I haven't tried that yet.
Using BitNami Native Installers
Assuming you have a Linux machine running already and want to add an application to it, I'll look at how to install from a BitNami Native Installer. Two options are possible with the installers: the entire application and software stack or BitNami Modules.
The Installer provides the whole kit and caboodle, except the underlying operating system. So, if you choose something like Tracks (a Ruby on Rails app), it provides MySQL and Ruby on Rails. If you choose WordPress, you get Apache, MySQL, and PHP, as well as any other incidental software you need above and beyond the underlying OS. Installers are handy, but if you want to run more than one application, they can conflict a bit.
If you need multiple apps on the same machine, then try using the modules instead. Right now, they're only available for PHP apps, so if you want a Ruby on Rails instance plus a PHP application, you will need the separate installers. But if you want something like WordPress and MediaWiki, you can try out the modules.
For simplicity's sake, I'll take a look at using a BitNami Installer. To begin, head to the BitNami site and find the installer that you're interested in. For this example, I'm going to use the Trac Installer, but the process is pretty much the same for all of them. After downloading the Installer, you'll find a file with a .bin extension, which you'll need to make executable:
chmod +x bitnami-trac-0.11.6-1-linux-installer.bin
The filename will probably be different, but you get the idea.
Another advantage to BitNami Installers is that you can configure them to run as an unprivileged user, so you don't need to install the application system-wide if you don't want to. To kick off the install, run the script like so:
./bitnami-trac-0.11.6-1-linux-installer.bin
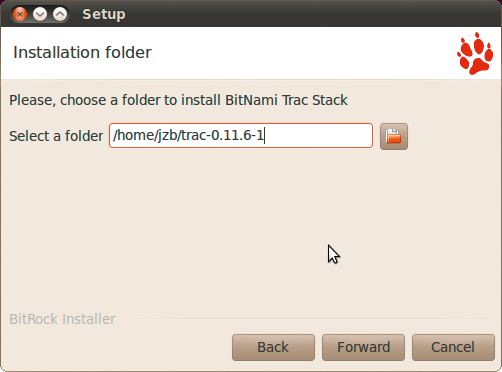
You'll see an install dialog like the one shown in Figure 1. The entire process is very self-explanatory. Just choose the directory into which you want to install your application and click Forward.
Then confirm the user and password for the application, and any other setup questions. These will vary depending on the application you're setting up, but none of the installers I've tried (admittedly, I haven't tried them all) are very simple to configure.
Note that you will see the GUI installer if you attempt the install in Gnome, KDE, or whatever your favorite desktop environment might be. But a GUI is not required to install a BitNami stack; you can run the install in text mode as well, and you'll see all the same questions as you see in the regular installer.
After the installation, you will see a dialog that indicates it was successful and asks whether you want to launch the application. Then you'll see a welcome page for the application you've installed, as well as a link to access that application.
What's not immediately obvious is how to control the application or service after the install. Under the install directory, you'll see a script called ctlscript.sh. Use it to start, stop, or restart the service. For example, to shut down the application, run:
./ctlscript.sh stop
Some of the applications have more than one service. For example, Trac uses Apache and Subversion. To stop only Apache, you'd run:
./ctlscript.sh stop apache
For the full list of commands, use the help argument (./ctlscript.sh help). As you can see, BitNami stacks are a great deal simpler than trying to install and configure your own set of applications. But that assumes that you just want to run an appliance, and that one is available. What if you'd like to roll your own to distribute or use in your organization?
Creating Your Own Appliances
As software appliances have become more popular, a number of tools have been developed to help ease the process of creating appliances. The most basic of these tools is the crop of Just enough Operating System (JeOS) images. Pronounced "juice," the JeOS offerings are stripped-down OSes that have the bare minimum set of services to allow third parties to build software appliances on top of them without having a bunch of unnecessary services. Traditionally, these are Linux-based, but you can also find an OpenSolaris JeOS image.
One of the first JeOS offerings came from Ubuntu, based on the Ubuntu Server Edition [7]. It's now included with the server ISO and requires only 380MB of disk space on its own. It has a special kernel for running on top of VMware or KVM and only requires 128MB of RAM before considering any additional software.
To create appliances based on Ubuntu JeOS, or another JeOS, on the basis of just the JeOS image requires quite a few steps: Create a JeOS install using KVM, VMware, or whatever hypervisors you plan to use, then install the software stack, configure your databases, set up default users, and so on. This process can be somewhat tedious by hand, but it's still easier than stripping down a full Linux distribution to make it suitable for a software appliance.
A few utilities greatly simplify the creation of appliances. VMware provides a toolkit for creating appliances, although it's a bit involved and requires a fair amount of hassle. Another tool that's a bit easier to use is the rBuilder Online appliance builder from rPath [8]. It allows you to generate images for VMware, Amazon EC2, and others.
The easiest tool to get started with, though, is SUSE Studio [9], a free online service that allows users to create appliances based on openSUSE or SUSE Linux Enterprise and build installable live CDs, USB images, VMware/VirtualBox images, or Xen images. (As a disclaimer, I should note that I used to work for Novell, the company that offers SUSE Studio.) The idea is that open source projects and enthusiasts can create openSUSE-based appliances to use and distribute for free during the life cycle of the openSUSE release. OEMs and ISVs can use Studio to create SUSE Linux Enterprise-based appliances and pay for support and other services.
Not only is the service free, it's ridiculously easy to use and provides the ability to test images on the website. I'll look at this in more detail shortly.
SUSE Studio has two disadvantages that need to be mentioned. Like the BitRock tools, SUSE Studio is not open source software, with no guarantee that Novell will continue it as a free service. If you're working on an appliance for your project or organization, becoming dependent on SUSE Studio means depending on Novell's roadmap for the service – wherever that might take you. This is not to suggest that Novell's product roadmap will lead to Studio's being discontinued or anything like that, but it's a risk that users need to be aware of.
The other, and fairly obvious drawback, is that SUSE Studio is limited to openSUSE and SUSE. If you wanted to distribute appliances based on Ubuntu, Debian, Fedora, and so on, you can't use Studio.
Although SUSE dependency cannot be remedied, the other problem can be mitigated somewhat. SUSE Studio uses a free software tool called Kiwi on the back end. Users can export the Kiwi configuration and use the openSUSE Build Service (oBS) to generate their own appliances based on the Studio configuration. That's a bit beyond the scope of this article, but this means that users aren't entirely trapped with Studio, although it will take more elbow grease to maintain an appliance using the oBS. The good news is the entire oBS stack is open source, so it should always be available.
SUSE Studio
As I mentioned, SUSE Studio is ridiculously easy to use. The first step is to head to the site and create an account. Once you have an account, you'll see a largish green button on your home page that says Create new appliance. When you click this, you'll be taken to a screen like that in Figure 2.
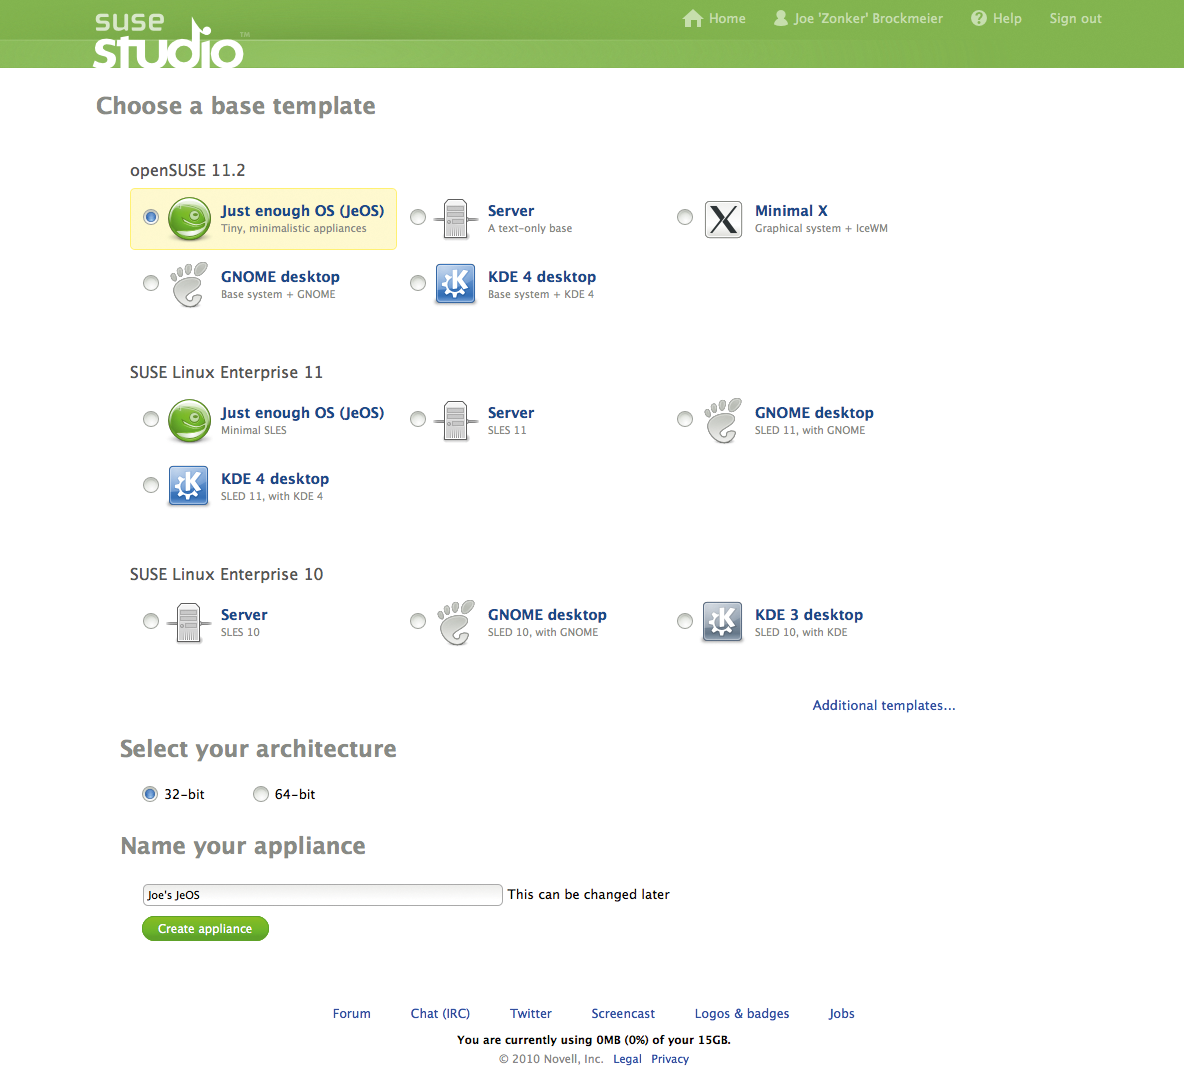
At the time I'm writing this article, the offerings are SUSE Linux Enterprise 10 and 11 and openSUSE 11.2. The SUSE Studio team takes a few weeks after a release before the service is set up to handle it, so SUSE Studio will probably offer openSUSE 11.3 some time in August 2010.
Unless you're looking to provide a commercial offering, you want to choose openSUSE. If you distribute SUSE Linux Enterprise images, users won't be able to get updates without some sort of contract. For the purposes of this piece, I'll work with openSUSE.
The choices are straightforward enough. If you want a totally bare-bones appliance, choose JeOS. Server is suitable for a more full-featured appliance – or Minimal X, KDE 4 desktop or GNOME desktop if you want a desktop appliance. Select the appliance you want, choose 32-bit or 64-bit, then click the Create appliance button at the bottom of the page.
At this point, you're taken to a Welcome page with several tabs at the top. Click the Software tab to go to a page that shows the default software included with the image you've chosen and repositories that are available. The buttons at the top let you add repositories or upload RPMs. If you packaged your software as an RPM, you can upload it here.
If you click Add repositories, you'll see a bunch of repositories available from the oBS and other compatible repositories. Not only that, you'll see an Import new repository button at the top of the page.
The oBS allows anyone to package software for openSUSE and host it in the service, providing it meets the licensing requirements and terms of use. This includes almost any open source software, although it does exclude some software that might infringe on patents, such as the LAME MP3 encoder.
If you're packaging software through the oBS, you can add the repository here. Actually packaging software via oBS is a bit beyond the scope of this article, but if you have something packaged in the build service, it can be grabbed here.
Because the build service is open source, some projects and organizations run their own instances of the service. If you're doing this, you can provide the URL to the repository for your project and import packages and so on.
As mentioned previously, you can create installable Live CDs of your project as one of the build types. If you're going to do this, you'll want to add the yast2-live-installer package. To do this, enter installer in the Search for software field, and click add next to the yast2-live-installer package option.
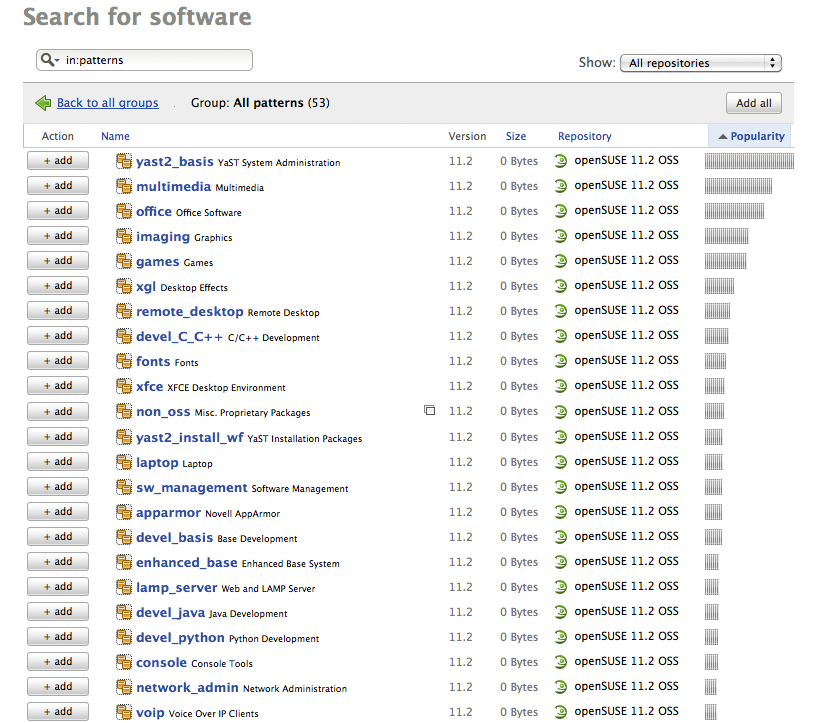
That's all that's needed. Figure 3 shows some of the available software patterns. Choosing individual packages can be tricky, or you can just choose patterns to get specific functionality. For example, if you want to include the Xfce desktop environment, just choose the that pattern.
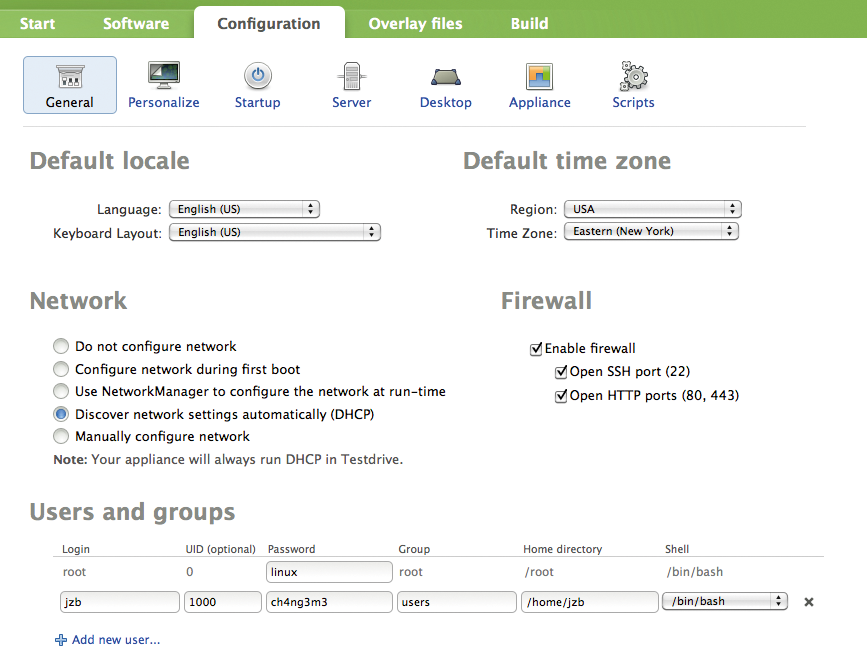
After you've selected all the software you want to add, move to the Configuration tab. Here, you'll be able to set up users for the appliance, make some basic network configurations (e.g., I recommend opening the firewall for SSH) and set the default time zone and language settings as shown in Figure 4.
The Personalize tab allows you to set the wallpaper and logo. The Startup tab under Configuration lets you set the runlevel for the appliance and add an end-user license agreement, if necessary. One hopes that's not necessary.
Need a database? Under the Server tab, you can add a MySQL or PostgreSQL database. Studio will warn you if you select one of these options but have neglected to select the MySQL or PostgreSQL packages and will allow you to add them. If you need a database, you'll be able to upload a database dump and configure users and permissions.
The Desktop tab allows you to set up automatic login, if you want that, and have some applications start automatically on login. This could be handy if you want to create an appliance that automatically launches a specific application for users. For instance, you could create a desktop Live CD, add the Mozilla 11.2 repository under Software, add Prism as one of the packages, and configure it to start on launch with a specific web application.
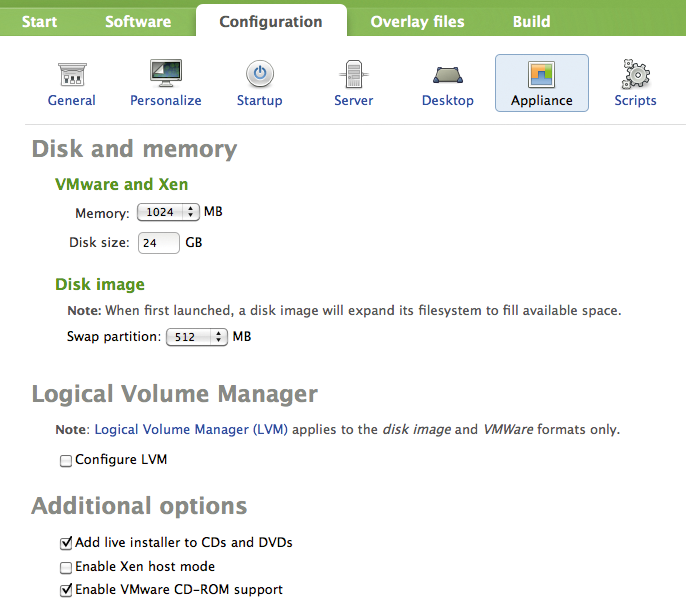
Next, check the Appliance tab under Configuration. This will allow you to configure the disk size for Xen/VMware appliances, how much RAM the appliance should have, and whether you want to use LVM or not. Here, you can also select to add the live installer and other options, as shown in Figure 5.
Finally, from the Overlay files tab, you can add additional files to the appliance, for instance, if you are creating an appliance with software that's not packaged in the oBS or as an RPM. This would be handy for web applications like WordPress. When you upload entire tarballs, they'll be extracted later.
Next, click the Build tab. Here you can choose the format or formats you want to build for. Once you have that sorted out, click the ridiculously large green Build button and wait a bit. How long the build takes depends on how loaded SUSE Studio is at any given time, how large your image is, and all that good stuff. Note that this is the page where you can export your Kiwi configuration (see the link at the bottom of the page) or build the appliance in the oBS.
Once the appliance is built, you can also fire it up in Testdrive. That's right, you can run the appliance in the browser and see how it works. Make sure that all the packages you want are installed, configured correctly, and so on. If you make changes, you can save those as well and rebuild the appliance.
Although you can provide a link to others for your appliance builds, they aren't permanent. Because SUSE Studio has so many people using it, images are deleted after a period of seven days. Note that the configurations are saved, but the ISOs or virtual machine images are taken off. No problem, though, because you can rebuild them any time.
In all, SUSE Studio is probably the easiest way to get started building appliances. I recommend setting up an account and trying it out, even if just to create a custom Gnome or KDE Live CD with your favorite packages pre-installed.
Summary
As you can see, the options for creating and running Linux-based software appliances are plentiful. I've only touched the surface of the offerings that are available, and more projects and offerings surface all the time. Even semi-technical users can create basic appliances quite easily on their own, and it's really easy for more advanced users to create advanced appliances.
The nature of Linux and open source software gives it a great advantage in the appliance space because there's very little barrier to creating and distributing open source appliances. If you spend a little bit of time working with appliances, you'll be amazed how much easier deploying open source can be!
