A simple approach to the OCFS2 cluster filesystem
Divide and Conquer
Wherever two or more computers need to access the same set of data, Linux and Unix systems will have multiple competing approaches. (For an overview of the various technologies, see the "Shared Filesystems" box.) In this article, I take a close look at OCFS2, the Oracle Cluster File System shared disk filesystem [1]. As the name suggests, this filesystem is mainly suitable for cluster setups with multiple servers.
Before you can set up a cluster filesystem based on shared disks, you need to look out for a couple of things. First, the administrator needs to establish the basic framework of a cluster, including stipulating the computers that belong to the cluster, how to access it via TCP/IP, and the cluster name. In OCFS2's case, a single ASCII file is all it takes (Listing 1).
Listing 1: /etc/ocfs2/cluster.conf
node:
        ip_port = 7777
        ip_address = 192.168.0.1
        number = 0
        name = node0
        cluster = ocfs2
node:
        ip_port = 7777
        ip_address = 192.168.0.2
        number = 1
        name = node1
        cluster = ocfs2
cluster:
        node_count = 2
        name = ocfs2
The second task to tackle with a cluster filesystem is that of controlled and orderly access to the data with the use of file locking to avoid conflict situations. In OCFS2's case, the Distributed Lock Manager (DLM) prevents filesystem inconsistencies. Initializing the OCFS2 cluster automatically launches DLM, so you don't need to configure this separately. However, the best file locking is worthless if the computer writing to the filesystem goes haywire. The only way to prevent computers from writing is fencing. OCFS2 is fairly simplistic in its approach and only uses self-fencing. If a node notices that it is no longer cleanly integrated with the cluster, it throws a kernel panic and locks itself out. Just like the DLM, self-fencing in OCFS2 does not require a separate configuration. Once the cluster configuration is complete and has been distributed to all the nodes, the brunt of the work has been done for a functional OCFS2.
Things are seemingly quite simple at this point: Start the cluster, create OCFS2 if needed, mount the filesystem, and you're done.
Getting Started
As I mentioned earlier, OCFS2 is a cluster filesystem based on shared disks. The range of technologies that can provide a shared disk spans expensive SAN over Fibre Channel, from iSCSI to low-budget DRBD [7]. In this article, I will use iSCSI and NDAS (Network Direct Attached Storage). The second ingredient in the OCFS2 setup is computers with an OCFS2-capable operating system. The best choices here are Oracle's Enterprise Linux, SUSE Linux Enterprise Server, openSUSE, Red Hat Enterprise Linux, and Fedora.
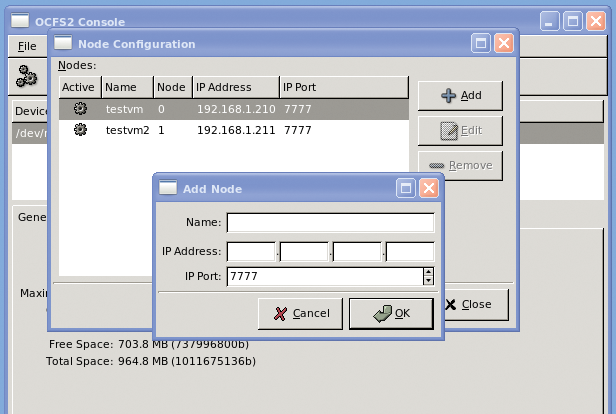
The software suite for OCFS2 comprises the ocfs2-tools and ocfs2console packages and the ocfs2-`uname -r` kernel modules. Typing ocfs2console launches a graphical interface in which you can create the cluster configuration and distribute it over the nodes involved (Figure 1). However, you can just as easily do this with vi and scp. Table 1 lists the actions the graphical front end supports and the equivalent command-line tools.

Tabelle 1: Directories in a Repository
|
Filesystem Function |
GUI Menu |
CLI Tool |
|---|---|---|
|
Mount |
Mount |
|
|
Unmount |
Unmount |
|
|
Create |
Format |
|
|
Repair |
Check |
|
|
Repair |
Repair |
|
|
Change name |
Change Label |
|
|
Maximum number of nodes |
Edit Node Slot Count |
|
After creating the cluster configuration, /etc/init.d/o2cb online launches the subsystem (Listing 2). The init script loads the kernel modules and sets a couple of defaults for the heartbeat and fencing.
Listing 2: Starting the OCFS2 Subsystem
# /etc/init.d/o2cb online
Loading filesystem "configfs": OK
Mounting configfs filesystem at /sys/kernel/config: OK
Loading filesystem "ocfs2_dlmfs": OK
Mounting ocfs2_dlmfs filesystem at /dlm: OK
Starting O2CB cluster ocfs2: OK
#
# /etc/init.d/o2cb status
Driver for "configfs": Loaded
Filesystem "configfs": Mounted
Driver for "ocfs2_dlmfs": Loaded
Filesystem "ocfs2_dlmfs": Mounted
Checking O2CB cluster ocfs2: Online
Heartbeat dead threshold = 31
  Network idle timeout: 30000
  Network keepalive delay: 2000
  Network reconnect delay: 2000
Checking O2CB heartbeat: Not active
#
Once the OCFS2 framework is running, the administrator can create the cluster filesystem. In the simplest case, you can use mkfs.ocfs2 devicefile (Listing 3) to do this. The man page for mkfs.ocfs provides a full list of options, the most important of which are covered by Table 2.
Listing 3: OCFS2 Optimized for Mail Server
# mkfs.ocfs2 -T mail -L data /dev/sda1
mkfs.ocfs2 1.4.2
Cluster stack: classic o2cb
Filesystem Type of mail
Filesystem label=data
Block size=2048 (bits=11)
Cluster size=4096 (bits=12)
Volume size=1011675136 (246991 clusters) (493982 blocks)
16 cluster groups (tail covers 8911 clusters, rest cover 15872 clusters)
Journal size=67108864
Initial number of node slots: 2
Creating bitmaps: done
Initializing superblock: done
Writing system files: done
Writing superblock: done
Writing backup superblock: 0 block(s)
Formatting Journals: done
Formatting slot map: done
Writing lost+found: done
mkfs.ocfs2 successful
Tabelle 2: Important Options for mkfs.ocfs2
|
Option |
Purpose |
|---|---|
|
|
Block size |
|
|
Cluster size |
|
|
Label |
|
|
Maximum number of computers with simultaneous access |
|
|
Journal options |
|
|
Filesystem type (optimization for many small files or a few large ones) |
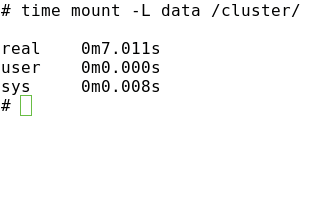
Once you have created the filesystem, you need to mount it. The mount command works much like that on unclustered filesystems (Figure 2). When mounting and unmounting OCFS2 volumes, you can expect a short delay: During mounting, the executing machine needs to register with the DLM. In a similar fashion, the DLM resolves any existing locks or manages them on the remaining systems in case of a umount. The documentation points to various options you can set for the mount operation. If OCFS2 detects an error in the data structure, it will default to read-only. In certain situations, a reboot can clear this up. The errors=panic mount option handles this. Another interesting option is commit=seconds. The default value is 5, which means that OCFS2 writes the data out to disk every five seconds. If a crash occurs, a consistent filesystem can be guaranteed – thanks to journaling – and only the work from the last five seconds will be lost. The mount option that specifies the way data are handled for journaling is also important here. The latest version lets OCFS2 write all the data out to disk before updating the journal. date=writeback forces the predecessor's mode.

Figure 2: Unspectacular: the OCFS2 mount process.
Inexperienced OCFS2 admins might wonder why the OCFS2 volume is not available after a reboot despite an entry in /etc/fstab. The init script that comes with the distribution, /etc/init.d/ocfs2 makes the OCFS2 mount resistant to reboots. Once enabled, this script scans /etc/fstab for OCFS2 entries and integrates these filesystems.
Just as with ext3/4, the administrator can modify a couple of filesystem properties after mounting the filesystem without destroying data. The tunefs.ocfs2 tool helps with this. If the cluster grows unexpectedly and you want more computers to access OCFS2 at the same time, too small a value for the N option in mkfs.ocfs2 can become a problem. The tunefs.ocfs2 tool lets you change this in next to no time. The same thing applies to the journal size (Listing 4).
Listing 4: Maintenance with tunefs.ocfs2
# tunefs.ocfs2 -Q "NumSlots = %N\n" /dev/sda1
NumSlots = 2
# tunefs.ocfs2 -N 4 /dev/sda1
# tunefs.ocfs2 -Q "NumSlots = %N\n" /dev/sda1
NumSlots = 4
#
# tunefs.ocfs2 -Q "Label = %V\n" /dev/sda1
Label = data
# tunefs.ocfs2 -L oldata /dev/sda1
# tunefs.ocfs2 -Q "Label = %V\n" /dev/sda1
Label = oldata
#
Also, you can use this tool to modify the filesystem label and enable or disable certain features (see also Listing 8). Unfortunately, the man page doesn't tell you which changes are permitted on the fly and which aren't. Thus, you could experience a tunefs.ocfs2: Trylock failed while opening device "/dev/sda1" message when you try to run some commands on OCFS2.
More Detail
As I mentioned earlier, you do not need to preconfigure the cluster heartbeat or fencing. When the cluster stack is initialized, default values are set for both. However, you can modify the defaults to suit your needs. The easiest approach here is via the /etc/init.d/o2cb configure script, which prompts you for the required values – for example, when the OCFS2 cluster should regard a node or network connection as down. At the same time, you can specify when the cluster stack should try to reconnect and when it should send a keep-alive packet.
Apart from the heartbeat timeout, all of these values are given in milliseconds. However, for the heartbeat timeout, you need a little bit of math to determine when the cluster should consider that a computer is down. The value represents the number of two-second iterations plus one for the heartbeat. The default value of 31 is thus equivalent to 60 seconds. On larger networks, you might need to increase all these values to avoid false alarms.
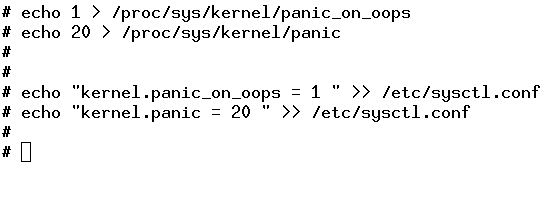
If OCFS2 stumbles across a critical error, it switches the filesystem to read-only mode and generates a kernel oops or even a kernel panic. In production use, you will probably want to remedy this state without in-depth error analysis (i.e., reboot the cluster node). For this to happen, you need to modify the underlying operating system so that it automatically reboots in case of a kernel oops or panic (Figure 3). Your best bet for this on Linux is the /proc filesystem for temporary changes, or sysctl if you want the change to survive a reboot.

Figure 3: Automatic reboot after 20 seconds on OCFS2 cluster errors.
Just like any other filesystem, OCFS2 has a couple of internal limits you need to take into account when designing your storage. The number of subdirectories in a directory is restricted to 32,000. OCFS2 stores data in clusters of between 4 and 1,024Kb. Because the number of cluster addresses is restricted to 232, the maximum file size is 4PB. This limit is more or less irrelevant because another restriction – the use of JBD journaling – limits the maximum OCFS2 filesystem size to 16TB, which can address a maximum of 232 blocks of 4KB.
An active OCFS2 cluster uses a handful of processes to handle its work (Listing 5). DLM-related tasks are handled by dlm_thread, dlm_reco_thread, and dlm_wq. The ocfs2dc, ocfs2cmt, ocfs2_wq, and ocfs2rec processes are responsible for access to the filesystem. o2net and o2hb-XXXXXXXXXX handle cluster communications and the heartbeat. All of these processes are started and stopped by init scripts for the cluster framework and OCFS2.
Listing 5: OCFS2 Processes
# ps -ef|egrep '[d]lm|[o]cf|[o]2'
root      3460     7  0 20:07 ?        00:00:00 [user_dlm]
root      3467     7  0 20:07 ?        00:00:00 [o2net]
root      3965     7  0 20:24 ?        00:00:00 [ocfs2_wq]
root      7921     7  0 22:40 ?        00:00:00 [o2hb-BD5A574EC8]
root      7935     7  0 22:40 ?        00:00:00 [ocfs2dc]
root      7936     7  0 22:40 ?        00:00:00 [dlm_thread]
root      7937     7  0 22:40 ?        00:00:00 [dlm_reco_thread]
root      7938     7  0 22:40 ?        00:00:00 [dlm_wq]
root      7940     7  0 22:40 ?        00:00:00 [ocfs2cmt]
#
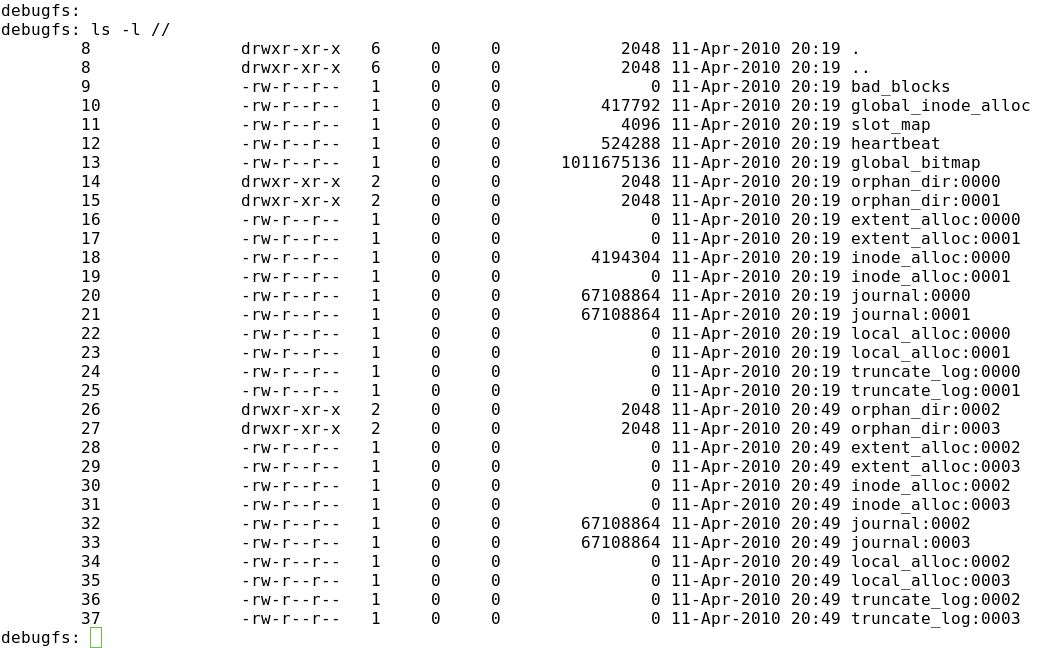
OCFS2 stores its management files in the filesystem's system directory, which is invisible to normal commands such as ls. The debugfs.ocfs2 command lets you make the system directory visible (Figure 4). The objects in the system directory are divided into two groups: global and local (i.e., node-specific) files. The first of these groups includes global_inode_alloc, slot_map, heartbeat, and global_bitmap. They have access to each node on the cluster; inconsistencies are prevented by a locking mechanism. The only programs that access global_inode_alloc are those for creating and tuning the filesystem. To increase the number of slots, it is necessary to create further node-specific system files.

Tabelle 3: New Features in OCFS2 v1.4
|
Feature |
Description |
|---|---|
|
Ordered journal mode |
OCFS2 writes data before metadata. |
|
Flexible allocation |
OCFS2 now supports sparse files – that is, gaps in files. Additionally, preallocation of extents is possible. |
|
Inline data |
OCFS2 stores the data from small files directly in the inode and not in extents. |
|
Clustered |
The |
What Else?
When you make plans to install OCFS2, you need to know which version you will putting on the new machine. Although the filesystem itself – that is, the structure on the medium – is downward compatible, mixed operations with OCFS2 v1.2 and OCFS2 v1.4 are not supported. The network protocol is to blame for this. The developers enabled a tag in the active protocol version so that future OCFS2 versions would be downward compatible through the network stack. This comes at the price of incompatibility with v1.2. Otherwise, administrators have a certain degree of flexibility when mounting OCFS2 media. OCFS2 v1.4 computers will understand the data structure of v1.2 and mount them without any trouble. This even works the other way around: If the OCFS2 v1.4 volume does not use the newer features in this version, you can use an OCFS2 v1.2 computer to access the data.
Debugging
A filesystem has a number of potential issues, and the added degree of complexity in a cluster filesystem doesn't help. From the viewpoint of OCFS2, things can go wrong in three different layers – the filesystem structure on the disk, the cluster configuration, or the cluster infrastructure – or even a combination of the three. The cluster infrastructure includes the network stack for the heartbeat, cluster communications, and possibly media access. Problems with Fibre Channel (FC) and iSCSI also belong to this group.
For problems with the cluster infrastructure, you can troubleshoot just as you would for a normal network, FC, or iSCSI problems. Problems can also occur if the cluster configuration is not identical on all nodes. Armed with vi, scp, and md5sum, you can check this and resolve the problem. The alternative – assuming the cluster infrastructure is up and running – is to synchronize the cluster configuration on all of your computers by updating the configuration with ocfs2console.
It can be useful to take the problematic OCFS2 volume offline – that is, to unmount it and restart the cluster service on all of your computers by giving the /etc/init.d/o2cb restart command. You can even switch the filesystem to a kind of single-user mode with tunefs.ocfs2.
To do this, you need to change the mount type from cluster to local. After doing so, only a single computer can mount the filesystem, and it doesn't need the cluster stack to do so.
In all of these actions, you need to be aware that the filesystem can be mounted by more than one computer. Certain actions that involve, say, tunefs.ocfs2, will not work if another computer accesses the filesystem at the same time.
The example in Listing 6 shows the user attempting to modify the label. This process fails, although the filesystem is offline (on this computer). In this case, mounted.ocfs2 will help: It checks the OCFS2 header to identify the computer that is online with the filesystem.
Listing 6: Debugging with mounted.ocfs2
# grep -i ocfs /proc/mounts |grep -v dlm
# hostname
testvm2.seidelnet.de
# tunefs.ocfs2 -L olddata /dev/sda1
tunefs.ocfs2: Trylock failed while opening device "/dev/sda1"
# mounted.ocfs2 -f
Device                FS     Nodes
/dev/sda1             ocfs2  testvm
#
The most important filesystem structure data are contained in the superblock. Just like other Linux filesystems, OCFS2 creates backup copies of the superblock; however, the approach the OCFS2 developers took is slightly unusual.
OCFS2 creates a maximum of six copies at non-configurable offsets: 1, 4, 16, 64, and 256GB and 1TB. Needless to say, OCFS2 volumes smaller than 1GB (!) don't have a copy of the superblock. To be fair, mkfs.ocfs2 does tell you this when you generate the filesystem. You need to watch out for the Writing backup superblock: … line.
A neat side effect of these static backup superblocks is that you can reference them by number during a filesystem check. The example in Listing 7 shows a damaged primary superblock that is preventing mounting and a simple fsck.ocfs2 from working. The first backup makes it possible to restore.
Listing 7: Restoring Corrupted OCFS2 Superblocks
# mount /dev/sda1 /cluster/
mount: you must specify the filesystem type
# fsck.ocfs2 /dev/sda1
fsck.ocfs2: Bad magic number in superblock while opening "/dev/sda1"
# fsck.ocfs2 -r1 /dev/sda1
[RECOVER_BACKUP_SUPERBLOCK] Recover superblock information from backup block#262144? <n> y
Checking OCFS2 filesystem in /dev/sda1:
  label:              backup
  uuid:               31 18 de 29 69 f3 4d 95 a0 99 a7 23 ab 27 f5 04
  number of blocks:   367486
  bytes per block:    4096
  number of clusters: 367486
  bytes per cluster:  4096
  max slots:          2
/dev/sda1 is clean.  It will be checked after 20 additional mounts.
#
Basically, Yes, but …
On the whole, it is easy to set up an OCFS2 cluster. The software is available for a number of Linux distributions. Because OCFS2 works just as well with iSCSI and Fibre Channel, the hardware side is not too difficult either. Setting up the cluster framework is a fairly simple task that you can handle with simple tools like Vi.
Although OCFS2 doesn't include sophisticated fencing technologies, in contrast to other cluster filesystems, fencing is not necessary in many areas. The lack of a cluster-capable volume manager makes it easier for the user to become immersed in the world of OCFS2. Because OCFS2 is simpler and less complex than other cluster filesystems, it is well worth investigating.
Listing 8: Enabling/Disabling OCFS2 v1.4 Features
# tunefs.ocfs2 -Q "Incompatible: %H\n" /dev/sda1
Incompatibel: sparse inline-data
# tunefs.ocfs2 --fs-features=nosparse /dev/sda1
# tunefs.ocfs2 -Q "Incompatible: %H\n" /dev/sda1
Incompatibel: inline-data
# tunefs.ocfs2 --fs-features=noinline-data /dev/sda1
# tunefs.ocfs2 -Q "Incompatible: %H\n" /dev/sda1
Incompatibel: None
#
# tunefs.ocfs2 --fs-features=sparse,inline-data /dev/sda1
# tunefs.ocfs2 -Q "Incompatible: %H\n" /dev/sda1
Incompatibel: sparse inline-data
#
