
Operating system virtualization with OpenVZ
Container Service
Hypervisor-based virtualization solutions are all the rage. Many companies use Xen, KVM, or VMware to gradually abstract their hardware landscape from its physical underpinnings. The situation is different if you look at leased servers, however. People who decide to lease a virtual server are not typically given a fully virtualized system based on Xen or ESXi, and definitely not a root server. Instead, they might be given a resource container, which is several magnitudes more efficient for Linux guest systems and also easier to set up and manage. A resource container can be implemented with the use of Linux VServer [1], OpenVZ [2], or Virtuozzo [3].
Benefits
Hypervisor-based virtualization solutions emulate a complete hardware layer for the guest system. Ideally, any operating system including applications can be installed on the guest, which will seem to have total control of the CPU, chipset, and peripherals. If you have state-of-the-art hardware (a CPU with a virtualization extension – VT), the performance is good.
However, hypervisor-based systems do have some disadvantages. Because each guest installs its own operating system, it will perform many tasks in its own context just like the host system does, meaning that some services might run multiple times. This can affect performance because of overlapping – one example of this being cache strategies for the hard disk subsystem. Caching the emulated disks on the guest system is a waste of time because the host system already does this, and emulated hard disks are actually just files on the filesystem.
Parallel Universes
Resource containers use a different principle on the basis that – from the application's point of view – every operating system comprises a filesystem with installed software, space for data, and a number of functions for accessing devices. For the application, all of this appears to be a separate universe. A container has to be designed so that the application thinks it has access to a complete operating system with a run-time environment.
From the host's point of view, containers are simply directories. Because all the guests share the same kernel, they can only be of the same type as the host operating system or its kernel. This means a Linux-based container solution like OpenVZ can only host Linux guests. From a technical point of view, resource containers extend the host system's kernel. Adding an abstraction layer then isolates the containers from one another and provides resources, such as CPU cycles, memory, and disk capacity (Figure 1).
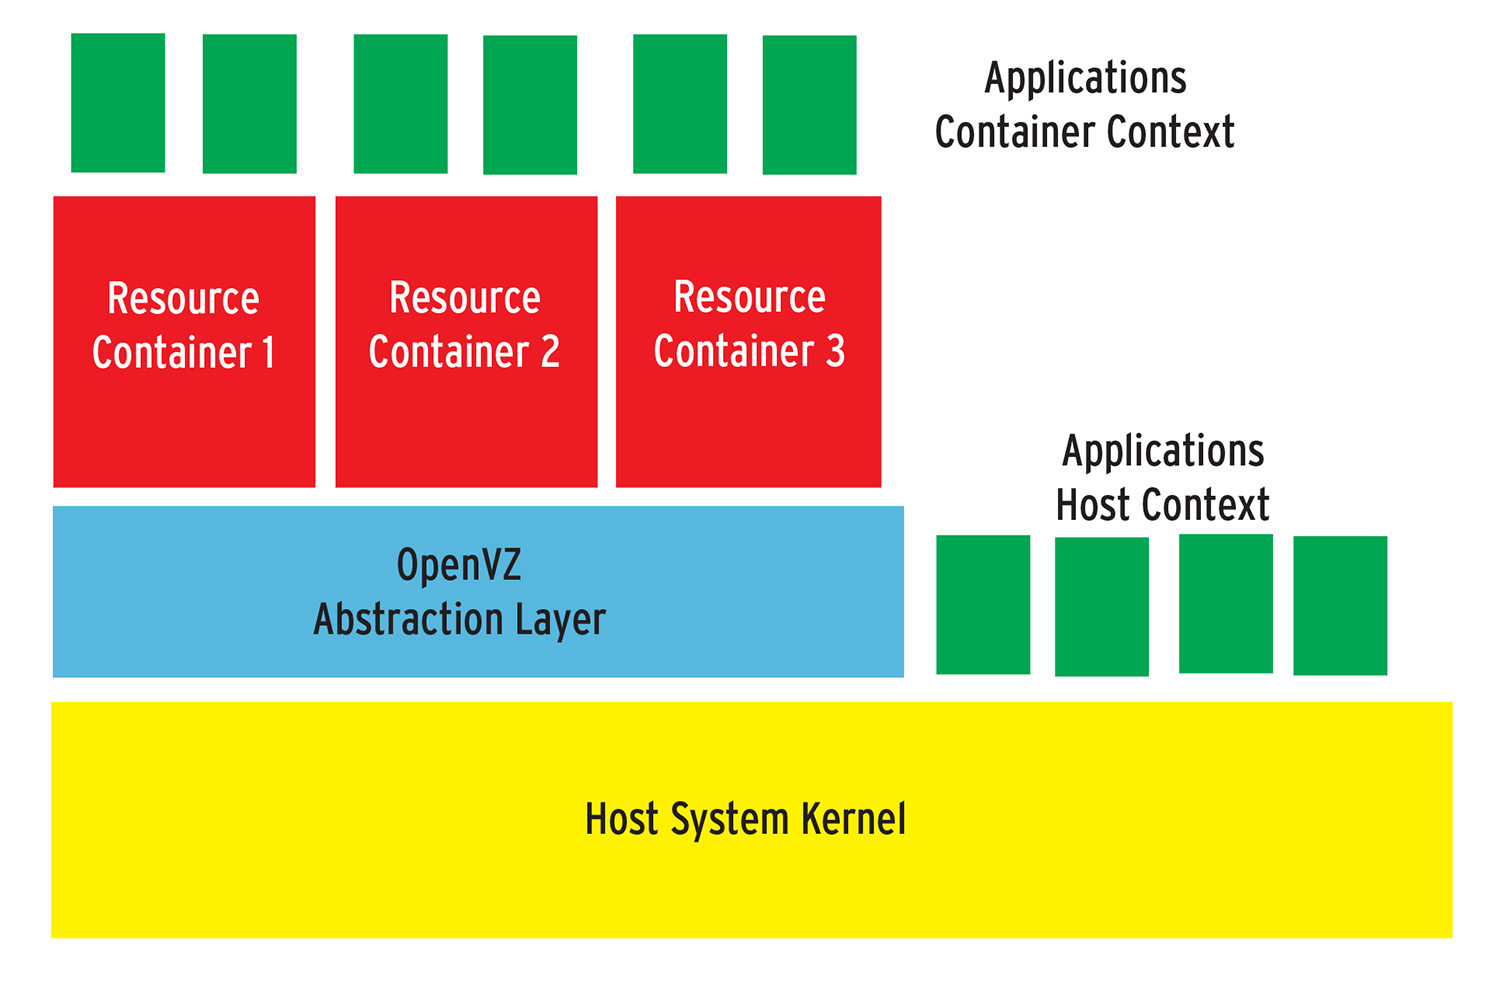
Installing a container means creating a sub-filesystem in a directory on the host system, such as /var/lib/vz/gast1; this is the root directory for the guest. Below /var/lib/vz/gast1 is a regular Linux filesystem hierarchy but without a kernel, just as in a normal chroot environment.
The container abstraction layer makes sure that the guest system sees its own process namespace with separate process IDs. On top of this, the kernel extension that provides the interface is required to create, delete, shut down and assign resources to containers. Because the container data are extensible on the host file system, resource containers are easy to manage from within the host context.
Efficiency
Resource containers are magnitudes more efficient than hypervisor systems because each container uses only as many CPU cycles and as much memory as its active applications need. The resources the abstraction layer itself needs are negligible. The Linux installation on the guest only consumes hard disk space. However, you can't load any drivers or kernels from within a container. The predecessors of container virtualization in the Unix world are technologies that have been used for decades, such as chroot (Linux), jails (BSD), or Zones (Solaris). With the exception of (container) virtualization in User-Mode Linux [4], only a single host kernel runs with resource containers.
OpenVZ
OpenVZ is the free variant of a commercial product called Parallels Virtuozzo. The kernel component is available under the GPL; the source code for the matching tools under the QPL. OpenVZ runs on any CPU type, including CPUs without VT extensions. It supports snapshots of active containers as well as the Live migration of containers to a different host (see the box "Live Migration, Checkpointing and Restoring"). Incidentally, the host is referred to as the hardware node in OpenVZ-speak.
To be able to use OpenVZ, you will need a kernel with OpenVZ patches. One problem is that the current stable release of OpenVZ is still based on kernel 2.6.18, and what is known as the super stable version is based on 2.6.9. It looks like the OpenVZ developers can't keep pace with official kernel development. Various distributions have had an OpenVZ kernel, such as the last LTS release (v8.04) of Ubuntu, on which this article is based (Figure 2).
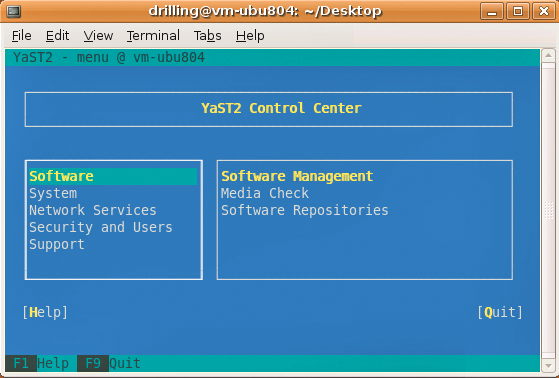
Ubuntu 9.04 and 9.10 no longer feature OpenVZ, apart from the VZ tools; this also applies to Ubuntu 10.04. If you really need a current kernel on your host system, your only option is to download the beta release, which uses kernel 2.6.32. The option of using OpenVZ and KVM on the same host system opens up interesting possibilities for a free super virtualization solution with which administrators can experiment.
If you are planning to deploy OpenVZ in a production environment, I suggest you keep to the following recommendations: You must disable SELinux because OpenVZ will not work correctly otherwise. Additionally, the host system should only be a minimal system. You will probably want to dedicate a separate partition to OpenVZ and to mount this below, /ovz, for example Besides this, you should have at least 5GB of hard disk space, a fair amount of RAM (at least 4GB), and enough swap space.
Starting OpenVZ
Installing OpenVZ is simple. Users on RPM-based operating systems such as RHEL or CentOS can simply include the Yum repository specified in the quick install manual on the project homepage. Ubuntu 8.04 users will find a linux-openvz meta-package in the multiverse repository, which installs the required OpenVZ kernel, including the kernel modules and header files (Figure 3). At the time of writing, no OpenVZ kernel was available for Ubuntu 10.04. If you are interested in using OpenVZ with a current version of Ubuntu, you will find a prebuilt deb package in Debian's unstable branch. To install type:
sudo dpkg -i linux-base_2.6.32-10_all.deb linux-image-2.6.32-4-openvz-686_2.6.32-10_i386.deb
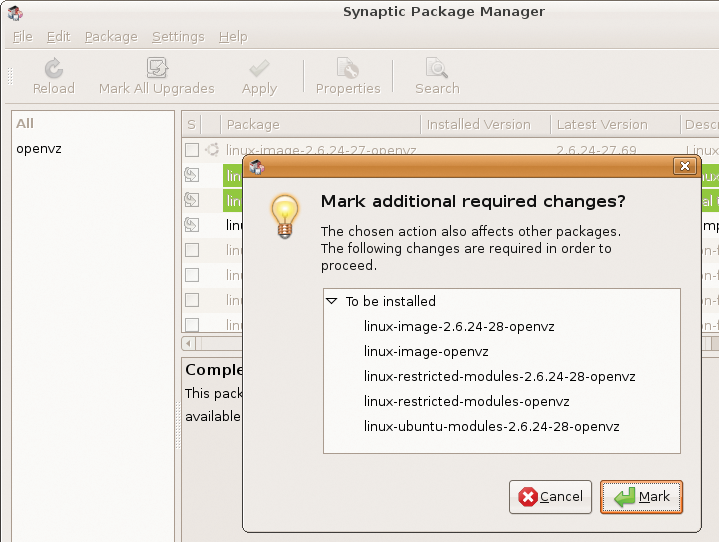
The sudo apt-get -f install command will automatically retrieve any missing packages. You will also need to install the vzctl tool, which has a dependency for vzquota.
Before setting up the containers and configuring the OpenVZ host environment, you need to modify a few kernel parameters that are necessary to run OpenVZ in the /etc/sysctl.conf file on the host system. For more detailed information on this, refer to the sysctl section in the quick install guide, which covers providing network access to the guest systems, involving setting up packet forwarding for IPv4 [5]. Then, you need to reboot with the new kernel. If you edit sysctl after rebooting, you can reload by typing sudo sysctl -p. Typing
sudo /etc/init.d/vz start
wakes up the virtualization machine.
Next, you should make sure all the OpenVZ services are running; this is done easily (on Ubuntu) by issuing:
sudo sysv-rc-conf -list vz
If the tool is missing, you can type
sudo apt-get install sysconfig
to install it. Debian and Red Hat users can run the legacy chkconfig tool. A check of service vz status should now tell you that OpenVZ is running.
Container Templates
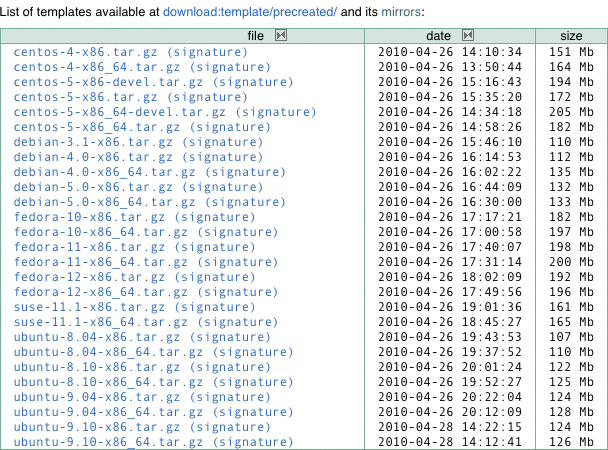
OpenVZ users don't need to install an operating system in the traditional sense of the word. The most convenient approach to set up OpenVZ containers is with templates (i.e., tarballs with a minimal version of the distribution you want to use in the container). Administrators can create templates themselves, although it's not exactly trivial [6]. Downloading prebuilt templates [7] and copying them to the template folder is easier:
sudo cp path_to_template /var/lib/vz/template/cache
Besides templates provided by the OpenVZ team, the page also offers a number of community templates (Figure 4).
Configuring the Host Environment
The /etc/vz/vz.conf file lets you configure the host environment. This is where you specify the path to the container and template data on the host filesystem. If you prefer not to use the defaults of
TEMPLATE=/var/lib/vz/template
VE_ROOT=/var/lib/vz/root/$VEID
VE_PRIVATE=/var/lib/vz/private/$VEID
you can set your own paths. VE_ROOT is the mountpoint for the root directory of the container. The private data for the container are mounted in VE_PRIVATE. VEID is a unique ID that identifies an instance of the virtual environment. All OpenVZ tools use this container ID to address the required container.
Creating Containers
The vzctl, which is only available in the host context, creates containers and handles most management tasks, too. In the following example, I used it to create a new VE based on a template for openSUSE 11.1 that I downloaded:
sudo vzctl create VEID --ostemplate suse-11.1-x86_64
The template name is specified without the path and file extension. The sudo vzctl start VEID starts the VE, and sudo vzctl stop VEID stops it again (Figure 5). The commands sudo vzctl enter VEID and exit let you enter and exit the VE.
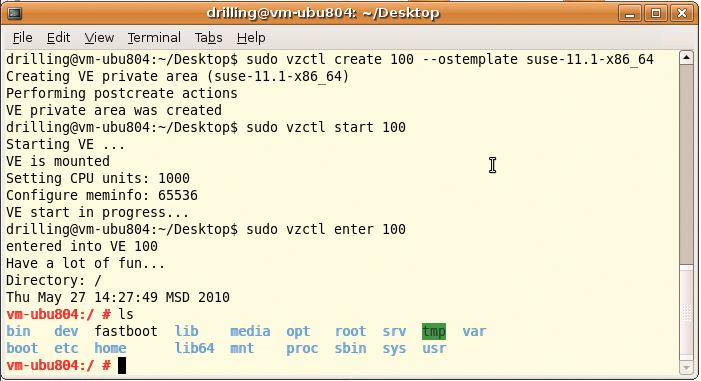
Entering the VE gives you a working root shell without prompting you for a password. Unfortunately, you can't deny root access in the host context.
Network Configuration
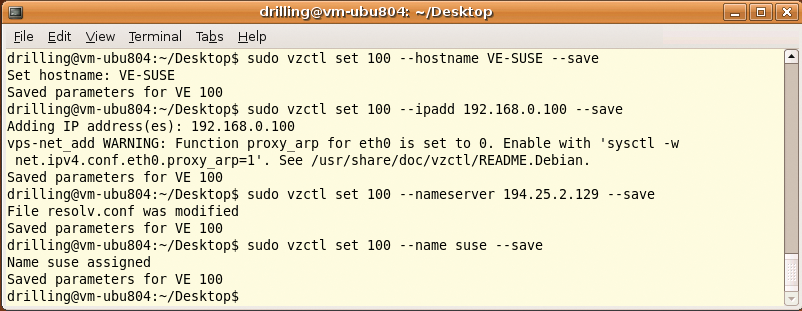
The next step is to configure network access for the container. OpenVZ supports various network modes for this. The easiest option is to assign the VEs an IP on the local network/subnet and tell them the DNS server address, which lets OpenVZ create venet devices. All of the following commands must be given in the host context. To do this, you first need to stop the VE and then set all the basic parameters. For example, you can set the hostname for the VE as follows:
sudo vzctl set VEID --hostname Hostname --save
The --ipadd option lets you assign a local IP address. If you need to install a large number of VEs, use VEID as the host part of the numeric address.
sudo vzctl set VEID --ipadd IP-Address --save
The DNS server can be configured using the --nameserver option:
sudo vzctl set VEID --nameserver Nameserver-address --save
After restarting the VE, you should be able to ping it from within the host context. After entering the VE, you should also be able to ping the host or another client (Figure 6). For more details on the network configuration, see the "Network Modes" box.
OpenVZ Administration
The vzctl tool handles a number of additional configuration tasks. Besides starting, stopping, entering, and exiting VEs, you can use the -set option to set a number of operational parameters. Running vzlist in the host context displays a list of the currently active VEs, including some additional information such as the network parameter configuration (Figure 7).

vzlist command outputs a list of active VEs.In the VE, you can display the process list in the usual way by typing ps. And, if the package sources are configured correctly, patches and software updates should work in the normal way using apt, yum, or yast depending on your guest system. For the next step, it is a good idea to enter the VE by typing vzctl enter VEID. Then, you can set the root password, create more users, and assign the privileges you wish to give them; otherwise, you can only use the VEs in trusted environments.
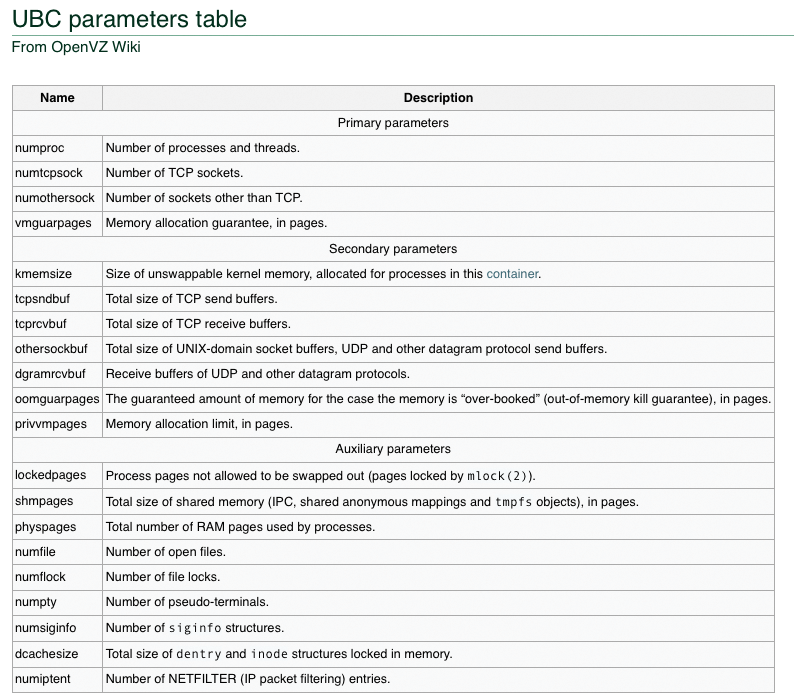
Without additional configuration, the use of VEs is a security risk because only one host kernel exists, and each container has a superuser. Besides this, you need to be able to restrict the resources available to each VE, such as the disk and memory and the CPU cycles in the host context. OpenVZ has a set of configuration parameters for defining resource limits known as User Bean Counters (UBCs) [8]. The parameters are classified by importance in Primary, Secondary, and Auxiliary. Most of these parameters can also be set with vzctl set (Figure 8).
For example, you can enter
sudo vzctl set 100 --cpus 2
to set the maximum number of CPUs for the VE. The maximum permitted disk space is set by the --diskspace parameter. A colon between two values lets you specify a minimum and maximum limit:
sudo vzctl set 100 --diskspace 8G:10G --quotatime 300
Incidentally, sudo vzlist -o lists all the set UBC parameters. Note that some UBC parameters can clash, so you will need to familiarize yourself with the details by reading the exhaustive documentation. To completely remove a container from the system, just type the
sudo vzctl destroy
command.
Conclusions
Resource containers with OpenVZ offer a simple approach to running virtual Linux machines on a Linux host. According to the developers, the virtualization overhead with OpenVZ is only two to three percent more CPU and disk load: These numbers compare with the approximately five percent quoted by the Xen developers.
The excellent values for OpenVZ are the result of the use of only one kernel. The host and guest kernels don't need to run identical services, and caching effects for the host and guest kernels do not interfere with each other. The containers themselves provide a complete Linux environment without installing an operating system. The environment only uses the resources that the applications running in it actually need.
The only disadvantage of operating system virtualization compared with paravirtualization or hardware virtualization is that, apart from the network interfaces, it is not possible to assign physical resources exclusively to a single guest.
Otherwise, you can do just about anything in the containers, including installing packages and providing services. Additionally, setting up the OpenVZ kernel requires just a couple of simple steps, and the template system gives you everything you need to set up guest Linux distributions quickly.
OpenVZ has a head start of several years development compared with modern hypervisor solutions such as KVM and is thus regarded as mature. Unfortunately, the OpenVZ kernel lags behind vanilla kernel development.
However, if you are thinking of deploying OpenVZ commercially, you might consider its commercial counterpart Virtuozzo. Besides support, there are a number of aspects to take into consideration when using resource containers. For example, hosting providers need to offer customers seamless administration via a web interface, with SSH and FTP, or by both methods; of course, the security concerns mentioned previously cannot be overlooked.
Parallels offers seamless integration of OpenVZ with Plesk and convenient administrations tools for, say, imposing resource limits in the form of the GUI-based Parallels Management Console [9] or Parallels Infrastructure Manager [10]. The excellent OpenVZ wiki covers many topics, such as the installation of Plesk in a VE or setting up an X11 system [11]. OpenVZ is the only system that currently offers Linux guest systems a level of performance that can compete with that of a physical system without sacrificing performance to the implementation itself. This makes OpenVZ a good choice for virtualized Linux servers of any kind.
