Flexible user authentication with PAM
Turnkey Solution
Hardware innovations are daily business in user account authentication. Pluggable Authentication Modules (PAM) help transparently integrate these new devices into a system. This gives experienced administrators the option of offering a variety of different authentication methods to their users while providing scope for controlling the total user session workflow.
Old School
User logins on Linux systems are traditionally handled by the /etc/passwd and /etc/shadow files. When a user runs the login command to log in to the system with a name and password, the program creates a cryptographic checksum of the password and compares the results with the checksum stored for this user in the /etc/shadow file. If the checksums match, the user is authenticated; if not, the login will fail.
This approach doesn't scale well. In larger environments, user credentials are typically stored centrally on an LDAP server, for example. In this case, the login program doesn't retrieve the password checksum from the /etc/shadow file but from a directory service. This task can be simplified by deploying PAM [1].
Modular Authentication
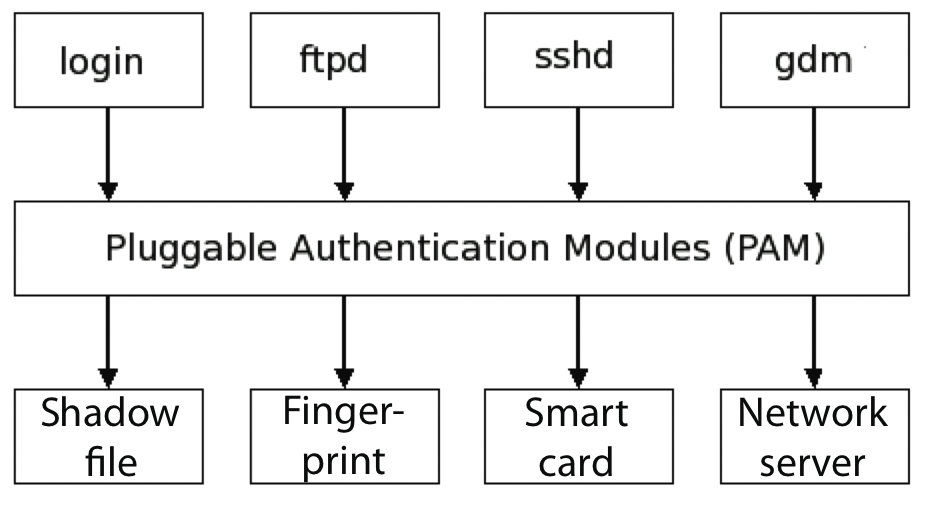
Originally developed in the mid-1990s by Sun Microsystems, PAM is available on most Unix-style systems today. PAM offloads the whole authentication process from the application itself to a central framework comprising an extensive collection of modules (Figure 1). Each of these modules handles a specific task; however, the application only gets to know whether or not the user logged in successfully. In other words, it is PAM's job to find a suitable method for authenticating the user. The PAM framework defines what this method looks like, and the application remains blissfully unaware of it.

PAM can use various authentication methods. Besides popular network-based methods like LDAP, NIS, or Winbind, PAM can use more recent libraries to access a variety of hardware devices, thus supporting logins based on smartcards or the user's digital fingerprint. One-time password systems, such as S/Key or SecurID, are also supported by PAM, and some methods even require a specific Bluetooth device to log in the user.
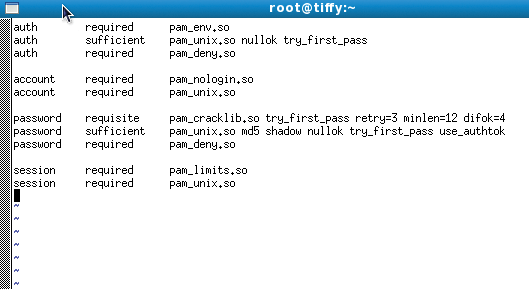
The way PAM works is fairly simple. Each PAM-aware application (the application must be linked against the libpam library) has a separate configuration file in the /etc/pam.d/ folder. The file will typically be named after the application itself – login, for example. Within the file, modules distribute PAM tasks among themselves. Numerous libraries are available in each group, and they handle a variety of tasks within the group (Figure 2). Control flags let you manage PAM's behavior in case of error – for example, if a user fails to provide the correct password or if the system is unable to verify a fingerprint.

Fingerprints
More recent PAM libraries allow administrators to authenticate users by means of smartcards, USB tokens, or biometric features. State-of-the-art notebooks often include a fingerprint reader that allows the owner to use a digital fingerprint when logging into the system. The PAM ThinkFinger library [2] provides the necessary support. According to the documentation, the module will support the UPEK/SGS Thomson Microelectronics fingerprint reader used by most recent Lenovo notebooks and many external devices.
Most major Linux distributions offer prebuilt packages for the PAM libraries. You can use your distribution's package manager to install the software from the repositories. To install the required packages on your hard disk, you would give the
yum install thinkfinger
command on a Fedora system and
apt-get install thinkfinger-tools libpam-thinkfinger
on Ubuntu Hardy. Gentoo admins can issue a compact command:
emerge sys-auth/thinkfinger
If you're using openSUSE, you'll need the libthinkfinger and pam_thinkfinger packages, the repository versions of which are not up to date.
You might prefer a manual install with the typical ./configure, make, make install steps and files from the current source code archive. Debian users on Lenny will need to access the Experimental repository and then type
aptitude install libthinkfinger0 libpam-thinkfinger thinkfinger-tools
for the install.
Before you modify the existing PAM configuration, you might want to test the device itself. To do so, scan a fingerprint by giving the
tf-tool --acquire
command (Figure 3). Then you can use
tf-tool --verify

tf-tool gives you an option for testing your fingerprint scanner …to verify the results. You might see a Fingerprint does *not* match message at this point; initial attempts can be fairly inaccurate because you will need to familiarize yourself with the device.
If you drag your finger too quickly or too slowly across the scanner, the device could fail to identify the fingerprint correctly. In this case, it will output an error message and quit. When you achieve reliable results from fingerprint scans, you can delete the temporary file with the test scan in /tmp and create an individual file for each user on the system that will contain the user's fingerprint. The command is
tf-tool --add-user username
(Figure 4). Users must scan their fingerprints three times for this to work. If the fingerprint is identified correctly each time, the tool will store it in a separate file below /etc/pam_thinkfinger/.

Once everything is working, you can begin the PAM configuration. Figure 2 shows a PAM configuration for the login program that lists just one authentication module: pam_unix. If you want to authenticate against the fingerprint scanner first, you need to call the pam_thinkfinger PAM module before pam_unix.
To prevent PAM from prompting users to enter their password despite passing the fingerprint test, you need add a sufficient control flag. This tells PAM not to call any more libraries once an authentication test has succeeded and to return PAM_SUCESS to the calling program – login in this example. If the fingerprint-based login fails, pam_unix is called as a last resort and will prompt for the user's regular password.
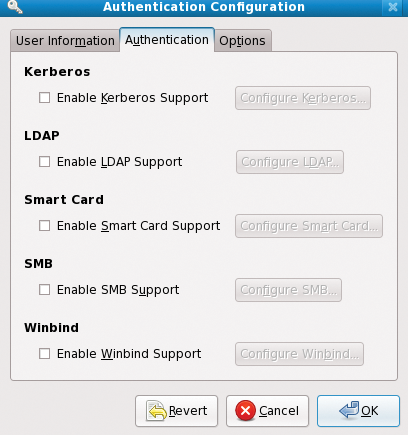
Manually entering the PAM libraries for all of your PAM-aware applications in every single PAM configuration file would be fairly tedious. A centralized PAM configuration file gives you an alternative. On Fedora or Red Hat, this file is named /etc/pam.d/system-auth, although other Linux distributions call it /etc/pam/common-auth. You can enter all the libraries against which you want to authenticate your users in the file (Figure 5).

The include control flag then includes the file in all your other PAM configuration files. From now on, this makes all the programs in the PAM libraries listed by the centralized configuration file available in the individual PAM files, including the pam_thinkfinger module.
USB Tokens
The pam_usb library supports another hardware-based approach, in which PAM checks to see whether a specific USB device is plugged into the machine. If so, the user is logged in; if not, access to the system is denied. The plugged in device is identified by its unique serial number and model and vendor names. Additionally, a random number is stored on the USB device and on the computer; the number changes after each successful login attempt.
When a user logs in, PAM checks both the specified USB device properties and the random number. If the number stored on the USB does not match the number on the disk, the login fails. This prevents attackers from stealing the random number, placing it on their own USB device, and then modifying the properties of their own device to access the system. Because the random number on the system changes after each login, the stolen number will not match the number on the system.
Gentoo and Debian Linux offer prebuilt packages of this PAM library. In both cases, you can use the package manager to install, as described for pam_thinkfinger. Users on any other Linux distribution can download the current source code archive [3] and run make; make install to compile the required files and install them on the local system. Then you need to connect any USB device – it can be a cellphone with an SD card if you like – and store its properties in the /etc/pamusb.conf file. The command for this is
pamusb-conf --add-device USB-device-name
(Figure 6). The command
pamusb-conf --add-user user

lets you add more users to the configuration and generates a matching random number. The number for each user is stored both on the USB device and on the system. Also, the tool adds each user to the XML-based /etc/pamusb.conf configuration file. You can use the file to define actions for each user; these actions will run when the USB is plugged in or unplugged. For example, the entry in Listing 1 of the configuration file automatically blocks the screen if the USB device is unplugged: Then You need to add the pam_usb PAM library to the corresponding PAM configuration file, /etc/pam.d/system-auth or /etc/pam.d/common-auth. If you use the sufficient control flag, users can log in to the system by plugging in the USB device, assuming the random number for the user matches on both devices (Listing 2).
Listing 1: Configuration File for pam_usb
01 <user id="tscherf">
02   <device>
03     /dev/sdb1
04   </device>
05       <agent event="lock">gnome-screensaver-command --lock</agent>
06       <agent event="unlock">gnome-screensaver-command --deactivate</agent>
07 </user>
Listing 2: USB Device-Based Authentication
[tscherf@tiffy ~]$ id -u
500
[tscherf@tiffy ~]$ su -
* pam_usb v0.4.2
* Authentication request for user "root" (su-l)
* Device "/dev/sdb1" is connected (good).
* Performing one time pad verification...
* Verification match, updating one time pads...
* Access granted.
[root@tiffy ~]# id -u
0
To enhance security, you can replace the sufficient control flag with required. This setting first looks for the USB device, but even if the device is identified correctly, PAM still prompts the user for a password in the next stage of the login process. Both of these tests have to complete successfully for the user to log in.
All of the hardware-based login methods I have looked at thus far are easily set up, but they all have vulnerabilities, and it is easy to fake fingerprints. Also, USB sticks can be stolen, thereby putting an end to any security they offered. If you take your security seriously, you will probably want to use two-factor authentication. This method inevitably involves using chip cards with readers or USB tokens with one-time passwords and PINs.
Yubikey
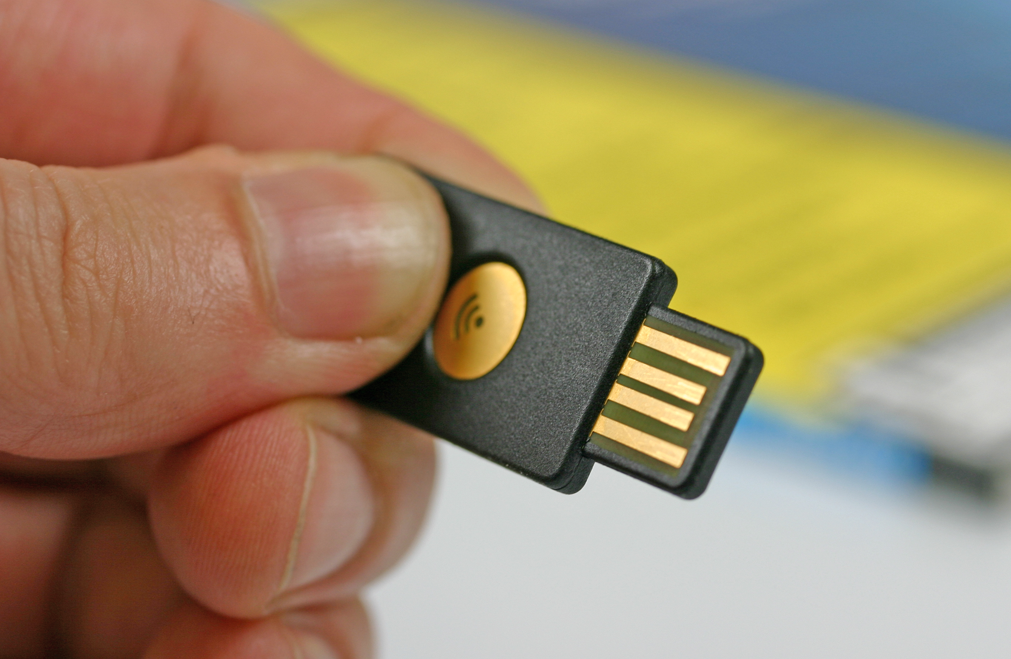
A small company from Sweden, Yubico [4], recently started selling Yubikeys (Figure 7), which are small USB tokens that emulate a regular USB keyboard. The key has a button on top which, when pressed, tells the token to send a one-time password (OTP) to the active application, such as a login prompt on an SSH server or the login window of a web service. The OTP is verified in real time by a Yubico authentication server. Because the software was released under an open source license, you could theoretically set up your own authentication server on your LAN. This would remove the need for an Internet connection.

The way the token works is quite simple. In contrast to popular RSA tokens, Yubikey doesn't need a battery because the OTP is not generated on the fly; instead, one-time passwords are defined in advance. The passwords are stored on the token and in a database on the authentication server.
When you press the Yubikey button, the key sends one of these OTPs to the active application, which then uses an API to access the server and verify the password. If this fails (Unknown Key) or if the password has already been used (Replayed Key), an error message is output and the login fails. If the server identifies the key as valid, it sets usage-count to 1 and the user is authenticated. The user cannot login with this key anymore times.
Because of the simple API, more and more applications are relying on authentication against the Yubico server. One example is the plugin for the popular WordPress blog, which allows users with a Yubikey to log in to the blog. A project from Google's Summer of Code produced a PAM module that supports logging in to an SSH server [5].
Instead of typing your user password at the login prompt, you simply press the button on the Yubikey to send a 44-character, modhex-encoded password string to the SSH server. The server then verifies the string by querying the Yubico server. The first 12 characters uniquely identify the user on the Yubikey server; the remaining 32 characters represent the one-time password.
You can define a central file on the SSH server to specify users permitted to log in by producing a Yubikey. To do so, first create a /etc/yubikey-users.txt file with a username, a colon separator, and the matching Yubikey ID (i.e., the first 12 characters of the user's OTP) for each user. Alternatively, users can create a file (~/.yubico/authorized_yubikeys) with the same information in their home directory.
You need to configure PAM to verify the OTP against the Yubico server. To do so, add a line for the Yubikey to your /etc/pam.d/sshd file (Listing 3).
Listing 3: PAM Configuration for a Yubikey
auth required pam_yubico.so authfile=/etc/yubikey-users.txt
auth       include      system-auth
account    required     pam_nologin.so
account    include      system-auth
password   include      system-auth
session    required     pam_selinux.so close
session    required     pam_loginuid.so
session    required     pam_selinux.so open env_params
session    optional     pam_keyinit.so force revoke
session    include      password-auth
The configuration shown in Listing 3 runs this authentication in addition to the regular, system-auth-driven authentication method. But if you replace the required flag with sufficient, there is no need for the user to log in after the Yubikey OTP has been validated. Unfortunately, the Yubikey is not protected by an additional PIN, and the system is vulnerable if the token is stolen. An unauthorized user in possession of a token would be able to spoof a third party's identity. The developers are working on adding PIN protection for OTPs, and an unofficial patch is already available.
X.509 Certificates and PAM
Classic two-factor authentication typically relies on chip cards. The cards typically contain a certificate protected by a PIN. The PAM pam_pkcs11 library allows users to log in to the system via an X.509 certificate. The certificate contains a private/public key pair. Both can be stored on a suitable chip card, with the private key protected by an additional PIN to prevent identity spoofing simply by stealing a chip card. To log in, you need both the chip card and the matching PIN. If the PIN is unknown, the login fails.
The details of the login process are as follows: The user inserts the chip card into the reader and enters the PIN. The system searches for the certificate with the public key and private key on the card. If the certificate is valid, the user is mapped onto the system. The mapping process can retrieve a variety of information from the certificate, typically the Common Name or the UID stored in the certificate.
To make sure the user really is who they claim to be, the system generates a random 128-bit number. A function on the chip card then encrypts the number using the private key, which is also stored on the card. The user needs to enter the right PIN to be able to access the private key. The system then uses the freely available public key to decrypt the encrypted number. If the results match the random number, the user is correctly authenticated because the two keys match.
The hardware required for this setup is a chip card with a matching reader – for example, the Gemalto e-Gate or SCR USB device by SCM. You can use any Java Card 2.1.1 or Global Platform 2.0.1-compatible token: Gemalto Cyberflex tokens are widely available. Various software solutions are also available: The approach described in this article relies on the pcsc-lite and pcsc-lite-libs packages for accessing the reader.
Public Key Infrastructure
It makes sense to use X.509 certificates, but only if you have a complete Public Key Infrastructure (PKI) set up. In this example, I'll use Dogtag [6] from the Fedora project as a PKI solution. Users with other distributions might prefer OpenSC [7]. The PAM library is the same for both variants, pam_pkcs11.
Dogtag consists of various components. For this setup, you'll also need a Certificate Authority (CA) to create the X.509 certificates. Online Certificate Status Protocol (OCSP) is used for online validation of the certificates on the chip cards. For offline validation, you just need the latest version of the Certificate Revocation List (CRL) on the client system. Of course, you also need a way of moving the user certificate from the certificate authority to the chip card. You can use the Enterprise Security Client (ESC) to open a connection to another PKI component, the Token Processing System, for this.
Assuming correct authentication, the user certificate is then copied to the chip card in the enrollment process. The ESC tool then gives the user a convenient approach to managing the card. If the user needs to request a new certificate from the CA or needs a new PIN for the private key on the card, it's no problem with ESC.
If you use OpenSC to manage your chip card, you can transfer a prebuilt PKCS#12 file [8] to the card using:
pkcs15-init --store-private-key tscherf.p12 --format pkcs12 --auth-id 01
The PKCS#12 file contains both the public key and private key. If you have a user certificate from a public certification authority like CACert [9], you can use your browser's certificate management facility to export the certificate to a file and then transfer it to the chip card as described.
If you don't have a certificate, you can create a request and send it to the appropriate certificate authority. Once the authority has verified your request, it will return a certificate to you.
For both approaches, you can use the /etc/pam_pkcs11/pam_pkcs11.conf file to define the driver for access to the chip card. The driver can be modified in the configuration file, as shown in Listing 4.
Listing 4: Configuration File for pam_pkcs11
01 pkcs11_module coolkey {
02     module = libcoolkeypk11.so;
03     description = "Cool Key"
04     slot_num = 0;
05     ca_dir = /etc/pam_pkcs11/cacerts;
06     nss_dir = /etc/pki/nssdb;
07     crl_dir = /etc/pam_pkcs11/crls;
08     crl_policy = auto;
09 }
Here, you must specify the correct paths to the local CRL and CA certificate repository. The CRL database is necessary to check that the certificate on a user's chip card is still valid and has not been revoked by the certificate authority. You need the certificate for the certificate authority that issued the user's certificate from the CA certificate repository. This makes it possible to validate the user's authenticity.
Certificates for Thunderbird and Co.
Applications that rely on Network Security Services (NSS) for signing or encrypting email with S/MIME, such as Thunderbird, use a file in the nss_dir as the CA database; applications based on the OpenSSL libraries use the database in the ca_dir directory. The certutil tool can import the CA certificate into the NSS database; OpenSSL-based certificates can simply be appended to the existing file. Finally, you can define the mappings between user certificates and Linux users in the pam_pkcs11 configuration file. Various mapping tools are available for this, specified as follows:
use_mappers = cn, uid
Next, you still need to add the PAM pam_pkcs11 library to the correct PAM configuration file – that is, /etc/pam.d/login or /etc/pam.d/gdm. You can edit the file manually or use the system-config-authentication tool referred to previously.
When you insert the chip card into the reader and launch the ESC tool, you should be able to see the certificate (Figure 8). If you now attempt to log in via the console or a new GDM session, the authentication process should be completely transparent. The Thunderbird email program can use the card to sign and encrypt email; Firefox can use the certificate for client-side authentication against a web server. The reward for all this configuration is a large choice of deployment scenarios. The ESC Guide [10] has a more detailed description of the tool and its configuration.

Conclusions
PAM is a very powerful framework for handling authentication. As you can see from the PAM libraries introduced in this article, the functional scope is not just restricted to authenticating users but also covers tasks such as authorization, password management, and session management. Administrators who take the time to familiarize themselves with configuring PAM, which isn't always trivial, will be rewarded with a feast of feature-rich and flexible options for password- and hardware-based authentication and authorization.
