
Updating Small Business Server 2008
Patched
Companies that deploy Microsoft's Small Business Server (SBS) 2008 to provide a variety of services on the server should make sure that they keep the server up to date. Only servers with the latest patches guarantee best possible performance, security, and stability. If a service fails, the whole server can be affected by the failure.
After installing SBS 2008, you originally have an older version of the server that doesn't even include Service Pack 2 (SP2) for Windows Server 2008, let alone a state-of-the-art version of Exchange Server 2007. This article identifies the critical updates and shows you how to install them. Because service packs delve deep into the structure of the server, some caution is advisable during the installation.
Windows Server 2008 SP2
If you haven't installed the older Service Pack 2 for Windows Server 2008, you should do that first. After installing SBS 2008, you only have SP1 for Windows Server 2008 in place. Service Pack 2 fixes a large number of bugs and is a prerequisite for many server applications.
The underlying operating system for SBS 2008 is Windows Server 2008 Standard Edition. For this reason, you should always install the required service packs and patches for Windows Server 2008. Start by downloading the installation file for the service pack [1] and make sure you have the x64 variant.
After you double-click the .exe file, SBS 2008 will show you a message from user account control, which you need to confirm. Afterwards, you'll see the welcome window for the service pack installation. The installation can take more than an hour because the service pack contains many system files. After completing the installation, the server will reboot and display a window confirming that the installation has been successful. If you access the properties of the Computer item in the Start menu, the window will also show you that the service pack has been installed.
SBS 2008 Update Rollup 4
One of the most important updates for SBS is always the latest Update Rollup. The current version available is version 4, and it contains all the changes introduced by its predecessors. Because the updates in the rollup build on SP2, you can install the patch after installing SP2 for Windows Server 2008. To install the patch, either use the update service included in SBS or, better still, download it manually from the site [2].
The download requires Internet Explorer; Firefox is not compatible with the Microsoft patch catalog. The patch fixes a number of incompatibilities with Windows 7 and adds warnings that the SBS event log can record, for example, server reboots, or backup errors. The patch also fixes various bugs.
To launch into the installation, download the patch and double-click. You might see a warning, which you again need to confirm before the installation starts. If the installer wizard notices that some files are still in use, it will need to close them to continue with the update. For this to happen, just select Close applications in the wizard and start again (Figure 1).
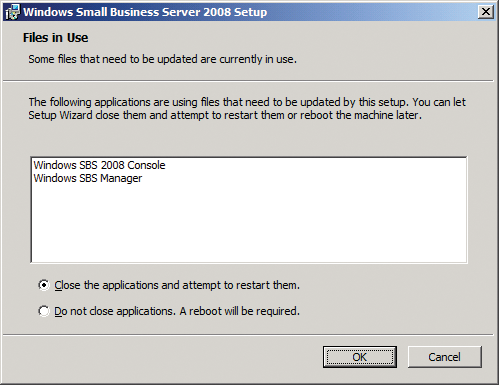
The installation takes just a couple of minutes, and then the wizard will inform you that the update has completed successfully. Although you don't need to do anything else, it always makes sense to restart the server after the installation.
The Rollup 4 update still doesn't give you the best possible support for clients with Windows Vista and Windows 7; remote management of Windows Vista/7 computers will not work.
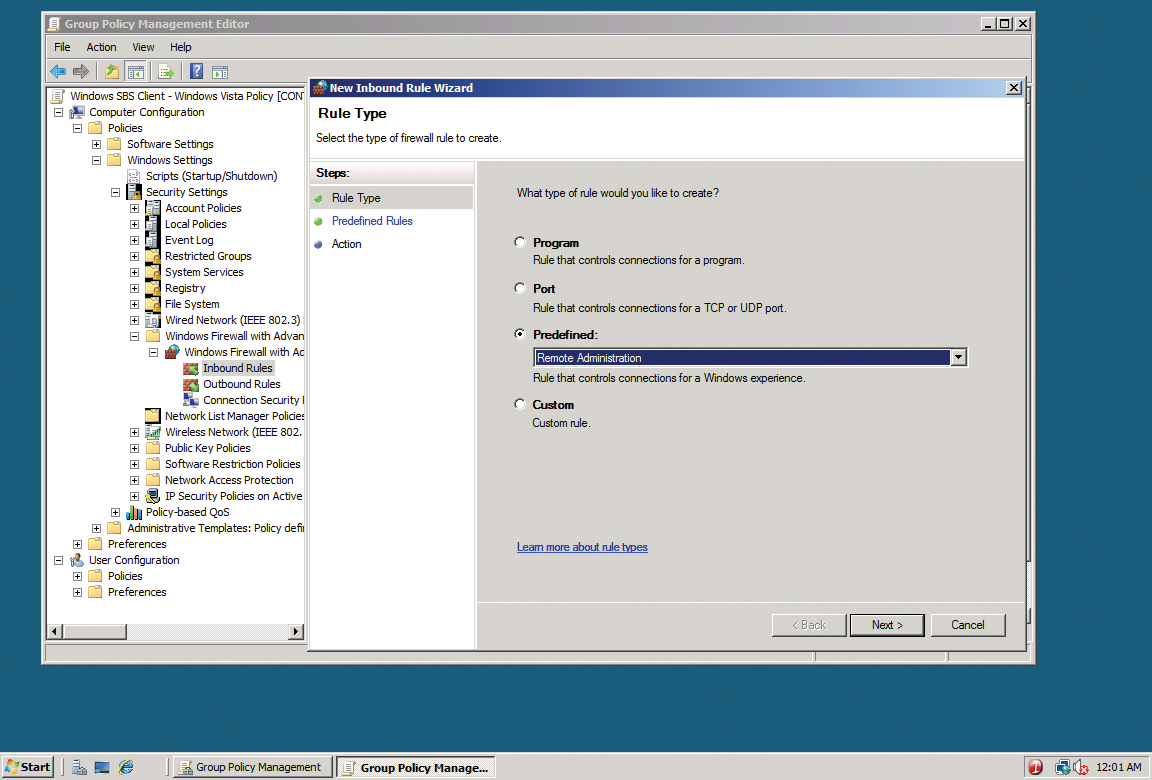
This client security issue can be fixed with a group policy. To do so, open the group policy management tool on the SBS Server and either create a new group policy or edit the Windows SBS Client – Windows Vista Policy. This policy also applies to Windows 7 (Figure 2).
To begin, open the policy manager and navigate to Computer Configuration | Policies | Windows settings | Security Settings | Windows Firewall with Advanced Security | Inbound Rules. Next, create a new firewall rule using the Predefined | Remote Management option. Leave the other settings as they are and make sure that the Allow Connections action is enabled. To enable the rule on the clients, enter gpupdate /force or reboot.
Forefront for Exchange 10.0 with SP2 Rollup 2
During the SBS 2008 installation, you can opt to install a 120-day trial version of the Forefront Security for Exchange virus scanner. Many companies decide to license the virus scanner because it ranks highly in various tests. If you want to update Exchange Server 2007 to the new Service Pack 3 version, you should update Forefront beforehand. To do so, download the latest version of Forefront from the website [3].
During the installation, the installer wizard will stop the info repository and the transport service on the Exchange Server. This means your users will not be able to access their Exchange data or send email during the install.
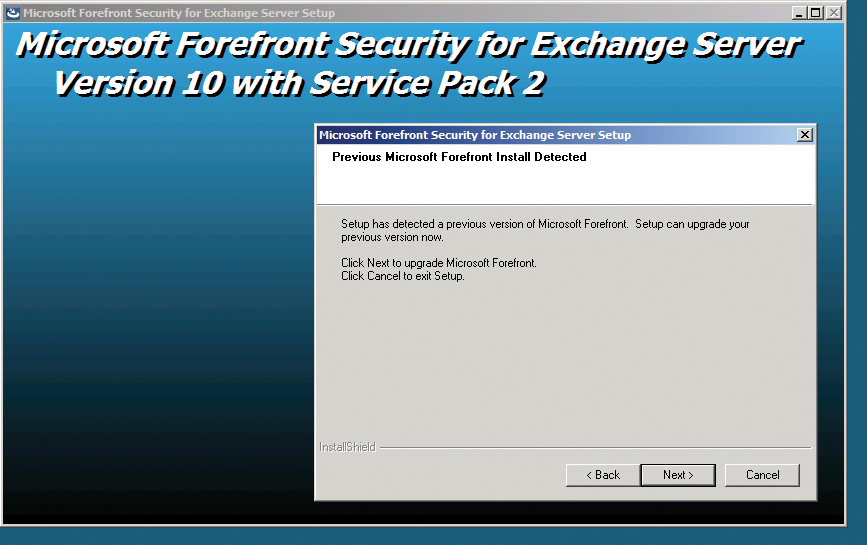
The installer wizard notices that you have an earlier version in place and offers to update it to the latest version. To install Service Pack 2 for Forefront Security for Exchange (FSE), download and launch the installation file and leave the defaults in the installer windows. If the Quarantine security settings page's Secure mode option is selected, FSE will rerun the virus check on any mail the administrator takes from quarantine and delivers to the intended recipient. Leave this option enabled.
The installer wizard then stops a couple of services; after completing the install, you are often required to reboot. After restarting the server, you can use the Forefront Server Security Administrator Console to check the installation. To do so, click on Help | Info. The console and server component versions should be identical, and SP2 should be installed on both.
After installing the service pack, you should also download [4] and install the latest Rollup 2 to resolve issues that still exist after installing SP2 for Forefront. The knowledgebase article also tells you which files the patch replaces.
Double-click to start the Rollup 2 installation; you can request the patch by email on the same page. Make sure you launch the installation program as the administrator via the drop-down menu; otherwise, the installer wizard will cancel the file-extraction process. After unpacking the archive, you can install the patch by double-clicking on the installation file icon. Again, you need to launch the file as the administrator via the drop-down menu.
During the installation, the wizard terminates a couple of Exchange services so that users can't work with their mailboxes while you are updating Forefront (Figure 3). The process only takes a couple of minutes. After the installation, launch the Forefront Server Security Administrator management console and select Help | Info to check that the release is 10.2.0952.0. This is the release status for Forefront Security for Exchange 10 SP2 Rollup 2. After completing the install, you should reboot the server, even if the wizard doesn't actually require you to do so.
Installing Exchange Server 2007 SP3
Microsoft introduced Service Pack 3 (SP3) for Exchange Server 2007 to fix various bugs and provide support for Windows Server 2008 R2. The latter is not really important for SBS 2008, but the bug fixes and service pack optimizations are. SP3 also lets you install the Exchange management tools on Windows 7 and supports a parallel installation with the management tools for Exchange Server 2010.
To begin, download the installation file from the website [5]; the download weighs in at about 1.2GB. Note that SP3 is cumulative; in other words, it contains all the updates provided by SP1, SP2, and all patches up to Update Rollup 3.
Before installing, you should make sure that all of your Exchange applications are compatible with the service pack; you can't uninstall SP3. If you want to uninstall the service pack, you have to reinstall SBS 2008 on the server. Before you update, make sure you have the latest version of Forefront Security for Exchange in place. The first version (RTM) of the antivirus solution is incompatible with Exchange 2007 SP3 (Figure 4). While you are installing the service pack, your users will not be able to work with their Exchange mailboxes.
If you have not installed Forefront Security for Exchange on your server, just omit the steps that relate to Forefront. To begin, launch the service manager on the SBS by typing services.msc in the Start menu search box. In the drop-down menu, you can stop the FSCController system services and the Microsoft Exchange information store and Microsoft Exchange Transport services that depend on them. In the Start menu, right-click on the prompt, select Run as Administrator, and confirm the message from user account control. Now, change directory to
C:\Program Files (X86)\Microsoft Forefront Security\Exchange Server
and enter the command FSCUtility /disable. Because you will need to re-enable Forefront in the same way after installing the service pack, keep this window open.
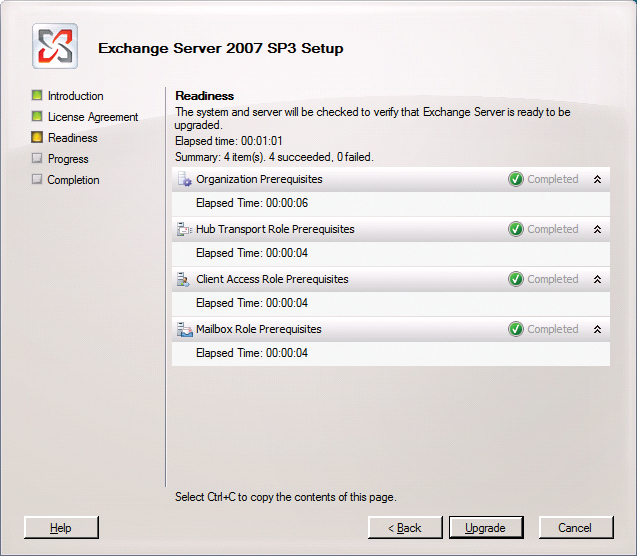
To launch the installation program for Service Pack 3 for Exchange Server 2007, double-click and choose the directory in which you will be unpacking the installation files. In the directory with the installation files, right-click on setup.exe and run the file as administrator. Now select Install Microsoft Exchange Service Pack 3. If you do not have administrative privileges, the installation will output an error message and quit. Confirm the dialogs until the wizard checks to see whether it can perform the update. If the wizard discovers an error preventing the update, you need to fix the error and relaunch the wizard. Once the check completes successfully, you can start updating by clicking on Upgrade.
In some cases, the installation routine outputs an error message and quits. If this is the case, you can click the Repeat button to retry the installation of the corresponding components without having to restart the server. The Exchange Server 2007 installation routine creates its own logfile, which contains all the information concerning the installation. The file is called ExchangeSetup.log and is located in the C:\ExchangeSetupLogs directory. This file is where you can view information that is collected during the installation.
If you need to troubleshoot problems that occur while you are installing Exchange Server 2007 or a service pack, you will want to use the ExchangeSetup.log file to do so. If you do experience problems during the installation, chances are you will find information about the error in this logfile. Then you can enter a description of the error in a search engine to find comprehensive help on the error. The logfiles for the Exchange Server 2007 installation use a cleartext format and can be read with any text editor.
During the installation, you can even access the file if it appears that the server is taking too long to install a particular role. If an error occurs during the installation, the setup program will also write the error to the logfile, which means you can start looking for errors while Exchange is still trying to install the service pack. You will see the errors down at the bottom of the file.
If you enter the error along with the name of the service that is causing it in a search engine, you will very often find a solution to the problem. If the installation creates and issues an error, you will also find a note to this effect, which again can help you with your search.
Finally, you can pop up a command line with administrative privileges and change to the Forefront installation directory. Then, run the FSCUtility /enable command. You might need to stop the three FSCController services and their dependent services – Microsoft Exchange Information Store and Microsoft Exchange Transport – again, because SP3 will have started them. Make sure that FSCUtility /enable doesn't return an error message. Then, you can restart the services manually and check that all three services have started.
In some cases, Outlook Web Access (OWA) or the Remote web desktop (\remote) on the server will not run properly after installing the service pack. These two sides are opened when you type:
https://Servername/owa
or
https://Servername/remote
in your browser. If the page fails to open properly, you will need to change some settings in the Internet Information Service management console (Figure 5) by unfolding the Servername\Sites menu and right-clicking on SBS Web Applications. Then, in the drop-down menu, select Edit bindings and click on https then edit. For SSL Certificate, select the correct certificate for the website. In most cases, the correct choice will be Sites.
SP2 for Windows SharePoint Services 3.0
SBS 2008 includes its own intranet solution known as Companyweb, which is based on version 3.0 of the Windows SharePoint Services, so you should update the server component to the latest version, too. To do so, download SP2 for Windows SharePoint 3.0 [6]. Again, make sure that you choose the correct installation file (i.e., the 64-bit version). The Microsoft Support website [7] has information on the changes. To run the installer, download the installation file, execute it, and confirm that you want to stop the required system services.
If you are unable to access Companyweb after the update, an authentication error might be the problem. In this case, Microsoft recommends reinstalling Update Rollup 4 for SBS 2008 and rebooting the server to fix the problem. The next step is to make sure that the Windows SharePoint Services Search has started and is using the Local Service user account. If this fix doesn't solve the problem, pop up a command line with administrative privileges. Before you enter the necessary command, restart the Windows Internal Database system service and change directory to:
C:\Program Files\Common Files\Microsoft Shared\Web server extensions\12\BIN
If the Windows SharePoint Services Search system service is using an account other than Local Service, you need to enter the command shown in Listing 1.
Listing 1: STSADM.EXE stop
STSADM.EXE -o provisionservice -action stop -servicetype "Microsoft.SharePoint.Search.Administration.SPSearchService,Microsoft.SharePoint.Search,Version=12.0.0.0,Culture=neutral, PublicKeyToken=71e9bce111e9429c" -servicename spsearch
Then, change the login name of the service to Local Service and enter the command shown in Listing 2.
Listing 2: STSADM.EXE start
STSADM.EXE -o provisionservice -action start -servicetype "Microsoft.SharePoint.Search.Administration.SPSearchService,Microsoft.SharePoint.Search,Version=12.0.0.0,Culture=neutral, PublicKeyToken=71e9bce111e9429c" -servicename spsearch
Now enter:
psconfig -cmd upgrade -inplace b2b -wait -force
This approach is also useful for problems that occur after installing the latest security patches for SharePoint, which I will look at in the next section. The command reconfigures your SharePoint Services but without deleting any data or changing any settings. The command can take quite a while to complete. You might also need to run the command multiple times if a single run doesn't work.
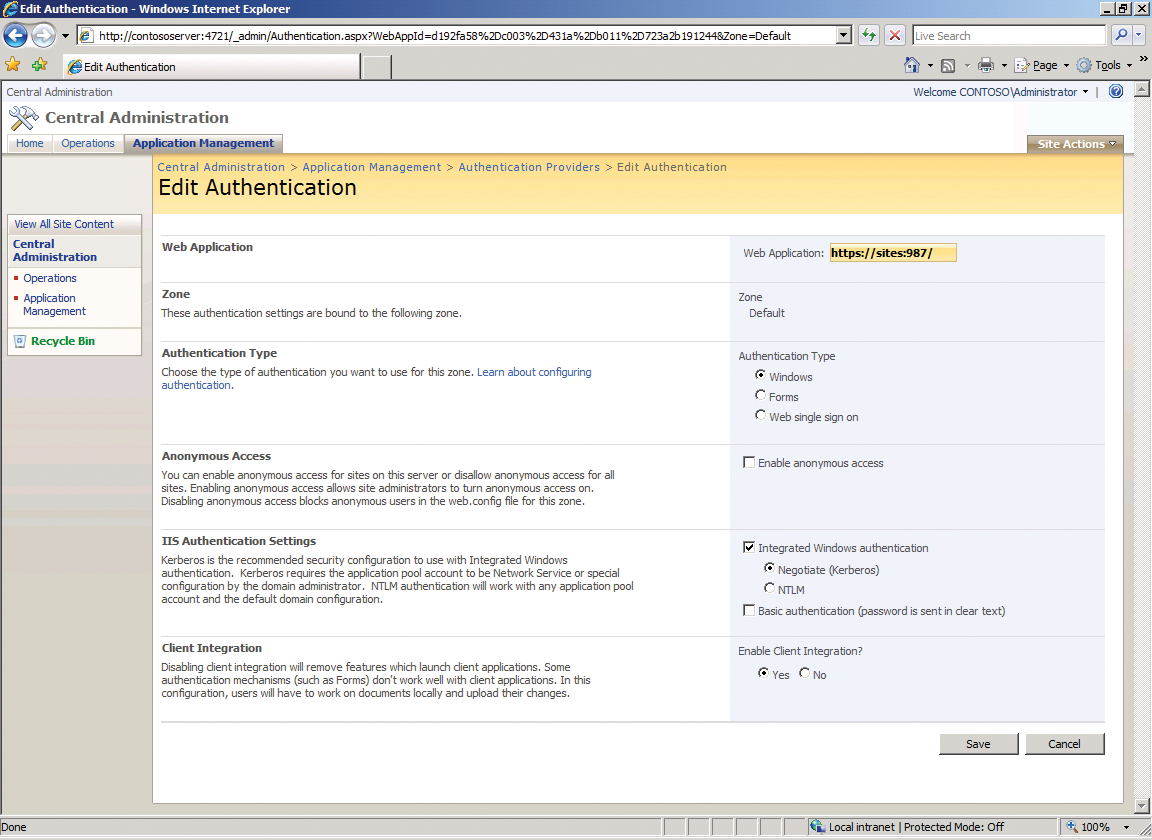
If this fix doesn't work for you, you can modify some settings in the SharePoint management console (Figure 6). To do so, in the Management program group, launch the SharePoint 3.0 central administration tool. Then, select the Application management menu item. In the Application security section, click on the Authentication provider link and select https://sites:987 in the top right below Web application. For the Zone, select Standard, and in the IIS Authentication Settings section, make sure that the options Integrated Windows Authentication and Negotiate (Kerberos) are enabled. After making the changes, click Save.

If this still doesn't fix the problem, you might need to edit the registry on the server by typing regedit in the Start menu search box, navigating to
HKEY_LOCAL_MACHINE\SYSTEM\CurrentControlSet\Control\Lsa\MSV1_0
and right-clicking MSV1_0 before selecting New | Value as a multipart string and naming the entry BackConnectionHostNames.
As the value of the string, assign the fully qualified DNS name with which your users access Companyweb via the Internet. Note that you provided this value when you ran the wizard to set up the Internet connection for SBS (e.g., remote.contoso.com). To finish, close the Registry Editor and restart the IIS management service.
If this still doesn't help, you will find a posting in the SBS developers' blog with various potential solutions relating to the database [8].
Besides SP2, Microsoft also recommends installation of the security patch, also available on the website [9]. The patch resolves security issues concerning SharePoint privileges. Additionally, you should download the update from the site [10] and run the installation. After the installation, you might experience problems with Companyweb. To resolve these issues, follow the procedure for the installation of SP2 for SharePoint Services 3.0.
Enabling Automatic Updates
On an SBS Server, automating the installation of critical Microsoft updates makes sense. To do so, click on Start | All Programs | Windows Update and Change settings. Make sure that the Give me updates for Microsoft products… checkbox in the Microsoft Update section is clicked to ensure that the Update wizard finds the required updates.
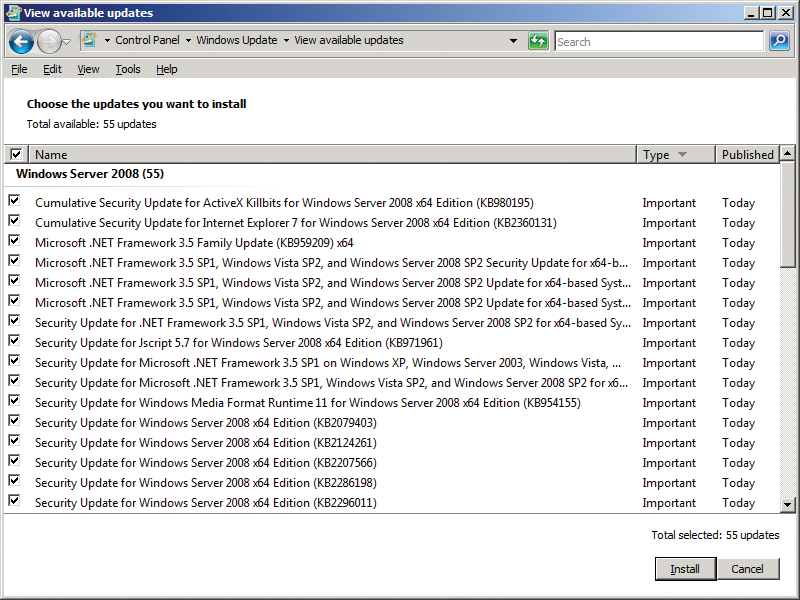
To update the server for the first time, you will need to click on Check for updates and install the updates that the wizard suggests. Note that the SBS Server will not search for updates on the Internet but will use the integrated update services on the server. Following the installation, or to update at any time, you can search the Microsoft servers directly via the Check for Microsoft Updates Online link and install any resulting updates (Figure 7).
Next, you should install all the patches and select any optional patches that you would like to install. Note that a patch installation of this kind can easily involve several hundred megabytes of data and include up to 50 patches. Because all of these patches improve the security and performance of your system, installing them is a very good idea. After installing patches, you should also repeat the search. In many cases, the wizard will then discover additional patches.
The server is not totally up to date until the search fails to return any results. As a general rule, you should check various SBS websites [11] [12] [13] on a regular basis because they always have the latest information and how-tos for Microsoft's Small Business Server.
