
Igel thin clients
Lean Machine
Germany's Igel Technology GmbH has distributed thin clients for many years and is regarded as one of the market's driving forces. Customers can choose from a variety of hardware configurations with different feature scopes. Additionally, Igel offers the Universal Desktop Converter, which converts normal desktops into thin clients.
Besides the different hardware, you can also choose from three different operating systems:
- Igel Linux
- Windows Embedded Standard
- Windows Embedded CE
The Igel Linux and Windows Embedded Standard operating systems are also available with Entry, Standard, and Advanced firmware. Only the first two variants are available with the Windows Embedded CE operating system; the Advanced version is not available.
The difference between the individual packages is the functional scope. The standard protocols for terminal services, RDP and ICA, are available in all of these versions. For Citrix XenDesktop or VMware View and many other protocols, users need the more advanced packages.
In addition to the protocols for remote services, depending on the version, the clients might also have local applications like PDF Reader, SAP GUI, or a media player. The vendor homepage provides a complete overview of the different versions [1].
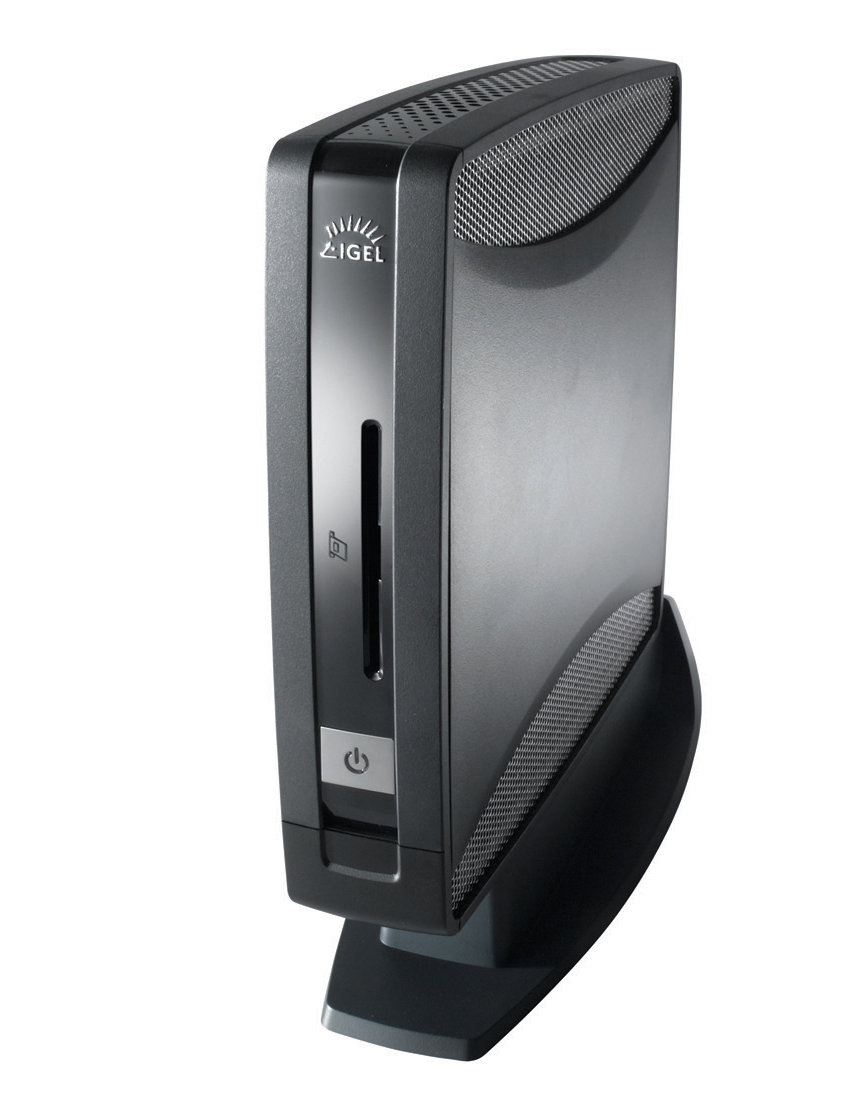
All Igel thin clients (e.g., Figure 1) can be managed in a standardized management console, the Igel Universal Management Suite (Igel UMS). This tool, which is supplied free of charge to customers, is currently available as version 3.06 for Windows and Linux.
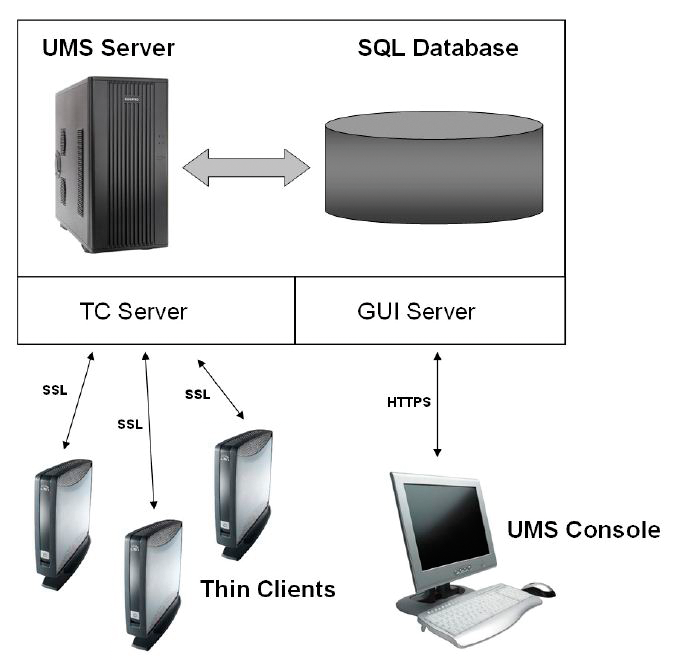
The Universal Management Suite is composed of the following components:
- Igel UMS Server: The server component, which accesses a database system.
- Igel UMS Administrator: A setup tool for installing and configuring the UMS servers.
- Igel UMS Console: The client component, which provides a graphical management interface for Igel UMS functions (Figure 2).
Igel UMS is absolutely essential for mid-sized to large environments that deploy Igel thin clients. The tool helps administrators configure clients and roll out firmware and also offers remote management and diagnostic options for support.
The settings for the individual thin clients are established with the use of a profile. Profiles contain complete or partial configurations (Figure 3), which administrators can assign to one or multiple thin clients or thin client directories. A thin client can receive its configuration from multiple profiles that may be assigned directly or indirectly.
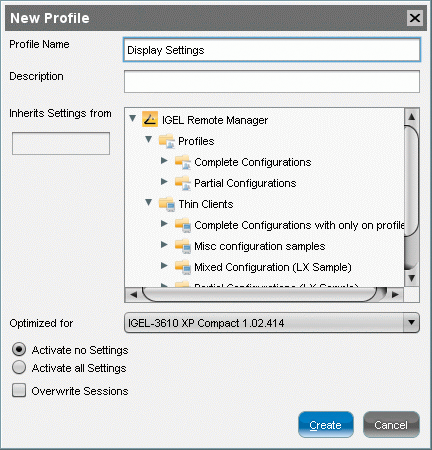
Administrators need to create profiles for specific firmware versions, because the options in the individual versions might differ.
Installation
Installing Igel UMS on Windows is simple. After downloading the latest version from the vendor website [2] and launching the EXE file, the wizard guides you through the process. Typically, accept all the defaults without making any manual changes to the values and settings. When you install on a Windows server, you have the following choices:
- Standard installation
- Installation with external database
- Console-only installation
In most cases, the standard installation will be the correct choice. On a Windows client operating system, you can only install the console, and you are not offered a choice. After querying for the installation type, you need to specify the credentials for accessing the database. Igel UMS supports external databases from Oracle, MS SQL, and PostgreSQL. By default, UMS will use its own integrated Apache Derby database.
After completing the installation, you can launch the UMS console via the link. The first time you log in, you'll need to supply the username and password you used to install the database user account.
The console window that appears is divided into multiple panels. At the top is a menu and taskbar; objects are on the left (Profiles, Thin Clients, etc.), organized in a tree structure. On the right, you will see details of the currently selected object and an event history below (Figure 4).
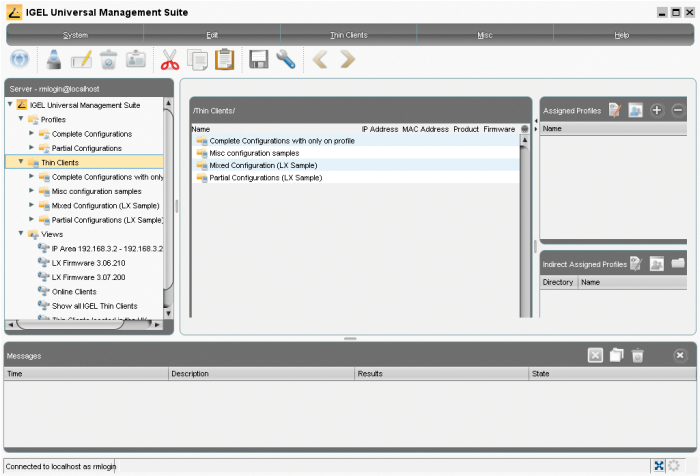
The first thing to do is access the System menu and select the Administrator accounts option to create a new user. You also have the option of assigning privileges to groups or at individual user level.
Entering New Thin Clients
Before you can start managing your own Igel thin clients in the Igel UMS, you will probably want to think about how you will be assigning profiles to the individual thin clients. Storing the thin clients in different folders and applying profiles to these folders is a good idea because profile assignments are inherited by subfolders.
The first question you need to ask is: What are the differences between the individual thin client configurations? The differences typically relate to screen resolutions because you probably will not have identical displays at each desk.
In this case, you will need to create a profile to define the default settings. You can assign this profile to the first folder in the tree structure and then create more subfolders below this level, to which you assign additional profiles to modify the resolution (Figure 5).
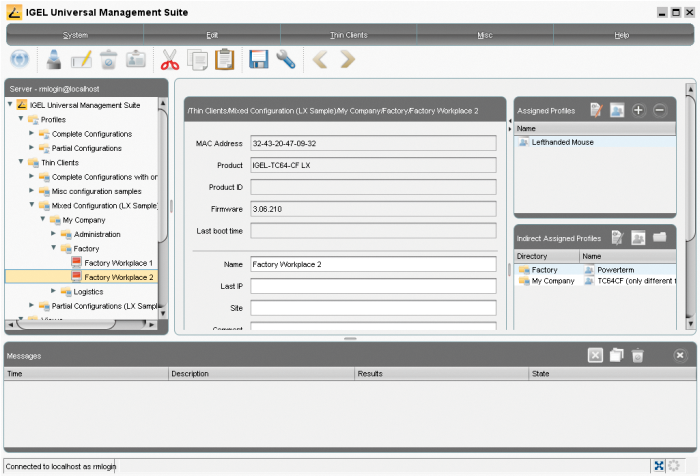
Thanks to this structure, you only need to move the thin clients to the correct folder to apply the correct settings. Alternatively, you can assign profiles manually to every single thin client.
Besides the screen resolution, thin clients can also differ with respect to the hardware or other settings – for example, special session types. In this case, you would need to create another profile, which you would then assign to individual thin clients or folders.
Once you have a basic framework with which to organize the thin clients, you only need a workflow for entering new clients in Igel UMS. Likely, you will not take delivery of a single thin client; rather, you will probably need to deal with a number of units at once. Thus, you should put some thought into accelerating the data entry process.
All that Igel UMS really needs is the MAC address of the client to add it to the database. As the administrator, you will probably prefer to have more information than this, including the hostname or inventory number, to help you keep track of things.
You have several options for registering thin clients on the UMS server, including:
- Scanning the network
- Importing from the thin clients (MAC address list)
- Manual registration of thin clients on UMS
- Automatic registration of new thin clients
Administrators in large environments will probably prefer to automate this kind of process whenever possible. At first glance, you would probably choose automatic registration of new thin clients.
To pass the Igel UMS Server IP address into the clients, you can either use DHCP option 224 or create a DNS entry for igelrmserver. If you need a manual registration option, you will still need one of these two options to allow the client to find the UMS server on the network.
For the automated variant, you need to specify in Igel UMS Administrator that any thin client that boots on the network will be registered automatically without requiring a certificate. This option poses a security risk, and you might thus prefer to enable it temporarily, or not at all.
The import option gives you a more useful approach to adding thin clients at the management console quickly. For single-click mass registration of your thin clients, you can use a CSV file. The import function also supports a number of parameters, such as the location, a department, a comment, or an inventory number. The only two mandatory options are MAC address and name.
To keep the CSV file creation process simple and intuitive, you can use a spreadsheet (like Excel or OpenOffice Calc). Of course, you could do this manually with a text editor if you prefer. You might even be able to export the data that you need from your inventory software.
The Igel UMS import function offers another benefit: You can immediately assign the new devices to the required folders after completing the import process. This step saves the need to move the devices manually and assign configuration profiles. Alternatively, UMS provides the option of creating rules that assign clients to default directories. The criteria include the IP address, name, product name, netmask, or firmware version.
Automatic DNS Updates
If you additionally want to assign hostnames to your thin clients (e.g., based on the inventory number), you can create reservations on your DHCP server to automatically set the hostnames in your DNS. To automate this process on a Windows DHCP server, you can use the netsh command. To create a new reservation, just issue the following:
netsh dhcp server scope 10.10.0.0 add reservedip 10.10.47.11 00E0C0E0B0B0 PC4711.contoso.msft
In this command, scope 10.10.0.0 refers to the configured DHCP scope. reservedip 10.10.47.11 is the IP address you want to reserve in DHCP for the MAC address, 00E0C0E0B0B0, that follows it, with a reservation name of PC4711.contoso.msft.
Of course, you will need to modify these values to match your own infrastructure. For example, you will need to replace contoso.msft in the reservation name with your own domain.The following command sets DHCP option 12 with a value of PC4711.contoso.msft for the reservation just created for the IP address 10.10.47.11. Option 12 is the hostname. The client later automatically picks this up.
netsh dhcp server scope 10.10.0.0 set reservedoptionvalue 10.10.47.11 12 STRING "PC4711.contoso.msft"
For both reservation names and hostnames, you must use the fully qualified domain name (FQDN); otherwise the A record will not be entered in the domain's DNS zone.
For the previous commands, you should compose the individual options in a spreadsheet so that you can easily duplicate the individual command lines. Alternatively, you could write a script to generate the required commands automatically.
If you use Windows DNS and DHCP servers, you need to set the Dynamically update DNS A and PTR records for DHCP clients that do not request for updates (e.g., clients that are running Windows NT 4.0) option in the DHCP server properties.
This option is necessary because Igel Linux thin clients can't contact the DNS server for the domain directly; rather, they use the DHCP server to request DNS record updates [3].
Backup
If you use the integrated Apache Derby database, the Igel Administrator lets you quickly create a manual backup of the database.
Unfortunately, no option is available for automating the backup to run it, say, once a day, but a workaround that uses Windows scheduling can be specified with the following command line:
C:\Program\Igel\RemoteManager\rmadmin\embackup.exe -b C:\DataBackup\backup.embak
The -b parameter lets you specify the path in which to store the backup.
Firmware Updates
Igel UMS has an option for automatically installing firmware updates. To do this, you first need to provision the firmware files on your enterprise network, preferably on an FTP server. Then you define the target FTP server in a profile below System | Update | Firmware Update.
To install the new update automatically on the thin clients, you need to create a new view at the Igel UMS console and then select the clients for the update in the view (Figure 6).
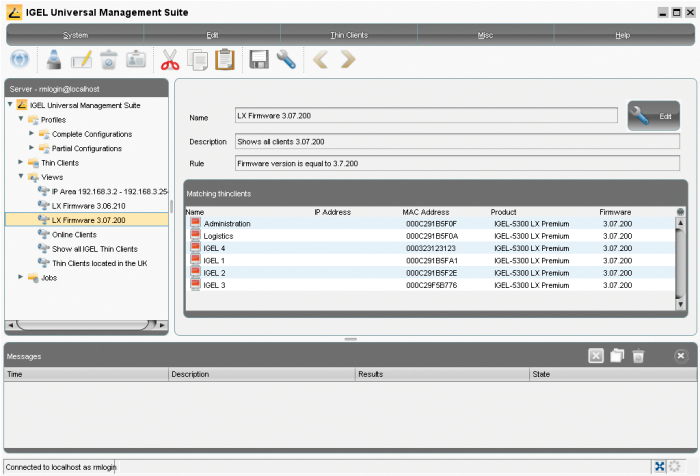
To make sure the firmware update only runs if it has not been implemented successfully in a previous attempt, you should select Firmware Version as the search parameter.
If the current version number is, say, 4.04.100, you would specify that clients with a firmware version less than 4.04.100 need an update. Theoretically, you could use many other search parameters or combinations thereof.
The next step is to create a new task with the Update on reboot command. Then, you can select the new view you created to assign the command to it. This setting launches the firmware update on any thin client that boots with a firmware version less than 4.04.100.
After completing the update, the update process will not launch on the next boot. The firmware update takes just a couple of seconds, then the client reboots and users can go on with their daily work.
At the time of writing, a view is always a static selection. If you add clients to UMS that match the criteria for the view, they will not be added automatically.
Conclusions
The Universal Management Suite by thin client manufacturer Igel is an extremely useful solution for centralized management and administration of Igel devices. Without a solution of this kind, the overhead of running thin clients in a larger environment would be enormous.
If you put sufficient thought into your internal structures and requirements up front, Igel UMS will definitely help reduce administrative overhead in the future.
Igel UMS not only helps you configure the devices, it is a mature tool for many recurring tasks, such as remote management or diagnostics.
