
Targeted defense against brute force attacks
Goalkeeper
To protect your system, sshguard takes a simple and effective approach, similar to that of a small intrusion detection system. The tool continually monitors logfiles for selected services. If it discovers questionable network access, it temporarily blocks the presumed attacker by introducing firewall rules (Figure 1).
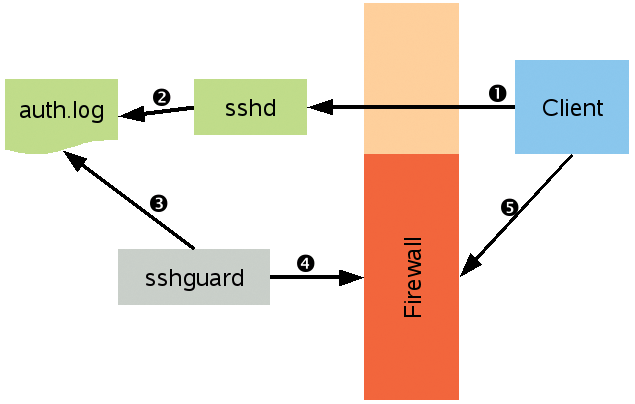
If the attacker doesn't stop at this point, sshguard will block the connection for increasingly long periods. This intelligent strategy has the advantage of not accidentally locking out forgetful users, and it provides effective protection against automated password crackers.
The Usual Suspects
As the name suggests, sshguard was originally designed to monitor failed SSH login attempts. But now, it can help you with any of the services listed in the "Supported Services" box. For other services, you can send attack patterns to the developers on a special contact form; the developers will then add the attack pattern to a future version [1]. The sshguard tool also speaks IPv6, is released under the BSD license, is easy to set up, and works without a configuration file.
The sshguard tool is a tiny C program that runs on Linux and other operating systems with Unix underpinnings, including Mac OS X, various flavors of BSD, Solaris, and AIX. Some major Linux distributions even include it in their repositories, although it is the older version 1.4; you can get the improved 1.5 version from the sshguard website [2].
When this magazine went to press, the latest version was a release candidate, but the final version should now be available. Because version 1.5 further simplifies the configuration, and the sshguard website recommends it for all users, in this article, I will focus on version 1.5 while working with Linux Debian 5.0.7, Ubuntu 10.10, and openSUSE 11.3. If you don't use Linux, check out the "Other Operating Systems" box.
Tabelle 1: configure Command by OS
|
Operating System |
Firewall |
Command |
|
AIX |
AIX Firewall |
|
|
Linux |
netfilter/iptables |
|
|
Mac OS X, FreeBSD |
FreeBSD IP Firewall |
|
|
Various BSDs |
OpenBSD Packet Filter |
|
|
Other |
TCP Wrapper |
|
Prebuilt
To build and install the current version of sshguard, you first need to install the GNU C Compiler (which is typically found in the gcc package), GNU make (make package), and autoconf. Once you have installed these packages, go to the sshguard website and look for the download section. There, go to the FROM SOURCES header and grab the latest release [1]. After unpacking the archive, run the configure script to configure the package; you need the following parameters for Linux
./configure --with-firewall=iptables
and will probably want to monitor the output. If configure complains about not finding iptables, you need to supply the path to this tool. Normally, it's located in /usr/sbin:
./configure --with-firewall=iptables --with-iptables=/usr/sbin
On openSUSE 11.3 and Debian, the iptables command requires root user access. For this reason, you will need to be the administrator to compile and set up the program. The sudo command is not sufficient for this process.
If you have openSUSE 11.3, the configure parameter --prefix=/usr will put the built version of sshguard in the search path for root:
./configure --with-firewall=iptables --prefix=/usr
Unless configure reports an issue, you can do:
make
sudo make install
to build and install sshguard.
Reinforced Firewall
Before you can run sshguard, you need to prepare a firewall on Linux. To do so, create a new chain to which sshguard will later add its own rules:
sudo iptables -N sshguard
sudo ip6tables -N sshguard
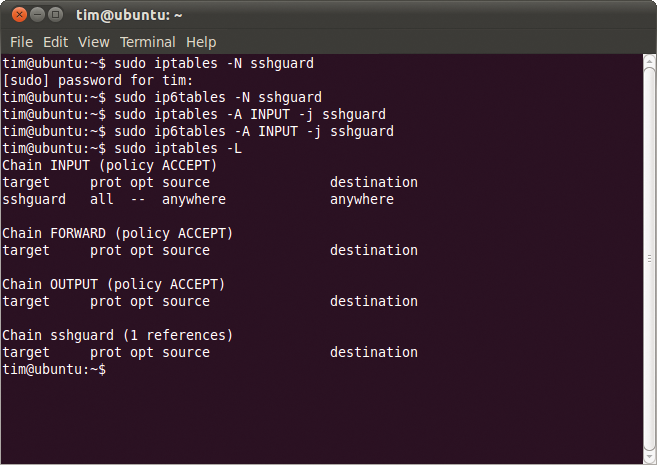
The second command handles IPv6 packets. The next step is to extend the input chain so that network traffic is routed through the sshguard chain (Figure 2):
sudo iptables -A INPUT -j sshguard
sudo ip6tables -A INPUT -j sshguard
If you want to protect only specific ports with sshguard, you can use the --destination-ports parameter to find them. For example,
sudo iptables -A INPUT -m multiport -p tcp --destination-ports 21,22 -j sshguard
would block only the services running on ports 21 and 22 (FTP and SSH by default).
If you have created your own firewall rules, or if you're using any other distribution, you need to make sure you don't have a default allow rule that allows packets to pass somewhere farther down the chain. Also, make sure you don't have a default deny rule that discards all packets.
Quirky Chameleon
If you have the newly installed version of Debian or Ubuntu, your installation is complete. But openSUSE 1.3 again does its own thing with SUSE Firewall2. Users with this distribution will need to add the commands listed previously to the configuration files.
To do this, open the /etc/sysconfig/scripts/SuSEfirewall2-custom file in a text editor. Then, insert the following line in front of true in the fw_custom_before_port_handling section:
iptables -N sshguard
Then, in the section fw_custom_before_denyall, add the following line in front of true:
iptables -A INPUT -j sshguard
Next, you need to remove the pound sign # at the start of the following line in /etc/sysconfig/SuSEfirewall2,
FW_CUSTOMRULES="/etc/sysconfig/scripts/SuSEfirewall2-custom"
and insert a pound sign in front of:
FW_CUSTOMRULES=""
Finally, restart your firewall:
/etc/init.d/SuSEfirewall2_init restart
Changes introduced by the iptables command survive only until the next reboot. How you store them depends on your choice of Linux distribution. On Ubuntu and Debian, you can use the iptables-save and iptables-restore commands (a comprehensive guide to this is available a couple of places [4] [5]). On openSUSE, you just need to define the entries in the configuration files.
Vacuum Cleaner
Log Sucker was introduced in version 1.5 of sshguard. This intelligent component monitors the logs passed into it and automatically parses any lines that are added. The logs can either be stored in files or written to sshguard using FIFO. The Log Sucker reads logfiles and identifies the formats of Syslog, Syslog-NG, Metalog, Multilog, and any formats written by the services that are supported directly (raw format). If needed, it will monitor multiple logfiles at the same time, and it can also handle round-robin and temporary logfiles (see the "Log Validation" box).
With Log Sucker, the complicated configuration in previous versions of sshguard is unnecessary. In earlier versions, Syslog and the like had to be set up to forward their logs to sshguard. Now, you just need to find out which file is used to store the log data for the supported services. On Debian and Ubuntu, for example, messages concerning failed SSH logins are sent to /var/log/auth.log, whereas openSUSE 11.3 collects them in /var/log/messages. You can pass on the full path to the logfile with the -l parameter:
sudo sshguard -l /var/log/auth.log
This command tells the program to keep an eye on auth.log, which means it automatically also detects failed SSH logins. If the numbers start to become too large, sshguard will set up a firewall rule to stop this. If other services also store their log data in auth.log, sshguard will take this into account. In other words, you don't need to configure FTP and the like separately.
If you want sshguard to monitor multiple logfiles, just add corresponding -l parameters with the paths. You can use the hyphen:
sudo sshguard -l /var/log/auth.log -l -
to feed data to the tool via standard input.
Testing, Testing
At this point, you can check to see whether your blockade is working properly. In the following section, I'll look at an example based on SSH; the other services monitored by sshguard use the same principle. Because Debian and Ubuntu don't run the SSH daemon by default, you might also need to install openssh-server to follow the examples.
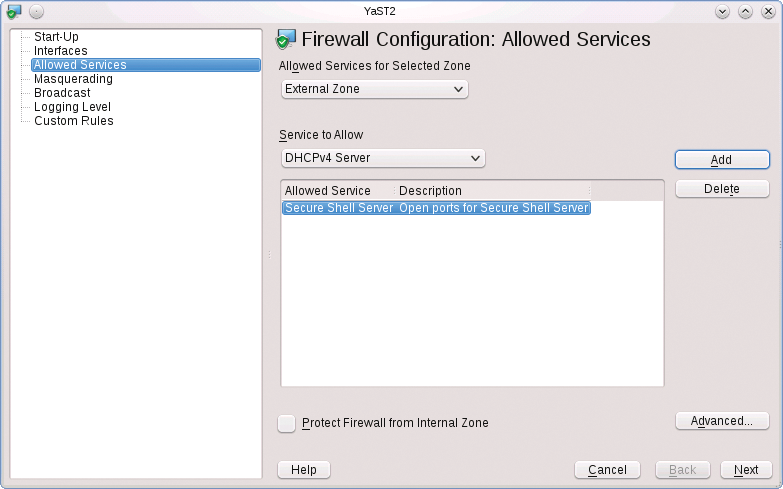
Although openSUSE installs sshd, it blocks access with its own firewall. To allow access, you need to become root and then in YaST go to the Security and users section, find the entry for Firewall, and, in the window shown in Figure 3, go to the Allowed services. There, select Secure Shell-Server | Add. After completing these steps, restart the SSH daemon:
sudo /etc/init.d/sshd start
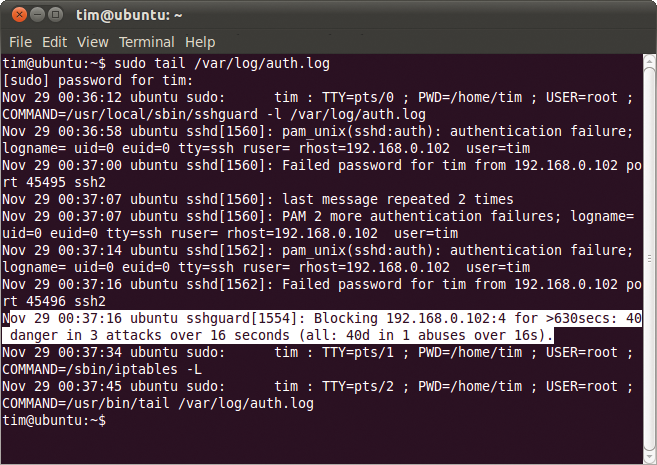
To test sshguard, you can use SSH on another machine to log in deliberately multiple times with the wrong password. After five login attempts, sshguard blocks are applied for a couple of seconds and the tool logs this action in the corresponding logfile – for Debian and Ubuntu, in /var/log/auth.log, and for openSUSE, in /var/log/messages (Figure 4).
Additionally, sudo ipconfig -L shows a new firewall rule that blocks the SSH client computer (Figure 5). From the client's point of view, it appears that the server is no longer responding to requests or that the connection is down.
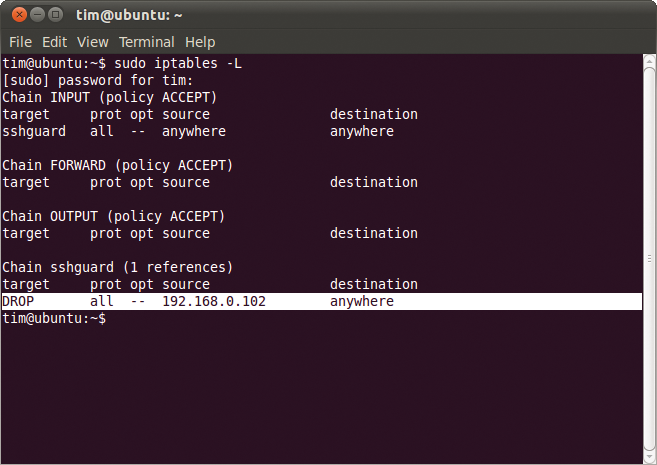
The more often you fail to log in, the longer the interruption will be. At some stage, you will reach a level that represents a more or less permanent block. This approach removes the need for a blacklist of IP addresses. If you would like to tinker with the times to delay, check out the "Action" box.
When sshguard identifies an attack, it creates a new firewall rule to block the attacker's IP address for the service they targeted. If somebody repeatedly tries to login via SSH, they could still attempt to log in via FTP even though SSH is blocked. In an extreme case, an attacker would gradually lock himself out of all services and access types.
Whitelist
The way sshguard works means that authorized users have enough attempts to remember their password. If you want to exclude some machines on a secure LAN from monitoring, you can pass the IP address to sshguard with the use of the -w parameter:
sudo sshguard -l /var/log/auth.log -w 192.168.0.101
In this example, the computer with the IP address corresponding to 192.168.0.101 is put on an internal whitelist and is allowed to make an infinite number of invalid login attempts.
To put multiple addresses on your whitelist, just add more -w options:
sudo sshguard -l /var/log/auth.log -w 192.168.0.101 -w 192.168.0.102 -w 192.168.0.103
You can use CIDR notation for an address range. The following example puts the IP addresses between 192.168.0.1 and 192.168.0.255 on the whitelist:
sudo sshguard -l /var/log/auth.log -w 192.168.0/24
Alternatively, you can do this with hostnames.
sudo sshguard -l /var/log/auth.log -w friend.example.com
The preceding command puts all the IP addresses that resolve to the DNS name friend.example.com on the list.
If you have a large LAN, the sshguard command can quickly become difficult to understand. For this reason, administrators can store all of their whitelist addresses in a text file. Each line of the file must contain an IP address, an address range in CIDR notation, or a domain name. The tool ignores lines that start with a pound sign. Listing 1 shows an example of a whitelist file.
Listing 1: Whitelist Example
01 # Edith and Joe's computers:
02 192.168.0.101
03 192.168.0.102
04 # The LAN in the Development dept.:
05 192.168.0/24
06 # Our branch offices:
07
08 branch1.example.com
09 branch2.example.com
Assuming the file is called whitelist.txt, you would pass it in to sshguard using -w:
sudo sshguard -l /var/log/auth.log -w /etc/whitelist.txt -w 192.168.0.103
As the example shows, you can still pass in other addresses at the same time.
Conclusions
Sshguard effectively prevents brute force attacks – no more, and no less. The list of supported services is still fairly short. Thus, the tool can't claim to replace a full-fledged intrusion detection system; however, it is a useful supplement.
Sshguard impresses with its simple and fast installation, assuming you don't get lost somewhere in your own firewall rules.
