
Open source remote access to Windows
Free for All
A large university was recently in a bind. They needed to become PCI compliant, which meant securing remote access to their Windows servers with two-factor authentication.
Most Windows-based remote access solutions that support two-factor authentication are quite costly, even for a relatively small number of users. Times are tight all around, especially for public institutions like this university, so this organization turned to an open source remote access solution, FreeNX, and the WiKID Strong Authentication System for two-factor authentication.
The WiKID system [1] is a dual-source, two-factor authentication solution that combines public key encryption embedded in software tokens and PINs to create a cost-effective, secure, one-time password system. With this setup, users start the WiKID token on their PC or wireless device and enter their PIN, which is encrypted and sent to the WiKID server behind the corporate firewall. If the PIN is correct (knowledge of PIN is one factor) and the encryption is valid (possession of the private key is the second factor), then the one-time passcode is generated on the server, encrypted, and returned to the user. The server comes in an ISO or RPM version.
Fast Access
FreeNX [2] is a great remote access program. It uses the NX protocol, which was released by NoMachine [3] as open source. According to the FreeNX website, the product "provides near local speed application responsiveness over high latency, low bandwidth links." And, it's right; FreeNX is very fast. It is tunneled through SSH, uses PAM for authentication, and supports VNC, Remote X, Session Shadowing, and RDP. Thus, FreeNX is the ideal solution for this use case.
Before you get started, the Windows servers will need VNC on them. In the past, I have used RealVNC's Personal Edition [4]. No reconfiguration was required in this example, so I have not documented that process here.
Also, both the WiKID server and your FreeNX server should be in the DMZ, with one NIC accepting connections from the Internet for client connections and the other configured for LAN access to exchange authentication requests and VNC connections, respectively.
Configuring the WiKID Server
Here's how the process works: When users want access to a remote desktop, they will start the NX client and enter their WiKID one-time passcode and username. Users then receive the one-time passcode on their WiKID token and enter it into the password prompt. SSH will route the username and one-time password to the WiKID server via PAM RADIUS. If the username and one-time password match, the server will tell SSH to grant access.
The NX client will then send the VNC password to the target VNC box.
On the WiKID server, you will need to add the SSH/FreeNX box to the WiKID Strong Authentication Server as a network client, then configure PAM RADIUS on the SSH/FreeNX server. I assume you have already configured the WiKID server. More information on how to install and configure WiKID can be found on the website.
You can start by creating a domain for remote access users. To do this, log into the WiKID server web interface (http://yourwikidserver/WiKIDAdmin). Then, click on Domains | Create a New Domain.
Next, fill in the form for a new domain. Note that you should leave Registered URL blank – that is just for SSL-based mutual authentication. Also, do not check Use TACACS+, Require Locked Tokens, Require Wireless Tokens, or Use TACACS+ at this time.
The Passcode lifetime field should be set long enough to allow the user to log in. The default is 60 seconds, but you can increase it. The default PIN length is six digits, but you can change that as well. Device Domain Name is what the user sees on the token client. It can be the same as the internal domain name or different. So, you can have a internal name such as "Extra Painful Users" that shows up as "VIP VPN" on the token.
Next, click the Create button. Then, add a new RADIUS network client to the WiKID server that points to your SSH/FreeNX server. To do so, select Network Clients | Create New Network Client.
Here, you can fill in the requested information. For the IP address, use the SSH/FreeNX server IP address. For protocol, select RADIUS, then click the Add button. On the next page, you will enter a shared secret, but do not enter anything into the Return Attribute box.
Now, from the terminal or via SSH, you can run wikidctl restart to load the network client into the built-in WiKID RADIUS server.
That's it for the WiKID server. You can add users manually as the administrator. Or, you can set up scripts in a secure location (e.g., your LAN) to allow users to add their own tokens, which makes life a lot easier for the administrator.
Configuring FreeNX
FreeNX is available in most repositories. I'm installing it on CentOS 5 using the following command:
yum install freenx
FreeNX uses the SSH PAM module for authentication, so you'll need to configure SSH to use RADIUS.
To begin, however, you'll need to install PAM RADIUS [5].
Download the TAR file (as of this writing, 1.3.17 was the latest) from the website. Then, untar the file, run make, and copy the resulting shared library to /lib/security:
$ sudo cp pam_radius_auth.so /lib/security/
Next, edit /etc/pam.d/sshd to allow RADIUS authentication. Note that distributions of Linux have different pam.d file formats. Please check with your distribution for specific suggestions. These instructions work for Fedora, Red Hat, and CentOS.
vi /etc/pam.d/sshd
Go to the second line of the file and insert:
auth     required
      /lib/security/pam_radius_auth.so
just above this line:
auth     required
      pam_stack.so service=system-auth
The "Required" tag requires two-factor authentication. Because you're only editing the sshd file, it will not affect terminal logins.
Next, you can write the file and quit. Then, edit or create your /etc/raddb/server file:
vi /etc/raddb/server
Next, below the line
127.0.0.1 secret 1
add
routableIPaddress shared_secret 1
substituting the IP address of the WiKID server.
Configuring the WiKID Token Client
If you haven't already done so, you can download a copy of the WiKID open source token client. The first time you launch the token client, you need to create a passphrase. Once the program is launched, select Actions | Create New Domain.
There, you will be asked to enter the 12-digit domain identifier, and the public key will be sent to the WiKID server.
You will be prompted to enter and verify a PIN. The WiKID server will store the PIN and return a registration code, which is used to associate the account with a user (Figure 1).
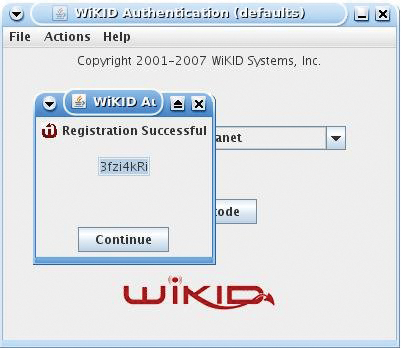
At this point, the account has been created on the WiKID server, but it is not yet active. To activate it and associate the token client with a user, go to the WiKIDAdmin users page and click on Manually Validate a User.
You will see the registration code listed. Click on it and type in a username. Users can also validate themselves based on existing trusted credentials. The WiKID server comes with scripts that allow users to register based on Active Directory credentials, for example.
Configuring the NX Client
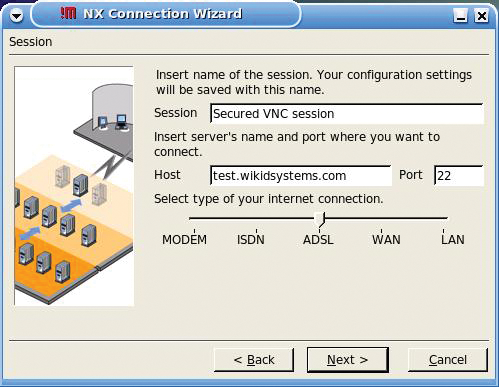
Although the screen shots shown here are from Linux, the setup for Windows is very similar. To begin, start the NX Connection Wizard (Figure 2). Create a name for the session and enter the IP address or name of the SSH/FreeNX server.
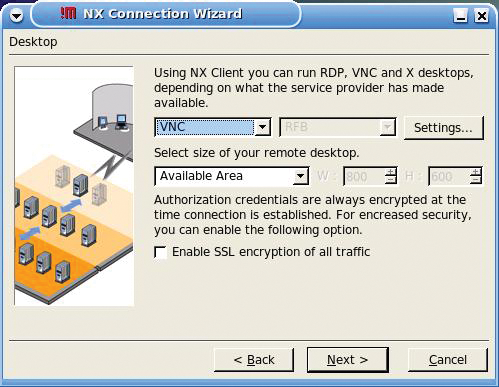
Click Next and select VNC as the connection method (Figure 3). Then, enter the internally routable IP address target PC and the VNC password (Figure 4).
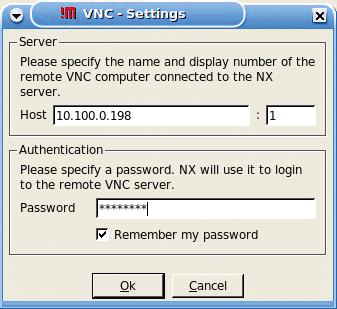
Remember that this connection is between the NX server and the target VNC box – it should occur inside your firewall. Next, you can select Create a short cut on the Desktop and Finish.
Testing the Setup
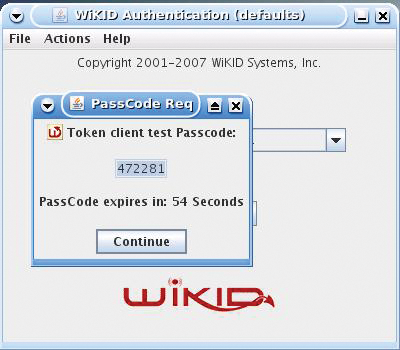
To test your setup, you can start the WiKID Token client, select the domain you created, and enter your PIN. You will get a WiKID one-time passcode back (Figure 5).
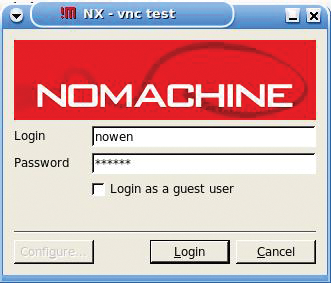
Next, enter the WiKID one-time passcode into the NX client password box (Figure 6), and you will see NX connecting. After the authentication process, NX will launch, giving you a secured, strongly authenticated VNC session.
Security always involves trade-offs, and it's never perfect. However, here I have combined the speed of NX with the security of SSH tunnels and Linux to quickly and inexpensively meet a tough PCI requirement.
Needless to say, a similar setup can deliver remote desktop access for all your users. FreeNX also offers RDP, remote X, and desktop shadowing. FreeNX development appears to have stalled, but NoMachine offers a commercial package and a free version for two users.
