
Managing VHD devices
Disk World
Since it was released in 2009, Windows 7 has received fairly good marks – it's certainly proven superior to the unfortunate Vista. One notable new feature is the hard disk management program's ability to handle virtual hard disks on Windows 7.
Virtual hard disks (VHDs) traditionally use the VHD format in the Windows world and are simply container files on the host filesystem. The VHD format is also used by Microsoft's Virtual PC and the Hyper-V component of Windows Server 2008, which means you can use a VHD file that you set up on Windows 7 in Virtual PC or Hyper-V. The option of booting from a virtual hard disk seems even more interesting, but Microsoft doesn't give you that for free.
Utility Value
The advantage of VHD files at the Windows 7 system level is that you can easily back up and manage virtual hard disks because they are simply files on the host system. And, compared with physical hard disks or partitions, there are virtually no disadvantages; the read and write performance is typically just a couple of notches down from that of physical access.
Unfortunately, the sleep features and Microsoft's BitLocker hard disk encryption do not work with VHD files. The biggest benefit of VHD files is that you can actually boot Windows 7 from a VHD drive, which gives administrators intriguing options for enterprise-wide deployment of Windows 7 installations.
Windows 7 can be configured to boot from VHD files only, so you don't even need to install an operating system on your desktop systems.
On paper, Microsoft seems to have integrated an interesting technology with Windows 7 and its VHD drives. If you need to experiment with operating systems as an administrator, you will need either a full-fledged virtualization server on a hypervisor basis, such as VMware ESX or Citrix XenServer, or a large number of disks and some partitioning know-how.
You'll need to watch out for other things, too. For example, Windows 7 still requires a start partition, which must reside on a disk with a Master Boot Record (MBR). Thus, administrators today typically tend toward virtual machines, but this approach takes careful planning.
Although a virtual PC easily is set up with a solution like VirtualBox, and although tools like VMware Player give administrators access to a huge selection of prebuilt images on the web, it will prove impossible to exchange these virtual machines because of different and incompatible formats used by VirtualBox, Parallels, KVM, or VMware.
Another free product by Microsoft, Virtual PC, isn't even an also-ran because it doesn't support non-Microsoft operating systems. Although conversion tools are available, administrators still depend on a virtual machine monitor and are thus forced to opt for one format.
Setting Up VHD Disks
You can easily create and mount a VHD file using the Disk Management tool. The drive is immediately shown as available in the Explorer. To do this, just right-click on Disk Management in the Computer Management window and select Create VHD (Figure 1).
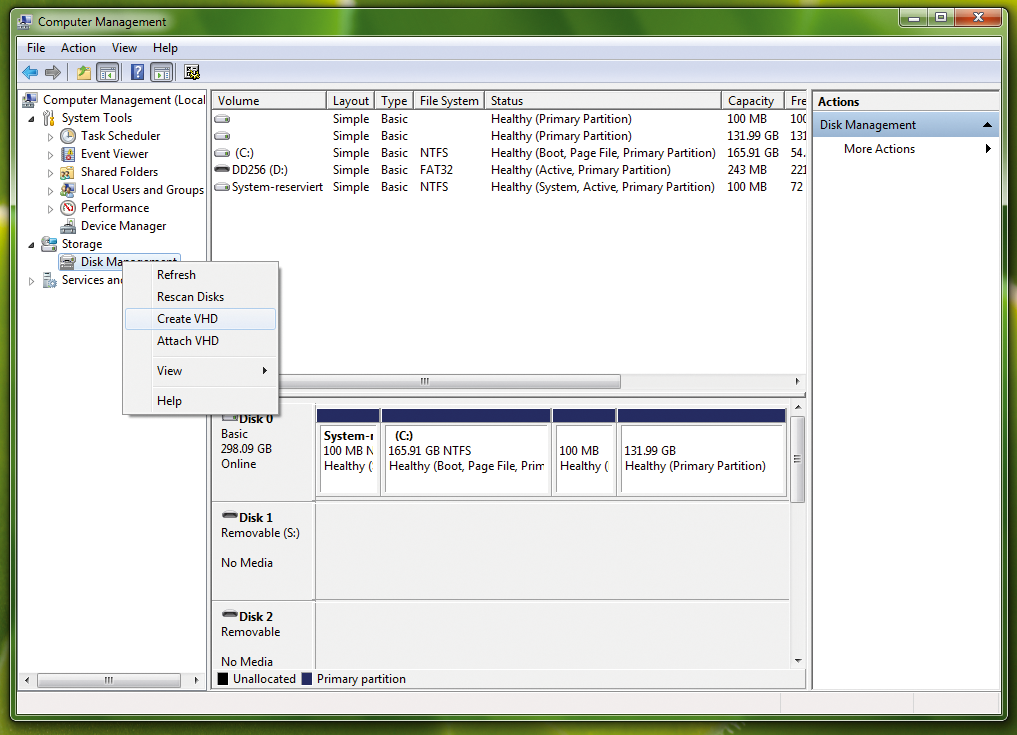
You then need to define the path and size of the VHD file, and you can choose between a dynamic virtual disk or a virtual disk with a fixed size, then specify the size and enter this in Virtual disk size. The next step is to initialize the new virtual disk so that the Logical Disk Manager (LDM) in Windows 7 can access it (Figure 2). Note that the LDM supports both the classic master boot record partition style and GUID partition tables (GPTs).
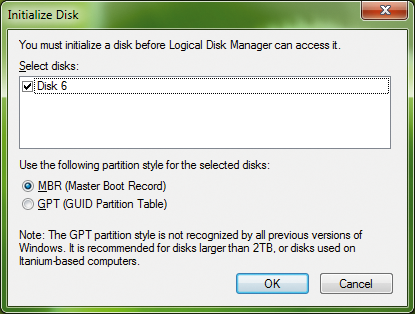
After completing these steps, you can create a new volume on the disk in the Disk Management tool, assign a drive letter, and format the disk. After this, it will be available for use in the file manager.
Alternatively, you can make the drive available in an empty NTFS folder. Experienced administrators might prefer to use the PowerShell Diskpart tool for this step. As an example, I'll look at how to mount a VHD disk named testdisk.vhd and assign a drive letter at the command line:
#diskpart
select vdisk file=C:<I>path-to-VHD-file<I>
attach vdisk
select volume {volume number}
assign letter=v
exit
To discover the volume number (in Diskpart command mode), you can simply enter the list volume command (Figure 3).
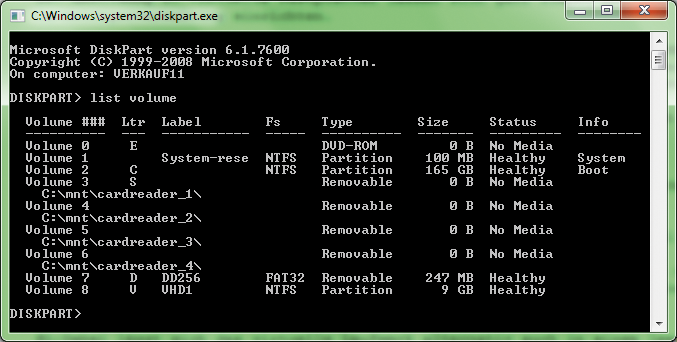
list volume command displays the volume number and drive letter mappings.Booting from Virtual Disks
If you want to experiment with the boot management of a recent version of Windows, note that Microsoft changed the paradigm for this in Windows Vista, so the editable boot.ini used by Windows XP no longer exists. The Vista and Windows 7 model is more flexible and compatible with extensible firmware interface (EFI) systems.
This model comprises three components: the Windows Boot Manager, the start routine for the operating system, and the routine for continuing Windows after a sleep state.
Windows XP and 2000 both used ntldr for these tasks. The information that was formerly stored in boot.ini now lives in the Boot Configuration Data Store (BCD), a binary file that resides either in the NVRAM (EFI systems) or the \boot directory of the boot partition. Changes to the boot configuration can be performed using the bcdedit command-line tool.
The BCD hierarchy has three levels: the store, the objects, and the elements. The store is a container for BCD objects, which in turn contain BCD elements. A typical object describes a boot environment (e.g., for an installed Windows 7). All the elements contain settings such as the name, debug settings, or device where the operating system is located. The Windows Boot Manager is also a separate BCD object whose elements define parameters such as timeouts, the default operating system, and the display order similar to the entries in the [boot loader] section of boot.ini.
The store also typically contains an object named "Windows Boot Loader," which is similar to the [operating systems] section of the legacy boot.ini. The Windows Boot Loader is responsible only for Vista and Windows 7. For any other operating system, the Windows Boot Manager uses the objects designated "Windows Legacy OS Loader," which are basically just references to other boot sectors that are loaded piggyback fashion and then take over control of the boot process.
This approach is true, for example, of Linux systems or Windows XP and 2000. The latter simply enable the legacy ntldr, which in turn parses boot.ini. If you install Windows 7 or Vista in addition to an existing XP, you should have the following entries in the BCD Store. If not, make sure you have administrative privileges and do:
bcdedit /create {legacy} /d "Windows XP"
bcdedit /set {legacy} device partition=E:
bcdedit /set {legacy} osdevice partition=E:
bcdedit /set {legacy} path \ntldr
bcdedit /displayorder {legacy} /addlast
Windows 7 will create a new entry in the BCD Store, which is reflected by a Windows XP entry in the boot menu and which boots the ntldr bootloader from partition E:.
To install a Linux system parallel to Windows 7, you typically just need to make sure that your distribution's installer doesn't install the Linux bootloader in the MBR, but in the Linux partition. You can then copy the Linux bootloader to the /bootloader.bin file like this:
dd if=/dev/xxx of=/bootloader.bin
bs=512 count=1
Then, save the results on a USB stick. Next, you can boot Windows 7, copy the bootloader.bin file to your Windows partition, and do the following to create the matching boot entry:
bcdedit /create /d "Ubuntu 10.10"
/application bootsector
Again, you should copy the GUID shown by bcdedit and insert it into the following commands:
bcdedit /set {newGUID} device boot
bcdedit /set {newGUID} path \bootloader.bin
bcdedit /displayorder {newGUID} /addlast
Setting up a virtual drive on the fly in Windows 7 is fairly easy, and a virtual drive is very useful to use as a backup or data partition.
The prospect of installing Windows 7 on a VHD and booting from it sounds pretty exciting. To achieve this, you will need to create the virtual drive beforehand and integrate it into the boot menu.
bcdedit Tool
Incidentally, the Windows 7 Installer lets you create a virtual partition directly during the installation. You can use the bcdedit tool to add it to the boot manager. If you do use bcdedit, note that you must have administrative privileges to run the command-line tool.
The bcdedit tool is very powerful, and its list of options is correspondingly long. Typing bcdedit /? will display a list of these options. To get an overview of the objects currently in the BCD Store, type bcdedit /enum -v (Figure 4). The output shows that Windows 7 uses a 32-digit GUID. Whenever you change an entry, you must specify this GUID.
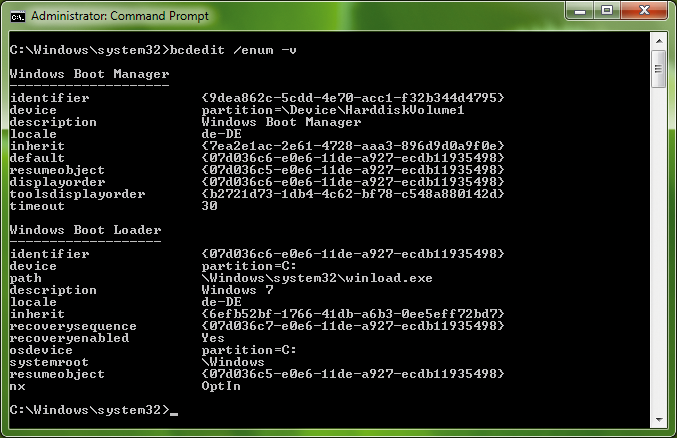
bcdedit tool gives an overview of the objects in the boot store.To save unnecessary typing, right-click the icon in the top right of the command-line window. Then, select the Edit | Select entry and drag the mouse in the output window to copy the required ID, which you can then copy to the clipboard.
Whenever you experiment with the boot manager, you should always back up the current boot store by using the -export option.
bcdedit /export c:\bootbackup
Then, to restore your backup, you would do:
bcdedit /import bootbackup
The following extends the BCD Store, adding a boot option for the VHD.
bcdedit /copy {current} /d "Booting Windows from a virtual partition"
The preceding commands will copy an existing boot configuration and add an entry for booting from VHD (Figure 5).
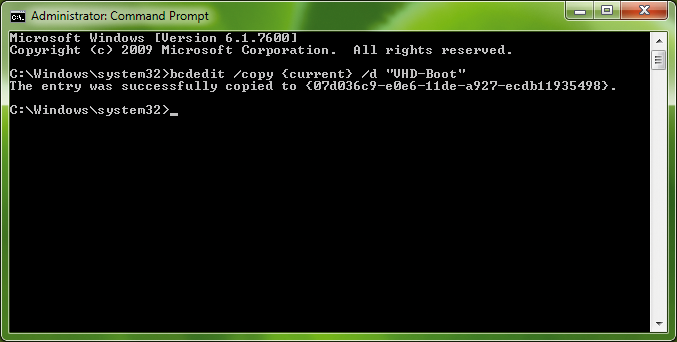
You can also reference the Windows Boot Manager as {bootmgr}, whereas {ntldr} references the legacy Windows Loader. The {current} entry in the example that is shown refers to the entry for the current active Windows. The default entry is referenced as {default}.
New entries in the BCD store can be created by using the /create option, then you can edit the new entry using /set and specifying the following options:
bcdedit /set {designator} osdevice    vhd=[C:]\Datei.vhd
bcdedit /set {designator} device    vhd=[C:]\Datei.vhd
bcdedit /set designator} detecthal on
After you have completed these steps, you can install Windows 7 on the VHD partition and then boot the system from the partition.
If this process is not successful, you probably have an error in your boot configuration. If this is the case, you can always restore the default state of your Windows PC with the use of the sysprep command.
Limited Value
You can install Windows 7 in a VHD file with any version of Windows 7, but only boot Windows 7 Enterprise and Ultimate from the VHD file. Additionally, installing in a VHD partition takes far longer than installing on a physical partition. The VHD driver unfortunately seems to slow down or delay write access. The disappointing thing is that Microsoft is imposing licensing restrictions on an intrinsically interesting option, thus, incurring additional costs.
Conclusions
If you don't intend to boot from a VHD, you will probably find VHD files a useful feature. The genuine enterprise benefits for administrators come with the price tag that is attached to the Ultimate version, and you could just as easily buy a full-fledged virtual machine monitor. An alternative that also offers XP mode capabilities on the Windows 7 Home edition is VMLite XP Mode 3.2.6 for Windows 7 [1]. According to VMLite, their XP Mode product is similar to Microsoft's, except it "doesn't require hardware virtualization.
This product's competitors are mature and free virtualization solutions, such as VirtualBox [2], which experienced users have long since discovered.
Also, the VMLite Inc. website has announced VBoot [3], which is said to support native booting of various operating systems, such as Windows XP, Windows Vista, Windows 7, and even Linux (32- and 64-bit) from virtual disks in VHD format.
