VMware Server 2.0 on recent Linux distributions
Updates Gone Awry
Linux distributions with the latest daily updates are not uncommon, especially on home networks. In many cases, the home admin has enabled automatic updates and won't even notice the changes, unless an application happens to fail. In this article, I will look at a practical example in which VMware Server 2.0 refused to cooperate after the administrator updated the underlying operating system from Fedora 13 to Fedora 14.
History
The starting point for this tale is a working VMware Server [1] with 64-bit Fedora 13 (including a full set of updates) [2]. Besides various guests for test purposes, two virtual machines run on this hardware, and I can't do without either for very long. Fedora 14 had just been released, and my initial experience with other machines made me optimistic about risking a complete upgrade of my home Linux environment. All I needed to do was enable the new package repositories and launch the Yum [3] package manager.
Thanks to a lean operating system image and fast Internet access, the server had a freshly installed Fedora 14 just a couple of minutes (and one reboot) later. But, somehow I'd lost the connection to my VMware application. A quick inspection of the /var/log/messages file revealed the issue – the vmware-hostd process had crashed with a segmentation fault (Listing 1).
Listing 1: Segmentation Fault in vmware-hostd
01 Dec 6 13:30:08 virtual kernel: [ 175.894212] vmware-hostd[3870]: segfault at 2100001c4f ip 0000003c0cb32ad0 sp 00007f3889e9cb88 error 4 in libc-2.12.90.so[3c0ca00000+19a000]
Analysis and Plan A
Initial analysis proved that the VMware application doesn't get on well with the newer glibc version in Fedora 14. Is there a more recent VMware Server release? No, because VMware has discontinued development of this product [4]. The alternative would be ESXi [5]; unfortunately, the hardware I have isn't compatible, and this isn't an option for a short-term workaround. A quick check of the Fedora Update Server also shows that a newer version of the Glibc package is not available. In other words, updating the operating system is not an option.
So, I have two approaches to fixing the problem: reverting the changes or discovering a fix or workaround. Falling back to the previous version would mean downgrading from Fedora 14 to Fedora 13. And, unless you have prepared for this step by creating filesystem or volume snapshots, the process is definitely non-trivial. Additionally, the issue of incompatibilities between applications and the new Glibc version is known and easy to fix for some applications.
The workaround I chose was to install an older variant of the library parallel to the newer one and then to modify the application environment so that it would find the "right" version of the library. This process sounds simple, but it can be fairly complex; my first attempt failed. By this time, I'd lost a day and was starting to hurt. I needed a solution – should I try the downgrade, after all?
Ups and Downs
One approach is to try to replace the individual packages with older versions, starting with Glibc, but this would mean knowing exactly which packages to replace (Listing 2). Also, running a hybrid operation with packages from two different versions of the distribution isn't exactly recommended. It can have side effects, including instability, especially if you are experimenting with a component as central as Glibc.
Listing 2: Manual Steps before the Downgrade
01 rpm -e libmount --nodeps
02 yum downgrade util-linux-ng libblkid libuuid
03 rpm -e upstart-sysvinit --nodeps
04 yum downgrade upstart
05 rpm -Uvh gdbm-1.8.0-33.fc12.i686.rpm --nodeps --force
06 yum downgrade perl\*
07 rpm -e man-db
08 rpm -e pam_ldap --nodeps
09 yum downgrade nss_ldap
10 ...
Fortunately, Yum introduced a downgrade option in version 3.2.27 that makes it easier to step back from Fedora 14 to Fedora 13. However, you can only apply the function to individual packages. You'll need to start by generating a package list. Without using the Yum history option, the easiest method is to issue the
rpm -qa --queryformat '%{NAME}\n' | xargs yum downgrade
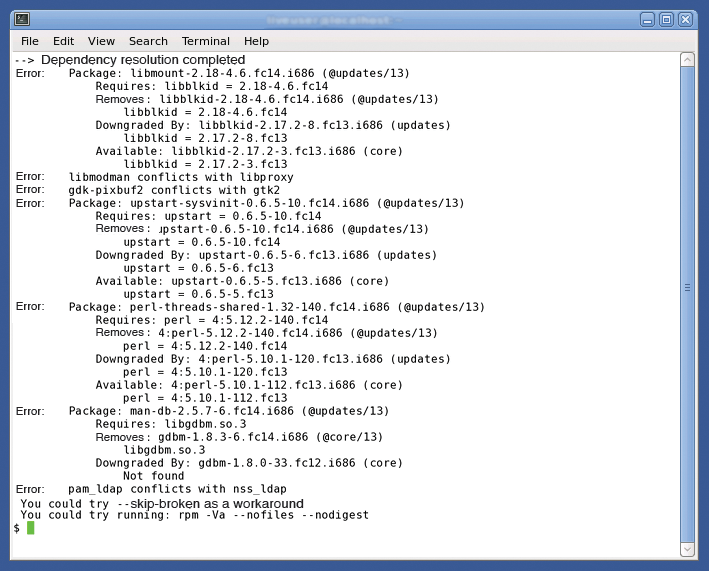
command. Unfortunately, this elegant strategy again failed in real life (Figure 1).

The basic problem is that Fedora 14 distributes the individual software packages over different RPMs than Fedora 13. In most cases, you can remove the package causing the conflict using
rpm -e package1 --nodeps
and then downgrade the other package with:
yum downgrade package2
After a couple of rounds of this procedure, the conflict should be resolved, and you can then downgrade the whole system to the older version. A final reboot enables the previous kernel and system libraries and, presto, the VMware Server is happy with its environment and decides to go back to work.
Next Attempt
This fallback is just a short-term fix, however. Sooner or later, you will be forced to move to a newer operating system or try a different virtualization software solution. But, once you have this workaround in place, you can take some time to consider your next steps.
In my case, the incompatibility issue between Glibc and VMware Server was fairly well documented, and the solutions on the web all used the approach I'd tried previously with a parallel installation of the older glibc version.
Could this really be the solution? Maybe there were some hidden dependencies, say, on further libraries that you would also need to install parallel to the newer versions. A check of the /usr/sbin/vmware-hostd executable shows that this is just a shell script. The binary file itself is hidden in the /usr/lib/vmware/bin directory. The command
ldd /usr/lib/vmware/bin/vmware-hostd
shows that some other objects are also relevant: six packages all told (see Listing 3).
Listing 3: vmware-hostd Libraries
01 $ ldd /usr/lib/vmware/bin/vmware-hostd
02     linux-vdso.so.1 =>  (0x00007fff75fff000)
03     libz.so.1 => /lib64/libz.so.1 (0x0000003c0e600000)
04     libvmomi.so.1.0 => not found
05     libvmacore.so.1.0 => not found
06     libexpat.so.0 => not found
07     libcrypt.so.1 => /lib64/libcrypt.so.1 (0x0000003c0da00000)
08     libxml2.so.2 => /usr/lib64/libxml2.so.2 (0x0000003c14200000)
09     libstdc++.so.6 => /usr/lib64/libstdc++.so.6 (0x0000003c0e200000)
10     libpthread.so.0 => /lib64/libpthread.so.0 (0x0000003c0d200000)
11     libgcc_s.so.1 => /lib64/libgcc_s.so.1 (0x00007f086f4d5000)
12     libc.so.6 => /lib64/libc.so.6 (0x0000003c0ca00000)
13     /lib64/ld-linux-x86-64.so.2 (0x0000003c0c600000)
14     libdl.so.2 => /lib64/libdl.so.2 (0x0000003c0ce00000)
15     libm.so.6 => /lib64/libm.so.6 (0x0000003c0de00000)
16     libfreebl3.so => /lib64/libfreebl3.so (0x0000003c0ee00000)
17 $
18 $ ldd /usr/lib/vmware/bin/vmware-hostd |awk '{print $3}'|grep lib | \
19 xargs rpm --queryformat '%{NAME}\n' -qf |sort -u
20 glibc
21 libgcc
22 libstdc++
23 libxml2
24 nss-softokn-freebl
25 zlib
26 $
Finally, the zlib package gave me the solution to the problem. To implement the solution, you can start by creating a directory for the parallel installation:
mkdir -p /usr/lib/vmware/lib/fc13lib64
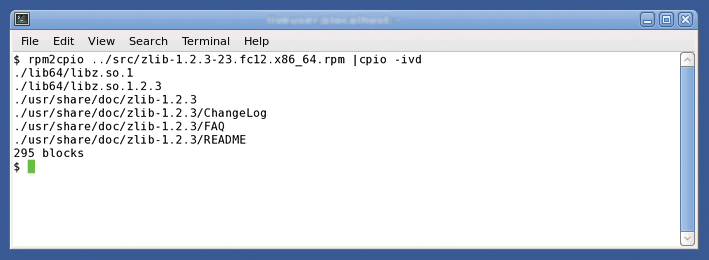
The next step is to retrieve the glibc and zlib RPMs for Fedora 13 and unpack them. You can use rpm with an alternative root directory for the parallel installation [6] [7], but converting the RPMs into CPIO archives and then unpacking them [7] [8] makes more sense (Figure 2).

This approach avoids having to execute pre- or post-installation scripts and keeps the system's RPM database clean.
Once you have the libraries in the right place, you need to teach the vmware-hostd binary to use the objects installed in parallel. To do so, set the shell LD_LIBRARY_PATH variable before the binary program is launched. After completing this step, you can test the environment (Listing 4). In fact, you can actually do this on Fedora 13.
Listing 4: LD_LIBRARY_PATH
01 $ tail /usr/sbin/vmware-hostd
02 if [ ! "@@VMWARE_NO_MALLOC_CHECK@@" = 1 ]; then
03    export MALLOC_CHECK_=2
04 fi
05
06 #####
07 LD_LIBRARY_PATH=$LD_LIBRARY_PATH:/usr/lib/vmware/lib/fc13lib64
08 export LD_LIBRARY_PATH
09 #####
10
11 eval exec "$DEBUG_CMD" "$binary" "$@"
12 $
Of course, you'll need the new operating system for the final test. Before the upgrade, you will probably want to take steps to make falling back easier. Thankfully, I was spared unpleasant surprises here, and the VMware Server is now happily running on Fedora 14.
Conclusions
The solution I described should work on any Linux distribution. Depending on the package manager your distribution uses, you might need to change the steps for extracting the "legacy" libraries. The moral of this story is that it pays to have a contingency plan if you are considering making low-level changes to a system. That way, you can implement the plan if something goes drastically wrong.
