
Using Univention Corporate Server 2.4 for virtual infrastructure management
Cockpit
Univention Corporate Server (UCS) has become a popular solution on the small to mid-sized enterprise market and has established itself in particular as a strategic platform for other OSS products, such as Open-Xchange, Collax, Scalix, or Kolab. Although many appliances come with preconfigured OSS services, UCS [1] [2] offers added value compared with Collax and others because of its comprehensively implemented domain concept and graphical user interface. Version 2.4, which was released late in 2010, adds a manager for virtual machines based on Xen or KVM to the package, and patch 2.4-2 substantially improves its functionality.
About Univention
The product's manufacturer, Univention GmbH, and its founder and CEO, Peter Ganten, have long been some of the open source community's most innovative creative forces and evangelists for Linux and open source in government offices and small businesses. At CeBIT 2011, Univention shared exhibition floor space with its partners, such as the Debian Project and Open-Xchange, and thus demonstrated the strategic position that UCS has established for itself as an infrastructure product for many partner products.
Incidentally, Univention employs three official Debian maintainers internally, which clearly shows that Univention programmers are very much at the cutting edge of the Linux scene. Univention is also a member of LIVE (a Linux association) and Lisog, and it supports the establishment of the Lisog Open Source Software Stack [3]. The most interesting development at Univention right now is the administration module for virtual instances (UVMM) in the latest version of the Univention Server, 2.4-2.
Univention Corporate Server
UCS is a Debian GNU/Linux-based server that is distributed exclusively as an appliance (ISO) and includes a proprietary management system for the centralized and cross-platform management of UCS servers, as well as desktops, services, clients, and users and their corresponding roles.
The current 2.4 version contains a virtual machine manager, which integrates seamlessly with the Univention Management Console (UMC) as a module, and to which interesting functions were added in the latest UCS patch level 2.4-2. The Univention Server thus differs from other well-known Linux appliances, such as the Collax Business Server, in that it implements its own domain concept on the basis of OpenLDAP. Although the old-fashioned-looking curses installer might make administrators suspicious at first, and although these suspicions might grow when faced with an installation option for integrating a graphical desktop based on KDE3, the installed server will finally win the administrator over with its carefully conceived overall concept and production-tested preconfiguration.
Administrators can complete the installation with just a couple of key presses; in fact, pressing the F12 key to confirm the defaults is about all you really need to do for a server with a ready-to-run, preconfigured domain model. The model uses a well-planned role model with a Master Domain Controller, Backup Domain Controllers, Slave Domain Controllers, basic systems (Univention servers), and Univention desktops. The OpenLDAP directory service handles identity and system management; administrators can configure this on the fly using the Univention Directory Manager (UDM). Additionally, the integrated Active Directory Connector supports bidirectional synchronization against the Microsoft directory services.
Thanks to a variety of defined interfaces for vendors of application software, external applications, such as Open-Xchange, Scalix, Kolab, or Zarafa, integrate excellently with the UCS concept. This has prompted some vendors to choose UCS as the underpinnings for implementing groupware solutions as an appliance, for example. Parallel to the release of version 2.4, Univention placed the license under the Affero General Public License (AGPLv3). Private users can thus download the Univention server free of charge and use it without restriction. Additionally, an OEM version is available as one of the commercial UCS variants for software makers and integrators.
UVMM
The current "Free for Personal Use" ISO of UCS 2.4 [4], ucs_2.4-0-100829-dvd-amd64.iso, isn't quite up to date. The Univention Virtual Machine Manager (UVMM) module in particular has seen a number of notable improvements since the release of UCS 2.4. Because of this, you will probably want to update to the latest available version 2.4-2 via Online-Update in the Univention Management Console.
The most interesting feature of the current UCS version 2.4 is Univention's own UVMM, which integrates seamlessly with the Univention Management Console as a module and supports browser-based administration of virtual machines on Xen and KVM.
Univention exclusively uses open standards, such as the libvirt library, for UVMM. Besides Xen and KVM, this library also supports other virtualization technologies, such as VirtualBox. Incidentally, UVMM is completely free software, like all the other UCS components developed by Univention.
Univention positions its virtualization project primarily as a lower cost alternative to proprietary virtualization solutions by VMware, Citrix, and Red Hat. The UVMM module became an integral part of the server in UCS version 2.4 and can be used by all customers with a current maintenance agreement at no extra charge. The UVMM lets administrators manage virtual servers, clients, disks, and CD and DVD images, including the physical systems or clusters on which they run via a central instance. Additionally, UVMM contains all the major functions required for the administration of virtual infrastructures. This includes the ability to migrate virtual machines from one physical server to another on the fly.
Virtualization with Xen and KVM
The market for professional virtualization solutions is currently dominated by Citrix, with its enterprise solutions XenServer and XenDesktop; VMware, with its enterprise products vSphere (RZ/Cloud), View (Desktop), and vCenter (infrastructure); and RedHat, with its RHEV Server and RHEV Desktop. If you want to virtualize servers and desktops with free software only, you can choose one of the two free solutions: KVM or Xen.
Although Xen has had everything necessary for deployment in a production environment since version 3.2, KVM currently seems to be stealing the limelight for two reasons. The official Linux kernel doesn't support operations with a dom0 implemented in PVOps (Xen 4.0). Although XenSource developed a kernel 2.6.31 especially for this purpose, the PVOps-based functions in the official Linux kernel still do not support operation as a dom0.
The second reason is that, although there have been some Linux distributions with Xen 3.0 support in the past, to run Xen 3.x as a full-fledged native DomU, you can only use the official Linux source code by Xen, which is only available as version 2.6.18.8. Thus, most Linux distributions now rely on KVM for virtualization technology.
KVM uses an infrastructure that officially exists in the Linux kernel to control, for example, the CPU or chipset – components that would need to be ported or reimplemented for Xen. The UVMM module with its current UCS kernel 2.6.32 supports both virtualization technologies, although it only supports version 3.4.3 of Xen. Depending on the installation, UCS can only use one of the three packages (Virtual Machine Manager, Xen Virtualization Server, or KVM Virtualization Server) and one of the roles that corresponds to these package names (KVM Hypervisor, Xen Dom0, or Virtual Machine Manager), which then correspond to the system role envisaged by UCS.
UVMM and libvirt
If you are deploying a KVM virtualization server, you should familiarize yourself with the basic workings of KVM, Xen, or both, but that is beyond the scope of this article. In short, KVM is a virtualization technology based on parts of the Qemu code that is officially integrated with the Linux kernel. KVM supports genuine hardware virtualization but only runs on hardware platforms that support process virtualization (Intel VT or AMD-V).
Xen is a virtualization technology based on a hypervisor model and is basically executable on any CPU. Both virtualization technologies usually can be set up and managed at the command line. The commands used by Xen and KVM/Qemu differ here, which prompted the people behind the Univention Server to turn to the libvirt C library. Libvirt is a standardized interface for the management of different virtualization solutions. Originally, it only provided Xen drivers, but now libvirt contains drivers for Xen, Qemu, KVM, VirtualBox, VMware ESX, Xen, LXC Linux Container System, OpenVZ, User Mode Linux, OpenNebula, and various storage systems. Thus, it acts as an API between the virtualization software and management tools such as UVMM. Besides managing virtual machines, libvirt can also manage virtual storage media, virtual networks, and the devices on the host system.
The complete configuration relies on XML files. The libvirt package also includes its own command-line-based management tool: virsh. Communications between host systems (nodes) are handled by the libvirtd daemon, which must be started on all nodes and which resides above the libvirt APIs. The libvirtd tool also discovers the local hypervisor and provides corresponding drivers. Additionally, the management tools use this daemon to handle their communications, which can be encrypted and support SASL authentication with Kerberos and SSL client certificates.
The Virtual Machine Manager uses SSH to secure the VNC connection. Because UVMM uses libvirt to access the underlying virtualization layer, management of Xen and KVM systems in UVMM looks virtually identical for the administrator, even though some functional differences in libvirt support exist. For example, only KVM supports backup points.
Deploying UCS Virtualization
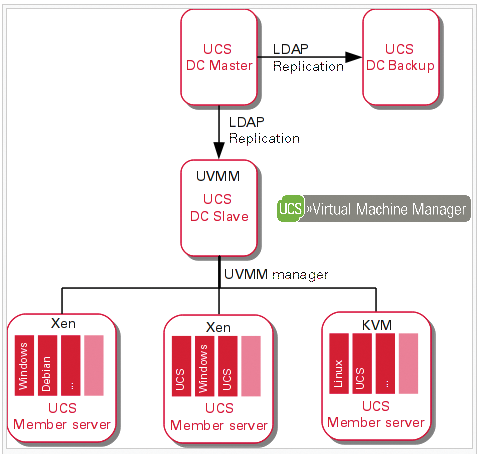
In UCS, a virtualization environment always comprises at least two components: a virtualization server (Xen or KVM) and a UCS that acts as the Virtual Machine Manager (UVMM). Appropriate role assignments are defined as mentioned before by the selection of the package to install at the time of setup. In the course of the installation, you also need to assign the system role to each UCS system. Thus, the UCS you choose as your UVMM Manager can also be your Master Domain Controller (DC) or a Backup Domain Controller or a Slave Domain Controller. A virtualization server can also be a UCS member server (Figure 1).
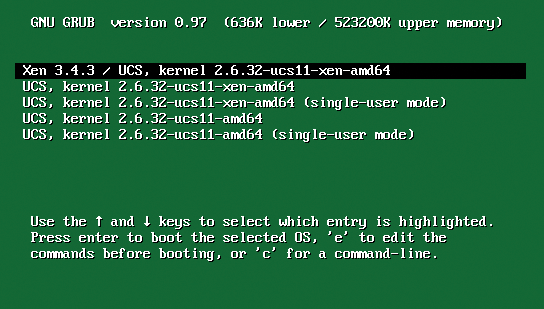
When you set up a new UCS virtualization environment, you can create a DC Master in the simplest case, which also will act as the physical server for virtualization and run the UVMM service. After the inevitable restart, the GRUB bootloader offers you a choice of kernels (Figure 2). The first entry launches UCS with the Xen kernel and loads a hypervisor for virtualization on the physical server.
In the Xen virtualization scenario, the hypervisor is responsible for distributing resources to the virtual machines. However, you still need to configure the Xen hypervisor. The first thing to consider is the weighting of resource allocations between the hypervisor and the guest instances; Xen uses credits to handle this internally. By default, all resources are equally distributed and have a credit value of 256. The documentation recommends increasing the value for the hypervisor to 512; you can do so in the /etc/rc.local configuration file by adding the following to the entry in the second to last line before exit 0:
xm sched-credit -d Domain-0 -w 512
The Xen documentation also recommends assigning a fixed proportion of the physical RAM and, on multiple-core machines, one or more CPUs to the hypervisor. In UCS, you can use a UCS system variable, grub/xenhopt, to do so. UCS gives administrators the ucr set tool for this purpose.
ucr set grub/xenhopt="dom0_mem=xxxxM dom0_max_vcpus=x dom0_vcpus_pin"
In this example, xxxx stands for the amount of RAM to be allocated in megabytes; x stands for the number of CPUs to allocate. The amount of RAM statically assigned to Xen mainly depends on the number of services. If you are setting up a pure UCS virtualization server, 1GB of RAM should be fine for a Xen hypervisor. If you will be providing other UCS services besides Xen virtualization (web server, mail server), you might need to increase this value
ucr set grub/xenhopt="dom0_mem=1024M dom0_max_vcpus=1 dom0_vcpus_pin"
for a virtualization server with 4GB of RAM and two CPUs.
UVMM Wizards
After completing all the proper assignments for the configuration, creating and managing virtual instances in the graphical UVMM module is relatively simple. Before you start configuring virtual instances, make sure you install patch level 2.4-2, which was released in early April 2011 and introduces some new features with respect to UVMM. For example, you can now configure paravirtualized access to drives and servers directly via the UVMM module. Thus, virtualized systems can access devices (CDs, DVDs) on the physical virtualization server (passthrough), and multiple network interfaces can be assigned to any virtual instance.
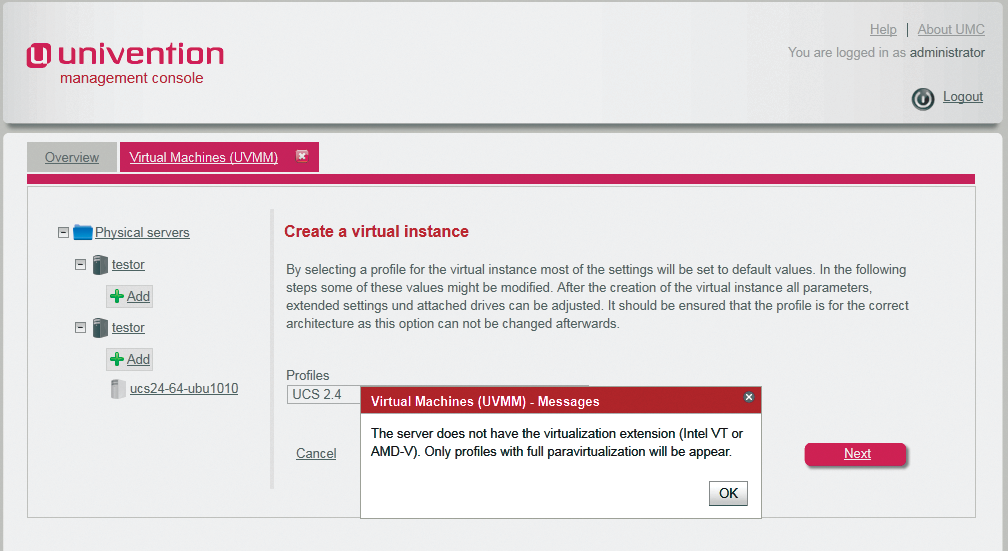
You also can set the Architecture parameter to automatic in the UVMM profile, thus telling the UVMM module to offer the physical server's hardware to the virtual machines. Incidentally, you no longer need to emulate a 32-bit CPU on a 64-bit system, but you can install a 32-bit operating system on it. When you create virtual machines, the system will typically create fully virtualized systems (KVM), assuming the CPU in the virtualization server has a VT extension (Figure 3).
In contrast, Xen hosts on Linux do support paravirtualization. The UVMM module is referred to in the UMC as Virtual Machines (UVMM) and displays a tree structure of the existing physical servers grouped by name and showing the configured virtual instances on the left-hand side. If you select a physical server, you can see the CPU and memory load for the selected server on the right. The UVMM module can create, edit, and delete virtual instances. Additionally, the administrator can change the status of a virtual instance. The details of the functional scope depend on the underlying virtualization technology; for example, backup points are only available with KVM. A wizard exists in the UVMM module to help create new virtual instances.
Profiles
When you click Add, you first need to select a profile on which the settings for the virtual instance depend, such as the name prefix, number of CPUs, RAM, and availability of other parameters, such as the automatic value mentioned earlier. You can also use the profile to define whether VNC-based direct access will be allowed. To do so, you need to check Enable direct access.
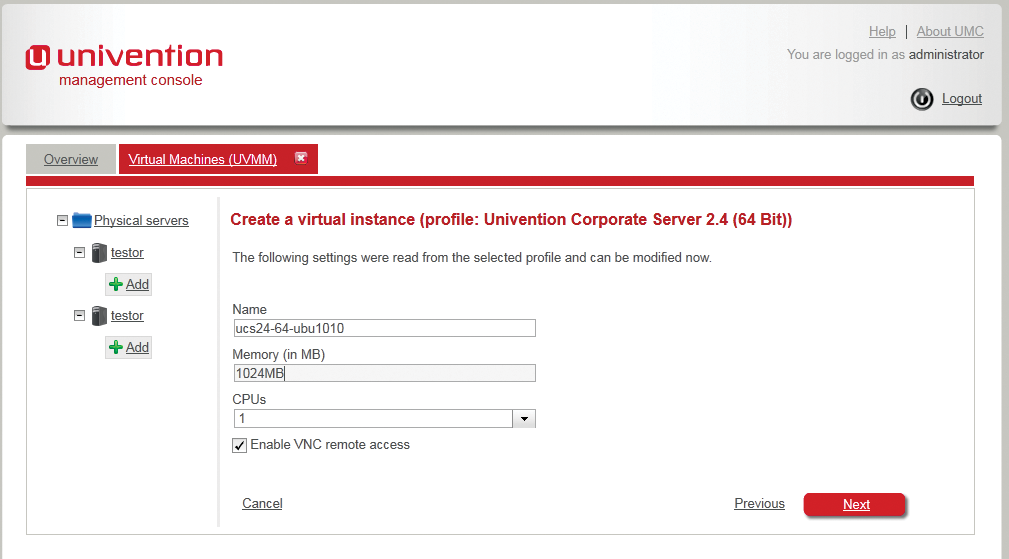
Incidentally, UVMM offers a number of predefined profiles for creating virtual instances and thus populates most of the settings with defaults. The administrator can either modify these values directly in the wizard or later in the advanced settings (Figure 4). Currently, depending on your computer architecture (i386 or AMD64), the following predefined profiles exist: Windows XP, Windows 7, Windows 7 (64-bit), Windows 2003, Windows 2003 R2 (64-bit), Windows 2008, Windows 2008 R2 (64-bit), UCS 2.4, UCS 2.4 (64-bit), and Other (64-bit).
UVMM reads existing profiles from the LDAP directory. Experts can edit these profiles directly in the container cn=Profiles,cn=Virtual Machine Manager; you can use the graphical Univention Directory Manager (UDM) for this purpose (Figure 5).
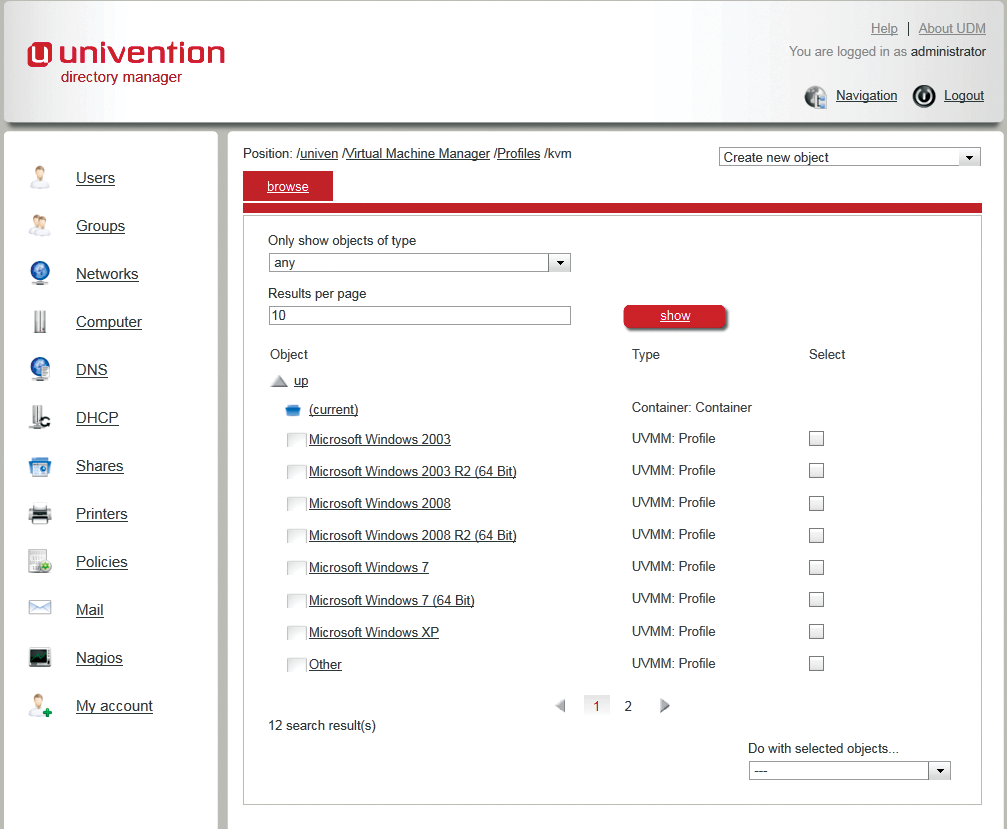
You can add more profiles at the same location, too. In the current UCS version 2.4-2, the UVMM module is updated by the Univention Directory Listener module whenever information relating to the virtual machines changes in LDAP, thus considerably reducing the overhead.
Drive Types
To integrate a drive with your virtualization environment, press Next. For virtual hard disks, you can either create an image file or select an existing image file. The administrator can use the extended standard format qcow2 for disk images in KVM (default) to support copy-on-write or opt for the simple raw format (Figure 6).

If you use copy-on-write, a change will not affect the original; instead, it will create a new version at another position. However, the internal pointer is updated to support access to either the original version or the new version; this is necessary for creating backup points. This function is only available for virtual hard disks with the extended image format. On Xen systems, you have to make do with the raw format, wherein the image files are stored directly in the storage area.
By default, every virtualization server offers a storage area by the name of Local directory that maps to /var/lib/libvirt/images/ on the virtualization server. Of course, you can copy ISOs directly to this directory and map them to disks in the UVMM dialog. Having done so, you still need to add at least one more disc – a CD drive this time – and then you can select the ISO that you copied as your boot medium (Figure 7).

When you create a new virtual disk for a virtualization instance, you need to configure the boot order in the UVMM profile to make sure the virtual machine really does boot from the CD drive linked to the ISO image. In the case of paravirtualized instances, the boot order is defined when you create the drives. After pressing Finish to quit the wizard, you can change the order in the Drives menu by selecting Set as boot medium.
Managing Virtual Instances
After successfully defining a virtual instance, the UVMM module shows you an overview of the new virtual instances, grouped by backup points (KVM only), disks, network interfaces, and settings, on the left. Most options for settings in the GUI are intuitive and self-explanatory. If you are familiar with the dialogs in VirtualBox, Parallels, or VMware Workstation, you will feel at home here, too. Virtual instances created in UVMM are disabled by default. You can enable them in two ways: in the overview of the corresponding physical server, with the use of the corresponding list entry, or in the overview of the virtual instance itself, in the Operations section.
All further menus in the overview for the virtual machines, with the exception of Operations and the overview at the top edge of the dialog, can be expanded or collapsed by clicking on the +/-- signs. Choosing Start launches a virtual instance, and Stop stops the virtual instance, as you might have guessed.
If the user or administrator fails to shut down the operating system running on the virtual machine before this step, the process is similar to switching off a physical machine. Selecting Pause lets you take away the CPU time from the virtual instance; however, the RAM on the physical system is still allocated.
Choosing Save and Quit makes sure the RAM used by the virtual instance is saved before you pull the CPU time out from under the instance's virtual feet. In contrast to selecting Pause, this function also releases the RAM.
Stored virtual machines can be restarted at any time using Start; however, Save and Quit is only available on virtualization servers based on KVM.
Continue assigns CPU time to a paused instance, thus restoring the state that existed before the interruption. Removing a virtual instance unmounts the corresponding drive and optionally deletes the corresponding image file.
The Drives menu shows you a list of all the defined virtual drives with their types, image files, and sizes. Virtual CD-ROM images only support mounting existing ISOs; in contrast, you can add hard disk images whose size will grow in subsequent operations up to the specified limit (sparse files).
Additionally, here you can define the boot order in which the emulated BIOS of the virtual instance will search the drives for bootable media. At the bottom of the Settings menu, you will find the basic settings for each virtual instance; you can only change these settings while the virtual instance is disabled and as long as you have not created any backup points (Figure 8). The Name of the virtual instance must match the hostname in LDAP. The Architecture field defines the architecture of the emulated hardware. Virtual 64-bit instances can only be created on virtualization servers with AMD64 architecture.

The Number of CPUs field defines how many virtual CPUs libvirt should assign to the new instance. The Memory field defines the size of the RAM. Settings for the virtual network interface are also specified here and include the MAC address of the network interface. If you don't fill out this field, UVMM will enter a random value. You need to specify the interface used as the bridge on the physical server as the Interface; the default is eth0. As of patch level 2.4.2, multiple network interfaces can be defined for each virtual instance. UVMM supports the Bridged and NAT types for this.
At the bottom, you'll see the Advance settings area, where you can set attributes such as the virtualization technology used, which the administrator will typically define when creating a virtual instance. Additionally, you have an option for direct access, which you will already have configured when defining the profile. Setting the Direct access option tells UVMM to open a Java session in the browser when the virtual machine boots. It then uses VNC to access the virtualized operating system; UVMM uses a Java-based VNC viewer for direct access to the virtualized systems by default. However, you also can use a standalone VNC program for access.
On KVM systems, UVMM also has the ability to create backup points, which you can return to as needed. The precondition for this is that you use disk images in qcow2 format.
As mentioned earlier, all backup points are stored directly in the hard distribution image files using copy-on-write. The corresponding management function is located in the Backup points section of the virtual machine settings.
New backup point lets you create a backup point. Besides the freely assignable name, UVMM also stores the time at which the backup point was created. The list that is displayed shows all the backup points in reverse chronological order. Restore lets you restore the virtual machine to an earlier backup point.
Conclusions
Besides the commercial virtualization solutions offered by Citrix XenServer, VMware, and Red Hat, the two free virtualization technologies, Xen and KVM, have established a firm position in the administrator's toolbox. KVM is now an integral part of the Linux kernel, and, in combination with a CPU that supports full-fledged hardware virtualization, KVM seems to have stolen the show from the former star, Xen.
Despite this, the technologies will co-exist for some time because there are still many Xen users and because only Xen supports paravirtualization without CPU support.
Both solutions previously relied on command-line-based tools like Red Hat's virt-manager for configuration purposes. In addition to Proxmox Virtual Environment [5], which is an open source virtualization platform that implements browser-based administration for KVM and OpenVZ containers, the new Univention Corporate Server 2.4-2 is another platform that supports management of KVM instances in the browser.
Additionally, UCS offers a convenient approach to setting up Xen virtualization scenarios, if they are based on version 3.4. What I particularly liked about UCS was the detailed implementation of a domain model that is based on OpenLDAP and the browser-based management systems UDM and UMC.
Although the visuals might look slightly outdated, with old-style KDE icons and the curses-based installer, the UCS server is backed by a huge amount of know-how. Other Linux-based server appliances might exist, but very few of them are as excellently preconfigured or designed as the UCS appliance.
Storage Management
The Univention Virtual Machine Manager accesses hard disks and ISO images via storage pools. A storage pool can be a local directory on the virtualization server, an NFS share, an iSCSI target, or an LVM volume. Storage pools are defined by XML files. Examples of definitions for the various storage back ends can be found in the documentation for libvirt [6]. UCS uses the /var/lib/libvirt/images directory for the default storage pool. Any hard disk images created by UVM are sparse files that will grow as they fill up. It makes sense for administrators to monitor the level of these directories constantly with the use of a monitoring solution like Nagios, for example.
Performance Tuning
In production, many administrators will not be happy with the emulated drivers on the virtual machine because it can affect performance. If you use KVM, UVMM will install Microsoft Windows systems in full virtualization mode by default. In this mode, hardware drivers for the network card or storage drivers, for example, are emulated by Qemu for the KVM hypervisor.
The virtio interface offers far better performance by supporting passthrough for network and storage devices, which is comparable to paravirtualization on Xen. Paravirtualized drivers for Linux systems are included with most Linux distributions, and a number of virtio drivers are listed on the KVM page [7] for Windows. The UCS includes virtio drivers for Linux systems, too, and installs them automatically in the course of installing a virtual Linux instance. The easiest approach to securing virtio drivers for Windows is to pick up the ISO or VFD files from Fedora [8] and store them in the storage pool below /var/lib/libvirt/images. The latest version is 1.1.16.
To create a new virtual machine, you can then use the preconfigured Windows 7 profile in UVMM; however, you also need to create a virtual floppy disk drive besides the ISO image of the Windows installation DVDs and link this to the image of the downloaded VFD file. Additionally, you need to edit the hard disk partition in UVMM, by selecting Drives | Edit and checking the Paravirtualized drive box, and set the driver for the network card to Paravirtualized device (virtio) in Edit | Network interfaces.
After doing so, you can install the Windows guest system in the normal way. During installation, the Microsoft installer will point out that it can't find a storage device because you need to integrate the virtio driver. To do so, install the driver in the same menu with the Load driver function. Then, select Red Hat virtIO SCSI Controller in the version for Windows 7 and Red Hat virtIO Ethernet Adapter in the version for Windows Server 2008 (this is compatible with Windows 7). After installing the drivers, you will see the newly created hard disk in the Windows Installer and continue the installation in the normal way.
After completing installation, the Red Hat virtIO SCSI Disk Device and Red Hat virtIO Ethernet Adapter devices should be visible in the Windows device manager. This process will be different if you use paravirtualization with Xen. XenSource provides open source drivers for virtual Microsoft Windows systems [9] in the scope of the GPLPV project. After installing the virtualized Windows system, install the drivers. The GPLPV drivers are not Windows certified, and both Windows Server 2008 and Vista will refuse to use them in the default settings. A description of how to resolve this is available online [10].
