
Managing SSH and other remote connections with PAC
Rest in PAC
When hard-working administrator David Torrejón Vaquerizas got fed up with manually juggling zillions of connections to the servers he managed, he turned to Perl to program a small graphical user interface for SSH, Telnet, an so on.
Over time, Vaquerizas kept adding interesting and useful functions to the Perl Auto Connector, or PAC for short [1]. Now, PAC automates the process of running commands at the command line both on local and remote machines. In doing so, it takes care of SSH certificates autonomously, can use a proxy server to contact remote machines, and can wake up sleeping machines via Wake-on-LAN [2].
Additionally, you can add multiple connections to a cluster. In this case, all of the connected machines will run any commands you type in parallel.
Starter's Gun
Because this jack-of-all-trades is licensed under the GNU GPLv3, you can use it free of charge. The only precondition is a fairly recent Linux distribution with Gnome. Although PAC runs on other desktops, you would have to do without some minor features, such as the useful panel applet for rapid access.
The installation is easily completed: You just need to make sure you have Perl installed on your own machine. Then, you can pick up the libgnome2-vte-perl package that matches your distribution from the project homepage at SourceForge [3]. After installing the libraries, go back to SourceForge to pick up the PAC Manager package proper in the pac-2.0 subdirectory.
Depending on your distribution, you can load a .deb, .rpm, or .tar.gz package, and install. Just unzip the .tar.gz archive. To launch PAC Manager, click the corresponding entry in the start menu (Internet category) or type pac at the command line.
The main window in PAC then appears, as shown in Figure 1; it is surprisingly plain. The Connections area on the left lists and manages your active connections. The big Hide Connections button at the bottom lets you hide or restore PAC.
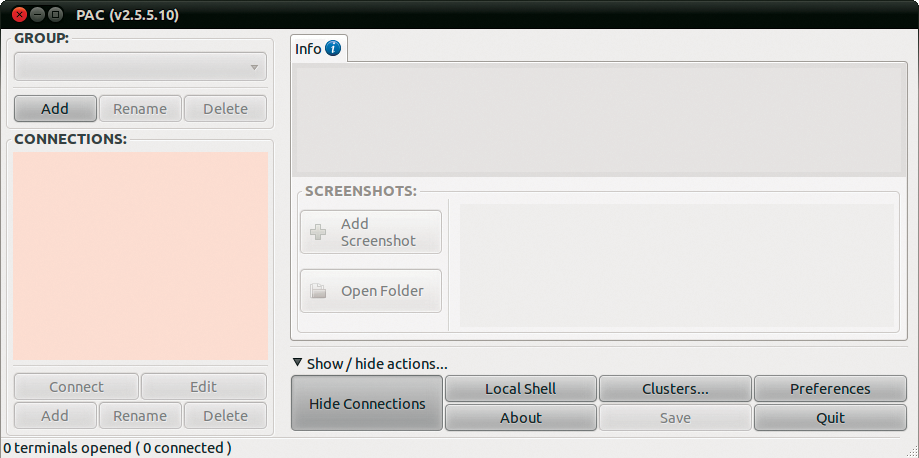
In the large panel on the top right, you will see the separate tabs for each of your active SSH and Telnet connections. The remaining buttons at the bottom right provide basic functions and thus give you something akin to a main menu.
Group Dynamics
PAC is designed to manage as many connections as possible at the same time. To keep track of them all, you can organize connections into groups, which PAC sometimes refers to as "environments." In a medium-sized enterprise, you might add six servers in Munich to one group and six colleagues in the development department to another. Each connection must belong to a group, so you'll need to create at least one. To do so, click Add in the main window and enter a name for the group. The available groups are shown in a drop-down list in the main window, top left, where you can select them.
You can now click Add below the empty Connections list to add a new connection to one of your remote servers. After you assign a name, something similar to Figure 2 appears. The window might look overloaded at first glance. The important thing here is the first tab, Connection, where you select the required transmission protocol as the Method.

The next step is to complete the missing information in the Host area. The IP | Hostname field expects the IP address or hostname of the target machine. You only need to change the Port if the port to use is non-standard. Then, enter your login credentials in User and Password. The text in TAB | Window Title is displayed in the tab with shell output later on. These are all the details you need to provide for a simple connection. The Options tab includes a couple of additional settings for the selected transmission protocol. If you chose SSH, you could disable X forwarding here or force a specific SSH and IP version, but normally, you will want to leave the defaults as they are. Clicking Save and Close creates a new connection.
Wake-Up Call
Connect tells the PAC Manager to create a new tab with a terminal in which it autonomously establishes the corresponding connection and at the same time logs in to the remote machine.
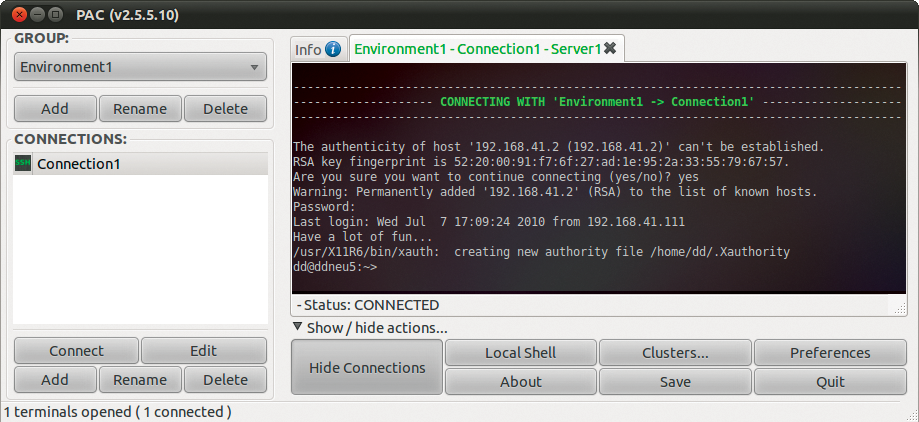
At the bottom edge of the tab, you can see the connection status (Figure 3; here, CONNECTED); the number of active terminals is shown in the status bar at the bottom edge of the main window. If you see a tab with a red label, the connection has been interrupted; if the label is green, the connection is active; and if the label is blue, the remote server has output some new messages in the meantime.
If the machine at the other end is still sleeping, you can right-click the corresponding connection in the list to wake it up using Wake On LAN… . In the window shown in Figure 4, you might need to modify the port and decide whether to broadcast the magic packet to wake up the machine (Send to broadcast). See the "Right-Click" box for more functions.

If your only option for reaching the remote server is via a proxy, you can go to the global preferences and select the Proxy Configuration tab to enable Use proxy.
If Gnome already uses the same proxy server, this is all you need to do. Otherwise, you need to enable Use this HTTP proxy and enter the data for your proxy server. Then, you can go back to the settings for the connection and, in the Connection tab, check Use 'Preferences' Proxy for this connection. PAC will take care of everything else.
Repetitive Tasks
Administrators often have to run specific commands or scripts over and over. To avoid having to remember all of these cryptic commands, you can simply install the commands in PAC and then conveniently execute them by clicking twice.
To do this, you first need to select the corresponding connection in Connections, then click Edit and change to the Remote Macros tab. There, you can press a button to add a new command, type the command in the Command line, and even add an intuitive name (Figure 6).

If you check Confirm, you will be prompted to confirm execution of the command. Using the same approach, you can add any number of commands, which PAC refers to as remote macros. After opening the connection, right-click the corresponding tab. All the commands you have created will be available for use in the Remote Command list. Alternatively, you can search for the required command at the bottom edge of the terminal tab (above the status bar) and launch it by pressing the Remote button.
An even more convenient approach is available: PAC can automatically execute commands for you when it logs in to a remote machine. This approach is one way, for example, to guarantee that the package list on a Debian-based server is up to date. To do this, the sudo apt-get update command will need a password, but there is no need for interaction. Once PAC has established a connection, it monitors all the messages that are output on the terminal of the remote server. When it sees a specific text, PAC simply "types" the required response on behalf of the administrator. A set of complex rules decides what PAC types in which situation.
Automatic Transmission
To update the package lists, you need at least two rules. To create them, go to the Expect tab in the connection preferences (via Edit in the main window) and then press Add to create a new rule. You then see two input boxes. PAC writes the text for Send to the terminal if the regular expression stored in Expect matches a previous message in the terminal.
For example, if you want PAC to execute the sudo apt-get update command directly after logging in, type the command in the Send box (see Figure 7). The login is complete when the command line appears and PAC has a <command prompt> keyword for this case, which you need to type in Expect. Checking Return ensures that PAC will not just write the command to the command line but actually execute it.

The sudo apt-get update command waits for the administrator to enter a password. To tell PAC to type this password, you need a second rule, which you can again create by pressing Add. You want the program to type the password precisely when the terminal shows the message password for xyz:. The matching regular expression for the Expect box is thus password*. You want PAC to respond with the administrator password that you type in the Send input box. Pressing Hide protects the password from curious intruders. To avoid having to complete the input by pressing the Enter key, you also need to check Return.
After pressing Save and Close to store the new rules, you can open a connection to the server in the normal way. PAC will handle the login as always. Once the prompt appears, the first rule takes effect. PAC thus types sudo apt-get update on behalf of the administrator and immediately executes the command (because you checked Return).
The remote computer now outputs the [sudo] password for root: to ask for the administrative password. The term "password" occurs here, so the second rule takes effect. PAC thus types the password and presses Return; the server then executes the command and updates the package lists.
Cluster Magic
Issuing the same commands to multiple (virtual) machines can quickly become a tiring task. To simplify this task, PAC can group multiple connections in what it calls a cluster. Each keypress is then automatically sent to all the terminals in the cluster. To create a new cluster, the connections have to exist. Then, you can press the Clusters… button in the main window to see the screen in Figure 8. When you get there, press Add to create a new cluster. After assigning an intuitive name, select all the terminals on which you will be executing the same commands, and press Add to Cluster. After pressing OK, all the terminals in this cluster will execute any command you enter on any one of them.
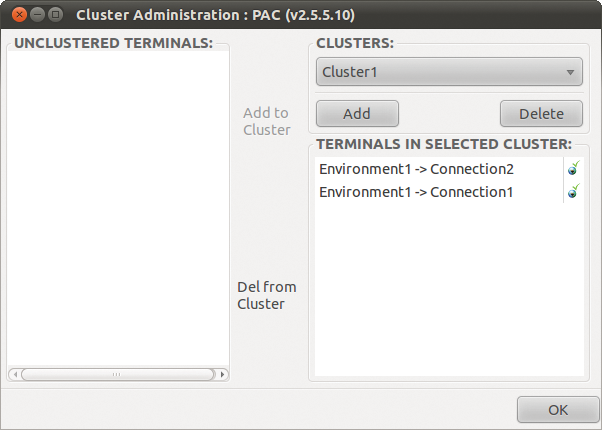
This approach looks very convenient at first glance: All of the terminals in the cluster will obey your commands, and if you define the command as a Remote Macro, this takes just two mouse clicks. What you need to remember, however, is that connections to remote computers can go down, response times will be different, and machines with different operating systems or different distributions will respond in different ways. If you use this technique, you should check whether all the computers in the cluster finish their work after issuing a command. Also, you might need to make sure that no problems or errors have occurred. To help, PAC shows the cluster to which a terminal belongs at the bottom edge of the window.
Versatile Helper
If you use Remote Macros or Expect rules, you will normally need to write out the complete terminal command, including all the parameters. If you manage a database, you also need to add the name of the administrative account to each management command. If the account name changes, you need to check all of these commands manually in the connection preferences and modify the corresponding parameter.
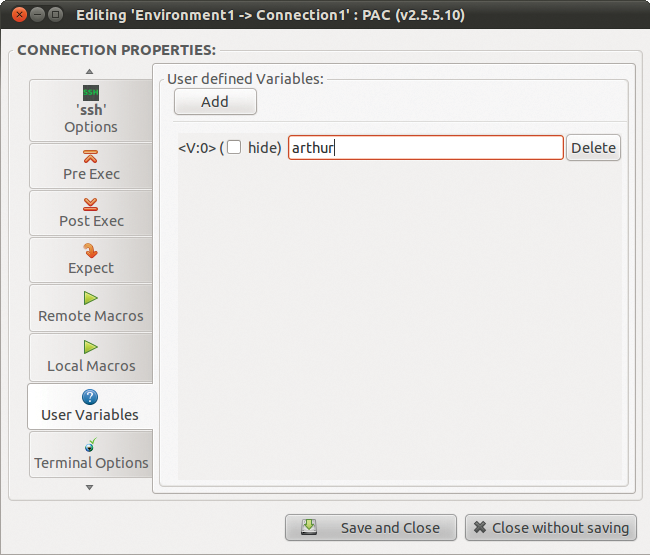
Variables remove the need for this pesky task. If you want to use variables, you first need to press Add in the User Variables tab of the connection preferences to create a new variable. In the input box that appears, just type the value of the frequently used parameter – in the database server example, this would be the name of the database administrator (Figure 9). Checking hide keeps curious onlookers at bay, which always makes sense for passwords. Then, make sure you remember the cryptic name of the variable on the far left: <V:0> for the first variable, <V:1> for the second, and so on.
Next, press Save and Close and return to the connection settings, where you can replace the value of the parameter with the variable for any commands you have stored. In the database example, you would replace the username with <V:0> in the Remote Macros tab. You can save some typing here by moving the cursor to the required insertion position, pressing the right mouse button, and selecting the required variable in User Local variables…. Incidentally, PAC stores the content of some frequently used environmental variables in Environment variables…. For example, <ENV_USERNAME> contains the name of the currently logged in user.
After pressing Save and Close once more, you can execute a command in the normal way. For example, with
mysql-user=<v:0> partsdb < maintenance.sql
in the Command line of the Remote Macros tab, PAC automatically replaces the <v:0> variable with the defined content (Figure 10). To change the value of the parameter later on, just go to the User Variables tab in the connection preferences and replace the content of the corresponding variable. Incidentally, variables can be used in any other commands you store in PAC, including local commands (see the "Local Press" box).
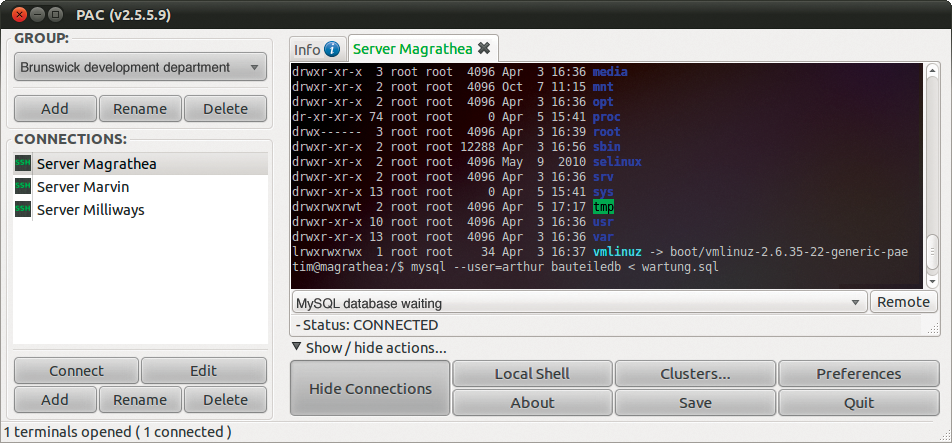
<v:0> variable with its content. In this case, it's arthur.PAC offers many other useful aids for your daily work, most of which are hiding away in the context menu that drops down when you press the right mouse button. On a Gnome desktop, you also get a PAC icon in the panel. Again, by pressing the right mouse button, you can quickly establish links, access a cluster configuration, and hide or restore the main window of PAC.
Conclusions
Once you have found your way through the user interface, PAC Manager conveniently lets you handle numerous open connections. You can tell that Vaquerizas has extended the application to suit his own needs, rather than adhering to GUI guidelines or an elegant programming style. Although a few of the input fields will display tool tips, you shouldn't rely on this happening. Nonetheless, administrators who are familiar with SSH and the like will quickly be able to get their bearings and will find that PAC can be a valuable tool.
When you quit PAC, watch out for another minor pitfall: If you don't explicitly store all the changes you make, the defaults will be restored the next time you start the program.
