Setting up Exchange Server 2010 with SP1
Chart Your Course
Before you can install Exchange Server 2010, whether in a test environment or on a production network, you first need to fulfill a couple of requirements. The server needs to run Windows Server 2008, preferably Windows Server 2008 R2. Additionally, you need an Active Directory on your network. Ideally, you will want to install Service Pack 1 for Windows Server 2008 R2 before you launch into the Exchange Server 2010 install. After completing these preparations, you can install Exchange Server 2010. This article looks at the steps.
Preparation
Even if you are aiming for a plain vanilla installation of Exchange Server 2010, it still makes sense to launch the Active Directory extensions, which the installation program executes manually beforehand. And, before you even start with the installation, you need to ensure that the functional level of your forest and domain are at least Windows Server 2003, but preferably Windows Server 2008 or Windows Server 2008 R2. To check this, launch the Active Directory Domains and Trusts tool. Right-click the top item on the menu, Active Directory domains and trusts, and select Raise Forest Functional Level.
You can then see the current functional level in your forest and raise the functional level, if needed. Then, right-click the individual domains and select Raise Domain Functional Level. Again, you will need at least Windows Server 2003 for all of your domains.
If you intend to integrate Exchange Server 2010 with an existing organization that uses Exchange Server 2003/2007, you need to run the Setup /PrepareLegacyExchangePermissions command from the Exchange installation program in each domain in your forest to set up the required privileges in active directory and create the required security groups.
The Exchange Server 2010 setup program is located at the root level of the installation DVD. The easiest approach is to slot the DVD into the drive on the domain controller. If you want to implement extensions directly on your Exchange server, you need to use the server manager to install the Active Directory management tools by clicking on Features | Add Features | Remote Server Management Tool | Role Management Tools | AD DS and AD LDS Tools.
If this is a new Exchange Server 2010 installation, enter the setup /PrepareSchema command to tell the wizard to extend the Active Directory schema. Assuming this process doesn't throw an error, and after allowing enough time for the schema changes to replicate through your directory (in a larger environment), you can enter the setup /PrepareAD /OrganizationName: organizationname command. Besides schema extensions and privileges, these commands create a new Organizational Unit (OU) with the required security groups. You can verify this step by checking whether you have a OU by the name of Microsoft Exchange Security Groups in your domain; it should contain the following groups, among others:
- Organization Management
- Recipient Management
- Public Folder Management
- Exchange Servers
- Server Management
The setup /PrepareAllDomains command prepares all of the domains in your forest for Exchange (Figure 1). After executing these commands, Active Directory is now prepared for Exchange Server 2010. You can also use the SP1 for Exchange Server 2010 installation file for these preparations. To do so, unpack the SP1 archive and run the SP1 setup file directly.

setup /PrepareAllDomains command prepares all of your domains for Exchange.When you attempt to extend the schema, you might discover that schema extensions are disabled in the schema master's registry. If this is the case, the schema extension will fail, and you need to find the following registry key on the schema master: HKLM/System/CurrentControlSet/Services/NTDS/Parameters. Change the two Dword values, Schema Update Allowed and Schema Delete Allowed, to 1. Wait for about 10 to 15 minutes after making this change before attempting to extend the schema again. If the Dword values don't exist, you will need to create them.
Preparations for Windows Server 2008 R2
As I mentioned previously, you need to install the Active Directory management tools on the Exchange server. If you will be using smartcards for authentication, you also need to download the update [1].
For a typical installation, or if you are installing the Hub Transport or Mailbox server roles, you need to obtain the Microsoft Filter Pack [2]. The installation is just a couple of clicks and doesn't require any user input. Next, pop up a PowerShell on the server and type the import-Module ServerManager command. For a typical installation, enter the command from Listing 1 to install the required server roles and features.
Listing 1: Installing Server Roles and Features
01 Add-WindowsFeature NET-Framework,RSAT-ADDS,
02 Web-Server,Web-Basic-Auth,Web-Windows-Auth,
03 Web-Metabase,Web-Net-Ext,Web-Lgcy-Mgmt-Console,
04 WAS-Process-Model,RSAT-Web-Server,Web-ISAPI-Ext,
05 Web-Digest-Auth,Web-Dyn-Compression,
06 NET-HTTP-Activation,RPC-Over-HTTP-Proxy -Restart.
If you prefer not to use the PowerShell to install these roles and features, you can use the server manager instead. You can even install the features individually. After launching the Exchange Server 2010 SP1 installation, you can use the Exchange installation interface to retrospectively install any features you need, although doing this up front is a cleaner approach.
After rebooting the server, log in and pop up a Windows PowerShell. Then, type the following command:
Set-Service NetTcpPortSharing \
  -Startup Type Automatic
After doing so, you can launch Windows Update in the control panel to make sure that the server has all the latest updates.
Typical Exchange Installation
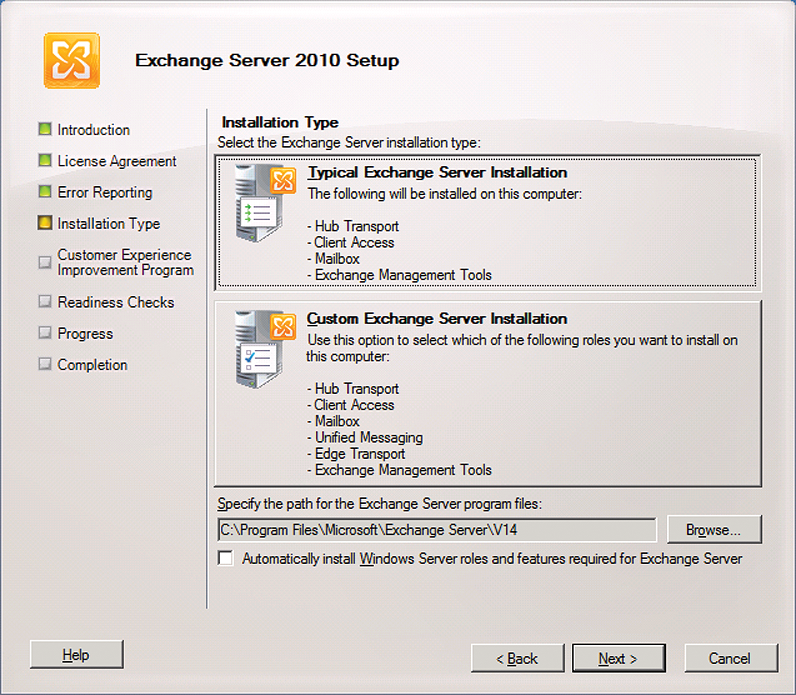
To install Exchange Server 2010 with SP1 in place, download SP1 and unpack the archive. Then, launch the server installation by executing setup.exe. You can then install a new server just like with the normal Exchange installation medium. After selecting the required languages, launch the typical Exchange Server 2010 installation. Confirm the first window and then select Typical Exchange Server Installation (Figure 2).

If you are installing a new server with SP1 in place, you will see an Automatically install Windows server roles and features required for Exchange Server checkbox lower down in the window. If you check the box, the Setup wizard will automatically install all the missing roles and features.
During the installation, you can define the external name of the client access server that users will use to access the server. In the next step, the wizard checks whether the installation can go ahead as planned. Resolving any errors here is a good idea, although you might get away with ignoring some warnings. After the installation, the Exchange management console will appear.
Troubleshooting
In some situations, the server installation will fail. In this case, you can press Retry to attempt to install the corresponding components without rebooting the server or restarting the installation. The Exchange Server 2010 installation program has its own logfile that stores information relating to the install. The file is called ExchangeSetup.log and resides in the C:\ExchangeSetupLogs directory.
The installation wizard uses this file to store any information that it gleans during the install. Entering the error in a search engine will probably take you to a comprehensive solution. The Exchange Server 2010 logfiles are plain text, and you can access them during installation if you think that installing a particular role is taking too long.
If an error occurs during installation, the setup program will often wait for various periods of time and log the error. This feature gives you the option of searching for the error while Exchange is still trying to install the server; errors will be at the end of the file.
After completing the installation, you should install SP1 on the server – that is, if you didn't run the installation with the SP1 setup files in place. If you deploy multiple Exchange Server 2010 servers on your network, Microsoft recommends updating the client access server with SP1, too. After updating the client access server, Microsoft then recommends updating the Hub Transport server, the Mailbox server, the Unified Messaging server, and finally the Edge Transport server. Service Pack 1 for Exchange Server 2010 cannot be uninstalled. You need to reinstall the server if you want to remove the Service Pack.
After installing a server, you should always install the current Rollup Package. At least three packages for Exchange Server 2010 have been released since Service Pack 1. They contain collections of important updates. In most cases, the packages are cumulative (in other words, they contain the patches from the predecessor packages). For example, Rollup Package 3 contains all the patches that you will find in Rollup Packages 1 and 2 for Exchange Server 2010 SP1. Always start by installing the current Service Pack and then add the available Rollup Packages. The link to, and details of, the current Rollup Package are available from the Exchange developer blog [3].
You don't need a product key to install Exchange Server 2010. If you don't enter a key after the install, you can test the Exchange installation for 120 days. The server stops working after this. If you have a product key, you can enter it at the Exchange management console. To do so, select Server Configuration and then right-click the unlicensed server. Select the Enter Product Key item from the drop-down menu and, in the window that appears, type the product key, and press Apply. If the key is accepted, the management console will show that the server is licensed. After this step, you will want to restart the server, or at least the information store system service, or issue:
set-exchangeserver -Identity Servername \
 -ProductKey  ProductKey
to enter the product key via the Exchange management shell.
Best Practices Analyzer
The next step is to verify the installation with the Best Practices Analyzer. This tool is available from the Exchange management console toolbox. On the first page, enable the Check for updates on starting box to tell the tool to download new rules and updates. The server needs an Internet connection for this. Then, start the update by clicking the Check for updates link.
The wizard then checks whether new rules or a new version of the BPA exist. If so, you can just allow the wizard to download and continue. Then, choose Select options for rechecking and, on the next page, type the name of a domain controller and click the Connect to Active Directory. The Advanced Login Options item lets you specify an alternative authentication method.
The server now connects with Active Directory and displays the scan window. You can select various areas to scan. In the Designator field, enter a name for the check. If you have run the Best Practices Analyzer previously, you can review the results of previous scans. At this point, you need to select the server to scan. In the Scan type to perform, you can start with the System diagnostics option. Set the network speed and then click Start scan.
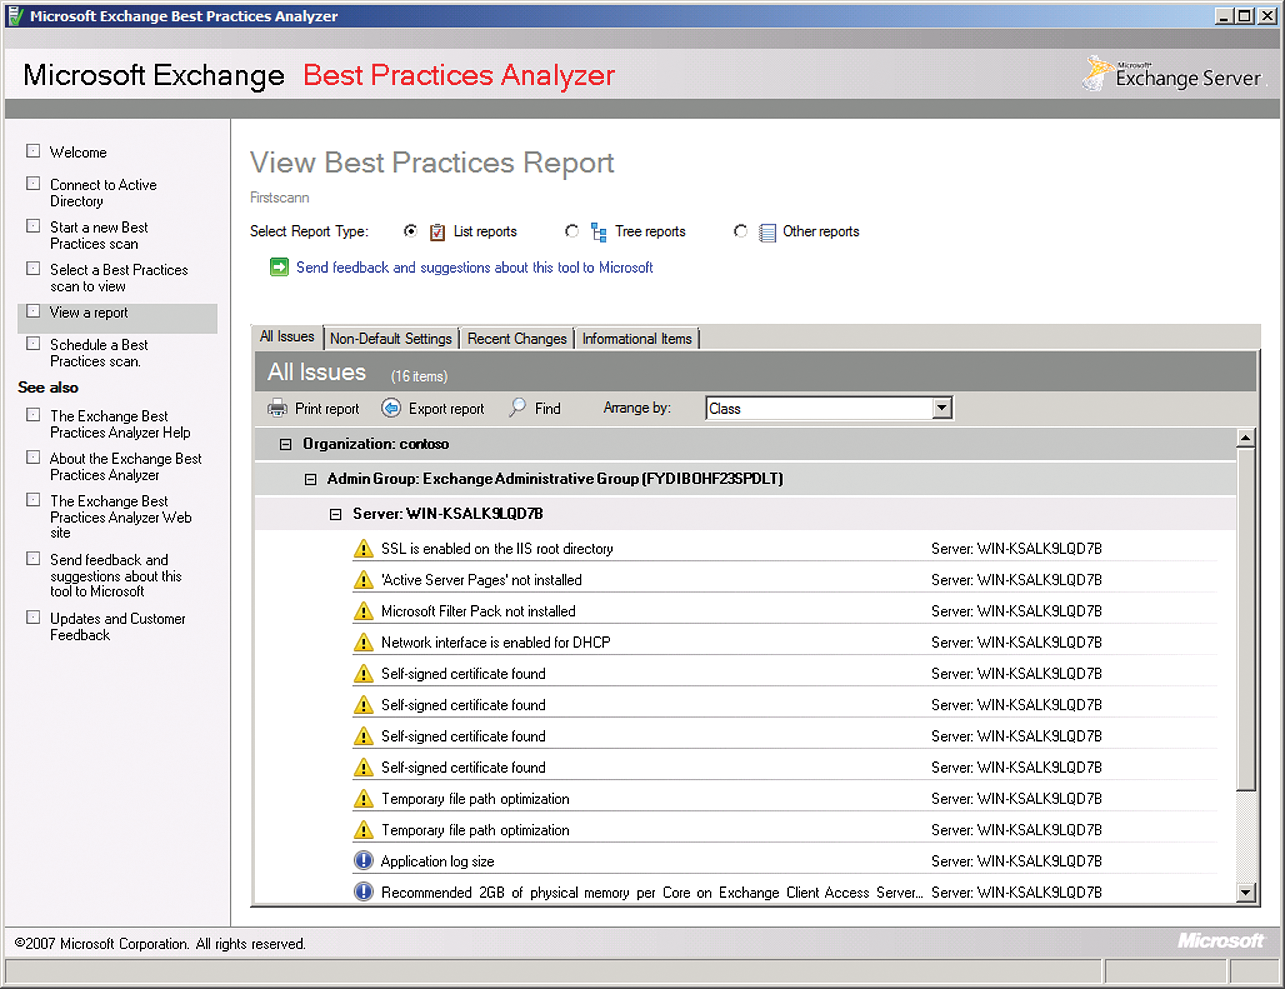
Depending on the network speed and the server load, the wizard's mileage for the scan may vary. After completing the scan, click the View Best Practices Report to view the results. The analyzer will suggest a solution for each issue it identifies (Figure 3). Be sure to resolve all problems. After doing so, run the scan again to make sure that the current configuration is error-free.

The next step is to check the event log in the log viewer to see whether the Exchange services are logging errors. Then, you can check the system services installed on the server. Above all, make sure that the services are launched and use the Automatic startup type.
Changing the Exchange Certificate
Exchange Server 2010 more consistently uses SSL connections and encryption than its predecessors. For this reason, every Exchange server needs its own server certificate. During the installation, every Exchange server issues a self-signed certificate and uses it for encryption.
The problem is that no client will trust this certification authority, which will cause certificate errors. One solution is to use the internal certification authority based on the Active Directory certificate services; alternatively, you can purchase a third-party certificate.
Clients that are members of the same Active Directory forest will automatically trust internal certification authorities. If you use a third-party CA and your choice of CA is not currently listed, you will need to add the certificate from the CA manually to the list of trusted root certification authorities.
Exchange Server 2010 has a new option for managing server certificates directly at the Exchange management console. You don't need to use the Exchange management shell for this. In the management console, just click on Server Configuration, and then on the server whose certificate you want to manage. On the right side of the window, you will see the options New Exchange Certificate and Import Exchange Certificate. The two options are also available from the server's drop-down menu. You will see the individual certificates at the bottom of the console window.
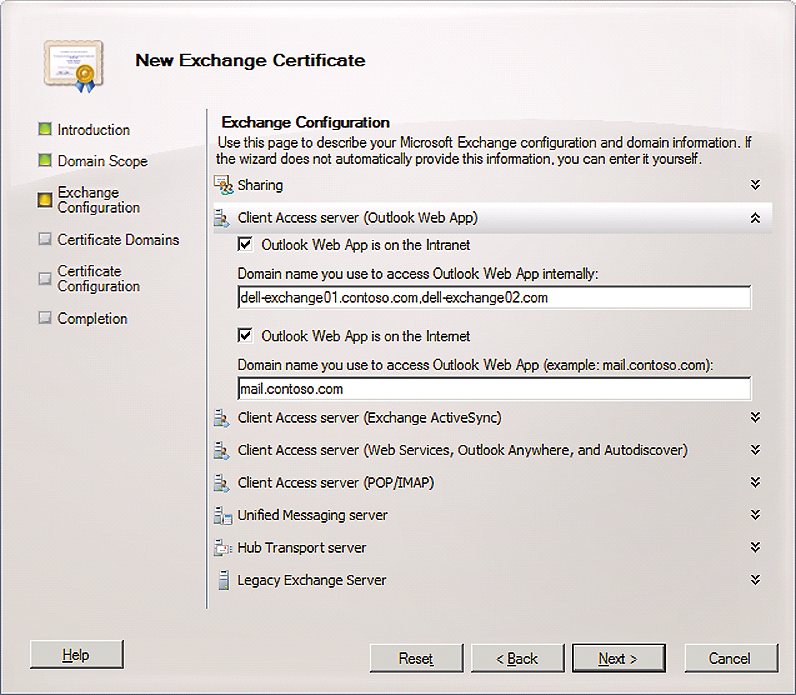
To create a new certificate, first select New Exchange Certificate (Figure 4). The wizard then creates a certificate request that you can then send to your Active Directory certification service, or to a third-party's web front end. The first step is to enter the name that will identify the certificate in the management console. On the next screen, you can opt to link a subdomain with the same certificate. The name with which the server is addressable from the web must be stored as a generic name. Otherwise, clients that access the server from the Internet will see an error message, because the certificate name doesn't match the URL for access.

If you use the Active Directory certificate services, you can type http://Servername/certsrv to access the certificate request. When installing the certificate services server role, make sure that you also install the web interface. Then, on the website for the certificate authority, select the Request a certificate option and then select an advanced request. Next, select Submit a certificate request; this uses a Base64-encoded CMD, a PKCS10 file, or a renewal request, which uses a Base64-encoded PKCS7 file. In the next window, copy the complete text from the request file that you just created into the Stored request box.
Download the file for the certificate, then go to the Exchange management console and click Server Configuration. When you get there, select the Exchange server for which you created the request, and in the lower part of the window right-click the certificate you created. Select the option Complete pending request from the drop-down menu. Select the certificate file and finish the process.
After creating a certificate request, and thus requesting the certificate from the CA, exporting, and installing the certificate, you still need to bind the individual Exchange services to the certificate. Again, you can use the right-click menu for this. To do so, select the option Assign services to this certificate.
This command is only available if the certificate is error-free. On the next page in the wizard, select Add to add the server on which you will be assigning services to the new certificate. Then, select the corresponding services.
Configuring Email Transmission and Reception
The email transmission and reception feature in Exchange Server 2010 comprises various components. The following six areas are important for the configuration and will need manual attention:
- Email reception: Exchange will accept mail from domains listed in the Accepted domains via Configuration Organization/Hub Transport.
- To allow the Exchange server to accept email, you need to create a receive connector and configure it to accept email from the sending server. Use
Server Configuration/Hub Transport/Servernameto find the receive connectors. - To allow the server to deliver email, the email address must exist in the organization. You can check the E-Mail Address Policy in Configure Organization/Hub Transport to see which email addresses the server assigns to your users.
- You can use the Receiver configuration in the receiver's context menu to create inboxes.
- To allow Exchange to send email, you need to configure at least one send connector. The configuration is located in Configure Organization/Hub Transport in the Send Connectors tab.
- Send connectors send email based on remote domains, which you configure in the Remote domains tab in Configure Organization/Hub Transport. A wildcard (*) will already exist.
