Optimizing Hyper-V network settings
Flow Control
Version 3.0 of Hyper-V in Windows Server 8 offers several improvements in terms of networking that improve the system's performance. Examples include direct access by virtual machines to the network cards' hardware functions and improved control and configuration of the network connections. But, the current 2.0 version of Hyper-V in Windows Server 2008 R2 also provides optimization options that administrators can use to accelerate substantially the virtual network connections.
Hyper-V Networks
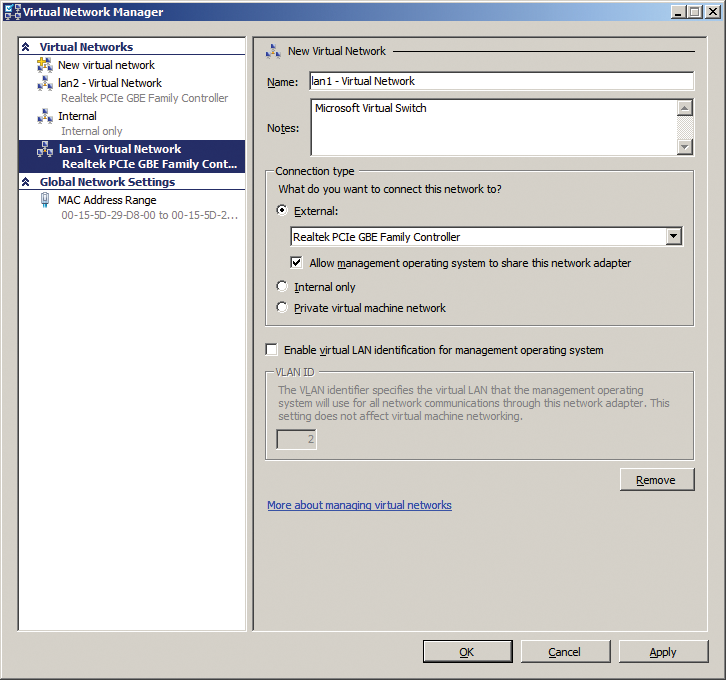
For a virtual server on a Hyper-V network to access the physical network, a connection must exist between the virtual and the physical network card in the Hyper-V host. The hypervisor uses a virtual network switch to provide this link. Because the various virtual servers on the Hyper-V host are forced to share the network card, conflicts and resource bottlenecks can occur. Network management is handled by the Virtual Network Manager in the Hyper-V Manager (Figure 1). Here, you can create three different types of virtual network:
- External virtual networks support communications between the virtual servers themselves and the rest of the network. This type of connection includes the physical network cards. The connection is handled by a virtual switch that connects the Hyper-V host and the virtual servers that use the connection to the network. In Hyper-V Manager, you can assign only one external network for each network card. But, you can create any number of internal virtual networks because they are not connected to a physical network card; instead, they only handle internal communications.
- Internal virtual networks only support communications between the virtual servers themselves and with the physical host on which the servers are installed. In other words, the servers can't communicate with the rest of the network.
- Private virtual networks support communication between the virtual servers on the host. The servers cannot communicate with the host itself.
It is a very good idea to plan exactly what type of virtual network the individual virtual servers need. You don't always need external networks.

Using Dedicated Network Connections
Always use one network card for server management on each Hyper-V host: Do not use the card for the Hyper-V configuration. If you do not following this setup, you increase the risk of performance hits on some virtual servers if the load on the network connection is heavy (e.g., copying patches or new applications to servers). You should always isolate Hyper-V host network traffic from traffic between virtual machines.
This approach is also recommended if you connect networked storage (e.g., NAS or iSCSI). Again, the network card should be available on the Hyper-V host to handle the data traffic to the storage device exclusively. That is, you can achieve considerable performance improvements if you use dedicated network cards.
To extend these optimizations to the virtual Hyper-V servers, identify the virtual servers that need the most network bandwidth and deploy separate network cards for those servers using virtual external networks. Servers that only need a small amount of network bandwidth can be grouped into multiple virtual networks. This kind of grouping is easy to achieve by grouping the corresponding physical network cards to create external networks and assigning them to the required servers. The basis for fast network communications is always going to be optimum planning of the use of your physical network cards.
Using High-Performance Virtual Network Cards
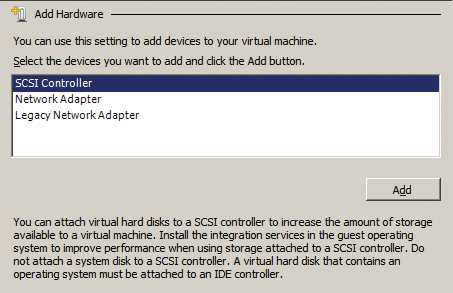
Although the general structure of the networks is configured on the Hyper-V host, the settings of the individual virtual servers determine what kind of virtual network cards you use for each server. You can click on Add Hardware in the settings of the virtual server to see the options that you have for integrating various network cards (Figure 2).

The Network adapter type uses the connection between the hypervisor and the physical network card. This connection can send and receive network data very quickly. Communication is handled by an internal drive on the virtual machines; the driver itself is provided by the integration services. For this reason, you should always enable, or at least install, the integration services on the virtual servers.
The Legacy network adapter type only makes sense if you are virtualizing special servers that cannot use the new type. Examples would be servers that you need to boot off the network, for example, using PXE. If the Network adapter type can be used for a server of this kind, use Legacy network adapter instead. Doing so tells Hyper-V to emulate an Intel 21140-based PCI Fast Ethernet adapter. This adapter will work without installing the driver, but it doesn't give you the high speed of the virtual switch between the hypervisor and the physical network card. Emulating this card means that the processor on the Hyper-V host must use some of its own computational time.
Handing Over Control to the Network Card
Windows Server 2008 R2 supports TCP chimney offload, which roughly translates as delegating authority for completing network traffic from the processor to the network adapters, thus potentially accelerating the system's performance for applications and on the network. Hyper-V in Windows Server 2008 R2 also uses this technique. For maximum effect, it is important to ensure that the Hyper-V host and the individual virtual machines are configured for TCP chimney offload. The settings for this are configured in the network connection properties on the host and virtual servers, as well as directly at the operating system level from the host and virtual server command lines.
On the Hyper-V host and virtual servers where you want to use this function, you need to type:
netsh int tcp set global chimney=enabled
To disable the function, issue:
netsh int tcp set global chimney=disabled
To view the settings and see whether this offloading process works, type:
netsh int tcp show global
netstat -t
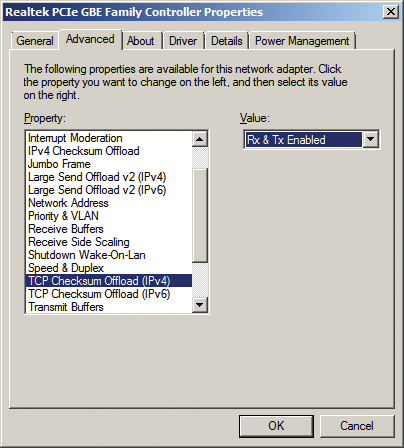
Next, go to the device manager on the virtual servers and the host and open the properties of the network adapter for which you want to enable the function. Go to Advanced and look for the TCP checksum offload function. Make sure that Rx & Tx enabled is selected (Figure 3).

Hyper-V in Clusters: MAC Addresses
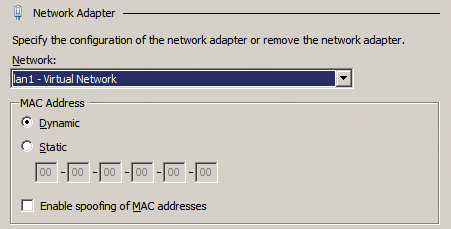
The settings for virtual MAC addresses in the virtual network of properties are very important (Figure 4). You will definitely need to enter some settings here for live migration if you run Hyper-V in the cluster – especially when you activate the operating system; otherwise, you will continually need to activate the servers. The settings also play a very important role in network load balancing (NLB) clusters with Exchange Server 2010 and SharePoint Server 2010 because communications here also depend on the MAC addresses.

If you move the virtual server that has dynamic MAC addresses enabled to another host in your cluster, the server's MAC address will change when it restarts. An MSDN article [1] provides detailed information on this. Every Hyper-V host has its own pool of dynamic MAC addresses. To find out which addresses the pool contains, go to the Hyper-V Manager and launch the MAC address pool function.
If the MAC address of the virtual server changes, you might need to reactivate the operating system; otherwise, a virtual NLB cluster might not work. Microsoft also provides more details on this [2]. For this reason, enabling static assignments for MAC addresses on your virtual servers is highly recommended. The setting is to be found in Network adapter on the individual virtual servers in Hyper-V Manager.
The settings also let you manage network adapter spoofing. Hyper-V can precisely distinguish which network data should be sent to the individual servers and uses the MAC addresses on the virtual server. In other words, virtual servers receive only the data intended for their MAC addresses.
Networks and Live Migration
If you run a Hyper-V cluster, you will also want to use dedicated network connections – especially if you rely on live migration in Windows Server 2008 R2. During live migration, virtual computers can be moved from one host to another without losing user data or dropping user connections. The servers continue to be active while they are migrating between cluster nodes.
The choices are either to start a live migration in the cluster console, use a script (including PowerShell), or use the System Center Virtual Machine Manager 2008 R2. Throughout the process that follows, the virtual machine continues to work without any restrictions, and users can continue to access the virtual server. The process includes the following steps:
- Initially, the source server opens a connection to the target server.
- The source server transfers the configuration of the virtual machine to the target server.
- Based on this empty configuration, the target server creates a new virtual machine that matches the virtual machine to be migrated.
- The source server transfers the individual RAM pages to the target virtual machine with a standard size of approximately 4KB. The faster the network, the faster the RAM content can be transferred.
- The target server takes control of the virtual disks on the source server on the virtual machine to be transferred.
- The target server switches the virtual machine online.
- Finally, the virtual Hyper-V switch is notified that network traffic should now be routed to the MAC address of the target server.
For this migration to work, the host systems must be connected on the same cluster. The network adapter performance also plays an important role. For this reason, dedicated cards are particularly important. This kind of migration will not work without a cluster or between different clusters. Additionally, the VHD files also need to reside on the same shared volume. As of Hyper-V 3.0 in Windows 8 Server, Microsoft has introduced Hyper-V replica. This function supports asynchronous replication of virtual servers on Hyper-V hosts without the need for a host to belong to a cluster. Again, the hosts should use dedicated network cards.
Fast migration in Hyper-V 1.0 (Windows Server 2008) differs mainly in that the machines remain active during the migration and the RAM content is transferred between the servers. In the case of a fast migration, Hyper-V first disables the machines. Besides live migration, Windows Server 2008 R2 can handle fast migration. This technology is based on the cluster with Windows Server 2008 R2 and thus requires either the Enterprise or Datacenter Edition of Windows Server 2008 R2 or the free Microsoft Hyper-V Server 2008 R2.
A cluster with Windows Server 2008 R2 can be configured so that the cluster nodes prioritize the network traffic between the loads and the shared storage. For a quick overview of the network settings that the cluster uses for communications with the Cluster Shared Volume (CSV), you can launch a PowerShell session on the server and execute the Get-ClusterNetwork cmdlet.
Note that the cmdlet does not work unless you have integrated the cluster management features in PowerShell by issuing the Add-Module FailoverClusters command. Also, you can use the cluster management console to see which networks exist and can be used by the server.
Hyper-V Network Command Line
The free NVSPBIND [3] tool lets administrators who run Hyper-V on a core server manage the individual bindings for network protocols on the Hyper-V server's network cards. This tool was created by the developers of Hyper-V and works on core servers, Hyper-V Server 2008, and Hyper-V Server 2008 R2. NVSPSCRUB [4] also lets you delete all of your Hyper-V networks and connections. The following options are available in nvspscrub:
-
/?displays help. -
/vdeletes disabled virtual network adapters. -
/pdeletes the settings of the virtual network adapter. -
/ndeletes a special network.
This tool is particularly useful if you are running Hyper-V on core servers where you do not have access to Hyper-V Manager.
Virtual LANs and Hyper-V
Hyper-V in Windows Server 2008 R2 also supports the use of virtual LANs (VLANs). These networks let the administrator isolate data streams to improve security and performance; however, the technology must be integrated directly into the network. Switches and network adapters need to support this function, too. One option is to isolate the server management network traffic from the virtual server network traffic.
For this connection to work, you need to define which physical network adapters on the Hyper-V host (in the advanced settings of the network adapter) belong to which VLAN ID card (Figure 5). After doing so, you can launch the Virtual Network Manager in the Hyper-V Manager and select the network connection you want to bind to the VLAN. Again, you need to specify the VLAN ID.

To do this, you first need to enable Virtual LAN identification for the management operating system. After you specify the ID, data traffic from this connection will use the corresponding ID.
Internal networks in Hyper-V also support VLAN configuration, and you can additionally bind virtual servers to VLANs. To do so, you must specify the VLAN ID in the properties of the virtual network adapters. If you want the virtual server to communicate with multiple VLANs, simply add multiple virtual network cards to the server and configure the corresponding VLAN.
This pervasive support for VLANs, assuming you have switches that support it, means you can set up test environments or logically isolate Hyper-V hosts, even if they are configured on the same network.
