High-availability workshop: GFS with DRBD and Pacemaker
Simultaneous
Cluster filesystems are most frequently seen in the context of high-availability (HA) clusters. The most popular filesystems of this type are GFS2 and OCFS2 – although Lustre has attracted much attention – and NFS version 4 offers a similar service (pNFS). Of course, you can argue the pros and cons of cluster filesystems until the cows come home (see the "Risks of DRBD in Dual-Primary Mode" boxout), but once the decision is made for a cluster filesystem, Pacemaker and DRBD will help you ensure high availability for the system.
In this article, I will look at deploying Pacemaker as a cluster manager for clustering filesystems using GFS as an example. Unfortunately, the four "major league" enterprise distributions – Debian, Ubuntu, SLES, and RHEL – completely fail to agree on the right kind of setup for this scenario. The void is particularly obvious when you compare Red Hat's approach with that of the other three distributions.
GFS History
The clustering filesystem GFS has actually been around since 1995, but it didn't start to make a name for itself until Red Hat acquired the vendor Sistina in 2005 and started to push development. GFS officially made its way into Linux when Linus Torvalds added it to kernel version 2.6.19. GFS2 was thus a later entry to the kernel than the comparable OCFS2, which made it into kernel 2.6.16.
In the kernel, GFS relies on the Distributed Lock Manager (DLM) structure. This software, which was also contributed by Red Hat developers, is basically a large framework that coordinates simultaneous access to storage resources. GFS2 only works if the Distributed Lock Manager is enabled and working properly. Red Hat's desire to see other software products use DLM was fulfilled: cLVM, the LVM cluster variant, also uses DLM, which is a logical choice because Red Hat is massively involved in LVM's development.
If you want to use DLM and GFS, you first need to make sure the kernel modules are loaded. Both of these components also need a userspace counterpart to handle communication with the kernel modules and provide an interface for other programs. For example, a control daemon for GFS ensures that the necessary exchange of data between the nodes in a GFS cluster really does take place.
And, this is precisely the issue: To save the effort of implementing a separate cluster manager for GFS (like the one that, say, Oracle created for OCFS2), the control daemons have always been tightly integrated with Red Hat's own Cman cluster manager in GFS's case. But, the events of the past three years in terms of integrating GFS with available cluster managers will seem more like a bad joke for anybody who has not followed the developments.
Tunnel Vision
While Corosync – mainly propagated by Red Hat – established itself as the future solution for cluster communication, Pacemaker's star continued to rise. Red Hat then created control daemons for DLM and GFS to support the integration of the software with Pacemaker. The binaries responsible for this are dlm_controld.pcmk and gfs_controld.pcmk; like other resources, they are launched via Pacemaker resource agents. Because both DLM and GFS have become part of the Red Hat Cluster Suite (RHCS), the control daemons for Pacemaker were delivered as part of the RHCS scope. Thus, up to RHCS 3.0, everything was fine if you wanted Pacemaker and GFS to cooperate.
But Red Hat changed its policy in Red Hat Cluster Suite 3.1, deciding to massively re-engineer its own cluster product so that Pacemaker – whose main developer had been taken on by Red Hat in the meantime – was given an interface for Cman. The idea was for the CRM to use this interface to communicate with the tools that control DLM and GFS. From Red Hat's point of view, the Pacemaker control daemons for DLM and GFS thus became superfluous, and they were simply removed.
For understandable reasons, Novell wanted to avoid making RHCS part of its own product, although that would be perfectly fine from a licensing point of view. Instead, SUSE will maintain the legacy RHCS 3.0 control daemons autonomously in future. This means that there are currently two methods of running GFS on Linux with Pacemaker – and they differ vastly. On RHEL 6, you need Pacemaker with Cman integration, and on Debian, Ubuntu, and SLES, you need the legacy variant that uses separate control daemons for DLM and GFS in Pacemaker.
Incidentally, the next major change that affects GFS is just around the corner: Red Hat's roadmap envisions replacing Cman completely with Pacemaker. In the not-too-distant future, you can expect Red Hat to make the control daemons for Cman Pacemaker-compatible, which will take them exactly where they were in version 3.0 of RHCS.
That's the theory; now, I'll move on to some action, starting with a GFS cluster setup for Debian, Ubuntu, and SLES. Debian and Ubuntu include Pacemaker in their standard distributions but not exactly the latest version. Pacemaker update packages are available in the Ubuntu HA PPA [1] or in the backports directory for Squeeze [2]. If you use SLES on your servers, you need the High Availability Extension (HAE), which includes packages for GFS. Alternatively, there are third-party packages on the web.
Preparation
As I mentioned earlier, you need the "legacy" daemons for Ubuntu 10.04 and Debian Squeeze – both distributions include them in the gfs-pcmk and dlm-pcmk packages, which should be available on the system. In SLES, you can search for the required packages. This article assumes that you have installed DRBD and that at least one DRBD resource is available.
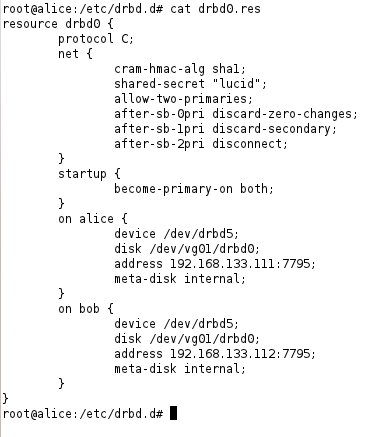
You need to set up the resource so that it can run in dual-primary mode (Figure 1).

net section for the resource and add fencing at resource level.Assuming a "normal" resource, as described in the DRBD article in the HA series [3], this will mean two changes to the resource's configuration.
On one hand, you need to add an allow-two-primaries yes; entry to the net section of the resource's configuration. On the other hand, you need to tell DRBD what to do if a split-brain situation occurs by adding following lines
after-sb-0pri discard-zero-changes;
after-sb-1pri discard-secondary;
after-sb-2pri disconnect;
to the resource's net section.
Additionally, Pacemaker must be installed with its basic configuration complete. At this point, I should mention that Pacemaker relies on a working STONITH configuration; this is the only option the cluster manager has for excluding cluster nodes that have run haywire. The final assumption I make in this article is that the DRBD resource is already configured as such in Pacemaker, and that it is available as ms_drbd_gfs. Note that you need to create the ms resource in a slightly different way than when a DRBD is running in primary-secondary mode:
ms ms_drbd_gfs p_drbd_gfs meta master-max=2 clone-max=2 notify=true
After fulfilling these requirements, you need to switch the DRBD resource on both sides of the cluster to Primary mode by issuing the
drbdadm primary resource
command (Figure 2).

GFS2 in the Cluster
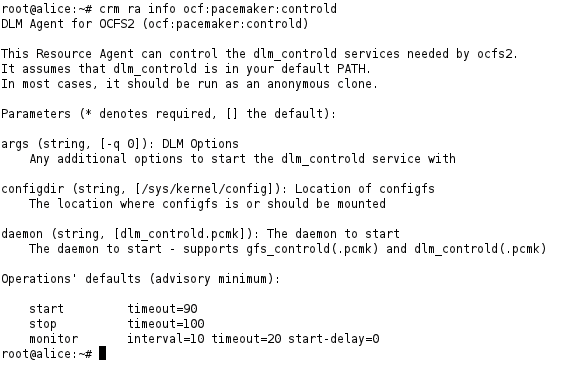
The next step is to configure the resource in Pacemaker. The cluster needs two services for GFS: dlm_controld, which handles communication with the Distributed Lock Manager, and gfs_controld.pcmk, which controls the GFS2 daemon. The two services are managed via the ocf:pacemaker:controld resource agent. The configuration in the CRM shell for this example should look similar to Listing 1.
Listing 1: Resource Configuration
01 primitive p_controld_dlm ocf:pacemaker:controld op monitor interval="120s"
02 primitive p_controld_gfs ocf:pacemaker:controld params daemon="gfs_controld.pcmk" args="" op monitor interval="120s"
03 clone cl_controld_dlm p_controld_dlm meta globally-unique="false" interleave="true"
04 clone cl_controld_gfs p_controld_gfs meta globally-unique="false" interleave="true"
05 colocation co_dlm_always_with_drbd_master inf: cl_controld_dlm ms_drbd_gfs:Master
06 colocation co_gfs_always_with_dlm inf: cl_controld_gfs cl_controld_dlm
07 order o_gfs_always_after_dlm inf: cl_controld_dlm cl_controld_gfs
08 order o_dlm_always_after_drbd inf: ms_drbd_gfs:promote cl_controld_dlm
The entries here tell Pacemaker that the control daemons should be running on all cluster nodes – the clone entries take care of this. The constraints ensure that the DLM daemon only starts where the DRBD resource is running in primary mode, and that it waits for DML and the GFS control daemon to launch before starting.
Once DLM and the GFS control daemons are running, the GFS filesystem can be assigned to the DRBD resource:
sudo mkfs.gfs2 -p lock_dlm -j2 -t pcmk:pcmk resource
resource is the DRBD resource device node – for example, /dev/drbd/by-res/disk0/0.
What's missing now is the filesystem resource in Pacemaker, which mounts GFS on the cluster nodes. The ocf:heartbeat:Filesystem command supports GFS2, and the matching resource configuration is shown in Listing 2.
Listing 2: GFS2 Filesystem Resource
01 primitive p_filesystem ocf:heartbeat:Filesystem params
02 device="/dev/drbd/by-res/disk0/0" directory="/opt" fstype="gfs2"
03 op monitor interval="120s" meta target-role="Started"
04 clone cl_filesystem p_filesystem meta interleave="true" ordered="true"
05 colocation p_filesystem_always_with_gfs inf: cl_filesystem cl_controld_gfs
06 order o_filesystem_always_after_gfs inf: cl_controld_gfs cl_filesystem
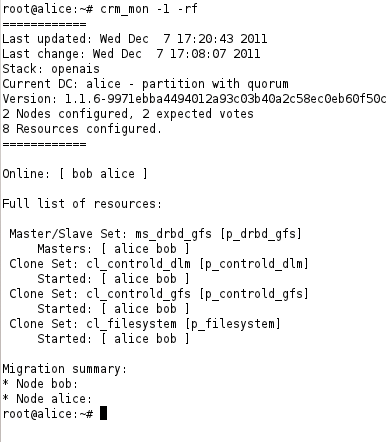
In combination with the clone entry, the primitive resource ensures that the filesystem runs on all the cluster nodes; however, the constraints stipulate that the resources are only allowed to run if the GFS control daemon is running. After issuing a commit in the CRM shell, the cluster should look like Figure 3.

crm_mon -1 shows that all GFS services are correctly configured and working.GFS2 on RHEL 6
The GFS setup on Red Hat Enterprise Linux 6 (and distributions compatible with it) is different. The control daemons that connect Pacemaker with DLM and the GFS do not exist. Instead, Pacemaker has a direct interface to Cman (Figure 4).These systems do not launch Corosync, which loads Pacemaker as a module, as has been the case in this HA series thus far. Instead, Pacemaker runs a Cman child process and receives critical information from Cman.

ocf:pacemaker:controld resource agent only exists on Ubuntu, Debian, and SLES. Cman is responsible for controlling DLM and GFS on RHEL-compatible systems.Configuring the DRBD resource on RHEL is no different from the configuration for Debian, Ubuntu, or SLES. RHEL also needs the DRBD resource to be set up in dual-primary mode. Once you have a DRBD configuration that fits the bill, you can turn to configuring Cman, which you will typically need to install first.
Cman for Pacemaker
Cman's configuration is located in /etc/cluster/cluster.conf. The file uses an XML-based syntax – as does Pacemaker internally. You only need to edit it once, and it will work perfectly. In the Pacemaker example, the cluster.conf might look like Listing 3.
Listing 3: cluster.conf
01 <?xml version="1.0"?>
02 <cluster config_version="1" name="mycluster">
03   <logging debug="off"/>
04   <clusternodes>
05     <clusternode name="pcmk-1" nodeid="1">
06       <fence>
07         <method name="pcmk-redirect">
08           <device name="pcmk" port="pcmk-1"/>
09         </method>
10       </fence>
11     </clusternode>
12     <clusternode name="pcmk-2" nodeid="2">
13       <fence>
14         <method name="pcmk-redirect">
15           <device name="pcmk" port="pcmk-2"/>
16         </method>
17       </fence>
18     </clusternode>
19   </clusternodes>
20   <fencedevices>
21     <fencedevice name="pcmk" agent="fence_pcmk"/>
22   </fencedevices>
23 </cluster>
This example also includes some fencing directives that force Cman to forward fencing requests of any kind directly to Pacemaker. The clusternode entries refer to the cluster nodes; instead of pcmk-1 and pcmk-2, you will need the cluster names for your environment here.
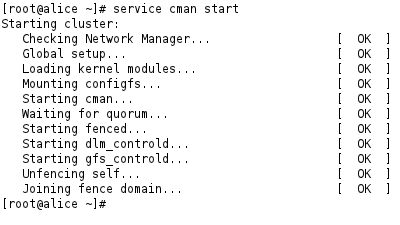
Once the Cman configuration file is set up, it's time to start the matching service: service cman start. The output at the command line should look like Figure 5. You can clearly see that Cman launches the control daemons for both DLM and GFS. In contrast to the variant for Debian and others, these services are not part of the cluster information base (CIB) monitored by Pacemaker on RHEL-compatible systems.

service cman start command launches Cman, which then launches Pacemaker as the cluster manager proper.DRBD for the Cman/Pacemaker Team
When you first launch Pacemaker in this way, the CIB will obviously be empty. It is thus a good idea to take care of fencing and the basic Pacemaker settings now. The resource and the master/slave setup for DRBD can now be added to the CIB; you can use the same approach as for the other systems, as described previously.
Additionally, you need to ensure that Pacemaker launches DRBD in dual-primary mode on RHEL as well. You can set the value of master-max and clone-max to 2 for this. Again, the example refers to the resource as ms_drbd_gfs.
Creating a GFS2 Filesystem
The next step is to create a GFS filesystem on the DRBD resource, which is now running in primary mode on both sides of the cluster, thanks to Pacemaker. The command for this is
mkfs.gfs2 -p lock_dlm -j 2 -t pcmk:web device
where you need to replace device with the resource's device node: for example, /dev/drbd/by-res/drbd0/0.
Finally, Pacemaker lacks a filesystem resource that makes GFS usable on the cluster nodes, including clone rules and constraints (Listing 4).
Listing 4: Pacemaker Filesystem Resource
01 configure primitive p_gfs_fs ocf:heartbeat:Filesystem params
02 device="/dev/drbd/by-res/drbd0/0" directory="/opt" fstype="gfs2"
03 clone cl_gfs_fs p_gfs_fs
04 colocation co_cl_gfs_fs_always_with_ms_drbd_gfs_master inf: cl_gfs_fs ms_drbd_gfs:Master
05 order o_cl_gfs_fs_always_after_ms_drbd_gfs_promote inf: ms_drbd_gfs:promote cl_gfs_fs
Any other services that you want Pacemaker to launch on both sides of the cluster, once GFS is available on both nodes, would thus be integrated using colocation and order constraints with cl_gfs_fs.
Conclusions
Finding a meaningful deployment scenario for this GFS cluster constellation is probably far more difficult than setting up the whole thing. The requirement for a comprehensive fencing setup because of the dual-primary mode DRBDs makes this solution complex.
A replicated filesystem solution might soon send GFS and company to the back of the field, and Gluster and Ceph are already champing at the bit.
