A free anti-spam tool for Exchange environments
Filtered
The Anti-Spam SMTP Proxy [1] (ASSP) acts as a proxy server between the Internet and local email servers, where it filters all email for spam. The ASSP open source server solution is also suitable for Exchange environments because it is based entirely on SMTP.
The solution supports all of the current Exchange versions, including Exchange Server 2010, relying on Bayesian filters, SPF scanning, its own honeypot, and real-time blacklists, among other features. Management takes place through a web interface. Additionally, you can scan mail for viruses with ClamAV. The feature scope is easily on a par with that of commercial solutions. If your company is looking for an anti-spam solution, ASSP is definitely worth considering.
After the trouble-free installation, the filter is up and running in a couple of minutes. Web interface-based management also makes the setup process very convenient (Figure 1).

Smaller businesses might also be interested in the POP3 connector in ASSP. This feature lets you pick up email from various POP3 servers, scan the messages for viruses and spam, and then forward the results to internal email addresses. One conceivable application for a scenario like this would be environments that deploy Microsoft's Small Business Server. Because this feature is free, too, administrators could set up a professional anti-spam solution in smaller companies with very little overhead.
Anti-Spam SMTP Proxy Basics
ASSP needs to be run on your server, especially in medium-sized enterprises with a large volume of email. The best option is to use a Linux server – for example, Ubuntu or Debian. That said, however, administrators on Windows networks do have the option of running ASSP on Windows. If you prefer not to operate a dedicated server, you can also run ASSP on the same machine as your email server.
ASSP is also a straightforward choice if you want to install on a virtual server. The anti-spam solution is built on Perl and can thus be deployed on a single machine without conflicting with Exchange. ASSP picks up email from the Internet and scans it for spam and viruses before using SMTP to forward it to internal email servers. However, you will not want to choose this approach if your server needs to process more than 5,000 pieces of email a day. Scanning for viruses and spam consumes a fair amount of server performance.
In this article, I will look at installing ASSP directly on an Exchange server because the setup there is slightly more complicated. ASSP doesn't need to be the direct gateway to the Internet. For example, if you run Exchange Server 2010 and also deploy an edge transport server, the server can stay connected to the Internet. The edge transport server then sends the messages to ASSP. After scanning, the server with ASSP then forwards the email to the users' Exchange server. Email destined for the Internet takes the opposite route. Internal Exchange servers send the messages to ASSP, which forwards them to the edge transport server, which in turn sends them on to the Internet.
If you are installing ASSP on the same server as Exchange, you will need to modify the standard port after completing the installation; otherwise, ASSP will use SMTP port 25. Alternatively, you can use a separate network adapter for ASSP and use the adapter's IP address and port 25. The Exchange connectors are obviously not allowed to use ASSP's IP address in this case. This approach gives you a more stable installation than operations using the same IP address but different ports.
Again, as a general rule, ASSP will be happier running on a separate server, because the solution requires a number of additional products that can actually disable an Exchange server. Running ASSP as a virtual server on Ubuntu and Debian is unproblematic, but does require a modicum of Linux knowledge. If you install ASSP on an Exchange server, the software runs in a command window. You can also configure it as a service. The project wiki [2] and the forum [3] provide many useful tips on configuring ASSP for the best results in your own environment.
ASSP for Exchange 2010
To determine whether ASSP is the right choice for your environment, you will probably want to perform a mockup first. Because ASSP is written in Perl, first you need to install the current 32-bit version of ActivePerl [4] on your Windows server in the default directory, C:\Perl. If you decide to use a different directory, you need to modify the appropriate parts in the ASSP scripts.
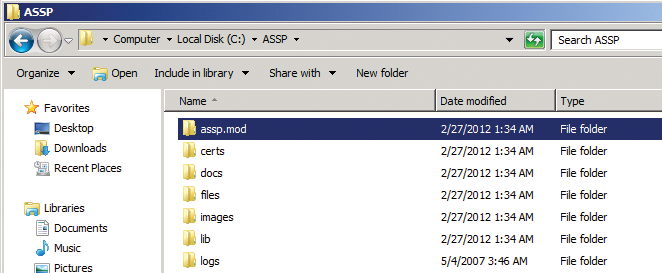
Next, download the current version of ASSP, unpack the archive, and copy the complete assp directory from the archive into the root directory on your server. The next step is to download the assp.mod.zip file from the previous download page. You will find this file by following the ASSP V2 multithreading link in the download area. Unpack the archive and copy the assp.mod\assp.mod directory into the C:\assp root directory as an additional directory (Figure 2).

Next, you need to install the Microsoft Visual C++ 2008 Redistributable Package (x86) [5] on your server. You don't need a more recent version, even if you have Windows Server 2008 R2 and Exchange Server 2010.
Before you proceed with the rest of the ASSP installation, you will need one more thing on the server: OpenSSL version 0.9.x. Make sure you do not use a more recent version. The required installation files are available online [6], and you can simply install the software with the default settings.
Make sure that the c:\perl, c:\perl\bin, C:\assp, and c:\openssl\bin directories are entered in the server's path as system variables. If you change the path, you need to restart the open command window to make sure that it uses the correct path.
Next, pop up a command line on the server and change to the C:\assp\assp.mod\install directory. During the installation, ASSP needs to download various modules from the Internet. In other words, the server on which you are installing ASSP must have a working Internet connection.
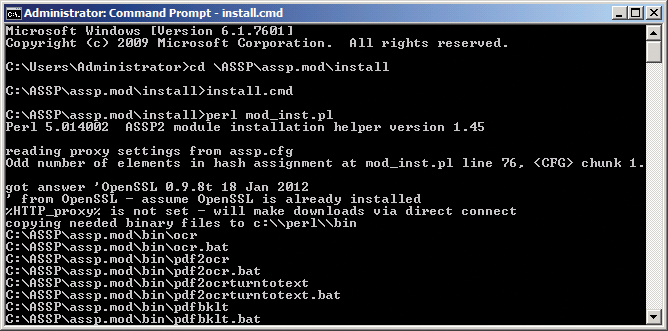
The installation wizard can also cooperate with a proxy server for this. If you do not set up a proxy server for Internet access, the next step is to type the perl mod_inst.pl command. If you are using your own directories and settings, or a proxy server, you need to modify the ASSP configuration files before installation. To do so, open the install.cmd file. If you are using a user-defined directory for ASSP, fill in the blank line using the format set ASSPDIR=directory. You also need to enter the proxy server in the file. When you're done, store the file and start the installation by typing install.cmd (Figure 3).

When installing some modules, you might see some error messages, but this is unimportant in a test environment because ASSP will work without these modules. If you decide to go ahead with production use of the anti-spam proxy, you can retrospectively add the missing modules at any time. To retrospectively add packages to Perl, you can either type ppm to open the package manager or go to the CPAN website [7]. A how-to for this process is available online [8].
Configuring ASSP and Installing as a Service
ASSP is configured via its web portal, so before you can start, you first need to set the password for logging in to there. To do so, change to the c:/assp directory and open the assp.cfg file. Now, look for the line containing webAdminPassword and set your own password.
Next, you can launch ASSP for test purposes by entering the command perl assp.pl. If you don't see an error message here, you can point your web browser to http://127.0.0.1:55555. On Windows Server 2008 R2, it is a good idea to disable increased security for Internet Explorer in the Server Manager first. Of course, you can also manage ASSP through your browser, but you will need to enable port 55555 for remote access on your firewall. To do so, type wf.msc in the search box of the Windows start menu and create a new incoming rule in the console to allow port 55555. You can then access the server across the network.
To modify the port in the ASSP web interface, enter the username, root, and the password that you defined in the assp.cfg configuration file. To terminate ASSP, don't simply close the command-line window, press Ctrl+C.
To operate ASSP as a system service, open the command-line window, change to the ASSP directory, and type perl assp.pl c:\assp -i. Make sure that ASSP is not running when you do this. After you type the command, ASSP should not start; rather, it will issue a message telling you: ASSP service successfully added.
Additionally, you should see a new service by the name of Anti-Spam Smtp Proxy on your server. Make sure that the service is configured to be Automatic and then launch it. If this doesn't work, you can type the following command to create a service:
sc create Anti-Spam binpath="c:\perl\bin\perl c:\assp\assp.pl"
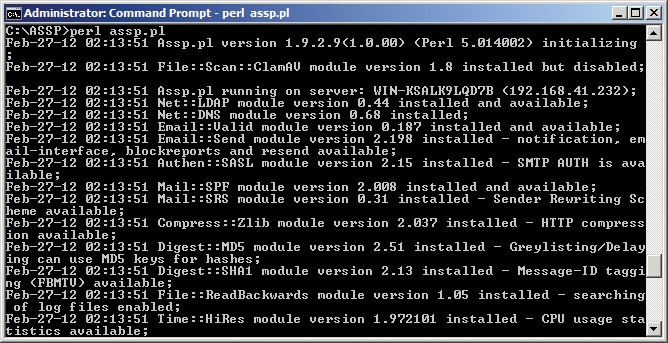
After restarting the servers, check out whether web access still works (Figure 4).

After logging in to the web interface, you can modify the port the web interface in the Server Setup area and enable SSL for access to the web interface. To let ASSP download definition files for ClamAV, for example, or definition lists for spam protection, the server needs Internet access; this doesn't just mean the ability to send SMTP mail.
The ASSP download function is proxy-capable and even supports authentication. For this to happen, you simply need to enter the proxies and the authentication credentials in the web interface Server Setup section. This section is also where you restrict access to the web interface to specific IP addresses. If you set the portal web access to 0, web access is disabled. To re-enable web access, you can modify the corresponding settings in the ASSP configuration file.
Collaboration with Exchange
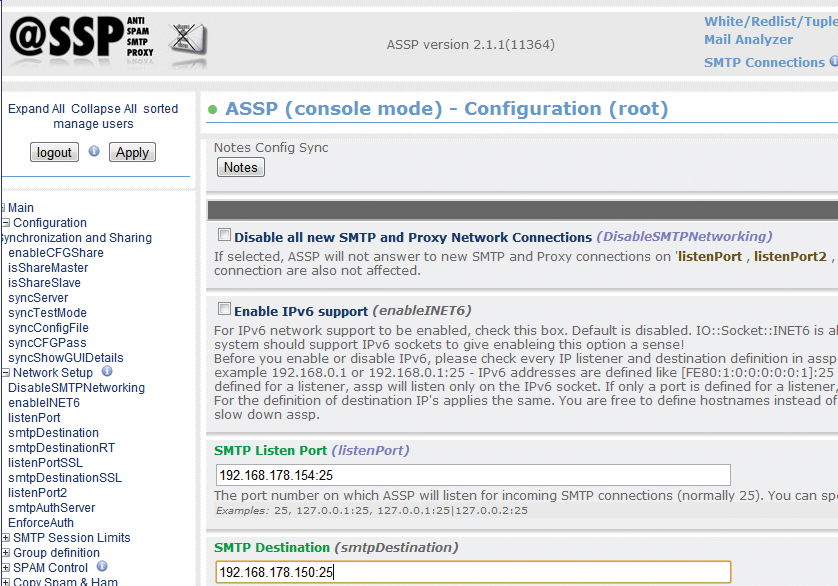
If you are running ASSP on a separate server or together with Exchange, but you are using a separate network adapter and IP address, make sure you create a DNS record for ASSP that points to the IP address of the ASSP network card. This type of setup uses the same approach as a standard installation. You can modify the configuration retrospectively in the web interface. The network settings are located in the Configuration | Network Setup | listenport section. Look for the SMTP Listen Port field and specify the IP address and port. After making changes in the web interface, you need to press Apply Changes to store them (Figure 5).

In the SMTP Destination field, enter the IP address and port for the Exchange server to which ASSP will be forwarding the scanned messages. In the Server Setup section, you can define the name of your ASSP server on the network. If you are using a separate IP address, you should give the servers a separate server name in the internal Active Directory domain. In environments using Exchange, note that you might need to allow relaying for the ASSP IP address to make sure that Exchange accepts the messages. You will find information about more complex collaboration with Exchange online [9].
Something else that can be important for the flow of mail in more complex environments is relaying on ASSP. You will find the corresponding settings in the Relaying section of the web interface. Here, you enter the IP addresses and email domains from which ASSP will accept messages – you can manage the local domains of your email organization in Recipients | Local Domains. To view the current connections on the server, just click on SMTP Connections at the top of the web interface.
Configuring Spam Filters
Most settings in ASSP can be left as the default values, with the exception of the IP address, mail traffic, and the name. However, you will probably want to go through all of the options and modify them to reflect your requirements after the installation. Before doing so, you should first set up your mail traffic flows and thoroughly test them.
If you want to make sure ASSP excludes specific IP addresses from scanning, you can manually update the whitelist of IP addresses. This setting is located in the Whitelisting menu below the Whitelisted IPs section, where you need to press Edit file. A bit further down in the web interface, you will also find the corresponding settings for domains.
When scanning for spam, ASSP also checks whether incoming mail originated in domains in which servers on real-time blacklists reside. A number of real-time blacklist providers are entered by default, and the filter works immediately. Of course, you can add more providers or remove providers that you don't included on the list. The settings for this are located in DNSBL.
If you want to forward messages identified as spam to a single email address, you can use the Copy Spam&Ham | Copy Spam and Send to this Address option. You can also use this section to configure various email addresses from different domains. This function lets you change the default SMTP target for ASSP and forward mail to a specific SMTP server.
In large environments, you also have the option of configuring ASSP for high availability. With this configuration, you will install multiple ASSP servers, but you only need to set up the configuration once. In the Configuration Synchronization and Sharing section, enable the Enable Configuration Sharing option. This lets you distribute these settings for one server to multiple ASSP servers. Then you can use the website to define whether the current server is a Share Master or a Share Slave. The Test Mode for Config Sync option lets you simulate synchronization without actually modifying the settings on the server.
Bayesian Filters and ASSP
ASSP also has an intelligent filter based on Bayesian filtering that scans all incoming and outgoing messages and thus learns how to distinguish spam from legitimate mail over the course of time. This kind of filter is very efficient but can also cause false positives. For this reason, the filter is initially disabled after the install.
You might want to run ASSP for a couple of weeks or even months before enabling the Bayesian filter via Bayesian and Hidden Markov Model (HMM) Options in the web interface. The filter comes with an internal database, which you also need to clean up periodically if you use the filter. You can do this in Rebuild Spamdb. That is also where you enter the intervals at which the server should clean up its database.
