Business continuity for small to medium-sized enterprises
First Aid
For cost reasons, small to medium-sized enterprises often rely on a single Windows server as their server infrastructure. The server typically runs on the Windows Server 2008 R2, Small Business Server 2011, or Windows Server 2008 R2 Foundation platform. Besides Active Directory, the server typically also supports file services, email/groupware, SQL, or terminal services. Also, it typically supports a business application, such as an ERP system or an industry-specific application. Typically, data is backed up to tape or USB disks directly connected to the server. Databases are typically backed up with the use of a professional backup tool. Other consoles for management tasks (e.g., for antivirus software) are also normally hosted on the server.
Increasing Dependencies
The server and the applications thus are the blood in the veins of the company's IT infrastructure. A server failure will inevitably lead to loss of productivity. Depending on the industry, the consequences of a server failure can be even more unpleasant – for example, if a doctor does not have access to medical information in an emergency or if other urgently needed data are stored only in electronic form and thus are unavailable.
Of course, hardware manufacturers offer corresponding warranty agreements or additional service packs to safeguard against the risk of a hardware failure. But, in practical terms, you are likely to lose one or two days until a replacement system has been set up, repairs have been made, and the operating system and applications have been restored. In most cases, a system failure of this duration is inaccessible. In other words, companies need to perform careful disaster planning to restore access to applications and data quickly.
Up and Running, and Fast
Business people refer to disaster or loss prevention strategies as Business Continuity Management. According to Wikipedia [1], the objective of business continuity management is to establish "a roadmap for continuing operations under adverse conditions (i.e., interruption from natural or man-made hazards). For failure of the only server in a small to medium-sized enterprise, such management is a question of restoring emergency service for data and applications within the shortest possible time.
Business Continuity
A completely redundant server would be the perfect design for continuity management, but that's something you will rarely see in a production environment because of cost. Thanks to the disk imaging program ShadowProtect from software vendor StorageCraft [2], administrators can regularly create a complete image of the server – Windows servers – which they can then store on network attached storage. When needed, the server image can be loaded on replacement hardware (available on short notice by means of a hardware-independent restore HIR process) or even be booted in a virtual environment. This virtual boot function is perfect for smaller companies. It lets administrators boot a ShadowProtect image directly in the free VirtualBox [3] environment without having to convert the format. For the test scenario, I chose a powerful Windows client, on which I additionally installed VirtualBox on top of the application software. For details of the test setup, see the "Test Scenario" box.
Preparing the Server
To create a backup image of your Windows server, you need the StorageCraft ShadowProtect Server Edition V.4 (see the "Editions and Pricing" box). The manufacturer offers all of its products for a free 30-day trial period [5]. Assuming your server hardware is fairly recent, the installation only takes a couple of seconds, although you need to reboot when done. To continue working with the latest copy of the data, I defined a daily full backup with several incremental backups every day. The shortest permissible interval between two incremental backups is 15 minutes. In an ideal case, I would lose a maximum of a quarter of an hour's work before the server is fired up again in the virtual environment.
Job Definition
To create the backup job, first you need to launch ShadowProtect Server Edition on the server and then go to the Destinations tab. The only potential target directory in this window is a share of the Network type – for example, in the form of a network drive on a NAS.
To be able to boot the server in a virtual environment at a later time, the virtualization host must be able to access the image file across the network. Additionally, the backup job needs to continue to work when you are running the server in the virtual environment in an emergency situation.
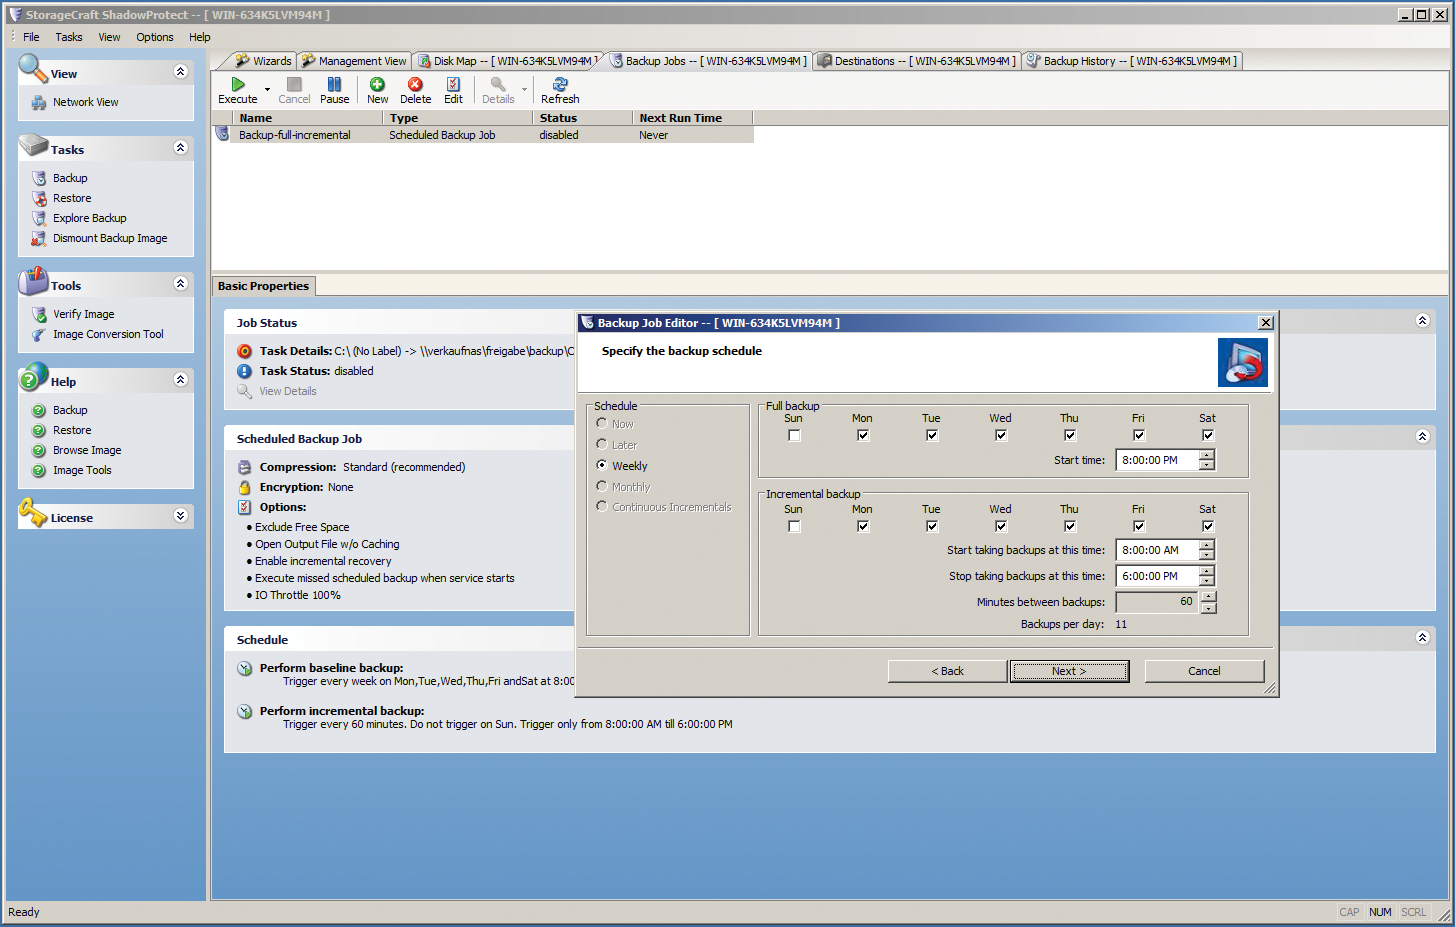
The next step is to click on the Backup Jobs tab and select the New button to launch the wizard (Figure 1). Select the drives and partitions to back up, and in the backup schedule define the days and times at which you will be creating a full backup; ideally, this will be outside of regular working hours for the convenience of your users.

Additionally, and depending on the speed of the available network and the volume of data you need to backup, you will need to define a sufficiently large time window for the full backup. In the test scenario, I defined a backup schedule with the following settings:
- Schedule: weekly
- Daily full backup: Monday – Friday 20:00
- Daily incremental backup: Monday – Friday 08:00--18:00, 30 minutes between backups
These settings create 22 files per day (one full backup and 21 incremental backups) on the NAS. The full backups are easily identifiable by the .spf file extension; incremental backups are identified by the .spi extension. Additionally, ShadowProtect stores an MD5 checksum in the same directory for each backup file.
Armed with these settings, the server diligently writes backup data to the network share on the NAS. In rare cases, ShadowProtect might be unable to write to the network share. If this problem occurs, StorageCraft support recommends stopping the ShadowProtect service in the Windows service manager and changing the account with which the service runs to an account with local administrator privileges and write permissions for the share. In the backup job definition, you then need to check the Open connection with ShadowProtect service login credentials option in Destination.
Desktop PC as a Virtualization Host
In the case of a hardware failure, you will obviously want the server to be back online again as quickly as possible. ShadowProtect relies on virtual boot technology to fulfill this requirement; the full and incremental backups created by the ShadowProtect server are booted directly in a virtual environment thanks to VirtualBox.
In the test scenario, I will use a more powerful PC workstation with Windows 7 Professional. Besides Oracle's VirtualBox, the computer also needs the Desktop Edition of ShadowProtect in place. This requirement is a potential pitfall, because the ShadowProtect and VirtualBox versions must be compatible. The latest version of VirtualBox isn't typically supported by ShadowProtect; StorageCraft regularly publishes a list of the supported versions [6]. For details, refer to the "Version Chaos" and "System Requirements for the Host" boxes.
You also need to install the Extension Pack to match the VirtualBox version. The Extension Pack gives VirtualBox the ability to access USB 2.0 devices connected to the host and thus to run the backup on the USB disks in the virtual environment.
Creating a Virtual Machine with VirtualBoot
Assuming the system requirements are fulfilled, you can now use the workstation as an interim server in case your server hardware fails. StorageCraft provides a how-to for starting up the virtual machine using VirtualBoot technology [7]. The following descriptions are thus specific to my test scenario rather than to a generic situation.
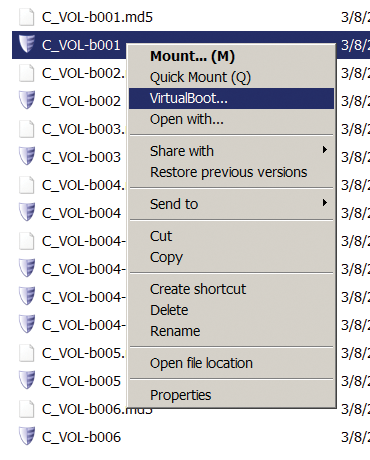
To boot the ShadowProtect image on VirtualBox as a virtual machine, follow these steps: In Windows Explorer, connect to the share on the NAS with the ShadowProtect server backups. Next, right-click the last incremental backup (SPI file), and then select VirtualBoot in the drop-down menu to launch the VirtualBoot wizard (Figure 2).

ShadowProtect works in a sector-oriented way and thus automatically uses all of the previous incremental and full backups it needs to run the server in the virtual environment. If you have, for example, a full backup and five incremental backups, you can select the latest incremental backup; ShadowProtect then automatically uses the four incremental backups created previously as well as the original full backup.
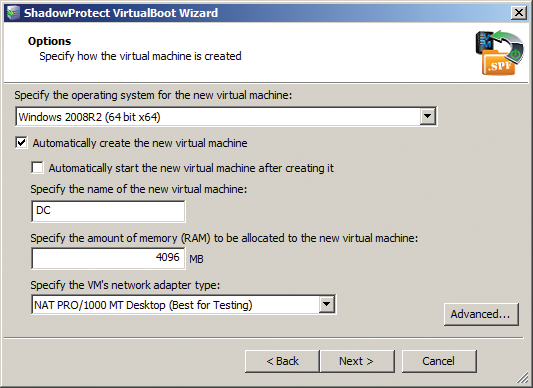
In the next step, make sure the correct operating system is set in the wizard and then assign the same amount of memory to the virtual machine as was present in the physical machine. Now you can uncheck Automatically start the new virtual machine after creating it; this step lets you check all of the new virtual machine settings before you try to boot (Figure 3). The network adapter is set to NAT by default for security reasons.

VirtualBoot now creates the virtual machine in VirtualBox. The next step is to launch the VirtualBox Manager and edit the virtual machine's settings in Change. In General, change the installed operating system again, if needed, and disable the floppy drive in System – unless your physical server really has a floppy drive. In Network, change the network adapter setting from NAT to Network bridge to allow the clients to log in to the virtual domain controller on the replacement server.
One important step you should take is to enable only the network bridge in case of disaster – that is, if the physical domain controller has actually failed. For test purposes, keep the default setting of NAT. In System/Processor, uncheck Enable PAE/NX for virtual operation of a Windows 2008 Host. Hardware virtualization VT-x/AMD-V needs to be enabled in Acceleration. If the host has an Intel processor, you can also uncheck the Nested Paging option, which is only relevant to AMD CPUs.
Drum Roll, Please
Next, launch the virtual machine. You can immediately click on the console window and press F8 to boot the operating system. Open the network and sharing center and make sure that the network location is set to Work network and that Network identification and File and printer sharing are enabled.
Finally, in the service manager, you can disable any existing OEM services, such as Symantec Backup Exec or HP Networking. If these services fail to find the related devices in the virtual environment, you can experience extremely high CPU load in some cases. In the worst case, it can take an hour to log in to the domain controller.
Now apply the modified settings and reboot the server; after the reboot, the clients can now log in to the virtual server and immediately use the services it provides.
The Way Back
With VirtualBoot, you can keep the interruption to your operation after a hardware failure to a minimum. ShadowProtect continues to produce full and incremental backups on the virtual server, given write permissions for the network share on the NAS, thus ensuring consistent operations. To migrate back after repairing the failed system or replacing it with some new hardware, ShadowProtect gives you the Headstart Restore feature, another intelligent mechanism that helps you restore or migrate a system. Four basic scenarios are supported:
- Physical to physical (P2P)
- Physical to virtual (P2V)
- Virtual to virtual (V2V)
- Virtual to physical (V2P)
To migrate back to physical hardware in a VirtualBoot scenario, you would need V2P mode. The virtual server is not available during the reverse migration. This could be a problem if you stored large amounts of data on the server because migrating back/restoring is going to take up a fair amount of time to copy the data. Restoring a server with 1TB of data could take several hours, or even a whole day.
Headstart Restore thus gives you the additional option of starting a restore but not finalizing it. Thus, you can continue to run the virtual server during the restore and continue to create differential backups. Do not shut down the virtual server until the bulk of the data has been restored. You can then restore the missing incremental backups, finalize the disk, and boot the physical host. For an exhaustive how-to, see the StorageCraft site [8]. (For more tips, see the "Only Deleted a File?" box).
Conclusions
StorageCraft's VirtualBoot technology and the free VirtualBox give small to medium-sized enterprises the ability to comply with high-availability requirements despite a restricted hardware budget. Virtual images are perfect for an uncomplicated approach to restoring individual files or for setting up a complete virtual ersatz server within a couple of minutes.
