Efficient central management of Windows libraries
A Question of View
In a jungle of shares and network drives, it's easy to lose track – Where exactly are those templates for vacation application forms? Libraries let you collate different storage locations to create a shared view.
This setup makes sense, for example, when administrators redirect folders or whole libraries to servers. Not only can you do this in a normal Active Directory domain in Windows Server 2008 R2 and Windows 7, but also on SBS 2011. In combination with Windows Server 2008 R2, you can even use group policies to manage libraries.
Windows displays libraries directly in Explorer in a separate area on the left-hand side of the browser, even without Active Directory (Figure 1). Users can create new libraries via the context menu of an existing library or modify the settings for standard libraries.

The properties of a library define the physical directories it contains and displays; libraries can span multiple physical drives and different directories. At the press of a button, you see the content of all the included directories in a single window. When a user selects a library to store a file, Windows saves the file in the configured directory. Additionally, you can specify the type of files the library should contain. Windows then optimizes the library view to reflect your choice.
Libraries are, however, not allowed to contain network paths (i.e., shares on other computers); they only support indexed directories.
Windows searches these directories constantly in the background and stores the results in an index. However, you do have the option of redirecting libraries and directories in the libraries to a server, a process that is completely transparent to the user. To add network paths to libraries, you need to configure the directories as offline files.
Windows then transfers the files from the server to a cache on the local client. Offline availability can be defined for complete network drives or just for individual subdirectories. However, you can only define shares as offline files on the client if the server is configured to support this. Although this behavior is the default setting, it can be disabled individually for any share.
Offline Files for Network Shares
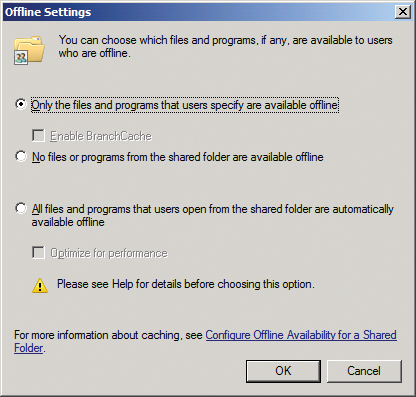
On Windows Server 2008 R2, you can manage the use of offline files via the properties of the share. Offline availability is governed by the caching option (Figure 2). Various options control access and grant users the right to set up offline access to directories on servers.

When you enable the No files or programs from the shared folder are available offline option, Always available offline will not be shown in the context menu for the shares on the client side. You can also select the following variants:
- Only the files and programs that users specify are available offline lets users choose which files to use by enabling offline availability in the context menu for the share.
- All files and programs that users open from the shared folder are automatically available offline stipulates that Windows 7 automatically configures every file opened in the share for offline availability.
- Optimize for performance lets you specify that executables on this share remain available on the client if used once. In this case, you will want to set the permissions for the share to Read to keep Windows from synchronizing modified programs.
Libraries and Group Policies
If you want to save specific directories automatically in your libraries on a server without users noticing, you can use a group policy. Document libraries use the user account's profile path and the public profile on a client by default, which means documents are not saved on the server when users save documents in libraries.
Group policies let you redirect folders without detouring via offline files. Windows 7 and Windows Server 2008 R2 allow you to redirect specific folders within the user's profile to a server drive, ensuring that any data a user saves in a library will automatically end up on the server.
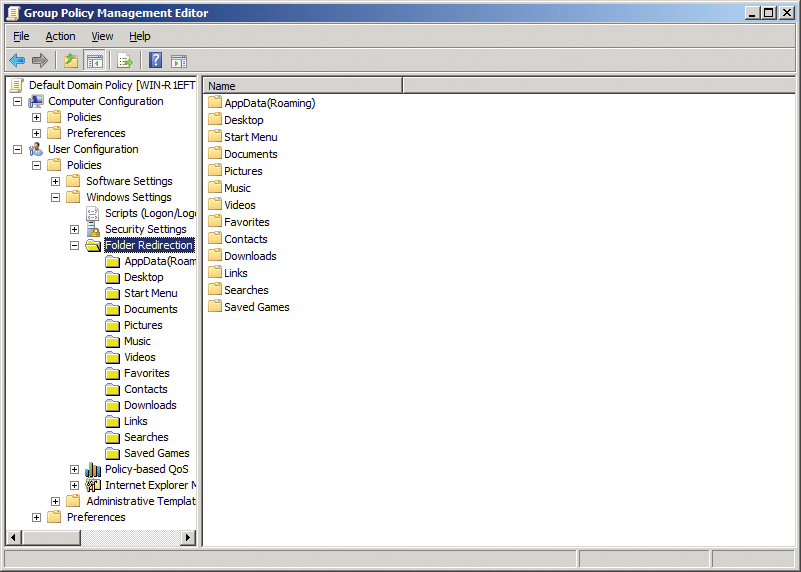
You can use folder redirection in the group policy to redirect these folders. The settings are available in the group policy management editor below User Configuration | Policies | Windows Settings | Folder Redirection (see Figure 3).

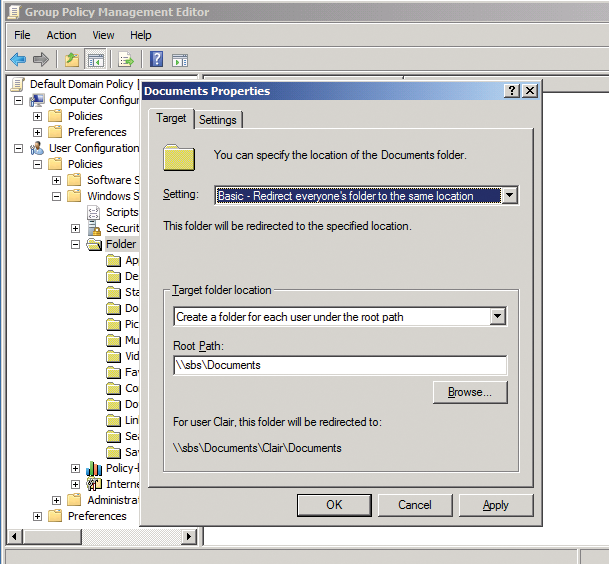
With redirection, you can redirect important folders in the standard libraries to directories on the server. The Properties Target tab lets you define the redirection options, and you need to create a root folder manually – that is, a central share that all users are allowed to access. Windows then automatically creates subfolders for the individual users and automatically configures matching permissions. Users don't need to map the share as a drive; the data is automatically available when the user opens the corresponding library in Explorer.
After creating the new root share, open the group policy manager, navigate to User Configuration | Policies | Windows Settings | Folder Redirection, open the Properties dialog for the Documents folder, and click on the Target tab. Select the option Basic – Redirect everyone's folder to the same location. For Target folder location, enable the option Create a folder for each user under the root path. As the root path, define \\<server name>\<share you created> and then press OK (Figure 4).

The next time the user logs on to their computer, Windows automatically creates a folder with the user's name in the share you created. In future, any files the user saves in their Documents library will end up in this folder. After setting up folder redirection, access the properties of the Documents library in the start menu; you will see that Windows automatically stores the data on the server. To ensure that users can access these documents when their computer is not connected to the network, Windows automatically enables offline file synchronization.
Using a Script to Modify the Settings
The libraries are configured via the GUI and XML files on client computers. You can use scripting to modify the XML files client side or use login scripts to copy the XML files to the computers. The XML files for the libraries are stored in the directory C:\Users\<username>\AppData\Roaming\Microsoft\Windows\Libraries. To make AppData visible, you need to show hidden files in Organize | Folder and Search Option. This directory contains the configuration settings for the libraries.
After opening the library file in the Windows editor, you can modify the settings by changing the icon for the library, for example. The icon is defined in the line <iconReference>imageres.dll,-1005</iconReference>. You can also use the XML files to control the libraries on Remote Desktop servers, for example. To do so, create a library with arbitrary paths and settings, then use group policies to distribute the XML file for the library to your client computers, thus making the library available on the client side. Copying an XML file to a client computer or Remote Desktop server via, say, the login script, group policy, or user properties automatically makes the library available on the computer in question as soon as you have copied the file.
Settings such as the icon can be managed in the same way. If you always copy the file at login time, you can make sure the library always uses the same settings. Copying also works on the fly; after copying, the library will reside in C:\Users\<username>\AppData\Roaming\Microsoft\Windows\Libraries and immediately become effective.
Another option is to make libraries available centrally via a link on the desktop. To do this, create a link and then use the login script to copy it to your users' desktops.
For example, if you want to view all of the Control Panel programs at a glance in an Explorer window, you would right-click the desktop, select New then Link. The path to enter is as follows:
explorer.exe shell:::{ED7BA470-8E54-465E-825C-99712043E01C}
Besides the control panel, you can use the same approach to view other system folders, such as the trash or the Action Center:
645FF040-5081-101B-9F08-00AA002F954E
BB64F8A7-BEE7-4E1A-AB8D-7D8273F7FDB6
respectively. A full list is available at the MSDN Library [1].
Login Scripts and Group Policies
After creating the template files for the libraries, the easiest way to copy them is to use login scripts. The classical login scripts are defined in the Profile tab of the user account properties. These scripts can be used in Windows Server 2008 R2 Active Directory without any trouble.
To ensure that these scripts run when a user logs in, copy them to the netlogon share on the domain controller. This approach applies to programs or other scripts that are launched by login scripts. After a script is copied to the netlogon share, it is automatically copied to the other domain controllers by the File Replication Service (FRS). The local location for the netlogon share on Windows Server 2008 R2 is the \Windows\SYSVOL\sysvol\<domain>\scripts folder.
In an Active Directory, you can also deploy scripts at login and logout time and at startup and shutdown. These scripts are located in the group policies at:
- Computer Configuration | Policies | Windows Settings | Scripts: Scripts for computer startup and shutdown.
- User Configuration | Policies | Windows Settings | Scripts: User login or logoff scripts.
When you double-click an entry and choose Show Files, an Explorer window pops up. You need to copy the script file and the library control files to this target and press the Add button to select the script. Also, you can use group policies to combine classic scripts and group policy scripts, assuming the scripts in the group policies are inherited by the subordinate organizational units (OUs) and additional scripts are launched in the subordinate OUs.
SBS 2011
Besides legacy folder redirection in Active Directory, which also works with SBS 2011 Essentials, SBS 2011 Standard offers an option for centralized folder management and redirection in its management console. Press the Folders option in the user account properties at the SBS console to define the maximum data volume a user is allowed to save; you can also configure folder redirection at the same time. This kind of redirection involves SBS 2011 automatically redirecting user access to the server when the user attempts to access a specific local directory. This access is transparent for the user, but the data is stored on the server and not on the local workstation. You can manage the threshold value via the file server resource manager in the Management program group, which means you don't need to create a root folder manually on SBS 2011 Standard. All of this work can be completed conveniently in the SBS management console. Folder redirection itself is handled by group policies as in a normal Active Directory or on SBS 2011 Essentials.
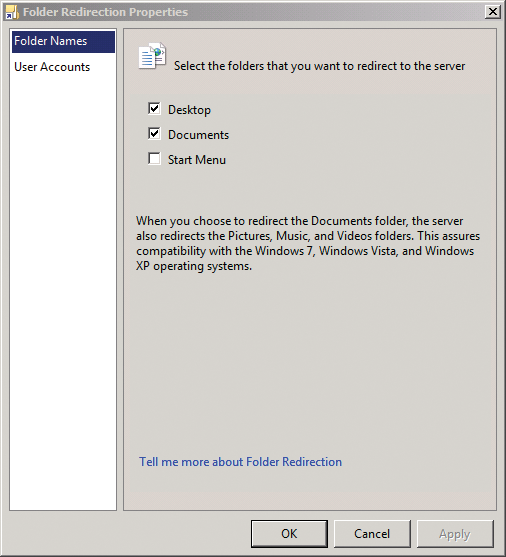
You can also use the SBS console to define which folders the workstation redirects to the SBS server. To do so, click on Users and Groups and then on the Users tab before clicking Enable folder redirection to the server and checking the box for each folder that clients should redirect to the server (Figure 5).

The User Accounts tab lets you mark the users for whom you will be enabling redirection. Users might need to log in two or three times after this change for the server to apply the changes. After enabling folder redirection, the Windows client automatically saves all the files a user stores in the corresponding folders, such as the Documents library, on the server. All of these processes take place in the background. The files remain on the computer as an offline copy, allowing mobile users to work with them on the road.
As soon as the computer opens a connection to the server, the client replicates new and modified files to the server. The files are located in C:\Users\FolderRedirections on the SBS server, and the server creates a separate folder for each user. Users can also access these directories via the share. Access to a redirected folder looks just like local folder access from the user's point of view. The difference is that data is stored in the shared folder on the server. If users log in to the network from different computers, they have access to the files from all of these computers.
Users in Active Directory
Because library directories are normally located in the user profile, you can enable server-based profiles for your users. In this case, the client automatically copies all the files in the library to the server when the user logs off. Depending on the volume of data, this process can take a while. To migrate profiles to the server, click the Profile tab for a user account in the Active Directory Users and Computers management console. On SBS 2011 Standard, you will find the user accounts in <Domain> | MyBusiness | Users | SBSUSers. This is the organizational unit that stores all the user accounts that you created at the SBS console. The profiles will also work in normal Active Directories.
To enable server-based profiles for your users, access the user account properties and go to the Profiles tab. Next, type the directory in which you want Windows to save the user's profile when they log off – and from which it will be loaded when the user logs on – in Profile Path. The advantage to using server-based profiles is that this profile will be available on any workstation on the network. Typing the pathname automatically creates an empty folder for the user. The profile path is defined in the following format: \\<servername>\<sharename>\%username%.
The profile path points to a folder in which the user's profile is stored. If you don't specify a path, Windows will continue to work with local user profiles. When a user logs in, Windows checks to see whether a profile path exists for the user, and thus a server-based profile has been defined. If so, Windows compares the server-based and local profiles to see which is newer; if the server-based profile is newer, Windows loads the modified files from this profile on the local system.
Note that the Everyone group – or the security group in which the user is a member – must be enabled to create the folder in the profile share and to write to the folders. When the user logs in, Windows updates the server-based profile by reference to any locally modified files. The first time a user logs in after defining a profile path, Windows will either load a predefined profile from the server or copy the user's current local profile to the server when the user logs off.
