
Port-based access protection with NAP and 802.1X
Access Ticket
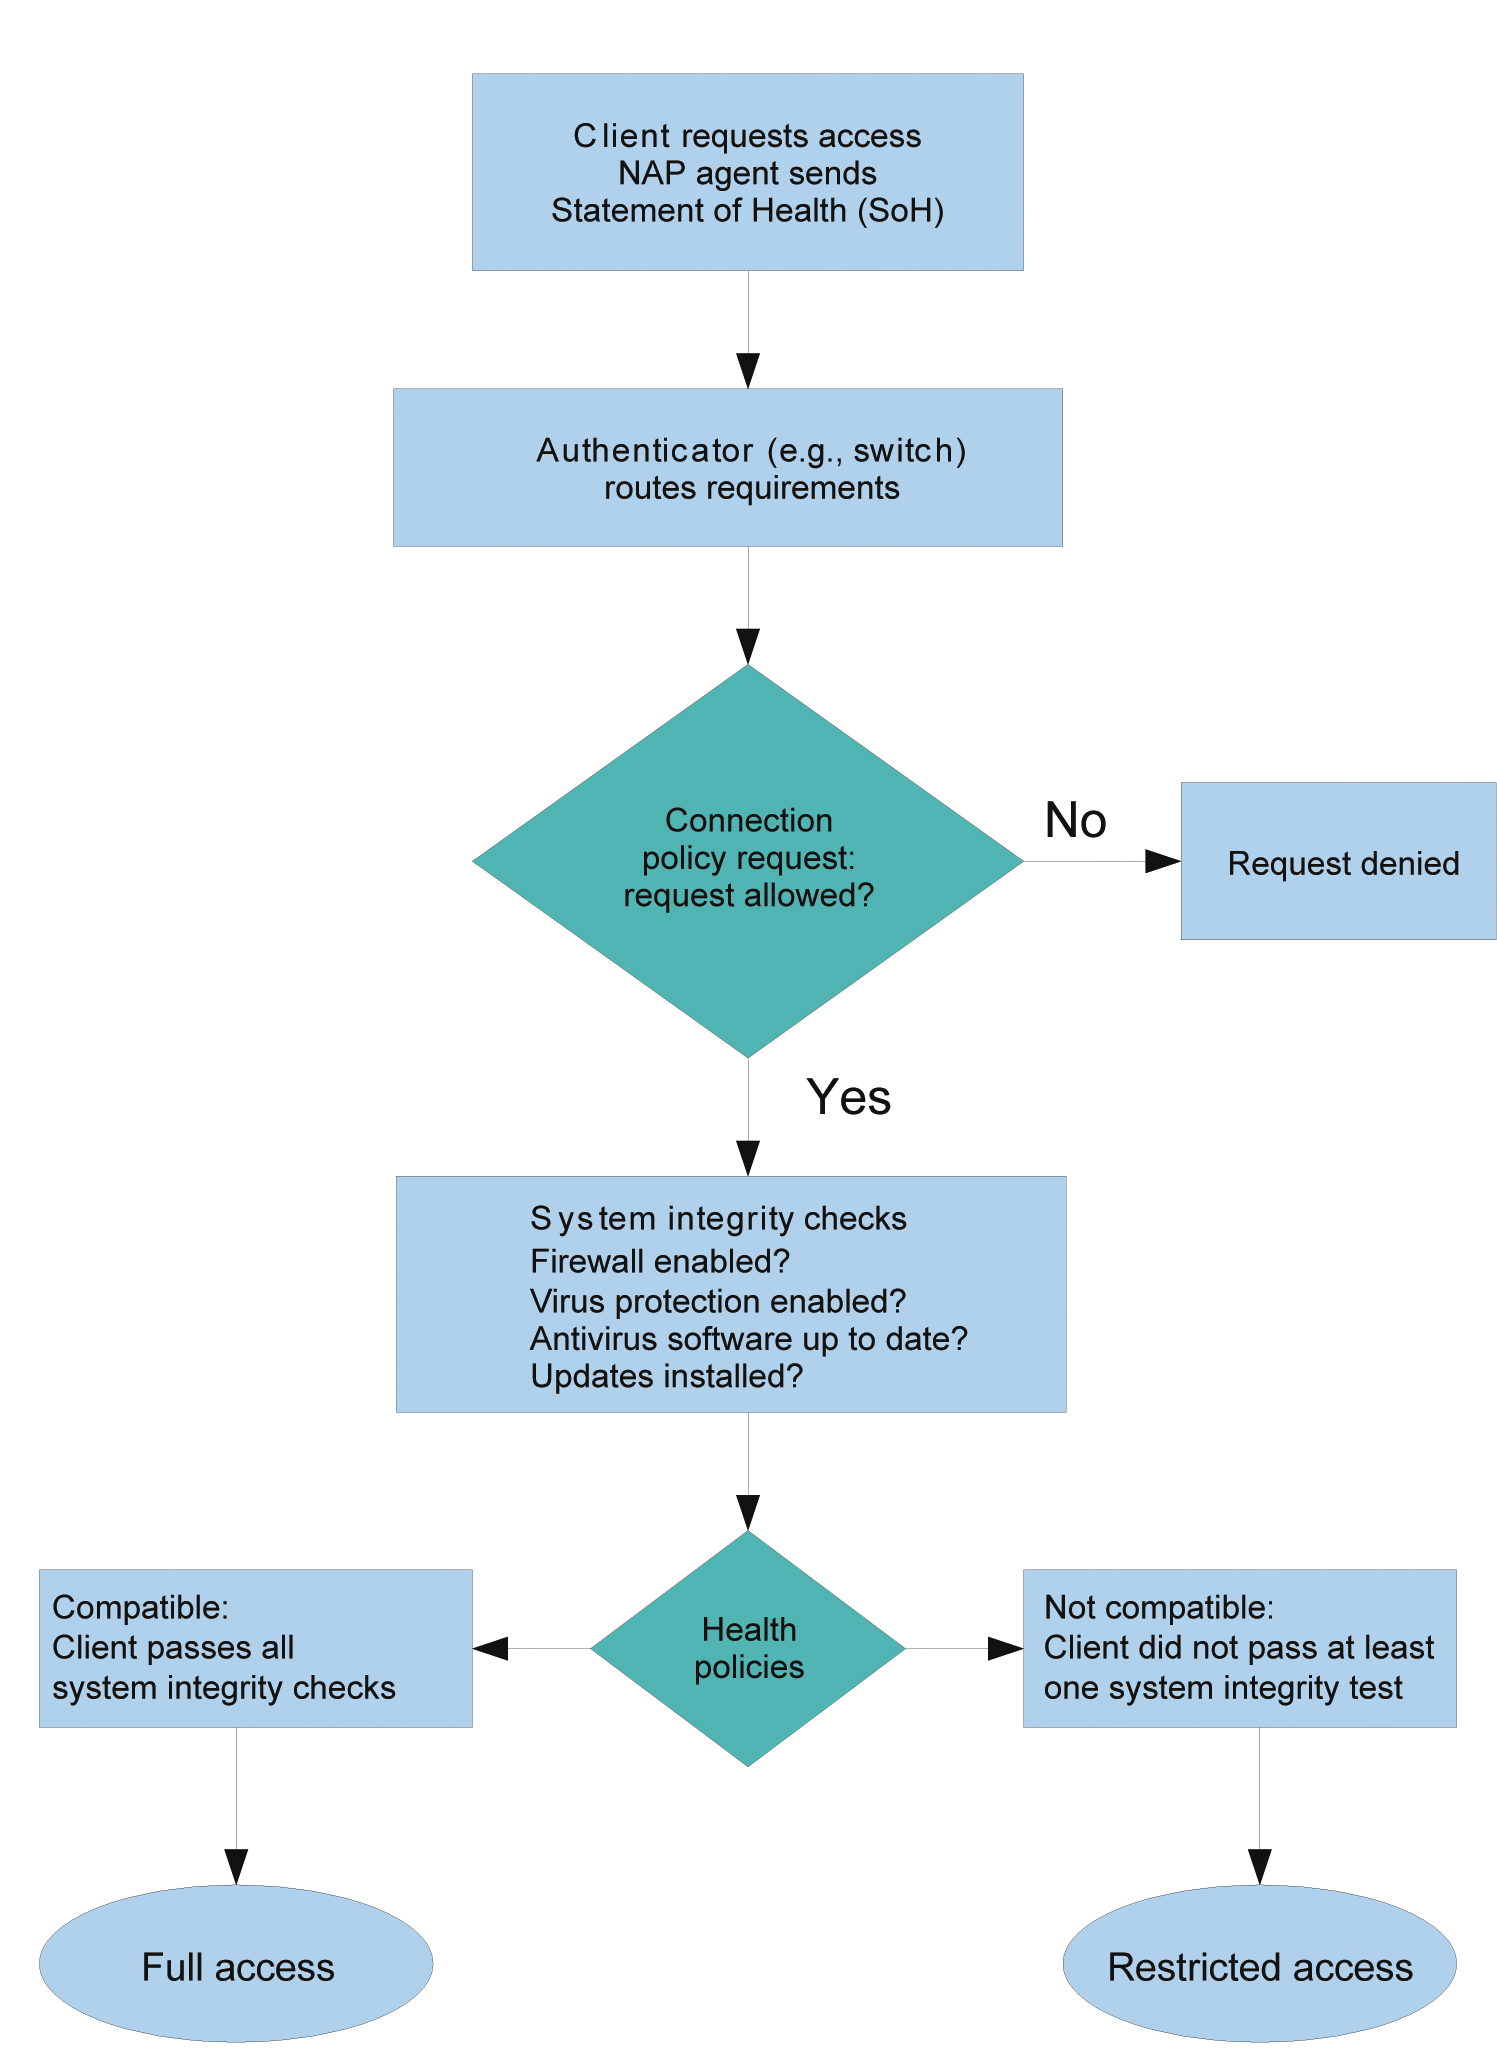
Network Access Protection (NAP) was introduced with Windows Server 2008 and gives the network administrator the ability to check a client's security status on network access. This process involves checking the client's compliance with defined health policies. A health policy can test whether a firewall is enabled for specific profiles, an antivirus scanner exists, the pattern updates are up to date, or the operating system has the current patch status.
Network access can be refused, or at least restricted, in the case of non-compliance with the policy. This ability to impose restrictions is interesting because it provides the ability to redirect the client to a maintenance network, where it can pick up updates or a compliant configuration. Once the client complies with the policy, it is rechecked and then allowed to access the network without any restrictions. Windows supports NAP for Windows XP SP3 with some restrictions, which no longer apply to versions as of Windows Vista.
Many Roads Lead to Rome
Various types of NAP are available for access protection, including: DHCP, VPN, IPSec, Terminal services (e.g., Remote Desktop Services), and IEEE 802.1X devices. This article relates to access via wired 802.1X devices, which are basically switches. Another typical deployment scenario for 802.1X is WLAN connections via an Access Point. In both cases, the setup is less a question of authentication (although 802.1X is designed for this) and more about compliance with configuration standards.
NAP Terminology
Various parts need to mesh for NAP to work. To begin, the client needs a NAP agent that collects the required information about the status of the components to be tested, for example:
- Firewall status
- Windows Update
- Antivirus scanner
- Vendor-specific information
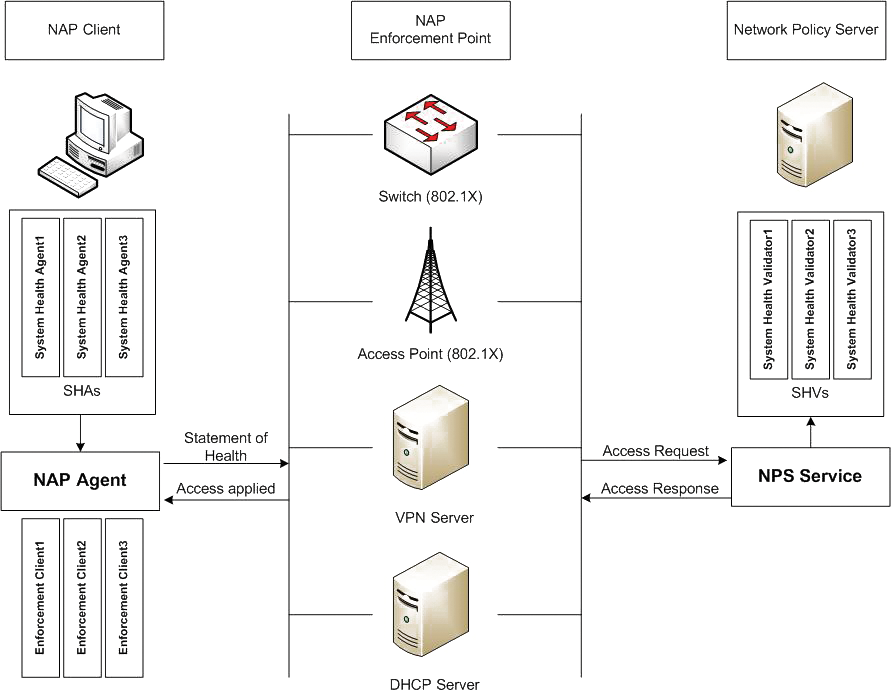
This information is gathered by System Health Agents (SHA), which transfer the health state for the component in question. The matching Enforcement Client (Figure 1), a NAP agent component, then transfers this information to the NAP Enforcement Point.
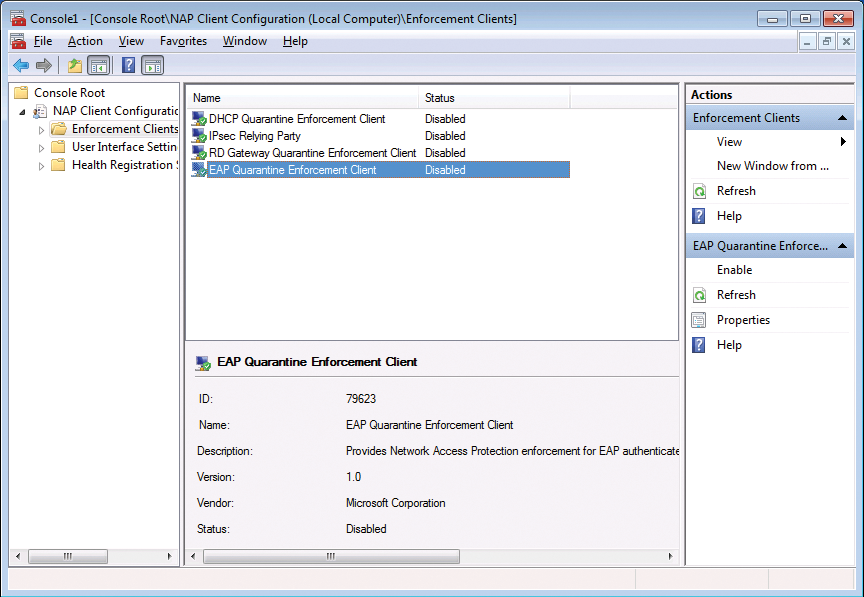
Depending on the technology, the enforcement point is either a DHCP server, a VPN or Remote Desktop gateway, or a 802.1X-capable switch (Figure 2). The enforcement point forwards the identified integrity status to the Network Policy Server (NPS), which then uses a System Health Validator (SHV) to conduct the compliance test. On the basis of network and integrity policies, the administrator can then define what kind of access is allowed or prevented under what conditions.
Stop and Check!
The IEEE 802.1X standard governs authentication and authorization on networks [1] (Figure 3). In combination with NAP, it can enforce NAP policies, thus giving unrestricted access to compliant clients only. Again, some special terms are important here: The client acts as a Supplicant and connects to the Authenticator (the switch). The authenticator then forwards the request to an Authentication Server (typically a RADIUS server). The RADIUS server validates the information it receives and then tells the switch whether the client is allowed access and, if so, what kind of access this is.
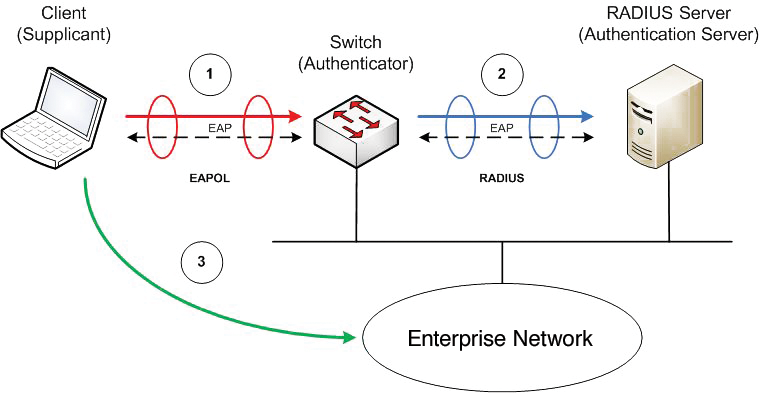
The supplicant and the authenticator use the Extensible Authentication Protocol (EAP) to communicate; in this case, it takes the form of EAPOL (EAP over LAN). The authenticator and the authentication server use the RADIUS protocol to handle the exchange of EAP information between the supplicant and the authentication server – the authenticator is only a relay for this communication. Incidentally, the authentication server can prove its identity to the supplicant by presenting a certificate.
Put simply, the NAP terms are equivalent to the following in 802.1X:
- Supplicant = NAP agent (client)
- Authenticator = Enforcement point (switch)
- Authentication Server = RADIUS server = NPS
Note that NAP with 802.1X is just one of the potential flavors of access protection. Other scenarios (e.g., NAP with DHCP) use different terms.
Sorting Out the Good Guys
In the case of 802.1X-capable switches, the VLAN assignment is used to distinguish between compatible and incompatible clients. A virtual LAN (VLAN) is a logically separate subnetwork within a switch or a complete network.
VLANs are isolated from one another and can only communication by way of routers or firewalls. This setup allows the management of communications.
The VLAN for compatible clients provides access to the enterprise network, whereas the VLAN for incompatible clients only allows access to the maintenance server, which resides in an isolated section. This allows the client to restore its integrity status and then, after completing another check, to re-access the production network. The negotiation requirements are automatically sent. To ensure that the switch knows which VLAN to assign the client port, the RADIUS server sends it the corresponding information. The configuration for this is standardized; however, it's anything but trivial. Details are provided later.
Enabling NAP Client-Side
To begin, you need to ensure that the NAP agent is enabled on the client. For this to happen, the NAP agent service must be set to automatic and must be started. The required enforcement client is enabled in the NAP Client Configuration MMC Snapin – for 802.1X, this is the EAP Quarantine Enforcement Client. The snapin doesn't exist for Windows XP SP3, for which you need to enable the enforcement client via the Group Policy (Figure 4). To do so, you will probably want to create a separate Group Policy Object (GPO) and then link it with the domain or with the organizational unit (OU) containing the mobile devices.
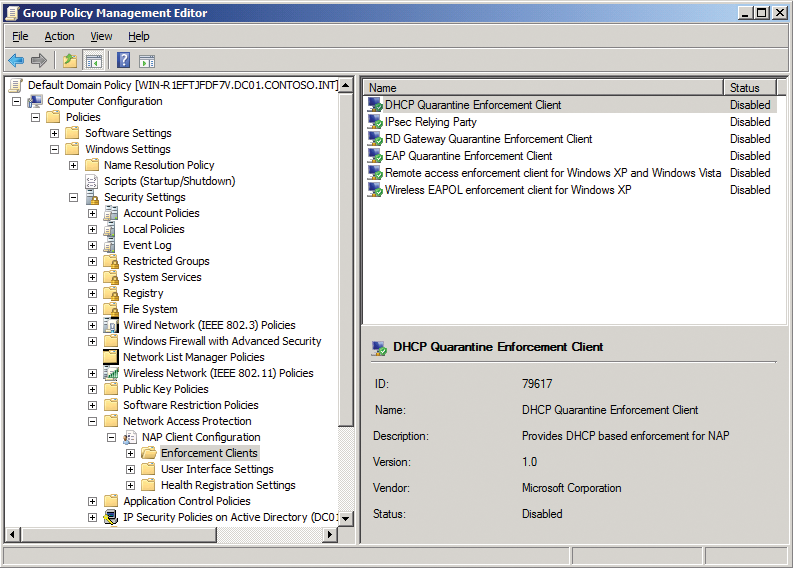
The NAP configuration is located below Computer Configuration | Policies | Windows Settings | Security Settings | Network Access Protection in the GPO. You can also configure the services via the GPO itself. The command:
netsh nap client show state
tells you whether the required enforcement client has been enabled
You also need to set the startup type for the Automatic Configuration (wired) service to automatic and then activate the service. This enables the 802.1X functionality. You will now see that the network adapter configuration dialog contains a matching Authentication tab. Go to the tab and enable 802.1X; additionally, ensure that the network authentication method is set to Microsoft: Protected EAP (PEAP). Computer authentication is enabled in this dialog's remaining settings in order to use the network policy server's certificate as the encryption key. For more information, read the section about server configuration later in this article.
Switch Configuration
The switch's 802.1X configuration depends on the vendor and model. Most managed switches in enterprise environments are 802.1X-capable today. This doesn't mean they need Layer 3 functionality. The configuration shown in Listing 1 is useful for popular Cisco Catalyst switches, although the configuration is pretty similar for an HP ProCurve switch. In any case, you need to enable 802.1X, define the authentication server, and specify which switch ports will handle 802.1X authentication (or Network Access Protection).
Listing 1: Switch Configuration for Cisco Catalyst
01 Switch# configure terminal
02 Switch(config)# aaa new-model
03 Switch(config)# aaa authentication dot1x default group radius
04 Switch(config)# aaa authorization network group radius
05 Switch(config)# dot1x system-auth-control
06 Switch(config)# radius-server host 10.1.1.1 key V@rYseCre!t
07 Switch(config)# interface fastethernet0/1
08 Switch(config-if)# switchport mode access
09 Switch(config-if)# dot1x port-control auto
10 Switch(config-if)# end
To do so, you need to enable access controls on a Catalyst switch via aaa new-model. After this step, you then stipulate the use of the RADIUS server or servers defined later in the sample listing for 802.1X. The VLAN assignment is handled by the aaa authorization network group radius command. The dot1x system-auth-control command enables port-based access monitoring on the switch. Now, you need to specify for each switch port you will be using that it is an access port with 802.1X port monitoring – as you can see for the Fastethernet0/1 port in the example.
Server Side
The central entity in NAP is the Network Policy Server (NPS). You need to add this role in the Server Manager first. The corresponding role service uses the slightly longer name of Network Policy and Access Service. After doing this, you can create various policies to use the NPS as the RADIUS server for 802.1X in combination with NAP. Fortunately, no manual steps are needed here.
The NAP wizard guides you through the most important stages of the configuration, thus substantially reducing the complexity. It is available from the network policy server's main management console page and accessible via the NAP Configuration link.
When you get to the wizard, select IEEE 802.1X (wired) from the drop-down as the network connection method. In the next dialog box, you can select a RADIUS client or create a new client, if needed.
Note that the RADIUS client is not the terminal device but the switch! The shared secret must match the key on the switch; in the example, this is V@rYseCre!t. Optionally, you can define user and computer groups for access, but this is rarely needed, and you will probably want to omit this step.
The next screen in the wizard defines the server certificate that the NPS uses to authenticate against the NAP client. The NAP client can additionally use the public key sent to it to encrypt any information to be sent. Make sure that Secure password (PEAP-MS-CHAPv2) is enabled here. It is important for the client to trust this certificate. Ideally, this will be a certificate from your own organization's certification authority, which the client will trust through its Active Directory domain membership.
The next dialog is called Configure Traffic Controls. You can use it for the VLAN assignment. Two zones are available here: Full network access and Restricted network access. The approach is the same in both cases, and I will thus only be looking at full network access in the following discussion. The properties to be defined are specified by a RFC [2].
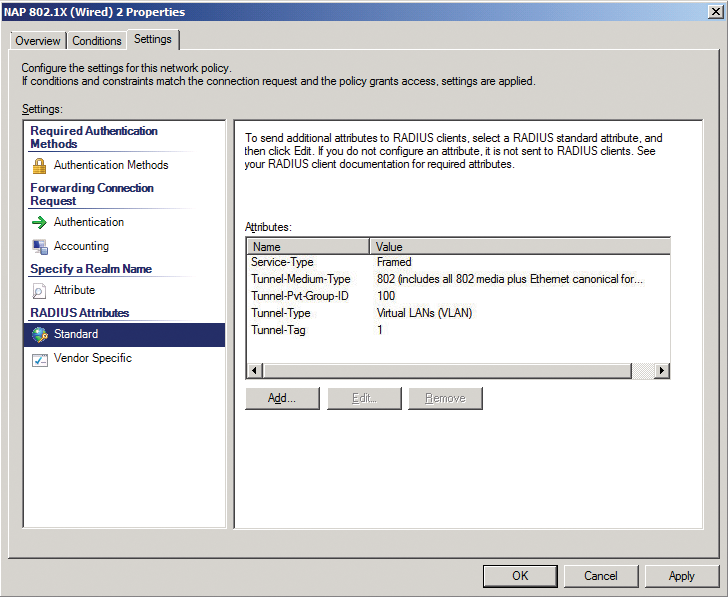
Press the Configure button and select Virtual LANs as the tunnel type (Figure 5), then set the tunnel medium type to 802. The tunnel PVT group ID defines the VLAN. Enter the value of the VLAN for full access here (e.g., 100 for VLAN 100). Type a 1 as the tunnel assignment ID to define a tunnel session ID. You need to configure the same settings for restricted network access; that is, you specify the VLAN for the isolated maintenance network (e.g., VLAN 200).
The next screen in the dialog defines the integrity policy and the system integrity check(s) to be used. By default, you will only see the Windows integrity check here – its settings are discussed later. However, software vendors basically have the option of defining their own integrity checks. In any case, you must specify how you want to handle non-NAP-capable clients – by default, they will only be given restricted access to the maintenance network (Figure 6). The wizard then shows you that a total of six policies are being created to define NPS management.
Waiting for the Doctor
The NAP wizard has done its job, but another element – the "health check" or System Health Validator (SHV) – still needs to be added. Although the health policies have already referred to this, until now, it has not yet been set up, so you still need to define a few things. To do so, open the NPS console, go to Network access protection | System integrity checks | Windows system health validator | Properties and look for the Default object.
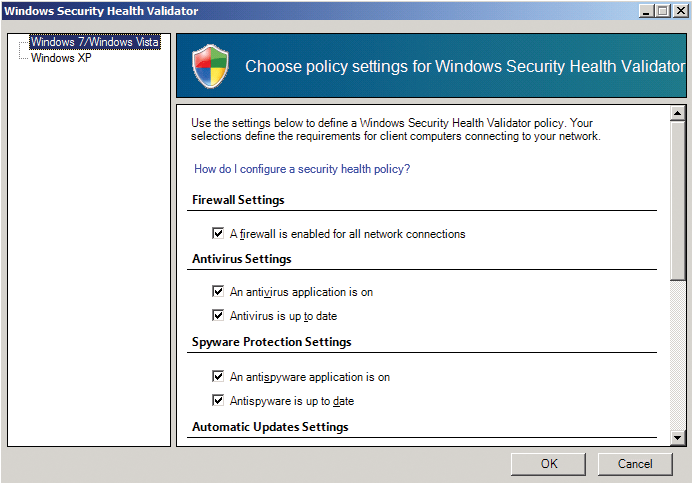
You can define various requirements – separately for Windows XP and Windows7/Vista – that a client needs to fulfill. These include the firewall settings, antivirus software, and so on (Figure 7).
The system is now ready for action. Clients using an 802.1X-protected port for the connection now need to go through integrity checks; after this, a decision as to which VLAN they are allowed to access is taken.
Users will see a corresponding message in an informational box on their screens, telling them that they have full access – or not. Additionally, ipconfig /all and netsh nap client show state tell you whether any access restrictions apply.
Potentials and Limits
NAP makes it easier for administrators to uphold security standards on a network. In particular, mobile and external clients that frequently migrate between networks are very difficult to track without NAP. NAP supports access control via various ingress points, including DHCP, VPN and IPSec, Remote Desktop Services, and 802.1X port-based access controls. The latter can either be used for wireless WLAN or wired connections, with the benefit that controls occur while physically opening the connection to the network.
Administrators also need to be aware that NAP does not offer comprehensive protection against attacks. Because the clients transmit information that could be spoofed, the concept of NAP is more useful for avoiding unintentional damage scenarios than for preventing malevolent attacks. NAP's abilities go well beyond the scope of the simple example in this article, and administrators need to put some thought into deploying NAP on high-security networks. Microsoft provides various step-by-step guides for configuring NAP on a test network [3].
