
Mandatory access control with Tomoyo Linux
High Sheriff
Contrary to what you might think, Tomoyo Linux [1] is not a full-fledged Linux distribution, it is a kernel module for Linux that monitors active processes directly and restricts their access and actions as needed (Mandatory Access Control, MAC). Additionally, it has a couple of command-line tools that help administrators configure Tomoyo. Security rules define what a process is allowed or not allowed to do; you can either create these rules manually or allow Tomoyo Linux to determine the rules in a semi-automatic learning mode. In this mode, Tomoyo monitors a program for a while and allows actions it sees during that time – all other actions are denied.
Versionitis
Back in 2003, Japan's NTT Data Corporation (a subsidiary of Japanese telecommunications giant Nippon Telegraph and Telephone, NTT) created a kernel patch that was capable of controlling processes and monitoring their behavior. If you wanted to use this first version of Tomoyo, you thus had to build your own kernel.
Starting with kernel version 2.6.0, security modules were supposed to use the standardized Linux Security Modules (LSMs) [2], which were created specifically for this purpose and which are also used by other popular security systems, such as SELinux, AppArmor, and SMACK.
Integration with the official kernel was an interesting prospect, so the Tomoyo developers changed their module to use the LSM interface. Because it would have been necessary to extend the LSM interface to port all of the Tomoyo Linux features, the developers opted for an approach that involved administrative action and much confusion. Now there are two versions of Tomoyo with different feature sets. The initial version of Tomoyo is still available and offers the complete feature set. When this issue went to press, this was version 1.8.3, and it works with any kernel above version 2.4.
The second Tomoyo version is part of any Linux kernel as of version 2.6.30, and it uses the LSM interface – at the cost of not having all the features that Tomoyo version 1 offered.
Mainly, this version is missing a number of MAC options; for example, it is no longer capable of managing the dynamic linker (ld). However, things get worse: The different Linux kernels contain different versions of Tomoyo that often are set up and managed differently.
Table 1 has an overview of the Tomoyo versions in the various kernels. The greatest differences in terms of features compared with version 1.x are noticeable in Tomoyo versions 2.2.x and 2.3.x; the current version 2.5 only lacks a couple of features. Unfortunately, version 2.5 is only available in Linux kernel 3.2, which in turn is only supported by a couple of distributions. If you want more precise details, you can find a comprehensive comparison of the individual Tomoyo versions and their functions on the Tomoyo website [3].
Tabelle 1: Currently Available Tomoyo Versions
|
Tomoyo Linux Version |
Kernel Version |
Availability (among others) |
|---|---|---|
|
1.8.x |
2.4.37, 2.6.27 through 2.6.39, and 3.0 |
|
|
2.2.x. |
2.6.30 through 2.6.35 |
Debian 6 (Squeeze) |
|
2.3.x. |
2.6.36 through 3.0 |
Ubuntu 11.10 |
|
2.4.x. |
3.1. |
openSUSE 12.1 |
|
2.5.x. |
3.2. and newer |
Ubuntu 12.04 (beta 2) |
The Tomoyo developers offer prebuilt 1.8.x packages for a couple of selected distributions, including Fedora, openSUSE, Debian, Ubuntu (as of version 8.04), and RHEL or CentOS. These packages are only available for the 32-bit standard installation, whereas the packages for Fedora 16 and RHEL 6.2 require a 64-bit system. On top of this, the packages replace the entire kernel, which means relying on the Tomoyo project for security updates – or creating your own kernel again. If you want to see whether Tomoyo Linux 1.8.x is worth all this effort, you can use the Live CD provided by the project [4] for special versions of Ubuntu 10.04, CentOS 5.8, and CentOS 6.2.
Hardened
On a production system, the preferred approach will typically be to use the Tomoyo Linux version built into the kernel (see the "Trials" box). This variant isn't just easier to deploy, it is also maintained by the distributor. To discover whether your distribution's kernel includes Tomoyo Linux, simply type one of the commands from Table 2. If it's there, it will output a cryptic string with a T and a term containing tomoyo (Figure 1). Otherwise, you will not see any output. The current CentOS 6.2 is the exception; it uses kernel 2.6.32, which none of the Tomoyo 2.x series versions is designed to support (see Table 1). Your only approach here is to use the Live CD, or replace the kernel using the RPM package provided by the Tomoyo project.
Tabelle 2: Testing for an Active Tomoyo Linux
|
Tomoyo Version |
Command |
Response if Active |
|---|---|---|
|
2.2. |
|
|
|
2.3. |
|
|
|
2.4. |
|
|
|
2.5. |
|
|

When Tomoyo Linux is ready for action, you will need the command-line tools. Most distributions include them in the tomoyo-tools package, which you can install using your package manager. This package is not in the Ubuntu Software Center; instead, type:
sudo apt-get install tomoyo-tools
Finally, you need to enable the Tomoyo module. To do so, specify the security=tomoyo kernel parameter either directly at the boot prompt or in the bootloader configuration. If you are still using the legacy GRUB, as on openSUSE 12.1, you need to open the /boot/grub/menu.lst file (also referred to as grub.conf), look for the section for the default boot entry (e.g., title Desktop -- openSUSE 12.1 ...), and then add the security=tomoyo parameter to the kernel ... line. If you have GRUB 2, as in Debian 6 (Squeeze) and Ubuntu, append the parameter to the GRUB_CMDLINE_LINUX_DEFAULT line in /etc/default/grub; for example, on Debian, use:
GRUB_CMDLINE_LINUX_DEFAULT="quiet security=tomoyo"
The following command then updates the configuration:
sudo update-grub
The /etc directory should contain a tomoyo subdirectory with several configuration files. Otherwise, you need to run the /usr/lib/tomoyo/init_policy script to create them; on Tomoyo 2.2, this is /usr/lib/tomoyo_init_policy. On a 64-bit system, the script is sometimes located in /usr/lib64. Incidentally, this is also a great way of repairing a Tomoyo configuration that has gone seriously wrong: Just delete the /etc/tomoyo directory and run the script.
After a reboot, the kernel should tell you it is running Tomoyo. To check, type
dmesg | grep TOMOYO
(note the uppercase letters). If Tomoyo is running, the command will output the version number (Figure 1).
Individuals
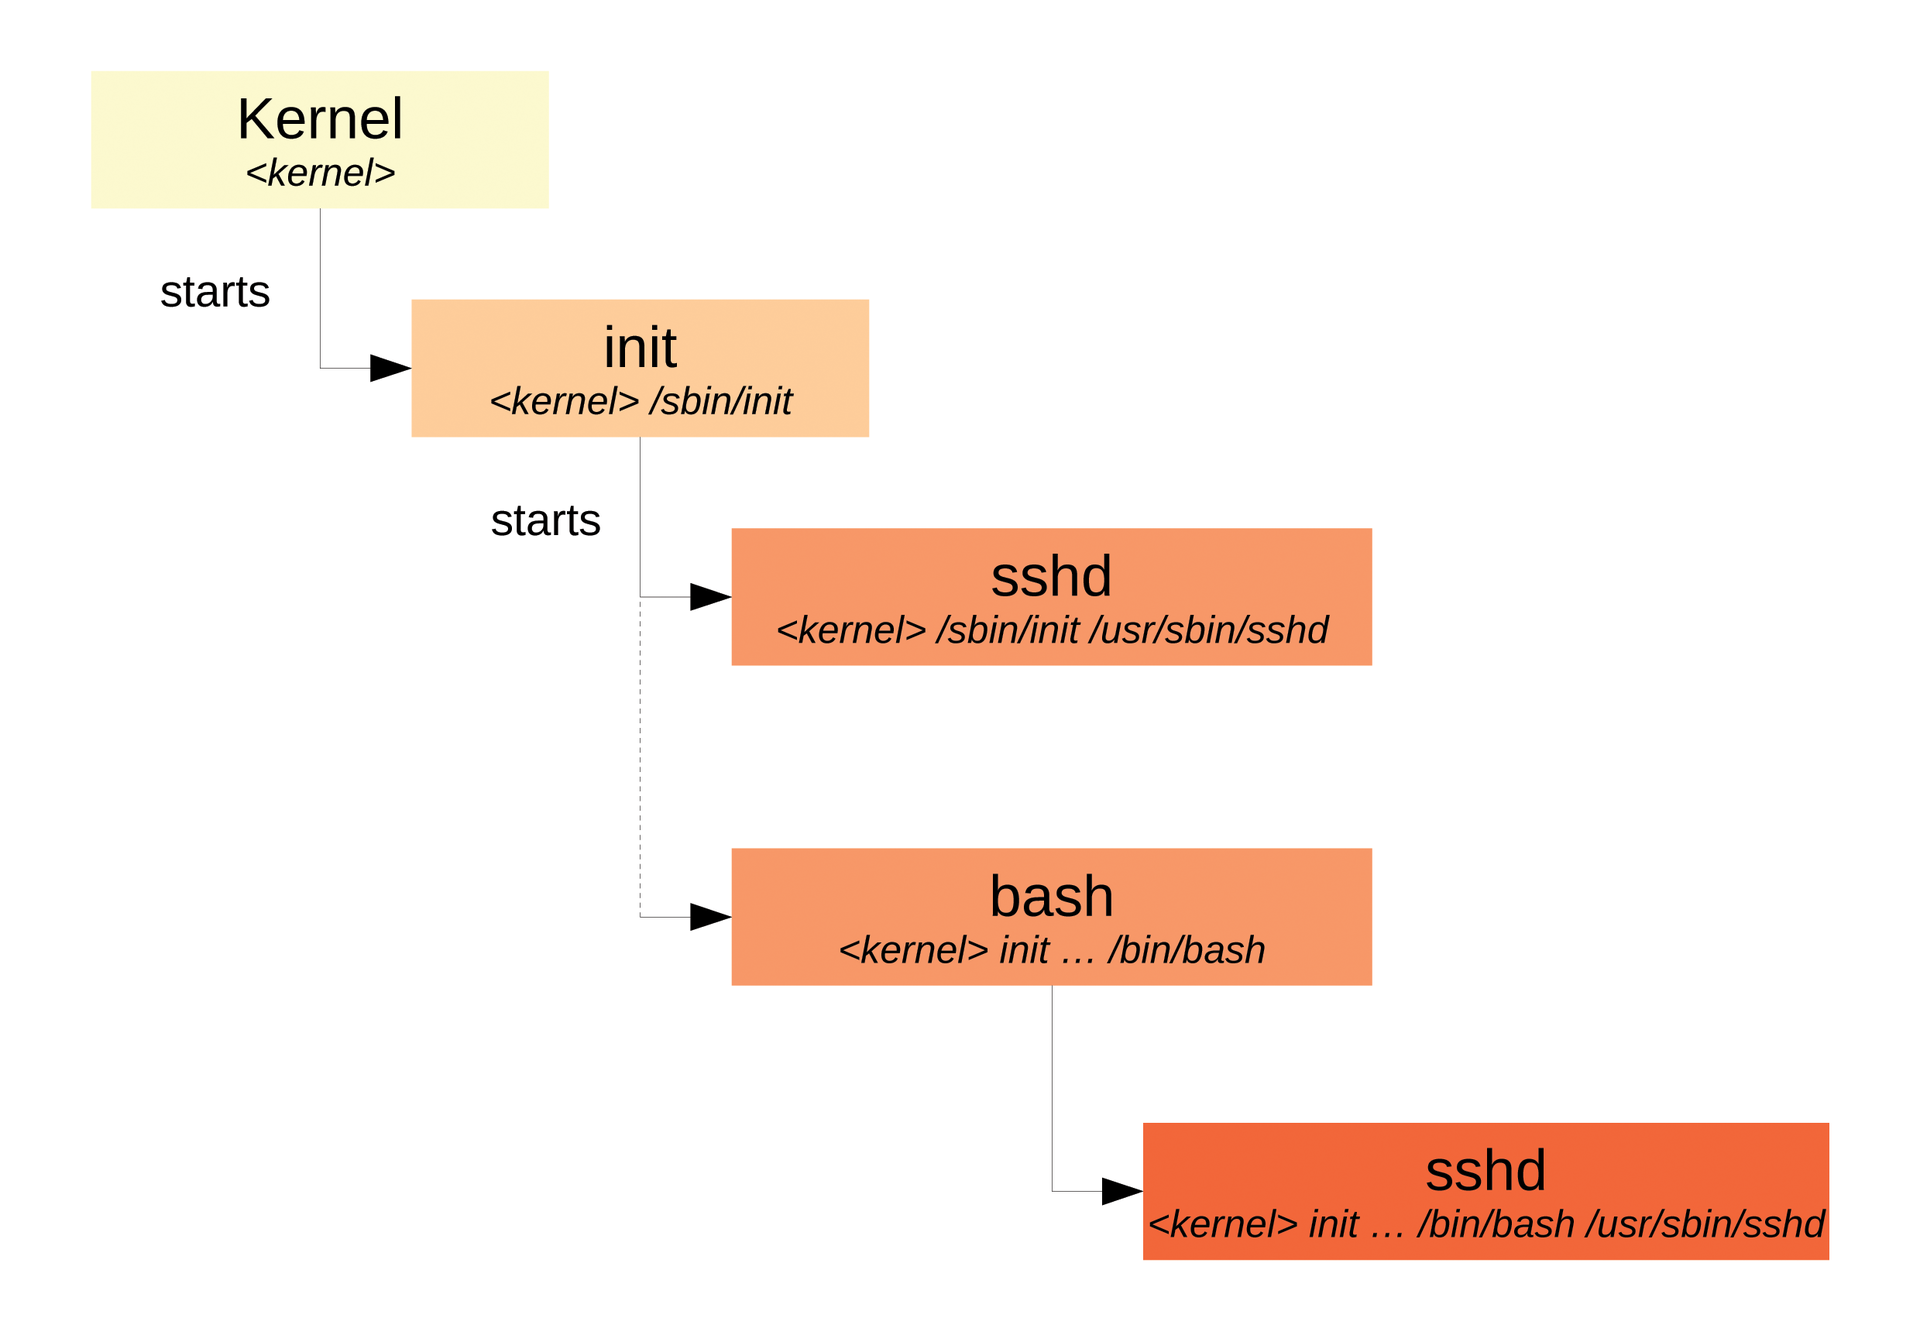
Tomoyo Linux locks each process away in a separate jail referred to as a domain. Each of these domains is given a unique name comprising the full pathname of the program that spawned the process – for the SSH daemon, this would be /usr/sbin/sshd. To this designator, Tomoyo then adds the full path of all previous programs and scripts leading to the process being run, going right back to the kernel, which uses the special <kernel> domain name (Figure 2). The sshd daemon's domain is thus <kernel> /sbin/init /usr/sbin/sshd. These long names might seem convoluted at first, but it actually gives you a precise approach to defining the actions the SSH daemon is allowed to perform in specific circumstances. For example, you can trust an sshd called by init but maybe not one started retroactively at the console.
You can view all the existing domains in the Policy Editor as the root user:
sudo tomoyo-editpolicy
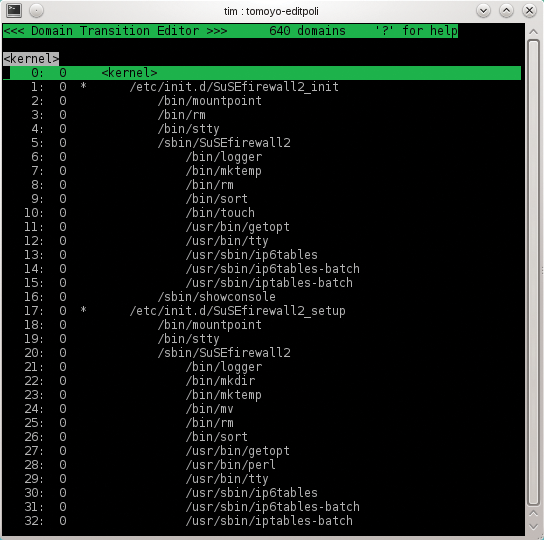
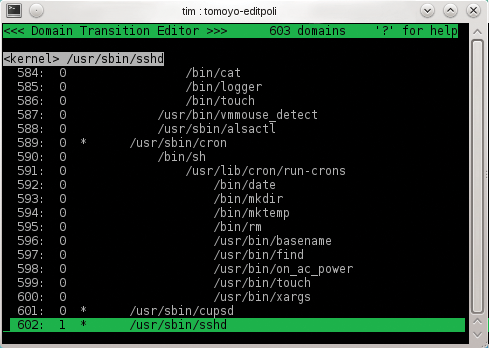
The program comes up as the Domain Transition Editor. Figure 3 shows that Tomoyo has been busy since boot time and has created 640 domains (as shown in the top line). The third line in gray shows that the <kernel> domain is currently selected. Below this is a list of all domains. To improve visibility, the Policy Editor doesn't simply dump the whole domain name onto the screen; rather, it indents the individual processes. You can navigate the list using the arrow keys, Home, End, Page up, and Page down. The full process domain name is always shown in the line with the bright gray background at the top. If you launch more programs and press r to refresh the view, you will see Tomoyo creating domains for these processes. To find an entry quickly, press f and type a search key. The n key takes you to the next match, and q quits the Policy Editor without a prompt.
Profiled
Tomoyo Linux needs to treat the individual domains in different ways. Although it needs to pay close attention to what a web server is doing and take action as needed, it can typically trust init blindly and simply allow all of its actions. Thus, you would need to define how Tomoyo should manage it for each domain individually. Because this would be very time consuming, Tomoyo takes a different approach. First, the administrator creates a profile that defines how Tomoyo should behave. The profile could thus state that Tomoyo Linux should allow all actions by default but log them to be on the safe side. Following the same principles, the administrator can create up to 256 further profiles and then note which profiles apply for each domain. If the domain then wants to perform some action, Tomoyo consults the profile assigned to it and behaves as defined (Figure 4 illustrates this principle).

Tomoyo Linux comes with a couple of prebuilt profiles out of the box. The Profile Editor shows you these profiles when you press the w key to access the menu and then p to open the Profile Editor (Figure 5). Each profile is assigned a number between 0 and 255. The Profile Editor shows line numbers in the first column; the profile number is always to the left of the hyphen. Figure 5 lists four profiles numbered 0 through 3. As of Tomoyo version 2.3, each profile contains up to three entries. The profile numbered 0 typically contains the following three lines:
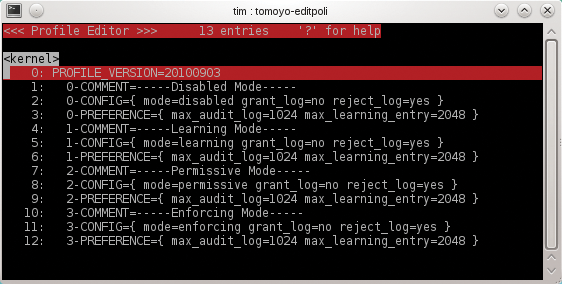
0-COMMENT=disabled
0-CONFIG={ mode=disabled grant_log=yes reject_log=yes }
0-PREFERENCE={ max_audit_log=1024 max_learning_entry=2048 }
COMMENT= is followed by a name or profile description. In this case, it is simply disabled.
Tomoyo Linux can allow all actions in a domain, block prohibited actions, or remember all actions performed by the domain as allowed. The curly brackets that follow CONFIG= tell Tomoyo what to make of the action. mode=disabled simply waves all actions through in the domain. Table 3 lists the other modes. mode= is followed by a couple of parameters that control Tomoyo's logging behavior (see also the "Listener" box).
Tabelle 3: Tomoyo Linux Modes
|
|
Effect |
|---|---|
|
|
Allows all actions. |
|
|
Enables learning mode (i.e., allows all actions and adds them to the ruleset as allowed). |
|
|
Allows actions, even if they infringe the rules. |
|
|
Blocks an action that infringes a rule. |
Finally, you can create a couple of granular settings in the curly brackets after PREFERENCES. In Tomoyo Linux 2.4 and 2.5, max_audit_log= defines the maximum number of audit logs remembered by the kernel, and max_learning_entry= defines the maximum number of actions that Tomoyo will add to the profile in learning mode. In Tomoyo Linux 2.3, max_entry has the same effect as max_learning_entry. If a process infringes a rule, Tomoyo 2.3 sends it to sleep for the time defined in enforcing_penalty.
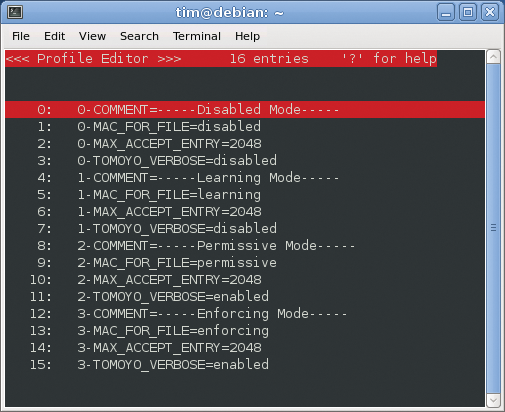
Tomoyo Linux 2.2, which is used in Debian 6, for example, is an exception. Each profile here contains four entries (Figure 6). Just as in the successor versions, a COMMENT line is first. MAC_FOR_FILE= defines the mode; permitted values are the values in Table 3. MAX_ACCEPT_ENTRY= defines the number of actions that Tomoyo remembers in learning mode. Finally, if you set TOMOYO_VERBOSE= to enabled, Tomoyo will log all infringements in the Syslog.
Under normal circumstances, the four default profiles will typically be enough, but if you want or need to create more, press a and type the profile number. The Profile Editor creates a new profile with default values. A word of caution: A profile created in this way is kept until you restart (unless you save the configuration – but more on this later). To change a line, access the line, press s, and enter the new parameter or edit the line that is displayed.
Sharing Jails
Now you can assign a profile to each of the existing domains. Pressing w and d takes you back to the Domain Transition Editor. The profile assigned to a domain is shown in the second column. The zeros show that Tomoyo Linux is currently using profile 0 for each domain, and thus allowing all actions to pass. You could now access one of the domains, and press s, to assign a different profile, such as the profile for learning mode. However, you'll encounter a slight hitch.
You can see from the domain name schema how a process was launched. This typically creates multiple domains, each of which you would need to manage individually. The prime example here is the Apache web server, httpd, which will normally comprise multiple processes. Additionally, it is hard to tell up front what entity will launch a process and how. If you want a program to be treated the same way, no matter how it is launched, you first need to press w and e to access the Policy Exception Editor. This tool manages all actions allowed in all domains. Then, you can press a to create a new rule, as in:
initialize_domain /usr/sbin/sshd from any
The /usr/sbin/sshd portion stands for the full pathname to the program in question – the SSH daemon in this example. Tomoyo now creates a single domain to which all sshd processes belong. These domains are tagged with an asterisk * in the Domain Transition Editor (Figure 7). If Tomoyo has created domains for active sshd processes before this, these domains are now obsolete. Domains of this type are tagged with an exclamation mark ! in the Domain Transition Editor; you can press d to delete them.
In this example, Tomoyo would thus treat all sshd processes in the same way. Additional no_initialize_domain rules let you create exceptions:
initialize_domain /usr/sbin/sshd from any
no_initialize_domain /usr/sbin/sshd from /bin/bash
In this case, Tomoyo would create a separate domain for each sshd process launched by Bash – but only in this case.
Speaking of Bash: If a program is launched in a shell, it is a good idea that it observe the same restrictions as the shell. The keep_domain rule
keep_domain any from /bin/bash
will do this and prevent Tomoyo from creating a separate domain for programs launched in the shell, such as ls or cat. Instead, the same restrictions that apply to the shell now apply to the programs. You can lift this restriction for individual programs with no_keep_domain,
no_keep_domain /bin/cat from /bin/bash
which tells Tomoyo Linux to create a separate domain for cat as an exceptional case.
Carrot and Stick
The next step is to define which actions a domain allows and which it rejects. To do so, select a domain in the Domain Transition Editor (press w and d to access the editor) and press Enter. The Domain Policy Editor appears showing all of the actions this domain is allowed to perform. The list should be empty immediately after startup; later on, it will look like Figure 8. The first column again contains the line number; the second column contains the action. allow_read allows read access to the file to its right. As of Tomoyo 2.4, the action names are slightly different: allow_read mutates to file read, for example. Additionally, wildcards are allowed for file and directory names: \$ stands for an arbitrary character; \* for any number of characters. The following rule would let sshd create arbitrary files in the /tmp directory,
allow_write /tmp/\*
or, as of Tomoyo 2.4:
file write /tmp/\*
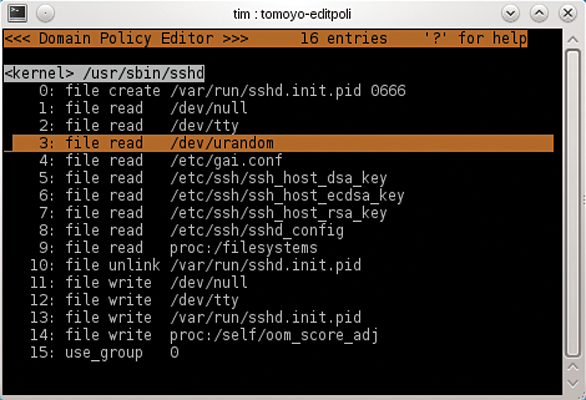
/dev/urandom (among other actions) when launched.If you make a typo, pressing d deletes the selected rule. An appendix to the Tomoyo documentation [6] [7] lists all possible rules and keywords. To manage a domain and thus a program, you could check this list and then painstakingly create one rule after another by pressing a. It is, however, far more convenient to switch the domain to learning mode and then let Tomoyo record all the allowed actions. To do so, access the domain in the Domain Transition Editor (press w, d), enter /usr/sbin/sshd, then press s followed by the number of the learning mode profile, which defaults to 1.
Pressing the @ key takes you to an overview of the active processes (Figure 9). In Tomoyo 2.2, you instead need to quit the Profile Editor by pressing q and then run the tomoyo-pstree command. In each case, there should be a 1 to the left of the application process. If you only see the end of the list, the up arrow takes you to the remaining entries. Pressing @ takes you back to the original view; in Tomoyo 2.2, you again need to launch the Profile Editor.
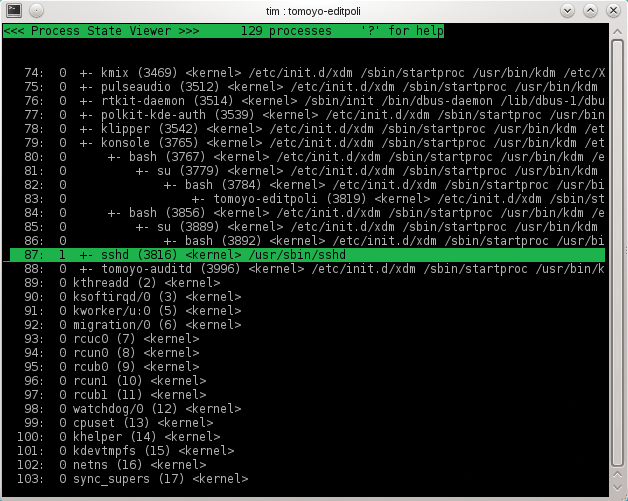
Now, launch the service again in a second terminal, access the process's domain in the Domain Transition Editor, and press Enter to change to the Domain Policy Editor. This shows you all the actions performed by the process when it started up (see Figure 8).
At the same time, these are the actions that Tomoyo Linux will allow the daemon to perform later. To complete the list, you should now perform a couple of standard tasks (e.g., for the SSH daemon, log in). Then, press r to refresh the Domain Policy Editor view. Because learning mode is a Tomoyo feature, you can temporarily quit the Policy Editor.
When you're done with learning mode, you can add or remove a couple of actions. After completing the list of actions, press w and d again to return to the Domain Transition Editor and assign the default profile 3 to the domain, thus switching it to enforcing mode (press s and 3). From now on, Tomoyo will only allow the actions it learned. This will remain transparent for users because the blocked programs don't return anything. For example, if you blocked logins via the SSH daemon, the user will only see an innocuous Connection closed by remote host message.
Elephants Never Forget
Restarting the system deletes Tomoyo's memory; all of the rules you created so painstakingly are lost. To prevent this, it is a very good idea to save the current configuration. To do so, quit the Policy Editor by pressing q and issue the command
sudo /usr/sbin/tomoyo-savepolicy
to send the current configuration to the exception_policy.YYYY-MM-DD.hh:mm:ss.conf and domain_policy.YYYY-MM-DD.hh:mm:ss.conf files in the /etc/tomoyo directory. Tomoyo versions as of 2.4 first create a subdirectory with the current date in /etc/tomoyo and then store no fewer than four files in this directory.
No matter which Tomoyo version you use, you can reload the configuration using the commands in Listing 1. When you restart the system, this happens automatically; there is no need to add the commands to the start scripts. Incidentally, the files domain_policy.conf, exception_policy.conf, and so on are symbolic links to the .conf files created by tomoyo-savepolicy. They are plain text files that you can edit manually, which could be a more convenient approach than using the Policy Editor, especially in a larger environment. If you have worked with the Policy Editor previously, the configuration files should not pose too much of a challenge.
Listing 1: Loading the Configuration
01 sudo /usr/sbin/tomoyo-loadpolicy -df < /etc/tomoyo/domain_policy.conf
02 sudo /usr/sbin/tomoyo-loadpolicy -ef < /etc/tomoyo/exception_policy.conf
03 sudo /usr/sbin/tomoyo-loadpolicy -p  < /etc/tomoyo/profile.conf
04 sudo /usr/sbin/tomoyo-loadpolicy -m  < /etc/tomoyo/manager.conf
You can collect actions blocked by Tomoyo with the tomoyo-auditd daemon (see the "Listener" box). In Tomoyo 2.4, the following command gives you some quick stats:
cat /sys/kernel/security/tomoyo/stat
The interesting thing here is the number next to Policy violation in enforcing mode (Figure 10), which tells you how often Tomoyo has blocked actions in enforcing mode. Tomoyo versions 2.2 and 2.3 write a Syslog entry for each infringement – assuming the profile in question has
TOMOYO_VERBOSE=enabled
set, or
PREFERENCE::permissive={ verbose=yes }
in Tomoyo 2.3

Conclusions
Tomoyo Linux's learning mode makes it very easy to restrict a process with MAC. The actions logged by Tomoyo can also help software developers identify undesirable behavior in their own programs. With just a couple of key presses, you can add individual rules – assuming you are familiar with the slightly quirky terminology and concepts.
The only drawback to using Tomoyo is the many versions and their different capabilities and configurations. If you manage multiple Linux machines running different distributions, Tomoyo could be more than irritating to set up.
To aggravate the situation, help is only available via the mailing list [8] and in the quirkily structured documentation [9]. As if this weren't enough, the Tomoyo developers are also working on another system, named AKARI, that is based on Tomoyo Linux and designed to be a loadable kernel module [10]. Work will continue at the same pace on all Tomoyo versions and on AKARI; thus, the developers do not recommend any specific version for any specific system, leaving administrators to wonder whether to deploy Tomoyo and, if so, which version.
