Adapting VMware vSphere for state-of-the-art hardware
Tailor-Made
Working on the latest hardware means you also need the latest drivers, whether on an operating system like Windows or Linux or a virtualized solution like VMware vSphere. However, vSphere drivers come not as Windows files or Linux packages, but as vSphere Installation Bundles (VIBs); moreover, software components for hardware monitoring and configuration (known as CIM providers) are provided by hardware manufacturers as VIBs.
A VIB is kept in an ar archive, which contains the files themselves, an XML-formatted descriptor file, and a signature file (Listing 1).
Listing 1: VIB Content
01 $ ar -tv Adaptec_Inc_bootbank_scsi-aacraid_5.0.5.1.7.28700-1OEM.500.0.0.406165.vib
02 --------- 0/0   1356 Jan  1 01:00 1970 descriptor.xml
03 --------- 0/0   2122 Jan  1 01:00 1970 sig.pkcs7
04 --------- 0/0  53423 Jan  1 01:00 1970 scsi-aac
The signature file designates the acceptance level (Table 1). The administrator can configure a minimal acceptance level on each; host, by default, this is Partner Supported. If a VIB does not fulfill these requirements, it can't be installed. VIBs with an empty signature file are deemed to be Community Supported. A signature file is mandatory for the three higher levels: Partner Supported, VMware Accepted, and VMware Certified.
Tabelle 1: Acceptance Levels
|
Level |
Description |
Support |
|---|---|---|
|
VMware Certified |
Highest level |
VMware |
|
VMware Accepted |
VMware partner tests the VIB; VMware verifies the test results |
VMware partner |
|
Partner Supported |
VMware partner provides and tests the VIB |
VMware partner |
|
Community Supported |
VIB without a signature |
None |
Image Builder
VIBs can be either installed retroactively on an ESXi host or integrated before installation into an ESXi image using VMware vSphere ESXi Image Builder. Integration with an image requires the VIB to be available in a so-called offline bundle. An offline bundle is a Zip file that contains the VIB and other metadata.
If you want to install ESXi on a volume belonging to a RAID controller – for example, the 6Gbps SAS Adaptec RAID Controller series 6 – you will need a matching driver. Although no driver currently exists in the VMware ESXi installation image, the required driver (version number 5.1.7.28700) is available as a VMware Certified signed VIB in an offline bundle that you can download from VMware, which then allows you to integrate the driver with an individual ESXi image.
Even if you install ESXi on a USB memory stick, integration before installation offers some advantages. With multiple hosts, you can save yourself the trouble of manually installing the driver on each machine after the fact. With a USB-based installation, it is advisable to set up a scratch partition manually on a VMFS filesystem after installing; otherwise, ESXi will grab 512MB of RAM for the scratch partition, and, of course, its content is lost when you reboot [1].
Image Builder is a component of VMware vSphere PowerCLI 5.0 [2], which requires at least Windows XP SP2 and .NET as of version 2.0 and Windows PowerShell 2.0. To ensure that you can use all of the PowerCLI features, VMware recommends setting the PowerShell Execution Policy to RemoteSigned at the end of the installation. To do this, right-click the VMware vSphere PowerCLI icon at the end of the installation and select Run as administrator. The Set-ExecutionPolicy RemoteSigned command that follows sets the execution policy appropriately. When next launched, PowerCLI then shows you a welcome message with a couple of commands for accessing PowerCLI help (Figure 1). The starting point for a custom image is the installation image profile of a VMware offline bundle, which is available from VMware as a Zip file or ISO image. The

Add-EsxSoftwareDepot
command integrates the offline bundle (Listing 2); the
Listing 2: Custom Image with Image Builder
PowerCLI C:\> Add-EsxSoftwareDepot E:\update-from-esxi5.0-5.0_update01.zip
PowerCLI C:\> Get-EsxImageProfile
PowerCLI C:\> Add-EsxSoftwareDepot E:\aacraid-1.0.1-offline_bundle-560288.zip
PowerCLI C:\> New-EsxImageProfile -CloneProfile ESXi-5.0.0-20120302001-standard -Name "ESXi-5.0u1-standard-Adaptec"
PowerCLI C:\> Get-EsxSoftwarePackage
PowerCLI C:\> Add-EsxSoftwarePackage -ImageProfile ESXi-5.0u1-standard-Adaptec -SoftwarePackage scsi-aacraid
PowerCLI C:\> Compare-EsxImageProfile ESXi-5.0.0-20120302001-standard ESXi-5.0u1-standard-Adaptec
PowerCLI C:\> Export-EsxImageProfile -ImageProfile ESXi-5.0u1-standard-Adaptec -FilePath E:\ESXi-5.0u1-standard-Adaptec.iso -ExportToIso
Get-EsxImageProfile
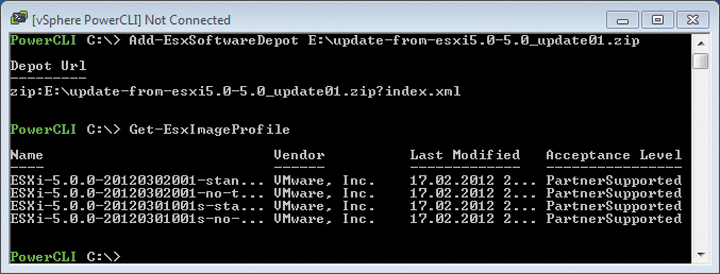
command shows the available image profiles in the offline bundle (Figure 2). Starting with ESXi 5.0 Update 1, offline bundles contain both the previous general image profiles, as well as security-only image profiles, which are identified by the "s" in their names and are suitable for updating previously installed ESXi hosts. These files are not suitable as a basis for a new installation image. Two general image profiles are offered: the standard profile (ESXi-5.0.0-20120302001-standard) and the profile without integrated VMware tools for guest systems (ESXi-5.0.0-20120302001-no-tools). The next step is to integrate the offline bundle for the Adaptec driver. To do this, use Add-EsxSoftwareDepot. The

New-EsxImageProfile
command clones the standard profile. When you choose a name for the new profile, it is a good idea to use something intuitive, such as ESXi-5.0u1-standard-Adaptec. Entering the command
Get-EsxSoftwarePackage
shows all available software packages, including scsi-aacraid by Adaptec, version 5.0.5.1.7.28700.
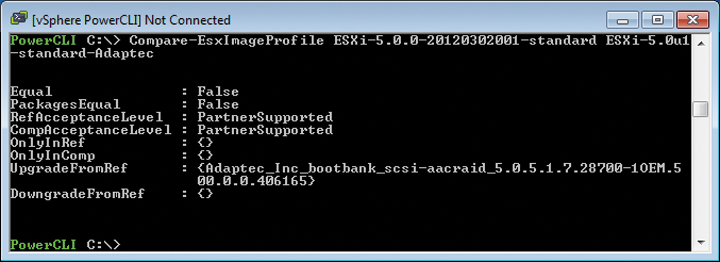
A call to Add-EsxSoftwarePackage adds scsi-aacraid to the new image profile. To discover whether this step has worked, you can compare the standard profile with the new image profile with the Compare-EsxImageProfile tool (Figure 3).

To export the image profile to an ISO file, use Export-EsxImageProfile. Now you can burn this file to a CD/DVD or use it as the basis for creating an installation USB memory stick.
Installing from a Stick
As mentioned earlier, ESXi can be installed locally, on SAN RAID volumes, and on USB memory sticks. Also, USB sticks can also be used as an installation source [3]. This method is far quicker than installing from a CD or DVD. Additionally, many of today's servers do not have a CD/DVD drive, which is another argument for looking to USB memory sticks as the installation medium.
VMware recommends using a Linux system to prepare the installation stick. In the example here, the USB stick is identified by the Linux system as /dev/sdb. If the stick has a different device name in your case, you just need to replace /dev/sdb accordingly in the following commands.
To begin, start fdisk and press c to create a single primary partition on the stick of type W95 FAT32 (LBA). Then, press a to make the partition active. Now, enter
mkfs.vfat -F 32 -n USB /dev/sdb1
to format the stick. To make sure the server can boot from the USB memory stick, you need to install Syslinux 3.86 [4] on the stick and in the Master Boot Record. The following commands take care of this:
syslinux-3.86/linux/syslinux /dev/sdb1
cat syslinux-3.86/mbr/mbr.bin > /dev/sdb
Caution: The first command pertains to the /dev/sdb1 partition; the second command relates to the /dev/sdb device. Newer Syslinux 4.* versions, as included with the current crop of Linux distributions, are not suitable for this purpose. The next step is to mount the filesystem you just created on the USB memory stick and the ESXi ISO installation image. A call to
cp -r /mnt/esxi-cdrom/* /mnt/usbdisk
copies all of the data to the USB stick. Rename the isolinux.cfg file to syslinux.cfg, then add a parameter -p 1 in this file to the line reading APPEND -c boot.cfg. Next, unmount, and your ESXi installation stick is ready.
Installing VIBs Retroactively
After installing an ESXi host, you can retroactively install VIBs with the esxcli command, which you can run directly in an ESXi shell on the host. If vSphere CLI [5] is installed on a remote host, you can also execute the command from that host. To install a VIB, type:
esxcli software vib install -v VIB-URL
The VIB URL supports access to VIBs via HTTP, HTTPS, and FTP and to VIBs stored locally on the ESXi host. If you call esxcli remotely via the vSphere CLI, you need the parameters -s for the server IP and -u for the username (Figure 4). If you are installing the vSphere CLI on a Linux machine, watch out for a little pitfall: The installation will fail unless you run the vmware-install.pl installation script to set the http_proxy and ftp_proxy environmental variables. If you do not use proxies, these variables must be empty [6].

Conclusions
VMware has created a valuable tool in the form of vSphere ESXi Image Builder to help administrators provide the latest drivers and software components to ESXi installation images. Many administrators will appreciate that installations now work without a CD/DVD drive.
