Using AppLocker to block applications on networks
Nailed Down
Even if users don't have administrative privileges, they can still launch many programs without trouble; these programs possess the same privileges as their users and can transfer enterprise data to the web. Because of this, it makes sense to restrict the degree of freedom that users enjoy.
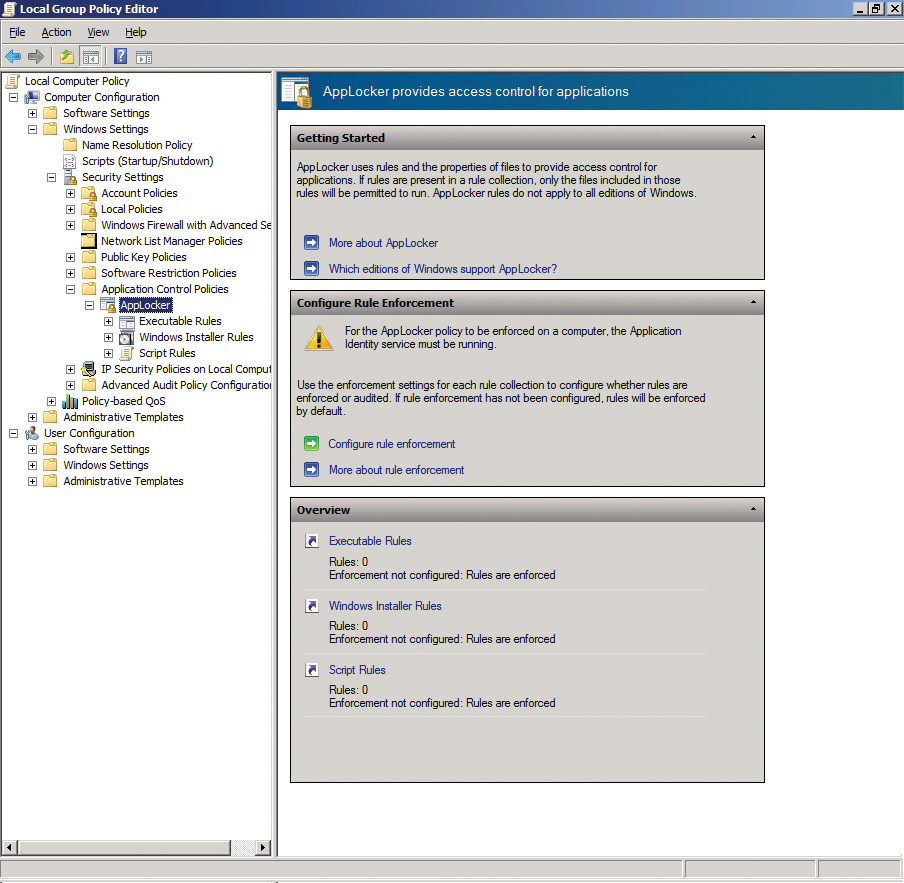
To use AppLocker (Figure 1), you must have Windows 7 Enterprise and Ultimate Edition client-side. AppLocker is also available in the Standard, Enterprise, and Datacenter Editions of Windows Server 2008 R2. The approach involves creating policies that are automatically applied to Windows 7 clients. Operating systems that are incompatible with AppLocker simply ignore the policies. There is no danger of disabling machines just because the operating system doesn't understand the AppLocker policies.

AppLocker also supports whitelists, blacklists, and combinations of rules. It can block applications and even individual DLL files in special use cases, including the ability to distinguish between program and DLL versions. AppLocker can also create automatic policies and monitor specific directories for new programs. Besides group policies, you can also filter via security groups, and with PowerShell, you can control AppLocker (Figure 2). To do so, load the commandlets with

import-module applocker
For a list of the available commandlets, type:
get-command *applocker*
Microsoft offers various documents to help you plan and implement your AppLocker policies [1]. And, Microsoft TechNet offers how-tos on the subject [2]. You can also check out WindowsSecurity.com [3] for a video that might help you set up your environment.
Creating Group Policies
Policy configuration is a two-step process; you need to create a policy and assign AppLocker rules to it. The policy is created much like any other: To create a new group policy object (GPO), launch the Group Policy Management Console, right-click the Group Policy Object in the GPMC, and select the New item in the context menu.
After creating the policy, link it to the organizational unit (OU) or domain to apply the settings. To filter within the AppLocker rules, you use security groups by going to Computer Configuration | Policies | Windows Settings | Security Settings | Application Control Policies, clicking on AppLocker, and creating the rules. Executable Rules is where you create rules for programs with .exe and .com suffixes.
Installer rules control the way setup files (.msi and .msp) execute. Script rules are for files with .js, .ps1, .vbs, .cmd, and .bat suffixes. You can combine rules and select whether the rule allows or blocks a program or programs. For each rule, you can additionally define exceptions for specific programs. Deny rules take priority over allow rules.
If you deny program execution, you cannot create a rule that gives a specific group the ability to execute the program. In this case, you need to set up filtering in the rule to avoid restricting all users. AppLocker supports Active Directory groups to let you do this. When you create a new AppLocker rule, you can assign it to a user group. Then, you can control program execution via group membership without having to create a new AppLocker rule or modify an existing one.
Creating AppLocker Rules
A good place to get started with AppLocker is with the executable rules, which allow you to block specific programs, or specific program versions. To do this, navigate to Computer Configuration | Policies | Windows Settings | Security Settings | Application Control Policies, click on AppLocker, and then right-click Executable Rules. In the drop-down menu, select Create New Rule and then go to the Permissions item to define whether the rule will allow or deny applications.
In the drop-down menu, select the group to which you will be applying the rule. On the next page, you can specify the conditions for blocking the programs, as follows:
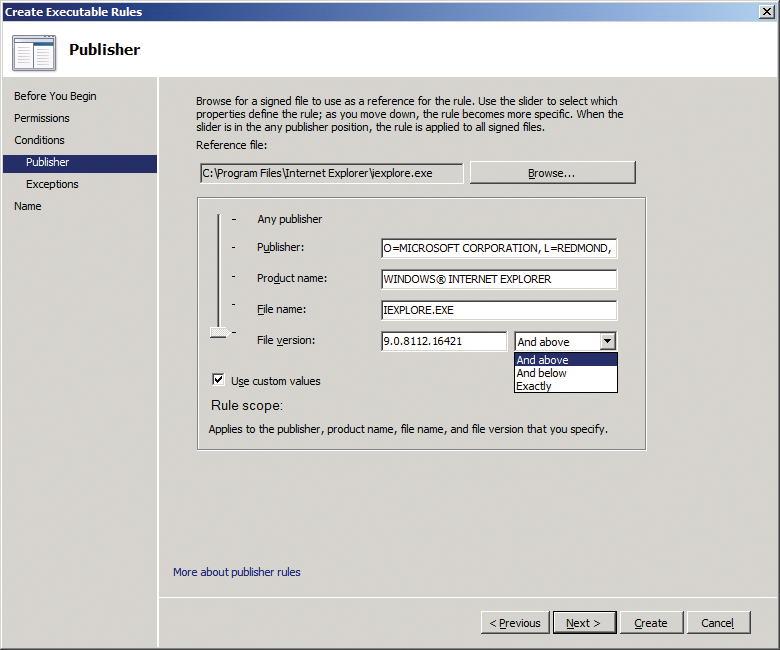
- Publisher: This selection lets you block applications based on their certificates, which means the application must be digitally signed. This is often the case with standard software, although this setup will not work for applications you programmed yourself and have not digitally signed (Figure 3).
- Path: The Path selection typically relates to programs in a specific directory. Users can move programs out of the directory, however, and the rule no longer applies.
- File hash: This selection relates to the fingerprint of the file, which changes for each new version and update. You need to modify the rule for each program change.

The other windows depend on your filtering choices. You can start by selecting a reference program by the manufacturer whose programs you want to filter. Then, use the slide controls to configure the settings for the program version you want to manage. You also have the option of blocking individual, perhaps undesirable, versions of the program. To do so, enable the Use custom values option to define the versions as of which, or up to which, are affected by the rule.
The other screens in the wizard let you choose whether or not to define exceptions for the rule. Of course, you can modify rules retroactively if the need arises. Then, you can create all the other rules you want to add to the GPO.
Once you have completed the GPO with the rules, bind it to an OU or the domain. The computers then apply the policy and implement the defined rules. The best way to test whether AppLocker policies are correctly deployed is to reboot or to type
gpupdate /force
at a command prompt that you ran as the administrator.
For more advanced analysis of the use of an AppLocker policy, download the Group Policy Help commandlet from the SDMSoftware [4] site. After installing the commandlet, you can type
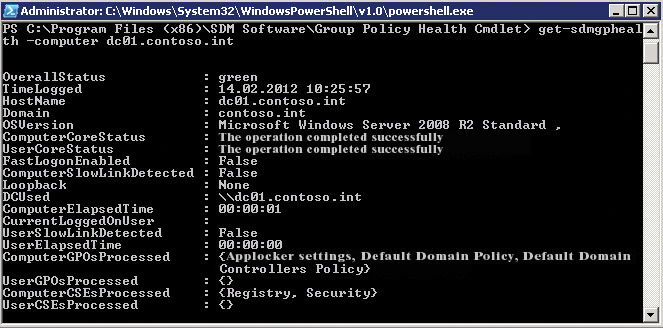
Get-SDMGPHealth -computer Computername
to check whether the group policies are working. This tool gives you an approach for avoiding problems with AppLocker rules because of incorrectly applied group policies. After installing the tool, you need to register a commandlet DLL. To do so, pop up a text window and navigate to C:\Windows\Microsoft.NET\Framework64\v2.0.50727. If you use a 32-bit system, you need to change directory to C:\Windows\Microsoft.NET\Framework and enter the command:
installutil "c:\Program Files (x86)\SDM Software\Group Policy Health CMDlet\GetSdmGPHealth.dll"
Note that you must be the administrator to run this command successfully at the prompt.
Next, call Launch PowerShell with GP Health Snap-In in the SDM Software program group. The C:\Program Files (x86)\SDM Software\Group Policy Health Cmdlet directory contains a help file for CMDlet. The Get-SDMGPHealth command used earlier returns the status of the computer and the policies it implements. Make sure the AppLocker policy is applied. If a rule doesn't work, this is not an issue with the policy, but of the rule within the policy when the target computer applies it (Figure 4).

Automatic Rules
You can also tell AppLocker to generate rules automatically. To do so, specify a directory that AppLocker will scan for new programs and automatically add to rules. To create an automatic rule, right-click Executable Rules and select Automatically Generate Rules. Tell the wizard the directory you want AppLocker to integrate and the user group to which the rule applies.
Then, select the basis on which AppLocker will create the rules. Again, you can choose between publisher, file hash, and path, just as with manual rules. Similar files can also be grouped in shared rules. The wizard then creates allow rules for the program it finds. You can edit these rules retroactively as needed.
Click on AppLocker in the left-hand console panel, and you can decide on the right how AppLocker should treat your client computers. To do so, select Configure Rule Enforcement. You can enable Enforce rules or Audit only.
In Audit mode, AppLocker doesn't apply the rules but simply monitors the applications affected by them. You will find the entries in the event log below Applications and Services Logs | Microsoft | AppLocker.
The Advanced tab lets you enable DLL rules. After enabling, the left-hand panel in the console offers a new DLL Rules option. You can create AppLocker rules based on DLL files here; however, you should avoid using this option in the enterprise until you have set up an AppLocker infrastructure.
DLL rules are created in the same way as executable rules. The difference is that you don't select COM or EXE files, but DLL files to which the rule applies. Again, you can block specific versions, allow, or filter, as with executable rules. Creating these rules is just like creating other rules. Filtering for DLL files can seriously slow down a client computer and inadvertently block a large number of applications.
AppLocker's predecessors are Windows Software Restrictions. You need to deploy these if you use AppLocker-incompatible operating systems, such as Windows XP/Vista, as well as Windows Server 2003/2008.
USB Sticks
Besides AppLocker, the group policies give you other approaches to preventing users from running programs and, thus, improving security. Again, you need group policies here. In Windows Server 2008 R2, Windows Vista, and Windows 7, you can use group policies to prevent access to removable media such as USB sticks. The policy for managing removable media is available in both the computer configuration and the user configuration. The settings for access to removable media are located in Computer Configuration | Policies | Administrative Templates | System/Removable Storage Access.
The settings for this policy are self-explanatory. When you open a policy, you will find an Explanation tab that gives you an exhaustive explanation of the policy's effect. Some third-party burning tools might not observe the policy settings for write access to CDs or DVDs. If you reliably want to prevent CDs and DVDs from being burned, you should prevent the installation of DVD or CD burning devices in the corresponding policy. The general settings for device installation are located in Computer Configuration | Administrative Templates | System | Device Installation | Device Installation Restrictions. This gives you an approach for preventing users accessing unauthorized USB sticks.
User Account Management via Group Policies
On an enterprise network, you can use group policies to manage user accounts. The settings for this are located in Computer Configuration | Policies | Windows Settings | Security Settings | Local Policies | Security Options. When a user runs a task that requires administrator privileges, a confirm/authorize window is displayed if the user is logged in as the default user on a workstation. Again, this functionality offers a potential approach to blocking applications.
BitLocker
In Windows 7, you can encrypt hard disks and USB sticks using BitLocker. For this to work, you need to install the TPM security module on the PC. To be able to use hard disk encryption, you can also modify the group policy setting. In this case, you need to plug a USB stick into the computer.
In the Group Policy Editor tree go to Computer Configuration | (Policies) | Administrative Templates | Windows Components | BitLocker Drive Encryption | Operating System Drives. Double-click the Require additional authentication at startup key. Windows Vista clients or Windows Server 2008 have a separate policy that you need to enable for this.
In the dialog, press the Enabled radio button, ensure that the Allow BitLocker without compatibles TPM is enabled, and then press OK. The policy then assumes a status of Enabled.
Monitoring Filesystem Access
If you want to monitor access to files or programs on computers or file servers, you can use policies to handle this, too. Open the local or group policy for the computer and navigate to Computer Configuration | Windows Settings | Security Settings | Local Policies | Audit Policy. To enable monitoring of filesystem access, select Audit object access. After monitoring is enabled, you can also choose whether to log successful or failed access attempts.
After enabling auditing, you need to enable monitoring of the individual files and directories. To do so, access the properties of the object (i.e., the directory with its data) and press the Advanced button in the Security tab. In the Auditing tab, you can see which operations are currently logged. To make meaningful use of the logfiles from auditing, it is a good idea to restrict what you audit to a minimum.
Selecting Add lets you specify the auditing details. Just as with NTFS permissions, the inheritance principle applies here, although you can disable it if needed. After pressing Add, you can then select Edit to select the users or groups to audit. And, just like assigning special NTFS privileges, you can specify the extent to which these settings apply to subordinate objects and directories. Then, in the Access field, you can select what access is logged and whether to log successful or failed access attempts.
Auditing logs are available in the event log. Launch the management console by typing eventvwr.msc. The event log shows you the logged access attempts in the Security log. The entries with a wrench icon represent successful access attempts, and entries with a padlock represent failed attempts. For more detailed information, you can open each item. A single access attempt creates a whole series of entries in the security log.
iPhone Configuration
Applications on smartphones, such as the iPhone, can be blocked by AppLocker. This approach lets enterprises reliably prevent the installation of apps. In combination with the ActiveSync policies on Exchange Server 2007/2010, administrators can use the iPhone configuration program to configure iOS devices. Apple explains the use of this tool and offers deployment tips on a separate page, which you can also access via the iPhone configuration program [5].
Administrators can use the configuration program to create various profiles with settings. The profiles take the form of XML files that define the iPhone settings and contain settings users normally define directly with their iPhone. A GUI is available for the configuration. Settings defined by administrators via a configuration profile cannot be edited manually on the iPhone/iPad. The tool also makes it possible to hide or disable various sections of the iPhone and installed apps. To do this, administrators can hide program icons on the mobile device and prevent the user installing apps via the App Store. The Restrictions area contains all the restrictions that let you disable individual sections of the mobile device.
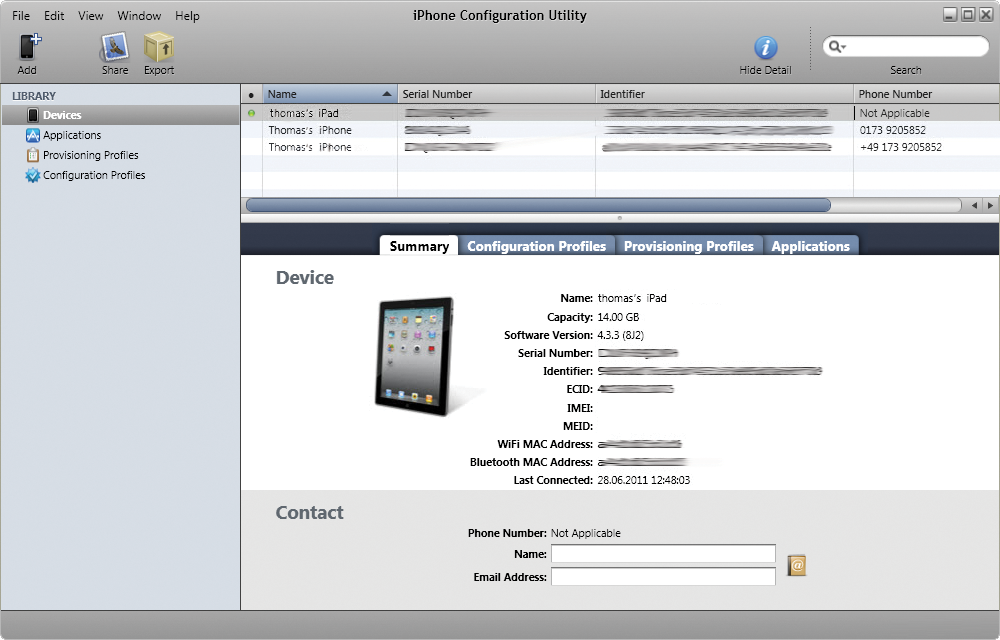
Restrictions and settings can be stored in separate profiles or in a shared profile. Restrictions are deployed as a configuration profile like any other setting. Profiles are created via the Configuration profiles menu (Figure 5). Press New to tell the configuration program to create a profile. In the top General area, you can assign a name for the profile and click your way through the various settings. The ability to configure Exchange settings, certificates, and WLAN access will be interesting for larger corporations in particular.

