Intrusion detection with Prelude
Fire Alarm
After the manufacturer of the Prelude security information and event management (SIEM) system went bankrupt, the future of the product was uncertain. Now that Prelude has been purchased by French and German IT service provider CS Group, Prelude confidently boasts its abilities as a SIEM solution.
As such, it collects all the security-relevant event data on a network. Besides analysis and graphical representation, a SIEM can also trigger defensive mechanisms. If you take a closer look, today's SIEM systems are a combination of Security Information and Event Management systems. Just a few years ago, these tasks would have been shared by various programs, but Prelude combines most of the required functionality in a shared user interface.
Two versions of Prelude [1] are available: the commercial Prelude Pro and an open source variant, which the package sources of more or less any major distribution feature today. The download page [2] is rumored to offer the source code, but work was in progress when this article went to press. I installed Prelude on Debian Squeeze (6.0) and Ubuntu 11.10 for this article.
Seeing Past False Positives
SIEM systems are, without a doubt, an important component of any modern security infrastructure, but they do pose a problem for administrators in that it is difficult to distinguish between false positives and genuine attacks. That said, the issue is common to all security solutions, right down to simple antivirus scanners. False positives can occur, for example, when a security solution has not been sufficiently tested, so that purported virus signatures also match harmless programs. This is not always the security solution's fault. An application that is not programmed carefully and fails to comply with RFCs can trip a SIEM signature.
In this test, Prelude suspected a DoS attack because one of the lab computers used the SMBTA analysis tool along with the RRDtool visualization tool to query a number of values from our router via SNMP. Another problem with complex SIEM solutions is that of culling the huge number of analyzed logs in a way that gives the administrator a fighting chance of systematically investigating them for security issues.
Prelude Architecture
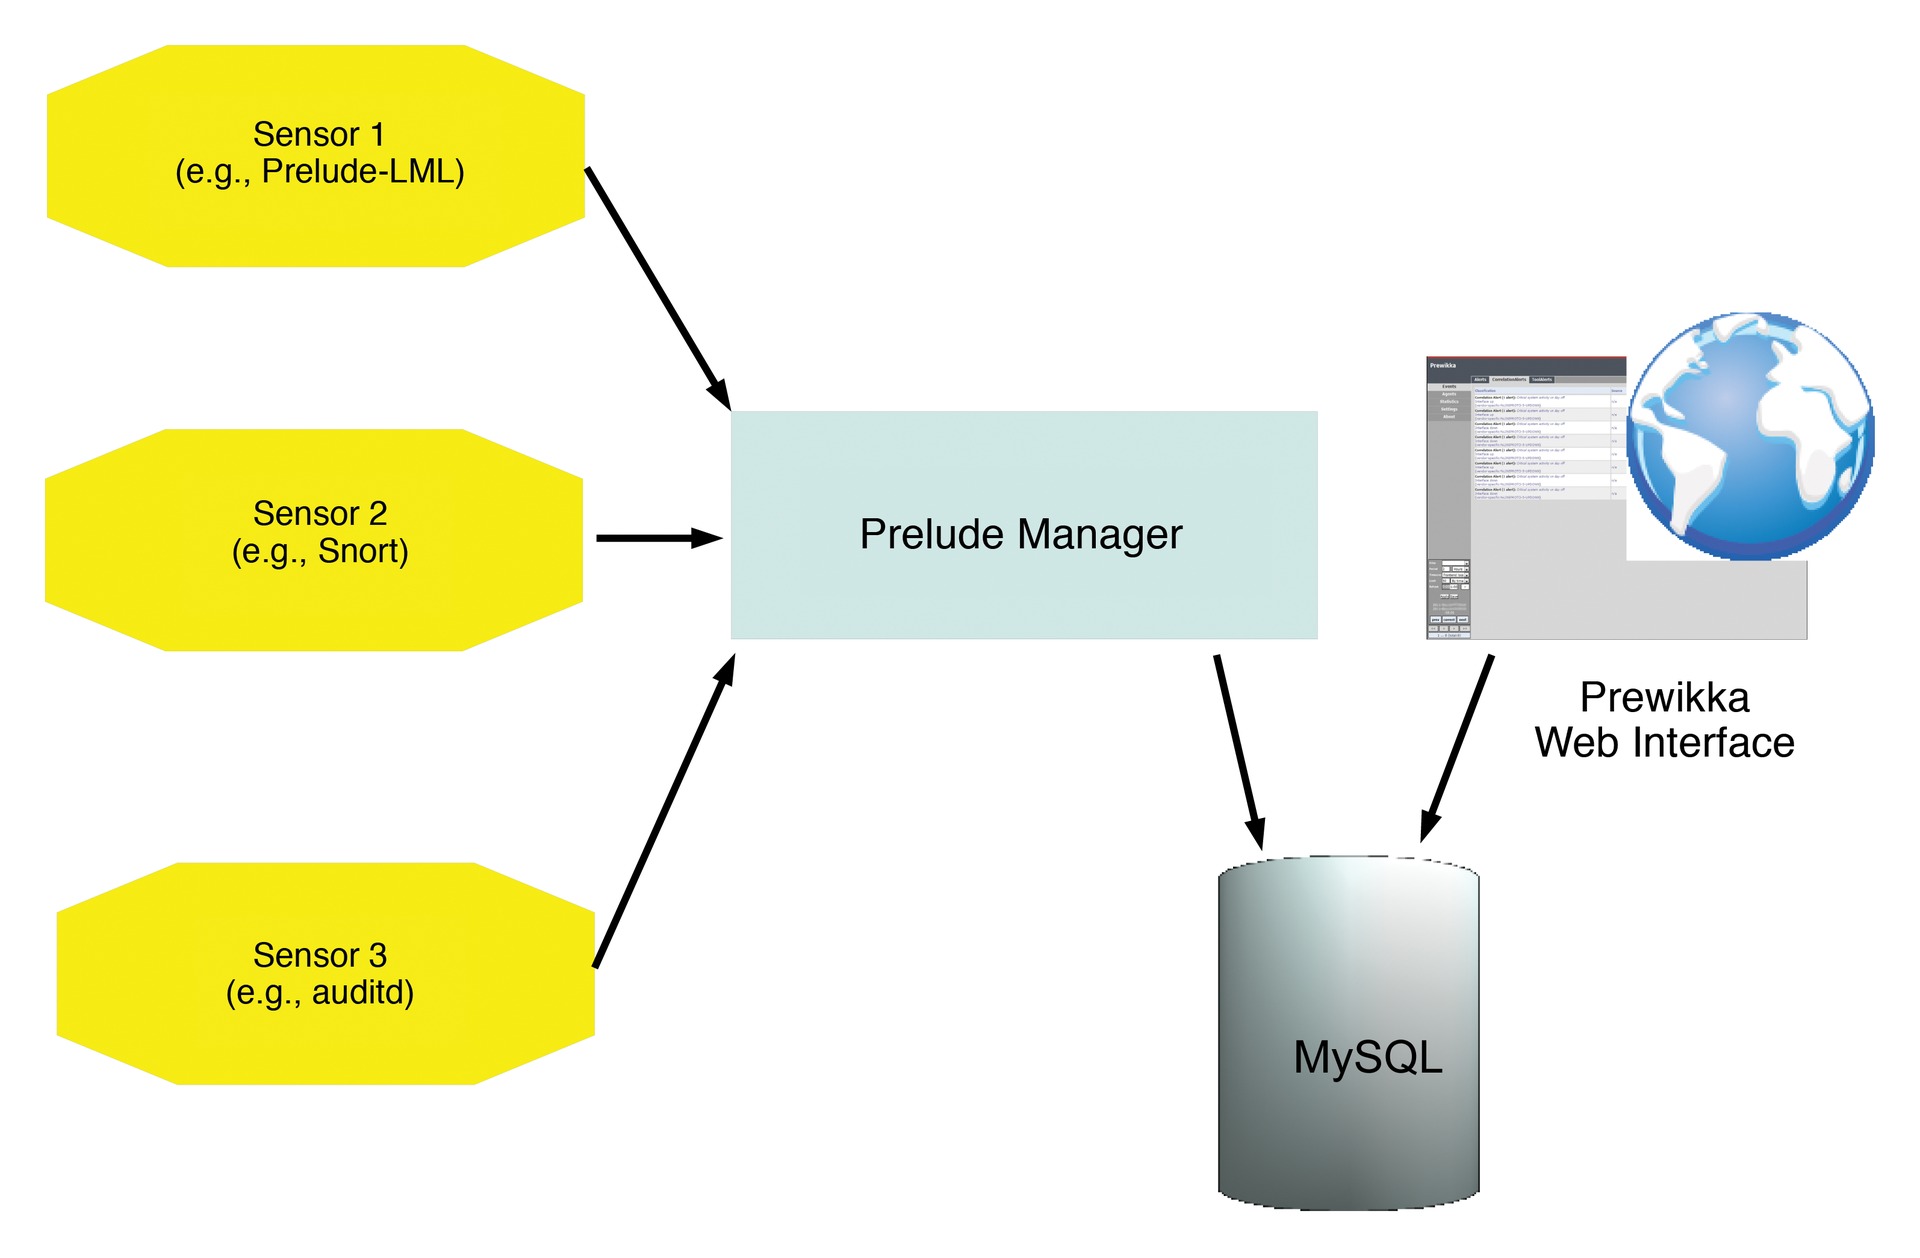
Prelude's answer to such problems is its modular architecture; at its center is the Prelude Manager with its underlying framework (libprelude, libpreludedb). The Prelude Manager collects event data from the connected sensors or agents and stores the results in a MySQL database. From there, you can use the Prewikka web interface to read and prepare the data. At the core of the solution are individual sensors and the Prelude Correlator, which allow administrators to correlate log messages from a variety of sources.
The Intrusion Detection Message Exchange Format (IDMEF), as defined by the IETF, plays a central role here, and Prelude's implementation makes it possible to store messages from diverse sensors in a standardized format and in a single MySQL database. Prelude itself comes with the Prelude LML sensor, a logfile monitor with a predefined ruleset.
Prelude also supports a large number of additional sensors whose output it standardizes and converts to the IDMEF format. Besides Snort and Linux PAM, the list of available sensors includes the Linux Audit daemon auditd, the versatile nepenthes tool, the samhain file integrity checker, and NuFW, an identity access management solution (firewall) from the Endenwall bankruptcy estate (see the "Endenwall Bankruptcy Estate" box for more).
All of these tools are included in the Ubuntu 11.x and Debian 6.x package sources. You can also opt for the host-based IDS OSSEC by Trend Micro [3]. If the Prelude Manager is running on a remote server, the rule-based Prelude Correlator (written in Python) picks up the alerts from a remote Prelude Manager server and correlates them with incoming messages on the local system. The Prewikka web interface picks up the standardized messages from the MySQL database and visualizes them. Figure 1 illustrates the architecture.

Installing Prelude
Despite Prelude's relatively complex architecture, installing the individual components is not a big deal on most of today's distributions because nearly all of the required modules are provided by the regular package sources. Additionally, the installation and configuration are well explained by the Admin Manual [4]. The configuration itself does involve some effort, however. Note that, in the following examples, I will be using the defaults, or vendor examples, for the database names (Prelude, Prewikka) and usernames (database-admin, prelude-manager, prewikka-user). You will definitely want to change these defaults. Additionally, you must be root for all of the following commands.
To create a central interface between the individual sensors and the web interface, you first need to manage the Prelude Manager. Installing the manager on Debian or Ubuntu, by typing apt-get install prelude-manager, automatically installs libprelude and libpreludedb to complete the framework components. You can also use a graphical tool for the install.
The libprelude library creates the RSA keys required for communicating with Prelude Manager, among other things: Libpreludedb includes the data and tables required to set up the database. Caution: If you install prelude-manager with Synaptic, don't be surprised if the GUI appears to freeze. You need to display the installation details to see that it takes some time to generate the RSA keys; this is likely to unsettle administrators because of the lack of visual feedback (Figure 2).

After completing the installation, the configuration settings for Prelude Manager are located in /etc/prelude-manager/prelude-manager.conf. The package manager might also tell you that Prelude Manager needs a database and offer to automate the process of configuring the database for Prelude. Prelude Manager supports MySQL, PostgreSQL, and SQLite. If you are installing on a Debian-based distribution, debconf will query the required database configuration parameters, assuming you already have a database (such as MySQL) in place (Figure 3).

The [db] section of the /etc/prelude-manager/prelude-manager.conf file should look something like Listing 1 on completion.
Listing 1: prelude-manager.conf
# The type of database: mysql, pgsql or sqlite3.
type = mysql
# Only if you use sqlite3.
# file = /your/path/to/your/db/idmef-db.sql
# Host the database is listening on.
host = localhost
# Port the database is listening on.
port = 3306
# Name of the database.
name = preludeg 1
# Username to be used to connect the database.
user = prelude
# Password used to connect the database.
pass = <xxxxxx>
If you opt for a manual database configuration, you will at least need to modify or complete the database settings in the [db] section of prelude-manager.conf. In this example, I used mysql as the database type along with the typical MySQL defaults (host, localhost; port, 3306). The database name here is preludedb; the Prelude admin account should be user=prelude with pass=prelude. At the same time, you should take a look at the default option of listen = 127.0.0.1; this option obviously only makes sense in a setup where Prelude Manager and the web interface are running on the same machine. If you have a distributed setup, you will need to modify the listen option.
Setting up the database manually (e.g., for RPM-based distributions) requires some basic knowledge of SQL. The
mysql -u root
command lets you log in to the MySQL DBMS as the administrator. If MySQL is configured to support root access without a password, you instead need to type mysql -u root -p followed by the MySQL password. In interactive MySQL mode, you can type
mysql> CREATE database prelude
to create the databases for Prelude and then do:
mysql> GRANT ALL PRIVILEGES ON prelude.* TO prelude@'localhost' IDENTIFIED BY '<password>';
to assign the required privileges. The exit command quits interactive database mode. You can optionally create the database setup with graphical tools such as Chive or phpMyAdmin.
Back at the Linux console, you need to issue the following command to continue the database setup with the SQL file provided with the package. To create the tables, enter:
mysql -u prelude prelude -p < /usr/share/libpreludedb/classic/mysql.sql
Then you can set up the administrative Prelude user with the prelude-admin tool:
prelude-admin add prelude-manager -uid 0 -gid 0
Next, launch the prelude-manager service. Depending on your distribution, for example, enter:
service prelude-manager start
On Ubuntu and Debian, this assumes you changed Run=no to Yes in your /etc/default/prelude-manager file.
Setting up the Web Interface
The Python-based web interface for Prelude goes by the name of Prewikka and version 1.0.0-1.1 can also be installed via the major distributions' package managers using either
apt-get install prewikka
or your preferred graphical front end. This process downloads and installs the python-prelude, python-cheeta, and python-preludedb packages to resolve dependencies.
The web front end also needs database access. Besides MySQL, which is already installed in the example, Prewikka also supports PostgreSQL and SQLite3 – just like Prelude Manager. Setting up the database is similar to setting up the database for Prelude Manager. Debian or Ubuntu users can leave this step to debconf (Figure 4).

Manual configuration requires a modicum of SQL syntax:
mysql -u root -p
followed by the MySQL password changes to database mode. Then, to create the database and the required permissions, you enter:
mysql> CREATE database prewikka;
mysql> GRANT ALL PRIVILEGES ON prewikka.* TO prewikka@'localhost' IDENTIFIED BY '<password>';
mysql> exit;
Again the remainder of the setup is completed by reading the SQL file provided by the package to create the required tables.
$ mysql -u prewikka prewikka -p < /usr/share/prewikka/database/mysql.sql
Again, typing the database password completes the configuration and creates the required tables. The Prewikka web interface is configured in the /etc/prewikka/prewikka.conf file, whose database setup section should look something like Listing 2 after running debconf.
Listing 2: prewikka.conf
type: mysql
host: localhost
user: prelude
pass: prelude
name: prelude
[database]
type: mysql
host: localhost
user: prewikka
pass: <xxxxxxxx>
name: prewikka
Setting up the Web Server
The web interface is now installed and configured, but you still need a matching web server. Prelude includes its own tiny web server that you can start with
/usr/bin/prewikka-httpd
The Prewikka web server accepts queries on port 8000 by default. If you are already running Apache on the host, you will probably want to keep things this way. The Prelude wiki [5] includes matching virtual host configuration files for a CGI setup (Listing 3).
Listing 3: Virtual Host Setup
01 <VirtualHost *:80>
02  ServerName my.server.org
03  Setenv PREWIKKA_CONFIG "/etc/prewikka/prewikka.conf"
04
05  <Location "/">
06   AllowOverride None
07   Options ExecCGI
08
09   <IfModule mod_mime.c>
10    AddHandler cgi-script .cgi
11   </IfModule>
12
13   Order allow,deny
14   Allow from all
15  </Location>
16
17  Alias /prewikka/ /usr/share/prewikka/htdocs/
18  ScriptAlias / /usr/share/prewikka/cgi-bin/prewikka.cgi
19 </VirtualHost>
In other words, you can just add the corresponding code to your Apache configuration file. On Ubuntu, /etc/apache2/apache2.conf uses an include directive to point to the /etc/apache2/sites-enabled subdirectory and, from there, a symlink to /etc/apache2/sites-available, where the separate configuration file for the virtual host resides. On Ubuntu, even the default web server is set up as a virtual host (/etc/apache2/sites-enabled/000-default). Additionally, the ServerName directory is not set by default on Ubuntu.
For a ModPython setup, you also need to remember to install the libapache2-mod-python package. After restarting or reloading Apache by typing either of the following lines,
sudo /etc/init.d/apache2 reload
sudo service apache2 restart
the Prewikka web interface should be available on http://localhost/prewikka.
Sensors
Once Prelude Manager and the web interface are running, you can install the first sensor. The Prelude-LML log agent that comes with the package will serve as an example; it lets the administrator evaluate a variety of logfiles. Prelude-LML can be configured to assume the role of a central syslog server; you simply need to configure your log generator to cooperate with a syslog service like Prelude-LML in each individual case.
Prelude-LML then evaluates all log messages on the basis of its ruleset and returns the information it gleans to Prelude Manager. Prelude-LML handles logs created by typical Unix services, such as the package filter (iptables), or by routers and switches. In the lab, I installed Prelude-LML on the same machine as Prelude Manager. In a production environment, you would probably prefer to run agents on the hosts or network segments to be monitored. Prelude-LML is included by the package sources of all the popular distributions; thus, you can use the front end or the following command:
apt-get install prelude-lml
After the install, you need to register the sensor with Prelude Manager, again using the prelude-admin command, but with the register option this time. When you register a sensor, Prelude Manager creates a unique identifier and a directory for the sensor. At the same time, the register option might also generate the required RSA keys if the sensor and the manager are running on separate hosts or if you are using a Remote Prelude Manager. The register process stores the required information in the matching sensor profile, which you can name freely. The generic syntax for the register command is:
prelude-admin register <profile name> <requested permission> <manager address> --uid <uid> --gid <gid>
The profile name is the name of the sensor to install; in this example, it would be prelude-lml. The requested permission parameter depends on the sensor you are registering. Typically, a sensor will need at least write permissions (w) for IDMEF messages. An option is available for the sensor to accept administrative commands; it only needs read permissions to do so. In my example, this would be:
prelude-admin register prelude-lml "idmef:w admin:r" localhost -uid 0 -gid 0
Among other things, the command states that the administrator must launch a registration server on the localhost, preferably using a second terminal window, while the first window waits for the input of a one-time password. To start the registration server, you again need the prelude-admin command:
prelude-admin registration-server prelude-manager
The command generates a random value, which you need to enter as a one-time password in the first window. The prelude-lml sensor is now registered with Prelude Manager and can be started as follows:
service prelude-lml start
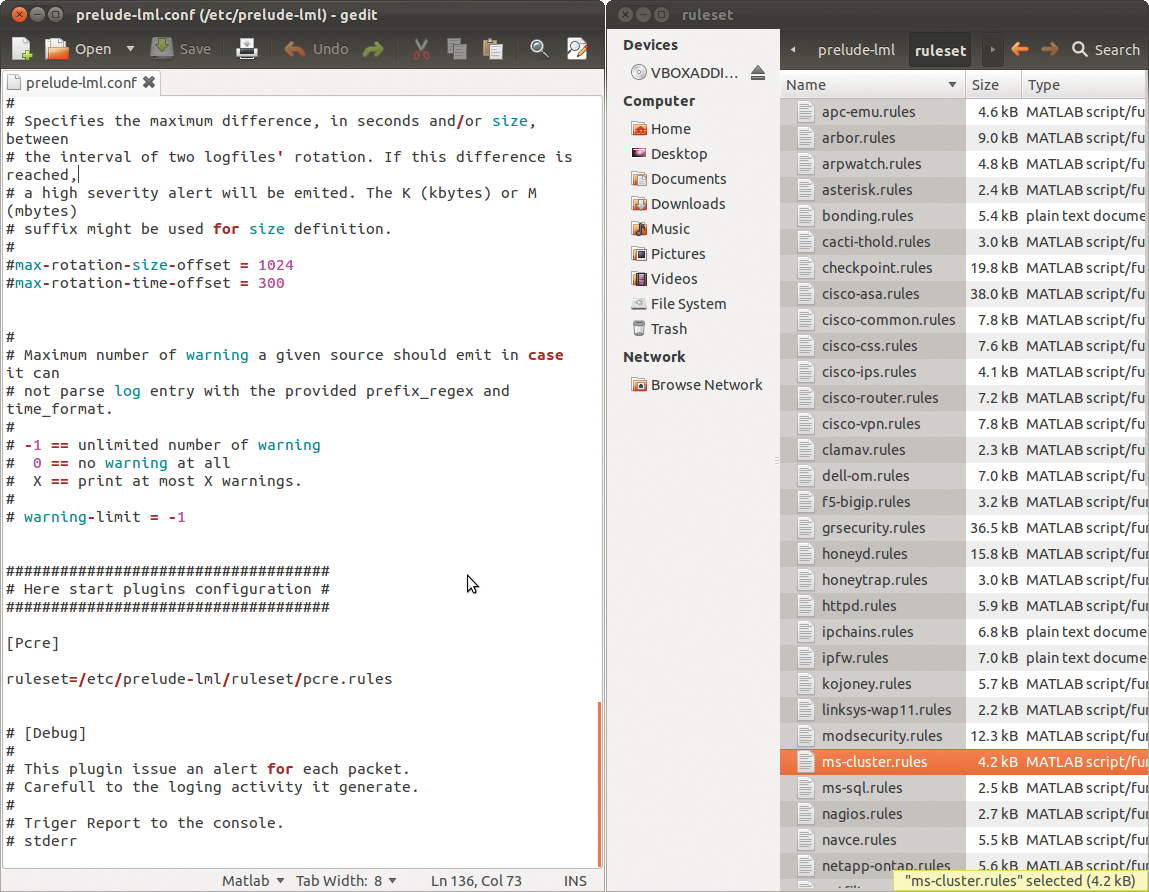
In the web interface you will see that the sensor is recognized by Prelude Manager. The configuration of the sensor is handled by the matching configuration file, /etc/prelude-lml/prelude-lml.conf. You can specify the logfiles that Prelude-LML will monitor as a centralized syslogger (Figure 5).

/etc/prelude-lml/prelude-lml.conf configuration file to define the logfiles that the sensor monitors. Rulesets are available in the /rulesets subdirectory.Other Sensors
As I mentioned previously, Prelude also supports a number of other sensors. One of the most interesting is certainly Snort, which lets you deploy Prelude as a network-based IDS. Snort acts as a network sniffer, identifying suspicious packages on the basis of their signatures, which you can download from the Snort website 30 days after they are first published. A commercial subscription is required for more up-to-date signatures. Installing the sensor and the basic working principles of Snort are unlikely to faze most administrators.
The approach to registering the sensor is similar to that for Prelude-LML. Snort can also be run as a back end with a MySQL database. Luckily, the Snort package provides a matching schema file in /usr/share/doc/snortxxx/create_mysql, and you can thus quickly set up the database and create the required tables. You need to set the variables required for production deployment in the Snort configuration file, /etc/snort/snort.conf; this includes the network interface that Snort will use to monitor network traffic and the path to the folder with the signatures.
More sensors for Prelude are available in the package sources for most distributions. The Notify sensor, which you can install via the prelude-notify package is a useful choice. Prelude-Notify is a Gnome applet that shows incoming messages in Prelude Manager in a pop-up window. You can call the web front end and concentrate on troubleshooting the root cause. Before doing so, you need to register prelude-notify as a sensor using prelude-admin. After completing the registration, you can launch the applet from the Gnome menu.
Conclusions
If you have previously only used a host-based IDS (HIDS), such as Tripwire, or an network-based IDS (NIDS), like Snort, it is a very good idea to take a look at the free hybrid system, Prelude. Prelude is a powerful and flexible SIEM system that has proved its value over many years. Its use as an IDS only covers one of the many application options. Thanks to the large numbers of sensors and agents available for Prelude, the borders between log analyzers, NIDS or HIDS, and event management systems are slowly disappearing.
After the acquisition of Prelude by CS Group from its previous owner Endenwall, Prelude's future seems secure. But where there is light, there are shadows. Although the Community version I tested gives administrators the opportunity to use a mature enterprise system free of charge, your mileage en route to a workable system will vary, and you shouldn't expect a short journey.
Although you can keep the installation and basic configuration effort for the framework down to a manageable quantity using the information in the well-maintained wiki, installing and modifying the sensors you need for your specific environment, configuring those sensors, and evaluating the results will take considerable patience.
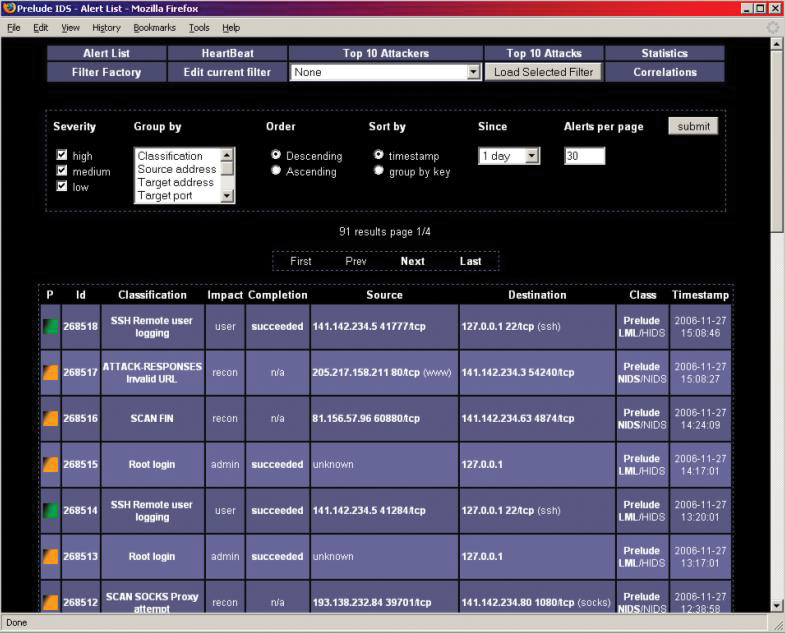
The Python interface, Prewikka, is an indispensable aid – but certainly not state of the art in terms of functionality and looks. If you don't like Prewikka, you can easily install the predecessor solution, PIWI (Figure 6), on most distributions; it is also included in the popular package sources. PIWI is definitely not a step forward – it would hardly have been replaced by Prewikka otherwise. A JavaScript or Ajax interface would be preferable for the future.

