Configuring Windows with NetShell
NetShell has been an integral part of every version of Windows since Windows 2000. It is based on a core program that can be extended with NetShell helpers. These helpers are libraries (DLL files) that can in turn be extended using the NetShell API. Among other tasks, NetShell lets you:
- Configure network interfaces
- Configure Windows Firewall
- Display various network parameters
- Configure network services
- Configure IPv6
NetShell is available on both client and server variants of Windows. In some cases, if an additional network service, such as DHCP, is installed on a Windows Server, Windows provides a corresponding NetShell helper to let you control the service via NetShell.
A Question of Context
NetShell [1] can be used in two ways: On the one hand, you can call each NetShell command in a separate line. This method is useful in batch scripts, for example. Alternatively, NetShell offers an interactive environment in which you can enter commands. This variant provides comprehensive help to make sure that newcomers can find their way around. To enter this environment, type
netsh
at the command prompt. On Windows Vista and Windows 7, note that the command prompt must be launched with administrator privileges if you want to change the system configuration in NetShell.
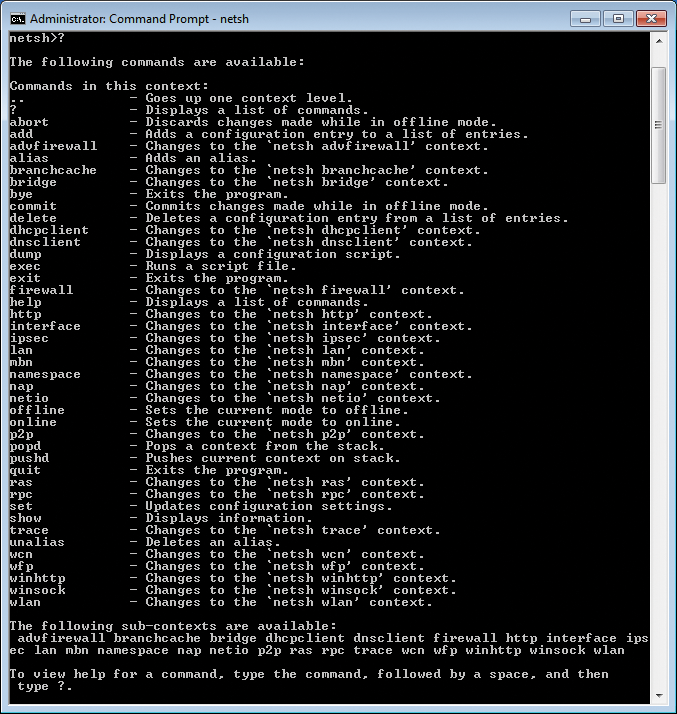
NetShell is based on contexts that represent the individual NetShell helpers. Each context refers to a specific network functionality, such as IP, firewall, IPsec, or DHCP client configuration. Figure 1 shows the output of the Help function, which can be called at any time by typing a question mark (?).

In the interactive interface, you can switch between the various contexts. Help shows all the commands available in any context, as well as in your current context. The available sub-contexts are shown at the bottom of the help output. The list of commands also contains those commands that take you to a different context.
The NetShell prompt shows the respective context. If you type interface to switch to the Interface context, for example, the prompt changes to netsh interface. The levels are structured hierarchically. Within a context, you can change to the sub-context of a command. For example, the Interface context offers the ipv4 command. Again, the prompt shows you the level as netsh interface ipv4 when you switch to that context.
Entering two dots (..) takes you to the parent level of a sub-context. As with the Windows command prompt, you can navigate through the command history by using the up and down arrow keys.
How It Works
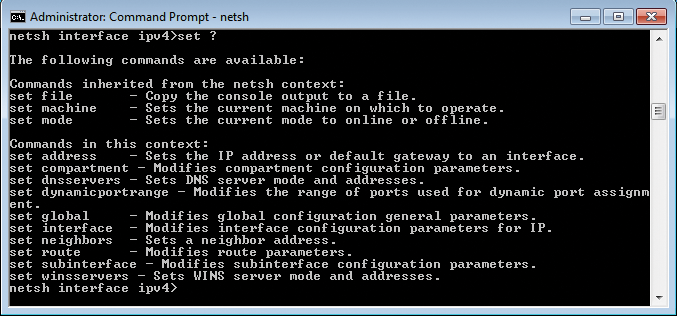
In addition to the general help, which shows you the available commands, NetShell also has detailed help output for each individual command. For example, if you are in the context netsh interface ipv4 and you type set ?, NetShell shows you other available commands (Figure 2).

A word of caution: set is not a separate sub-context under netsh but a command with further sub-commands and parameters. If you type set, the context remains the same. Instead, after studying the help output, you need to specify the command with the desired sub-command, for which you can again get help. Typing
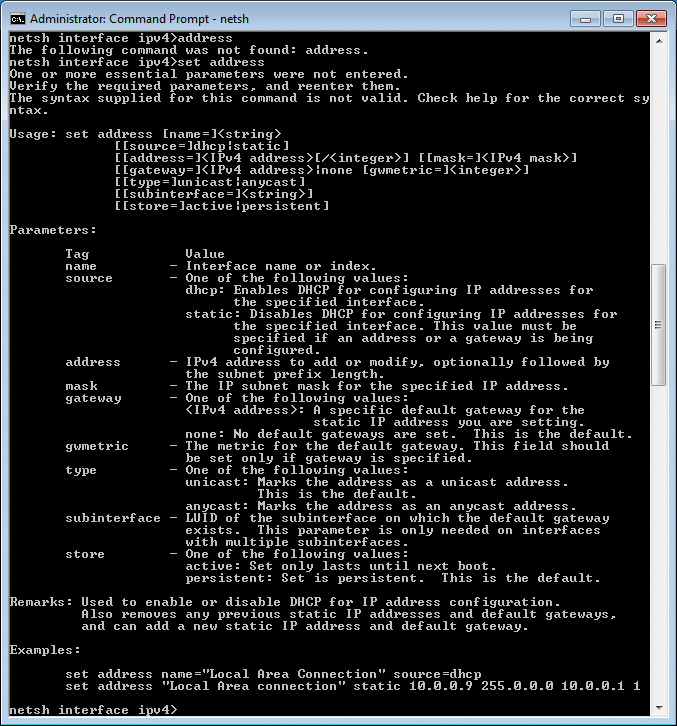
set address ?
takes you to a detailed syntax description (as shown in Figure 3). Thankfully, the output also includes examples that illustrate the use of the respective NetShell command.

Hands On
Although some configuration tasks can be handled in a GUI via dialog boxes, NetShell is the only option for other tasks, such as editing various IPv6 or BranchCache settings. In particular, the show commands give you details the graphical interface hides.
To configure and edit the network interfaces on your system, enter the netsh interface ipv4 context and, when there, type
show config
for an initial overview. The IP address configuration looks like the ipconfig command output. If you want to modify the interface configuration, several commands are often necessary. The following example shows how to set some of the parameters for the standard Ethernet interface (IP address 10.10.1.20, subnet mask 255.255.255.0, default gateway 10.10.1.1, DNS server 10.10.1.254).
To discover the name of the corresponding interface, you again need show config. Windows refers to the first Ethernet interface as the Local Area Connection. The IP address, subnet mask, and default gateway are set with:
netsh interface ipv4 set address "Local Area Connection" static 10.10.1.20 255.255.255.0 10.10.1.1
If the command is successful, NetShell says nothing; otherwise, you'll see a message that returns a reference to the error. To configure the DNS servers, you need to add the following command:
set dnsservers "Local Area Connection" static 10.10.1.254.
Note that NetShell immediately checks the specified DNS server and displays a warning message if it is not reachable. Regardless, the entry is still made, as you can see later by entering the
ipconfig /all
command at a separate prompt. Incidentally, the changes are permanent.
Thus far, you could have easily made these changes in the graphical input mask for the IPv4 configuration of the interface. But NetShell lets you additionally set specific parameters that do not appear in the GUI, including tuning values for the TCP/IP stack and security settings. For example, you can use the command
set global icmpredirects=disabled
in the context netsh interface ipv4 to specify that the system should not respond to ICMP redirect messages that cause a change in the routing and are thus a major concern in terms of security. You can also add or delete values. If you want to add another DNS server, use:
add dnsservers "Local Area Connection" 10.10.200.100 index=2
The index specifies the priority. If you got something wrong, you can delete the DNS server by typing:
delete dnsservers "Local Area Connection" 10.10.200.100
Then, check the results of the configuration steps with ipconfig /all.
NetShell also has limitations. For example, you can't change the DNS suffix with it. If you want to do so without the GUI, you need other tools, such as netdom or the Group Policy Manager. Both only work in Active Directory domain environments.
Customizing Windows Firewall
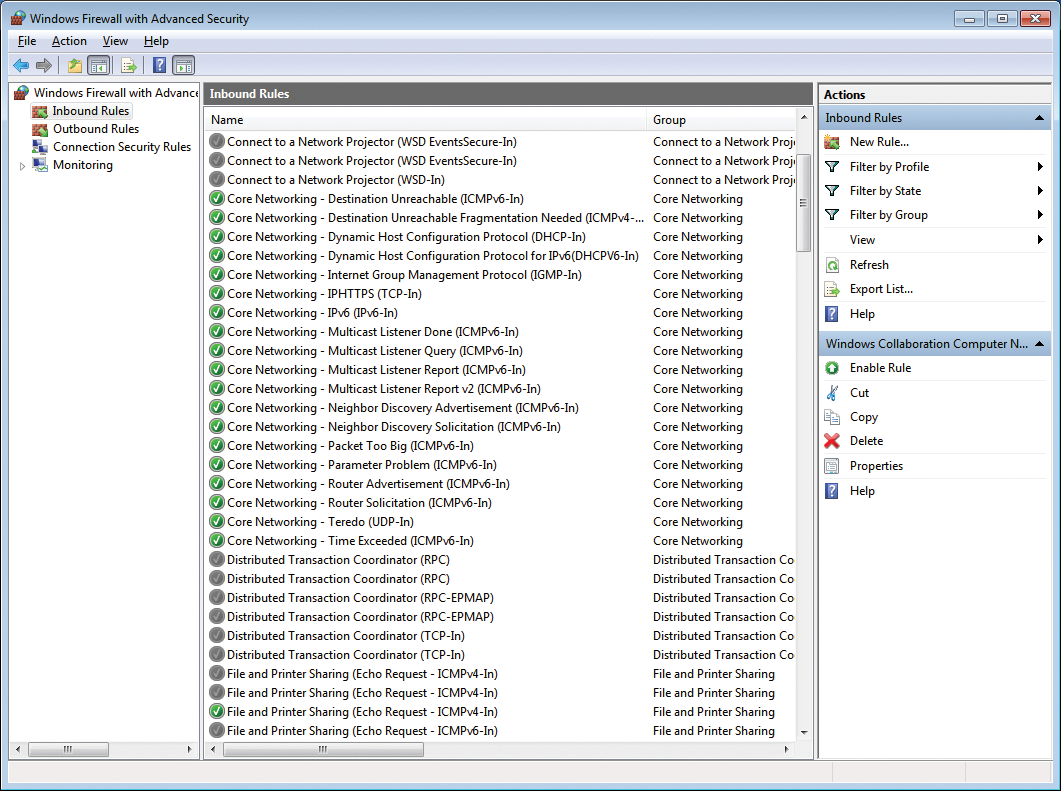
Configuring Windows Firewall is another task often performed in NetShell. Windows XP and Windows Server 2003 used the old Windows Firewall, whereas Windows Vista and Windows Server 2008 use "Windows Firewall with Advanced Security." The graphical Administrator Console has a separate snap-in for this (Figure 4), but for cases in which either a script-based or command-line approach is necessary, in the absence of a graphical interface (typically on Windows Server Core), NetShell can help.

Entering advfirewall takes you to the context for the advanced firewall. The
show currentprofile
command shows basic settings for the current network profile, which has distinguished between home, work, public, and domain since Windows Vista. As usual, you can call for help by typing show ?, which reveals that you can view each profile separately in this context, as well as access all of the profiles in the overview.
If you want to configure firewall rules, go to the firewall sub-context. The prompt now reads netsh advfirewall firewall>. Here, you can view, create, modify, and delete firewall rules. The difficulty is in identifying the appropriate rules or their names. Entering
show rule all
lets you view all the rules. This list will be rather long because it displays not only all the incoming and outgoing rules, but all the profiles as well (Figure 5).

In many cases, the required rule already exists but is disabled. For example, if you want enable the Windows Firewall Remote Management (RPC) rule, you can use the command:
set rule "Windows Firewall Remote Management (RPC)" new enable=yes
In this case, NetShell might even return a response, such as
2 rule(s) were updated. OK
indicating that the same rule has been deployed for two different profiles.
Many standard rules are organized in groups. By specifying the group, you can edit all the associated rules at the same time. The rule in the example here belongs to the group Windows Firewall Remote Management; thus, all related rules can be enabled at once:
Set rule group="Windows Firewall Remote Management" new enable=yes
If you want to create a new rule, you have to select from a plethora of parameters. Typing set rule ? lets you review the syntax and shows some basic examples. The following example shows how to create a rule that allows traffic from network 192.168.1.0/24 on the local HTTP port 80/TCP and is effective for the domain profile:
add rule name="local web server" dir=in action=allow profile=domain localip=any remoteip=192.168.1.0/24 localport=80 remoteport=1024-65535 protocol=tcp
This sets the name of the rule to local web server and the direction of the rule (dir) to inbound (in). The remote port is in the range 1024 through 65535 as it relates to the regular ports used by client applications. More examples can be found in the help output for add rule.
Configuring IPv6
IPv6 introduces some new concepts and features that require special configuration. Although configuration dialogs for the network interfaces since Windows Vista have supported the basic configuration of IPv6, you might find it difficult to avoid customizing additional parameters with NetShell in real life. Moreover, various IPv6 statuses can only be viewed in NetShell (e.g., the routing table, which does not appear in older versions of Windows with netstat -nr or route print).
You can switch to the IPv6 context in a similar way to IPv4 by entering interface ipv6, putting you in the netsh interface ipv6 context. The show route command displays the IPv6 routing table. The show addresses command lists the IPv6 addresses for all of the interfaces. The output also includes special addresses that ipconfig /all does not display.
For a detailed configuration of IPv6, more advanced parameters are necessary. If you want to set a global unicast address for the interface Local Area Connection, use the command:
add address "Local Area Connection" 2001:db8:10::5
Because the border between the network and host in IPv6 addresses is always at 64 bits, you do not need to specify a subnet mask. Note that you can assign multiple IPv6 addresses to a single interface. To add an IPv6 anycast address of 2001:db8:aa:bb:cc::1, use the command:
add address 2001:db8:aa:bb:cc:1 type=anycast
One of the most important IPv6 features is auto-configuration, which allows an IPv6 system to assign itself a globally unique IPv6 address. In the original version, these addresses included the MAC address of the respective interface, allowing global traceability.
To prevent this, the Privacy Extensions [2] were introduced to generate temporary addresses automatically.
To discover whether these Privacy Extensions are enabled on your system, type:
show privacy
You can enable this feature with:
set privacy state=enabled
To switch Privacy Extensions off again, just type
set privacy state=disabled
and you're back to the original EUI 64 format.
Temporary addresses are only valid for a certain period of time, before they need to be renewed. If you want to adjust the parameters responsible for this, you can do so with set privacy; for help, again type the usual set privacy ? command. Here, you will find parameters such as maxvalidlifetime or maxpreferredlifetime that govern the behavior of the temporary address.
NetShell Server-Side
When you install certain services on a Windows Server, NetShell helpers are installed for the appropriate contexts to support management of the server component. For example, a context named dhcp is installed for the DHCP server.
Using NetShell to configure services on a server is a particularly useful option in the case of a slow WAN connection or a large number of servers that use scripts for a uniform and automated configuration process.
If you want to configure the DHCP server, for example, you must first authenticate against Active Directory. This process begins in the nethsh dhcp> context using the following command:
add server server1.windschief.local: 192.168.1.50
You need the fully qualified domain name and IP address of the server for this; then, you can specify a scope in which the DHCP server can assign its addresses. The following example shows how to create a scope named Test:
server 192.168.1.50 add scope 192.168.1.0 255.255.255.0 Test
Then, you can define the address range:
server 192.168.1.50 scope 192.168.1.0 add iprange 192.168.1.100 192.168.1.200
To define the scope of the network, you need the first and last IP addresses. The following command now sets up a default gateway. The corresponding option is 003:
server 192.168.1.50 scope 192.168.1.0 optionvalue 003 ipaddress 192.168.1.254
Finally, you still have to activate the scope:
server 192.168.1.50 scope 192.168.1.0 set state 1
If you check these settings in the management console on the DHCP server, you will see that the scope has been set up properly and is active (Figure 6).

Tips and Conclusions
NetShell uses contexts and works in a modular and hierarchical way. Because NetShell supports two modes, using the tool initially takes some getting used to, but you once you become familiar with it, you will find the options easy to navigate. If you enter all the commands in one line, as required for scripting, NetShell outputs help text documenting the correct call for the user.
In the interactive shell, it is much easier to work your way through the individual levels. Interestingly, Microsoft has adopted proven concepts here. The command-line interface in Cisco's Internet Operating System (IOS) acts as a role model: On the one hand, show commands are used for viewing the various configurations; on the other hand, it is not necessary to write out each command fully. Instead, you just need to type enough of the command for the results to be unique. For example,
netsh int ip show a
gives you the same result as:
netsh interface ipv4 show addresses
NetShell is a useful tool for network configuration. It lets you tune the network stack with options the graphical dialog box does not give you. However, the administrator must evaluate whether working with NetShell will add any real value on a case-by-case basis as bandwidth becomes increasingly available for remote administration. Almost all management snap-ins support connecting to other servers via RPC. In this case, bandwidth only plays a minor role, but working with NetShell can still be worthwhile because a well-founded understanding of its approach can help in cases where tuning and configuration via NetShell are necessary.
