
A Btrfs field test and workshop
In the Hot Seat
Btrfs is still rated "experimental" in the Linux kernel, and no consumer distributions use it as a preferred filesystem. This is hard to understand, because the designated standard filesystem for Linux offers attractive enterprise-level features that have not been available on Linux from a single source thus far. For a long time, Linux users cast envious glances at ZFS, but with its Sun Common Development and Distribution License, it is not compatible with the GNU General Public License of the Linux kernel.
Preview
I'll start with a brief description of the main features and functions of Btrfs, followed by an installation guide using a virtual instance of Ubuntu 12.04 as an example. Then, I'll demonstrate the main administration tool. Following this, the root filesystem on a test system is converted from ext4 to Btrfs and then converted into a RAID 1. This setup allows a useful demonstration of filesystem snapshots in the course of software updates with a subsequent rollback of the changes.
Enterprise-Level Features
Btrfs is a copy-on-write (COW) filesystem. Whereas a filesystem like ext3 logs block changes in a journal, Btrfs always writes changes to a block at a new location on the disk and references the new data block in the metadata if successful. Only then is the old data released for overwriting, provided it is no longer referenced elsewhere (e.g., by a snapshot).
Btrfs aims not only to offer advanced features but primarily to be fault tolerant, easy to manage, and quickly recoverable if worst comes to worst. It exclusively uses only COW-optimized (B-trees) to manage the metadata and payload, with the exception of the superblock. Btrfs also stores checksums (CRC32C hashes) for data and metadata to detect silent data corruption. Additionally, it provides high-scalability functions targeted at modern data centers. Before Btrfs, admins needed additional tools to manage disk space (e.g., Logical Volume Management) or increase resiliency (e.g., RAID).
The most important properties of Btrfs (kernel version 3.4) [1] are:
- Metadata and data checksums
- Subvolumes (filesystem in a filesystem)
- Writable snapshots
- Snapshots of snapshots
- Filesystem clone (writable snapshot of a read-only filesystem)
- File clones (also known as "reflinks" in other filesystems)
- Transparent compression
- Integrated volume management (can manage multiple hard drives)
- Support for RAID Level 0, 1, and 10
- RAID level conversion on the fly
- Background process for detecting and correcting errors proactively ("scrubbing")
- Growing and shrinking a filesystem on the fly
- Defragmentation on the fly
- Offline recovery tools (not to be used on mounted filesystems)
- Lossless conversion of an ext3 or ext4 filesystem (and back)
Features that almost go without saying include dynamic inode counts, efficient storage of small files, the use of extends, Access Control Lists (ACLs), and extended attributes. Another must-have is support for the TRIM command and special optimizations for SSD storage. The maximum filesystem and file size is 264 bytes or 16 exbibytes, respectively, and a maximum of 264 files per filesystem should make Btrfs future-proof at least for the next few years.
Initial Barriers
Before you start using Btrfs, you need to figure out what the recommended minimum versions are for the kernel and the associated management programs – the Btrfs Tools. Orientation on the enterprise versions of the kernel in SUSE and Oracle is not at all easy because they represent a maximum of one starting point, which is updated to the desired level by a succession of additional patches. The Btrfs wiki [1] and the very accommodating developers on the Freenode IRC network's #btrfs channel can be very helpful here. The Btrfs developers would, of course, like to see the latest release candidate of the Linux kernel tested, but on closer questioning, the developer community does rate the stability of the filesystem from kernel 3.2 very highly.
Choosing the right version of the associated administration programs is not much easier than choosing the correct version of a distribution kernel. It has been frozen at 0.19 for more than two years. Various versions have a greater or lesser feature scope. Your last resort here is to orient your choice on the date in the package name or the package description. This date should be at least March 28, 2012, the day tagged by Chris Mason in his official Git repository [2] on kernel.org.
One thing you might notice about this version is the promising Git tag dangerdonteveruse, which was probably due to the quality of the btrfsck program included in the package for inspecting and repairing Btrfs filesystems. The lack of a reliable option for restoring a corrupt Btrfs installation with heavily damaged metadata has, until now, been a reason for many Linux distributions (above all, Fedora) to postpone the move to Btrfs as the standard filesystem.
Conveniently, the latest long-term support version of Ubuntu, 12.04, was released at the end of April based on kernel version 3.2. Inexplicably, however, Ubuntu 12.04 LTS (at the time of writing) contains a version of the btrfs-tools package that is now nearly two years old [3].
Thanks to the close relationship between Ubuntu and Debian, you can use the current package from Debian Sid [4], which is available there as version 0.19+20120328. After meeting these preconditions, you can start with a fresh Ubuntu 12.04 LTS server default installation as a test system, adding the btrfs-tools from Debian Sid on top.
Churning for Beginners
Creating a Btrfs filesystem doesn't take much more than unused disk space on a hard drive and the corresponding mkfs.btrfs tool, as you might expect. For later testing of the integrated volume management of Btrfs, this virtual Ubuntu instance has four extra devices of 32GB each (Figure 1). A filesystem with the label TEST is created with the
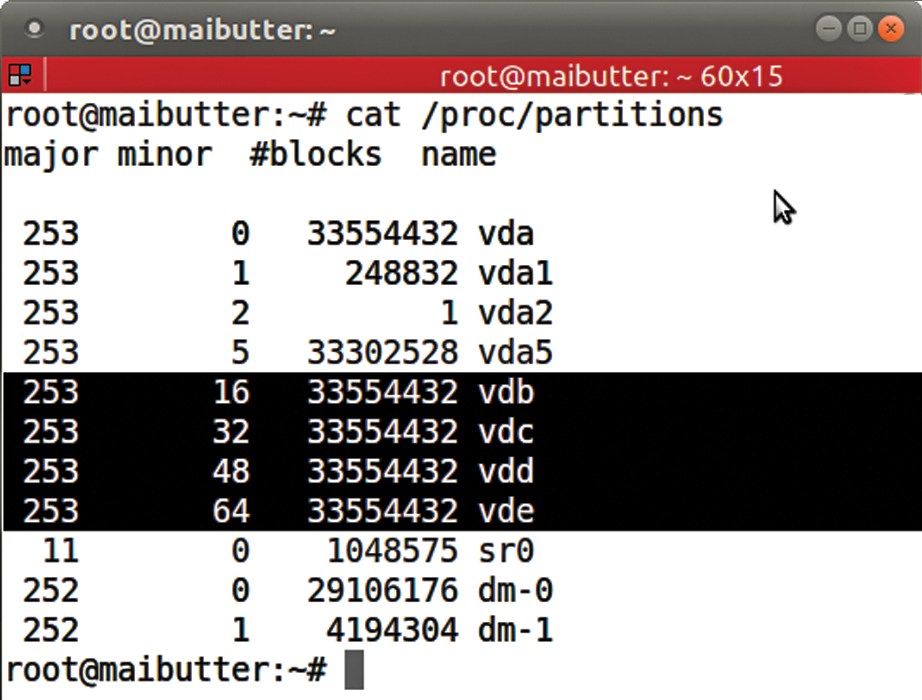
proc filesystem shows that four unpartitioned devices (/dev/vdb through /dev/vde) are available exclusively for Btrfs.mkfs.btrfs -L TEST /dev/vdb
command.
Creating a Filesystem
Creating a Btrfs filesystem is practically an instantaneous process because only a bit of metadata needs to be written, with no need for time-consuming inode table creation. The universal, all-purpose btrfs tool immediately gives you information about the freshly created Btrfs volume (Figure 2). This command-line program is a central tool for many Btrfs filesystem administrative activities. In this example, the Btrfs volume is identified by its label, but it can just as easily be addressed via the hard disk device name (/dev/vdb).
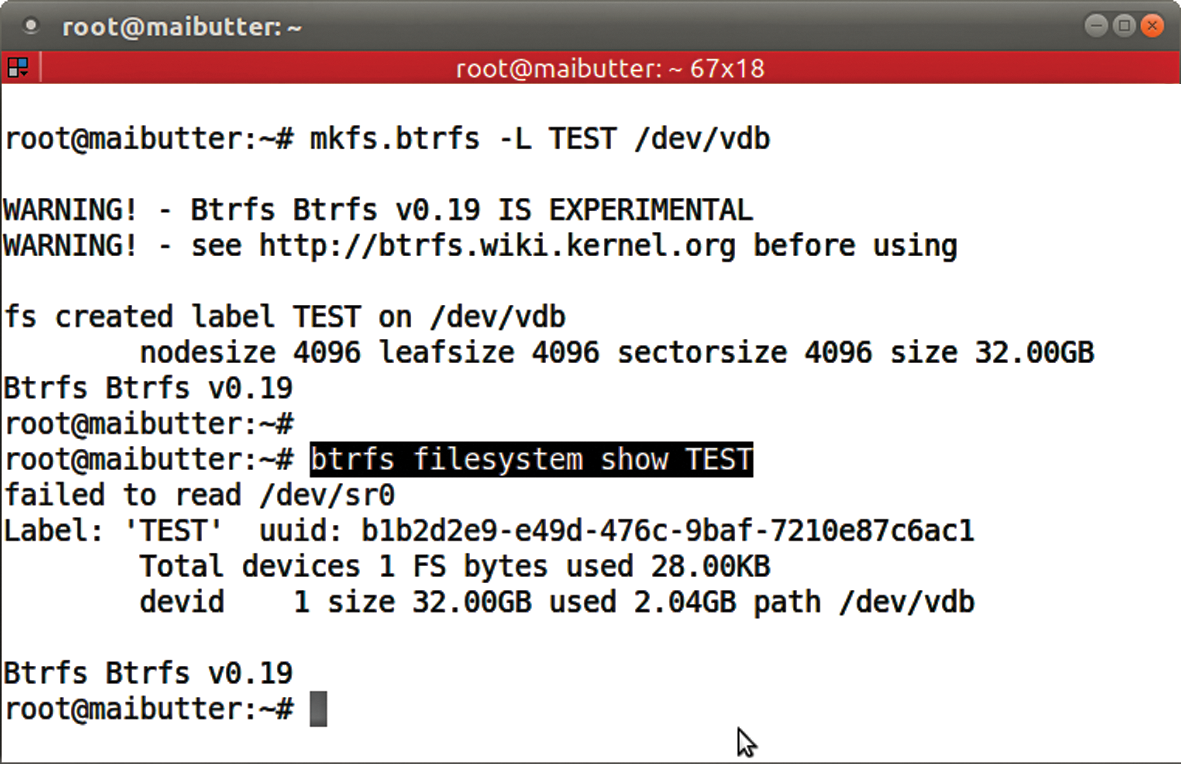
TEST. The btrfs multifunctional tool provides additional information about the new Btrfs volume.When called without switches, the command lists all the Btrfs filesystems known to the kernel. Note that mkfs.btrfs does not verify whether a Btrfs filesystem, let alone any other filesystem, LVM signature, or the like already exists on the hard disk. The newly created filesystem can now be mounted in the classical way:
mount /dev/vdb /mnt
A mount using the UUID or the filesystem label is, of course, also possible; you never know when the order or device name of the disk will change. Now, you can fill the fresh Btrfs with data. Using a local
rsync -a /usr /mnt
and dd, you can quickly populate the volume with a few gigabyte-sized files. Typing df -h /mnt then shows a corresponding utilization of 50%, or 16GB, as expected. However, internally, Btrfs actually uses more space to manage its growing metadata (Figure 3).
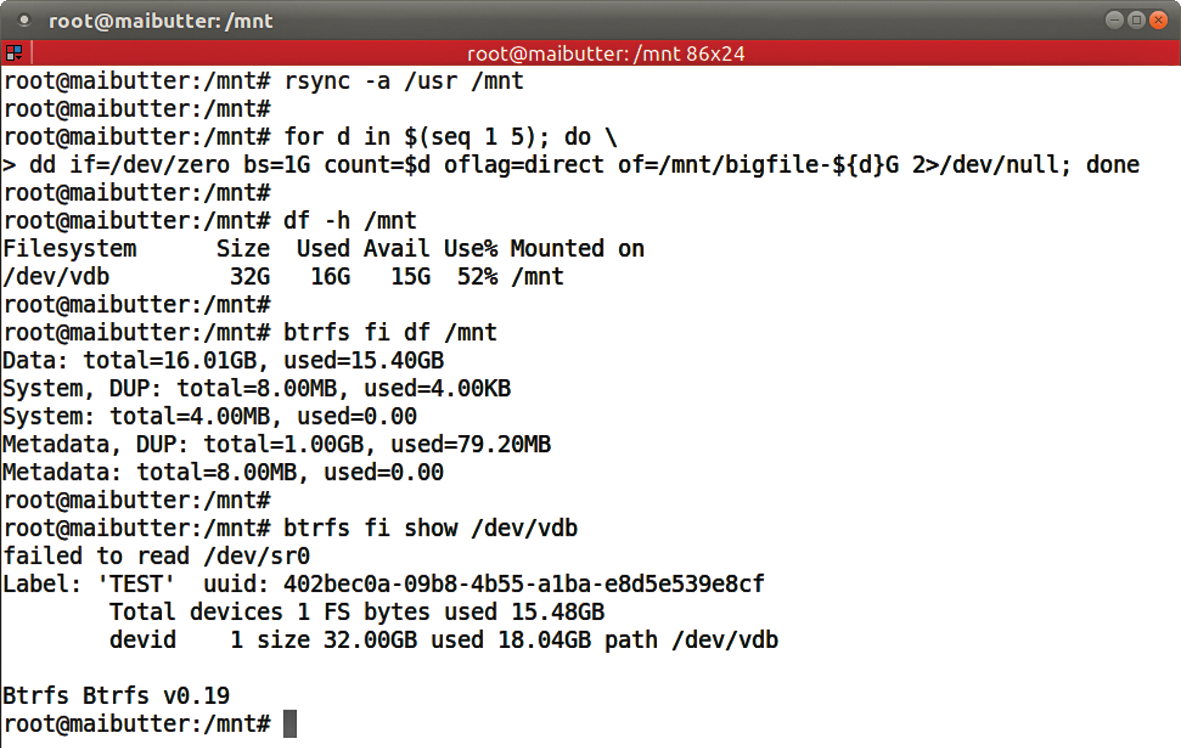
df command only provides information about how much space the user data uses. Behind the scenes, Btrfs consumes much more disk space.How Much Space Is Free?
The btrfs tool provides more detailed information on the real space usage of the filesystem. As long as the commands passed into btrfs are unique, they can be abbreviated.
The output from this command shows how much space is assigned and what percentage the metadata and payload can use. Also, the effective degree of use is visible to the user. The fi show command shows the total user data and the metadata space usage, but fi df gives more detailed insights into how Btrfs has allocated space to specific data types. The metadata is always stored redundantly by default to improve fault tolerance:
Data: total=16.01GB, used=15.40GB
System, DUP: total=8.00MB, used=4.00KB
Metadata, DUP: total=1.00GB, used=79.20MB
If Btrfs only has one device available when the filesystem is created, it automatically generates a duplicate of the metadata in a different location on the hard disk – shown here as DUP in the output from fi df. If several block devices are used to create the filesystem, then RAID 1 is used for the metadata and RAID 0 for the data. Different profiles can be selected for both metadata and payload data:
- Single
- RAID 0
- RAID 1
- RAID 10
For RAID 0 and RAID 1, you need at least two block devices; for RAID 10, at least four. The switches -mprofile for metadata and -dprofile for data give you granular control over how a new filesystem is created when you run mkfs.btrfs. The stripe size for RAID 0 and RAID 10 is fixed at 64KB and probably will not be changeable in the foreseeable future. Kernel 3.6 is expected to introduce the long-anticipated profiles for RAID 5 and RAID 6.
Chunks
To check the checksums regularly on all media in the RAID, you can use the line
btrfs scrub start path | device
in a cron job. In the case of a read or checksum error, the data is automatically read from another copy and newly created in the faulty replica on the fly for RAID 1 and RAID 10.
Btrfs reserves storage space for data and metadata in fixed units known as block groups. Block groups in turn consist of one or more chunks (depending on the RAID level). These chunks are usually 1GB for data and 256MB for metadata. One exception is the first metadata chunk, which mkfs.btrfs creates 1GB in size, assuming there is enough space. Intermediate sizes are used for block devices of just a few gigabytes.
This means a total of 18GB of disk space is already assigned on the filesystem created previously – 16x1GB user data, 2x1GB metadata (with the duplicate) – with a small quota for the special system chunks (where the B-tree that manages all the chunks resides). For filesystems of less than 1GB, Btrfs automatically uses special mixed chunks that contain both user data and metadata to better exploit the meager space.
The metadata on this filesystem does not occupy 80MB yet, but the filesystem also has not seen any production use. Once chunks were assigned to a data type, they were (until now) not automatically released until no longer needed. When you create new data, this process can lead to a filesystem that has insufficient reserve capacity, according to df -h, which responds earlier than expected with an error message that it has run out of free space (except in the metadata areas). These are the notorious ENOSPC errors reported by many Btrfs users that were incorrectly generated much more frequently in the past.
In Btrfs, keep an eye on the
btrfs fi show
and
btrfs fi df mountpoint
output to know how much space has been used and to discover potentially free space on a filesystem. The good old df -h is only of limited value in Btrfs, especially when it comes to reliable statements about available space.
Make Room!
If you need to create space by recycling chunks, you have only one option, and that is launching the btrfs balance command. Unfortunately, you cannot determine in advance how much space can be recovered, and you have no option to simulate the action, but at least this command can be applied to a filesystem on the fly (Figure 4):
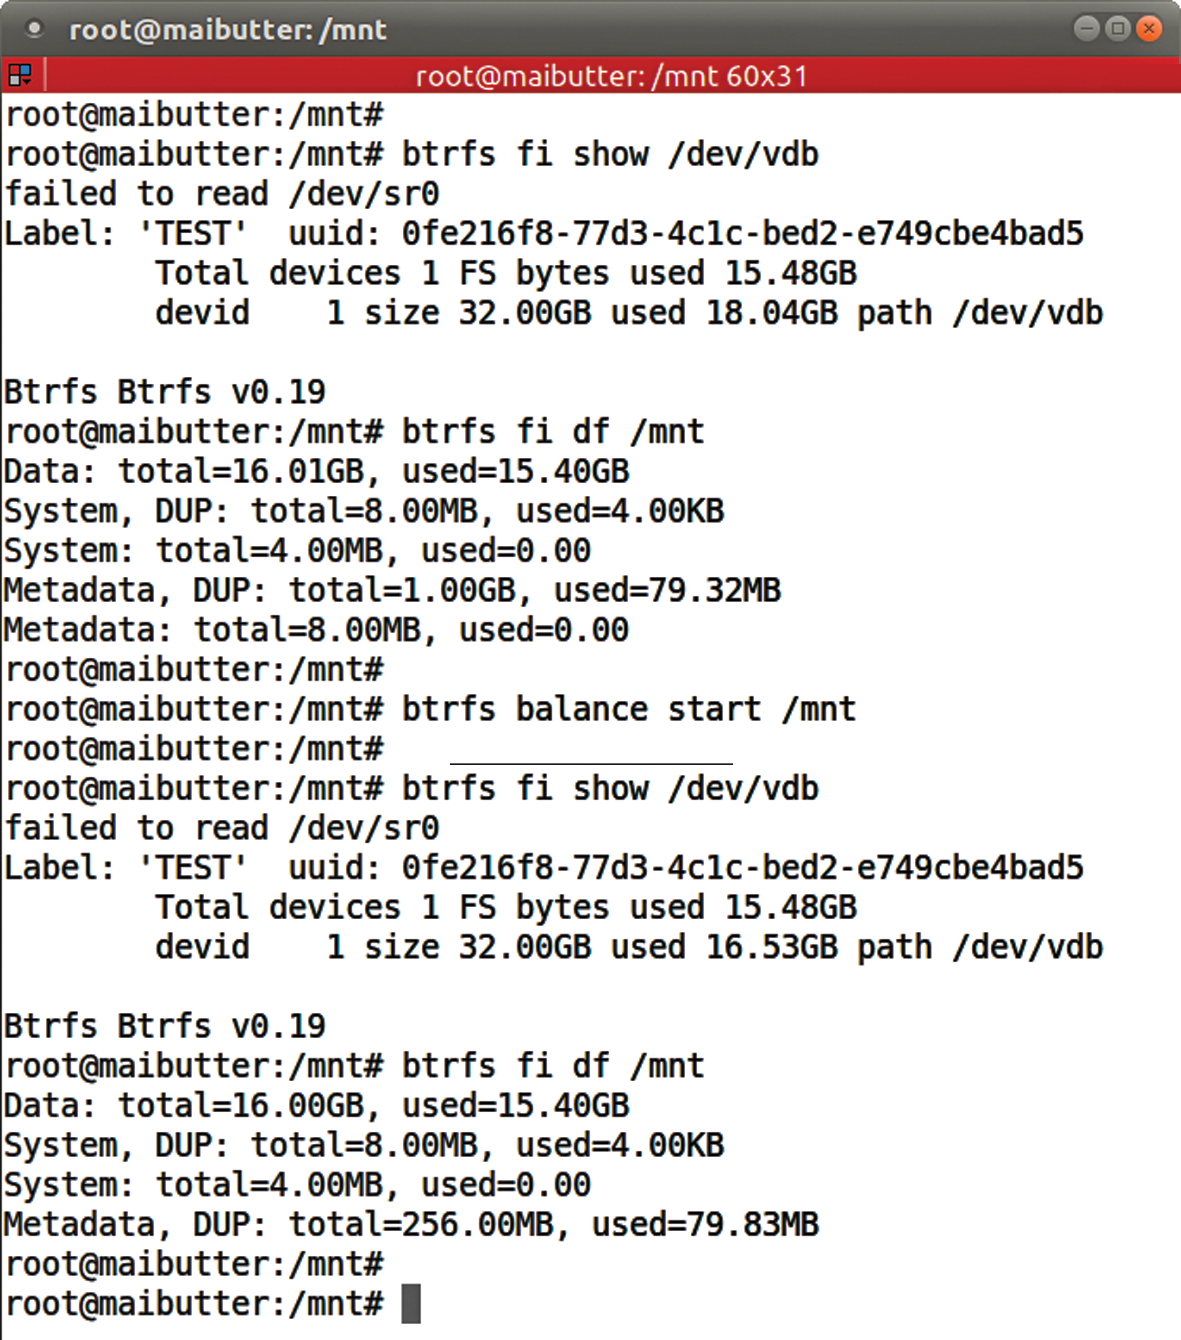
btrfs fi df and btrfs fi show – before and after balancing – show that the metadata chunk size has been reduced to 256MB; thus, 1.5GB (2x750MB) of space has been made available.btrfs balance start /mnt &
Your mileage for balancing the filesystem will vary depending on the fill level and system performance. All data is completely read and written to new chunks, so for a successful balance, you still need a bit of free space, at least enough to copy the first selected block group, including enough space for the metadata created during the COW process.
Only with the Current Kernel
If the load caused by running balance in the background is worrisome, you can cancel the action; for this example, you would need to issue a
btrfs balance stop /mnt
to do so. Note that all the commands for balance except start generate an error on Ubuntu 12.04. To fix this, you need a more recent kernel. Newer kernels as of version 3.3 also let you stop the balance temporarily and continue later, as well as display the current progress for the process.
An involuntary interruption to a balance action (e.g., a power outage) is not critical, and the action will continue automatically the next time the filesystem is mounted (as of kernel 3.3, the mount option skip_balance prevents this).
In production operations with Btrfs, you need to allow extra space for metadata when dimensioning a new filesystem. How much you need to allow is probably something learned by experience. However, many small files will cause a large volume of metadata because the data is stored directly in the metadata areas (also empty files). Snapshots are also very demanding in this respect.
Filesystem in a Filesystem
When managing disk space on modern Linux systems, LVM has become an integral part of many a system admin's portfolio. If you want to migrate a subdirectory to a separate filesystem, whether for security or purely organizational reasons, with LVM you would create a new logical volume and then a new filesystem on the volume. Btrfs provides a very similar mechanism in the form of subvolumes, but with one difference: You don't need to create a separate new filesystem.
A subvolume behaves basically like a directory. It has a name and is located somewhere in an existing path on an existing volume. Initially, each new Btrfs filesystem contains exactly one subvolume – the top-level volume with a fixed subvolume ID of 5. This special subvolume is also used by default when you mount the filesystem. In practical terms, a subvolume behaves like a full-fledged Btrfs filesystem of its own but shares its metadata with the top-level volume. Almost any number of subvolumes can be created, the theoretical limit is 264 – 256 subvolumes per Btrfs filesystem.
The btrfs subvolume command group lets you create, delete, and list subvolumes. They can be mounted at any location in the directory tree and can use different mount parameters (Figure 5):
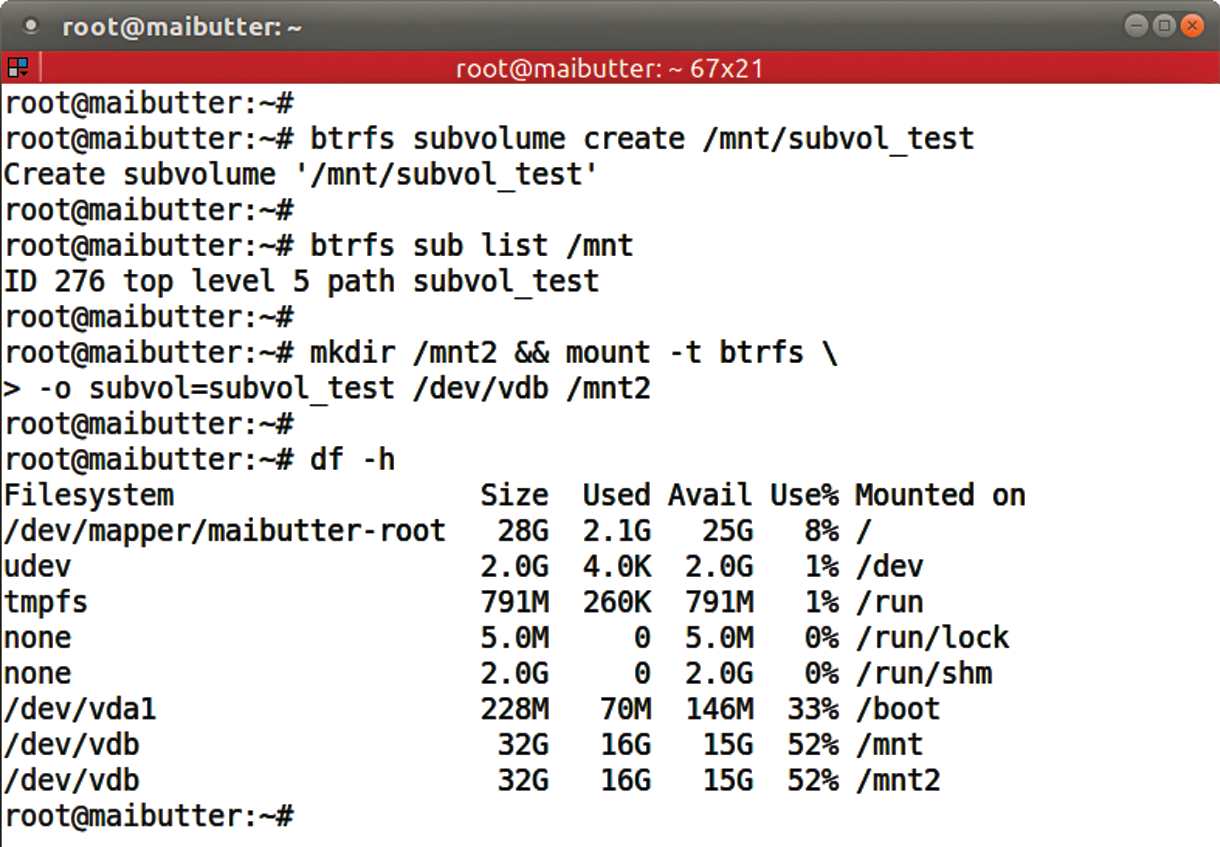
subvol_test. Typing btrfs sub list displays its ID and the name and ID of the corresponding top-level volume. 256 should really be the first ID used; why Btrfs goes for 276 here is unclear.btrfs subvolume create /mnt/subvol_test btrfs sub list /mnt mkdir /mnt2 && mount -t btrfs -o subvol=subvol_test /dev/vdb /mnt2
The output from df -h is reminiscent of bind mounts; thus, one way to find which subvolume is mounted where is to look at /proc/self/mountinfo (Figure 6).

grep of btrfs in /proc/self/mountinfo directly displays where the subvolumes are mounted.A subvolume that is not at the top level of its parent volume must be mounted via its ID using the subvolid=ID mount option. Note that normal user rights are all you need to create a subvolume. Using different Btrfs mount options as the parent subvolume and deleting subvolumes is also allowed.
If you use logical volumes in LVM to limit the maximum space consumption of a specific area in the folder structure, you will not have much fun with Btrfs for now. Currently, no option exists for defining the maximum size of a subvolume. When subvolume quota groups (QGroups) will become available is not known, although patches for this already exist.
Individual snapshots of parts of a filesystem are probably one of the main reasons to use subvolumes. Snapshots are frozen images of a subvolume at the time of its creation, which you may be familiar with from LVM.
In contrast to normal subvolumes, snapshots are not just empty folders; they are filled with the data of the source subvolume at the time the snapshot was created. When a snapshot is first created, this almost exclusively means references to the data blocks on the source subvolume.
Snapshots with a Difference
Btrfs snapshots come with the package and are thus very efficient. Additionally, snapshots in Btrfs do not consume any space at the beginning of their lives. In contrast to LVM snapshots, for example, you don't need to assign a certain part of the hard disk. Accordingly, Btrfs snapshots cannot overflow from a lack of pre-allocated space. These filesystem snapshots open up a wide range of applications. Again, in contrast to LVM snapshots, you don't risk performance hits if you use a large number of snapshots, and the number of snapshots is practically unlimited, as with subvolumes.
As the close relationship to subvolumes suggests, you can create snapshots with the same command group. The following example creates a new snapshot of the top-level volume then moves a file from the top level to the previously generated subvolume. As desired, the snapshot saves the data state at the time of its creation. As on any other subvolume, you can access a snapshot directly via its directory name; you don't need to mount it separately (Figure 7).
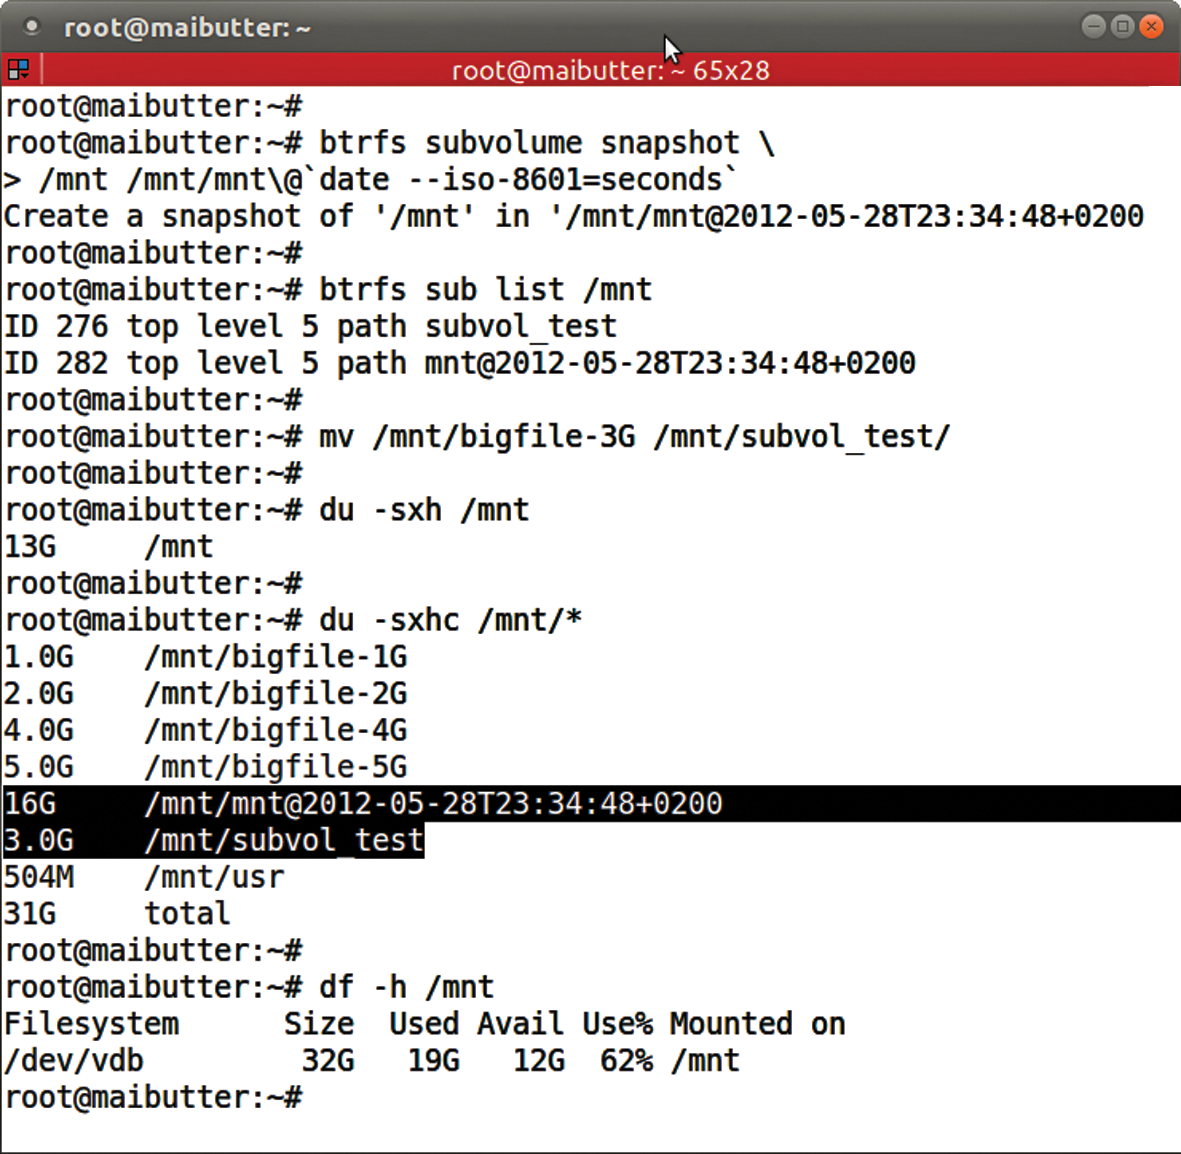
du and df in different ways.Using Snapshots
As expected, after moving a 3GB file to a subvolume, du reveals that the top-level volume occupies only 13GB instead of 16GB. The snapshot still shows the 16GB, and the subvolume subvol_test shows only 3GB. The df command points to the 3GB of extra space needed by the snapshot.
The name you assign to a snapshot is freely selectable, but a meaningful naming scheme is highly recommended. The additional -p switch for btrfs subvolume list shows the parent subvolume from which a subvolume is derived. However, it's not possible to distinguish a snapshot from a subvolume, and you can't directly see when a snapshot was created. Just because you can create snapshots from snapshots with an arbitrary depth of nesting doesn't simplify things either; after all, they all come from the same parent volume.
A little catching up is needed in terms of easier administration. Assuming you have enough space to store deltas between subvolumes, you could, for example, simply create hourly snapshots of subvolumes (e.g., the home directory) and automatically delete old snapshots with a cron job. Also, read-only snapshots could be created purely for backup purposes.
However, snapshots do not replace a backup of the filesystem on an independent disk. They are tied to the top-level subvolume and thus to the same hard disk. Because snapshots are not recursive, you can specifically create a separate subvolume for subdirectories with highly variable content – for example, a /var/log or a /var/spool directory – to exclude it from a snapshot of a parent directory. This approach can save a huge amount of space during the lifetime of a snapshot.
Hard Linking Limited
If you rely heavily on hard linking when creating backups, you need to bear in mind one of the peculiarities of Btrfs: It allows only a very limited number of hard links to a single file within a directory. The Release Notes for SUSE Linux Enterprise Server 11 SP2 refer to 150 hard links being permitted in production [5]. Again, significant improvements can be expected in the future.
If you can do without a full snapshot of a subvolume and only need snapshots of individual files, Btrfs also has an answer. Space-saving COW clones of files are created with:
cp --reflink <C><I>SOURCE DEST<C><I>
This is a practical method, for example, of cloning a disk image for a virtual machine.
Rollback
A typical application for this simple, flexible, and cheap way of creating snapshots can also take the worries out of system updates: a complete rollback after package installations. openSUSE and the SUSE Enterprise Server offer snapper [6] for this purpose, whereas Fedora and Oracle Linux versions provide the Yum plugin yum-plugin-fs-snapshot with Btrfs support. Current Debian and Ubuntu distributions offer apt-btrfs-snapshot.
All of these programs use hooks in the respective package managers to create a snapshot of the subvolume on which the system is installed, before installing new packages or updates. After a failed update, this process lets you take a quick step backward to a working configuration. You can run the package manager manually or perform an automatic update as a cron job to install the current security fixes regularly.
Of course, this approach assumes you installed the operating system on Btrfs or that you use the btrfs-convert program to convert existing ext3 or ext4 filesystems to Btrfs. This migration variant even includes the option of returning to the original filesystem if necessary. The only prerequisite for this conversion is sufficient free space on the original filesystem for both the data of the old system and the copy on the new Btrfs system.
During this process, Btrfs stores the first megabyte at the beginning of the device at an alternate position, builds its own metadata, and references the data blocks on the ext3/4 filesystem. At the end of the process, you have a snapshot of the original data. New metadata and data are written by Btrfs at free locations on the hard drive so that none of the blocks of the original filesystem are lost. As long as the snapshot of the original ext3/4 filesystem exists, you can revert. However, you will lose all changes since the conversion. GRUB 2 (since 1.99-rc2) also lets you boot from a Btrfs filesystem; you don't need an extra partition for /boot with an alternative filesystem.
Fast and Painless
A successful conversion of the root filesystem begins with a reboot in a rescue environment, such as the one you find on an Ubuntu installation CD. But, this does not give you the btrfs-convert command. Therefore, before rebooting the system, you should copy it to /boot, which is usually a partition of its own. After changing the entry for the root filesystem in /etc/fstab from ext4 to btrfs, the only thing missing for a successful restart is a successful conversion.
After booting the rescue environment, you can mount the boot partition, instead of the root filesystem, to access the conversion tool. Next, perform a fsck of the original filesystem, followed by the conversion itself and a restart of the converted system (Figure 8).
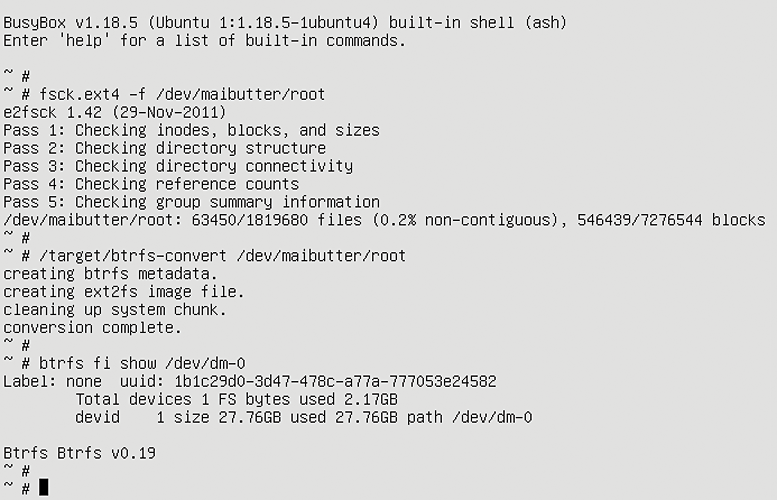
After starting the system, the newly converted Btrfs superficially looks fairly inconspicuous as the root filesystem. Closer inspection shows that a lot of things have happened (Figure 9). The striking feature of this converted filesystem is also the lack of metadata redundancy.
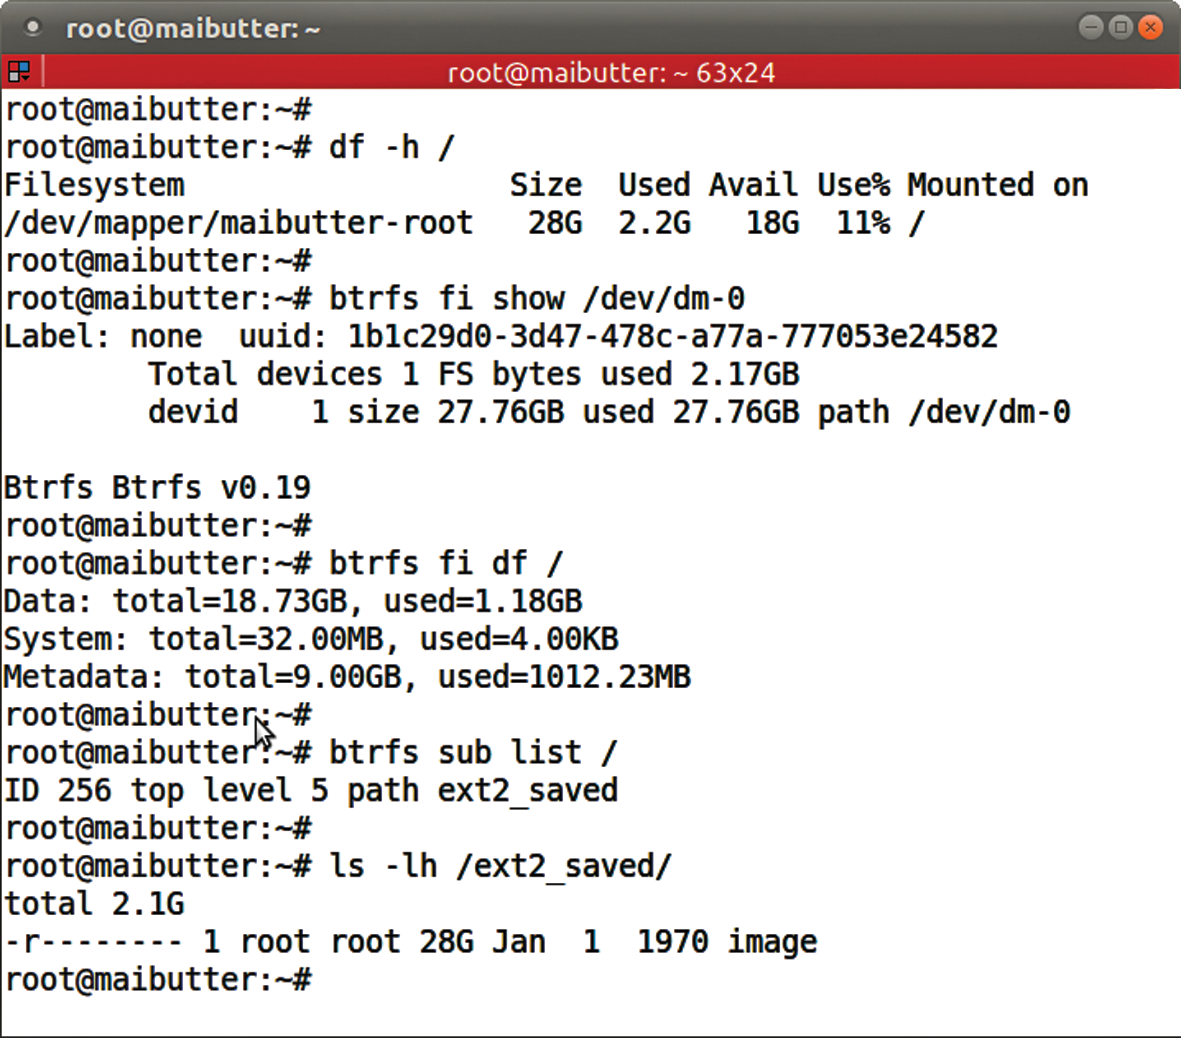
Into the Pool
This step is the perfect opportunity to test the handling of multiple block devices, also known as pooling. Additionally, it's important to protect not only the metadata, but also the user data, via RAID 1 against faults on individual block devices and accidental data corruption.
To add an extra device to the filesystem with LVM tools, you would first need to define a new block device or at least a partition for use as a physical volume. This physical volume would then need to be added to a volume group. Then, a filesystem could be enlarged on the logical volume or created and mounted on a new logical volume.
Single Step
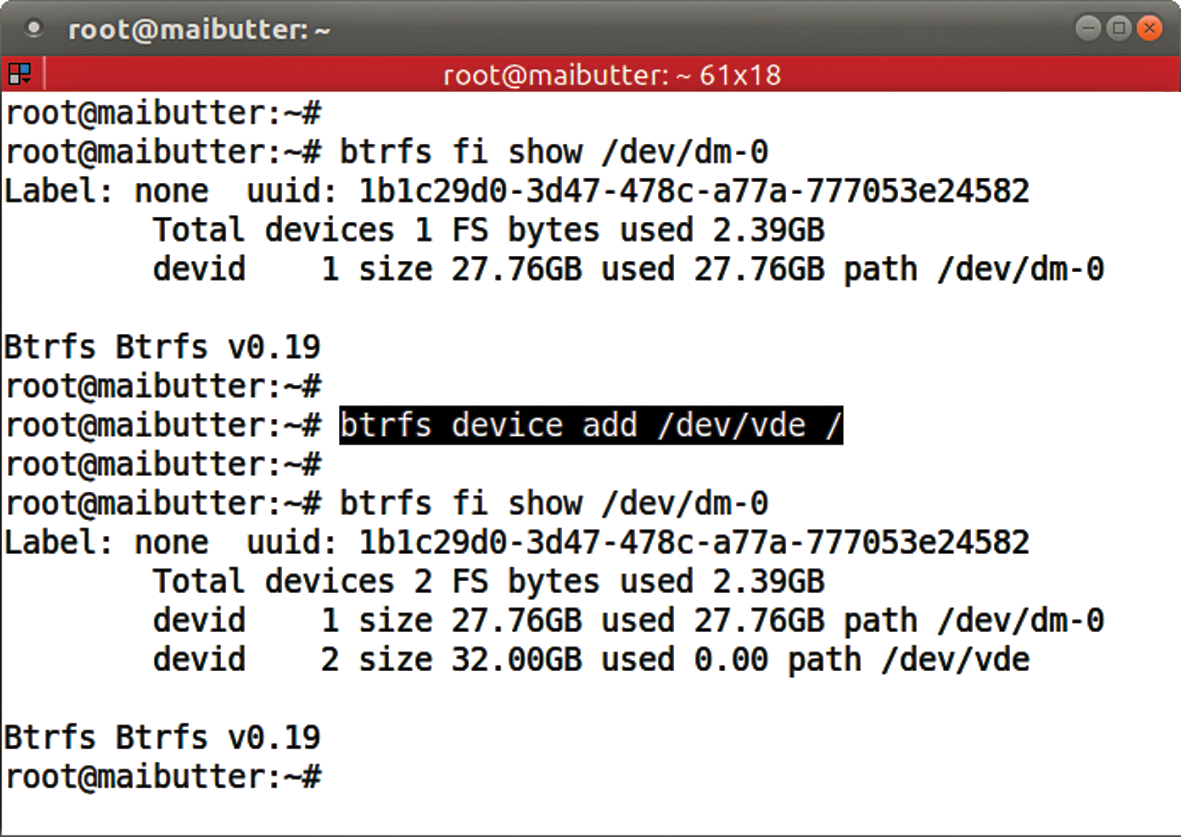
The btrfs tool handles the whole job in one step using the device add parameter. This command adds an unused hard disk to the root filesystem:
btrfs device add /dev/vde /
The block devices do not all have to be the same size. Depending on the RAID level, which can be different for the data and metadata, the potential overall capacity can vary for different hard disk sizes. As shown in Figure 10, no space is as yet assigned on the hard disk just added. You could use the enlarged filesystem now, but a rebalance is recommended to distribute the data and metadata evenly over all block devices.
For the sake of completeness, I should mention that Btrfs also can be installed on a LVM logical volume or a Linux software RAID. Especially when dealing with logical volumes, the convenience of growing and shrinking on the fly is something you do not want to do without. Using btrfs filesystem resize helps do this.
As of kernel 3.3, performing a rebalance can also change the RAID level of the data, metadata, or both on an already existing volume. To test these new features, as well as numerous improvements in speed and error handling, the other tests in this article use a 3.4 kernel from the Ubuntu Mainline Kernel archive [7].
Uniform distribution of the data and metadata in this case means duplication to achieve redundancy via RAID 1. For this purpose, all of the data must be moved. As of kernel 3.3, you can specify whether only certain parts of a filesystem are balanced or whether its RAID configuration is changed. A complete, and often time-consuming, full balance is no longer always necessary.
A Question of Balance
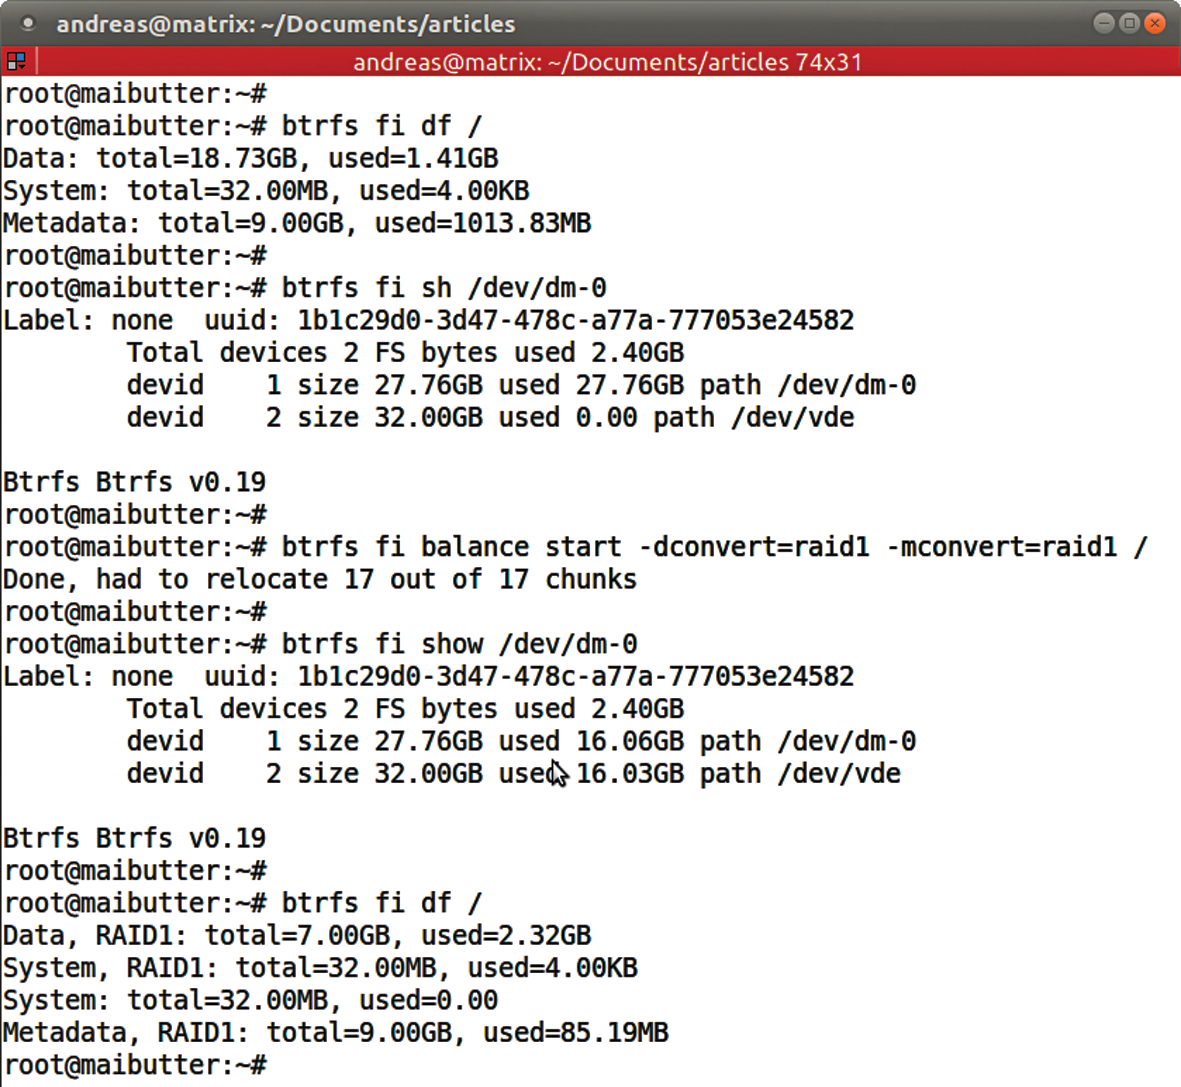
The following command converts a non-redundant root filesystem to a redundant one:
btrfs fi balance start -dconvert=raid1 -mconvert=raid1 /
The -d switch here determines the modification type of the data, whereas -m applies the action to the metadata.
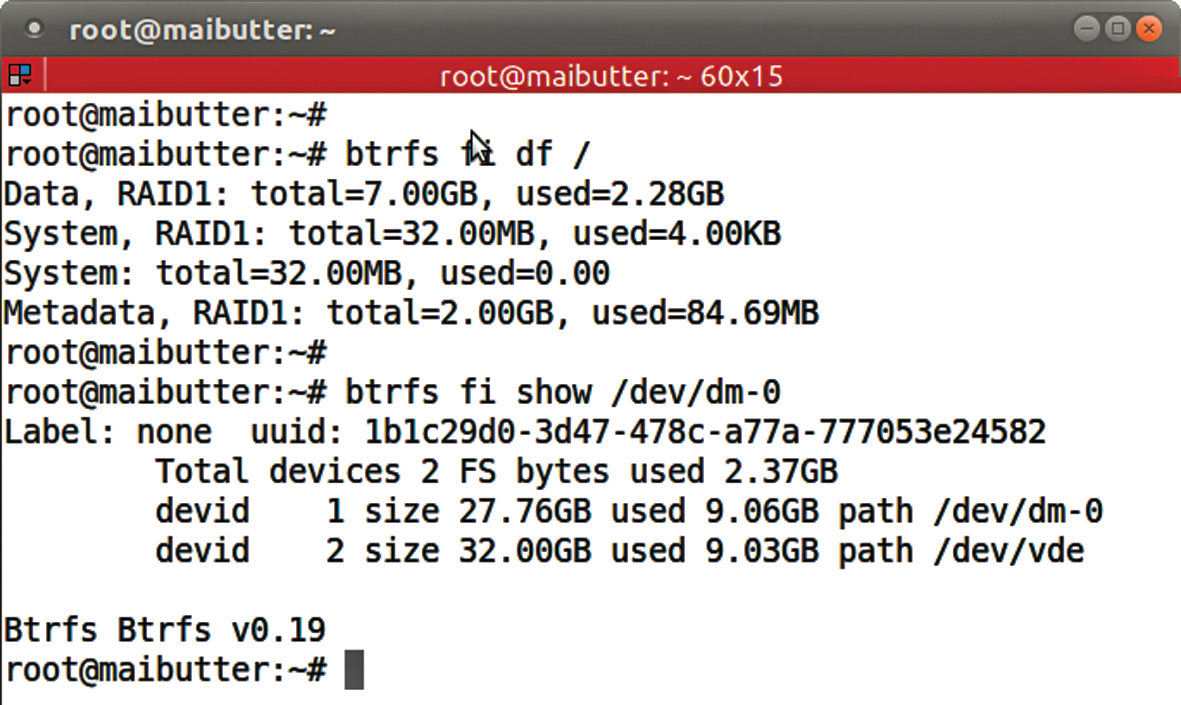
As you can see in Figure 11, the data and metadata are now evenly distributed over both block devices, but you can also see that, despite the frugal use of metadata, 9GB was assigned for this. A specific balance of the metadata should provide a solution here. The following command only optimizes the metadata chunks:
btrfs fi balance start -m /
Unfortunately, issuing this command on the test system made the system unresponsive and logged messages about hanging Btrfs kernel tasks on the console.
After a few hours of waiting and a reset of the system, everything started up again, and the balance process was obviously completed successfully. If a system crash occurs during balancing, the process is automatically restarted in the background after the system boots. As already mentioned, you can display the current progress and pause or completely cancel the balance process.
Figure 12 shows only 2GB is assigned per block device for metadata, and 7GB of space per hard disk has been released. For a RAID 1 with two replicas, these values must be taken times two because all data and metadata are mirrored. A simple df -h / therefore shows that twice as much disk space is occupied. This value also includes the redundant metadata.
To compensate for this, the sum of all block devices on the volume is displayed as filesystem size. How the value of remaining free space was computed is unclear; in fact, I was unable to fathom it despite intense research. Some simple math shows that about 8GB is missing:
root@maibutter:~# df -h /
Filesystem Size Used Avail Use% Mounted on /dev/m/maibutter-root 60G 4.8G 47G 10% /
The number of replicas of a file on RAID 1 and of a stripe on RAID 10 is always two, regardless of the number of disks in the pool. The option of creating more than two copies will be available in the future. RAID 5 and RAID 6 will probably not be available before kernel 3.6.
When using multiple block devices for a Btrfs filesystem, note that simply loading the Btrfs kernel modules for the kernel is not sufficient to detect all the devices belonging to a filesystem. To do this, you need to scan all the block devices (you can also specify certain devices) using btrfs device scan. For this step to work for a root filesystem, the command must be run in the startup environment (i.e., initrd on your system). Ubuntu 12.04, which I used here, has already integrated this. It is then also irrelevant which device the mount specifies to mount the filesystem.
Volume @
Having a root filesystem on Btrfs and using apt-btrfs-snapshot can take the fear out of major system upgrades or extensive program installations – but with one stumbling block. Because the Btrfs used for this article was a converted system that does not follow the same conventions as a freshly installed Ubuntu 12.04, you need to make some adjustments. A test up front with
apt-btrfs-snapshot supported plugins
checks the system's snapshot capabilities and indicates that a specific subvolume (@) is expected for the root filesystem. This is not configurable, but the workaround is quite easy:
- Reboot the system into a rescue environment
- Create a subvolume in the top-level volume named
@ - Mount the top-level volume and the new root subvolume
- Copy the entire root filesystem to the new subvolume
Now change the entry in /etc/fstab so the root subvolume @ is mounted in the future:
/dev/mapper/maibutter-root / btrfs defaults,subvol=@ 0 1
A call to update-grub in Ubuntu 12.04 extends the boot command line in GRUB to rootflags=subvol=@.
Safe Updates
After making these preparations and rebooting, you can install no fewer than 62 updates for this test system (Figure 13). A list of existing Btrfs subvolumes shows that a new snapshot was created (with snapshot creation time in its name), and you can use the command that came with the Apt plugin for snapshots (Figure 14):
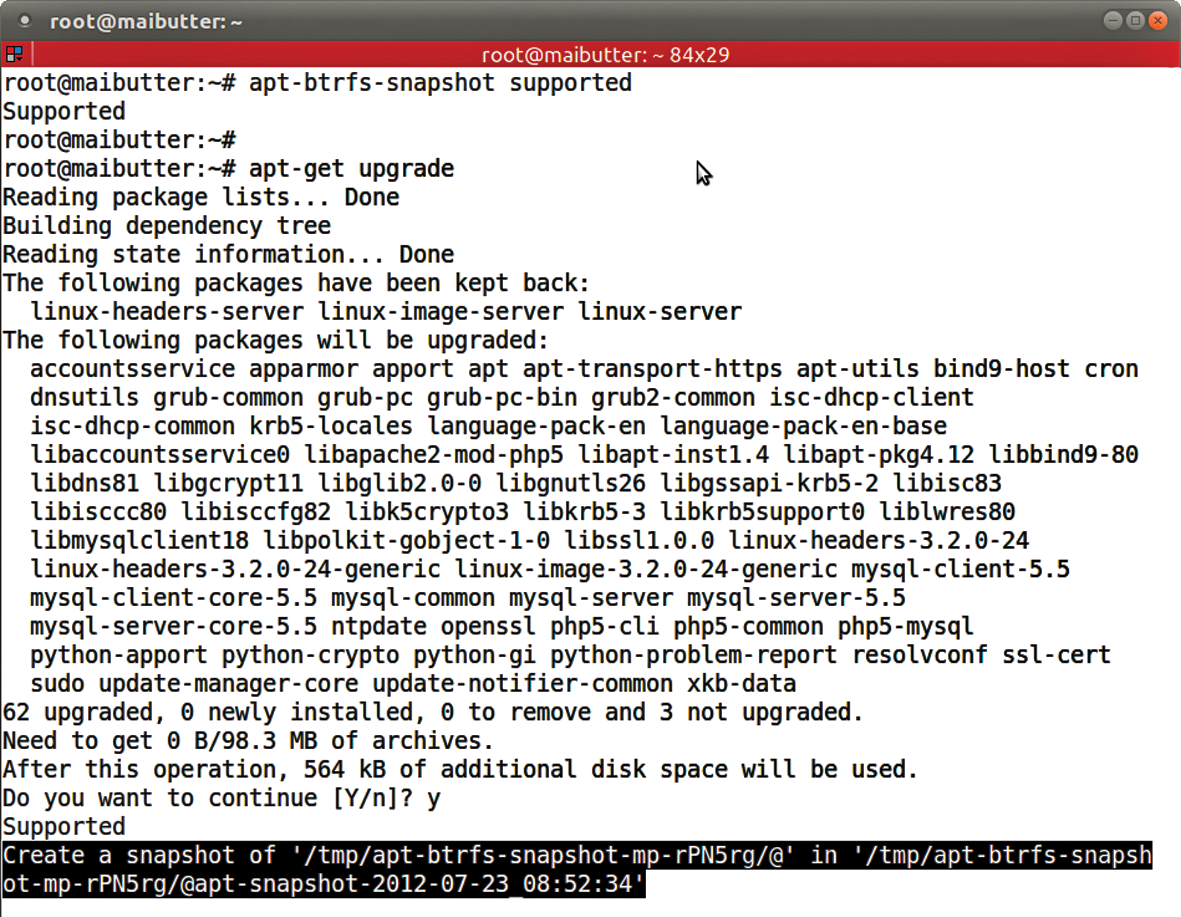
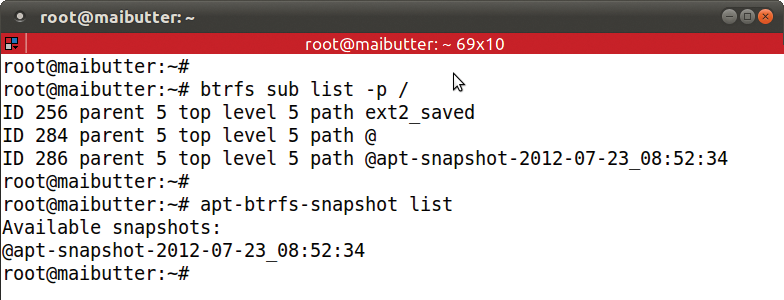
btrfs sub list -p /
apt-btrfs-snapshot list
If the /boot directory is a separate ext2 filesystem on an extra partition, as was the case with the test system, all the files there are excluded from a Btrfs snapshot and a rollback. If you want to include these files in the snapshot to make kernel upgrades easier to undo, this directory must reside directly on the root subvolume. A current GRUB 2 makes this possible.
Back to the Future
If the latest update causes more harm than good, a rollback is now possible. To do this, you need to modify the /etc/fstab file to point to the desired snapshot, rather than to subvol=@ (here, this is @apt-snapshot-2012-07-23_08:52:34). One grub-update and one reboot later, the system reverts to the snapshot status and once again offers to update (Figure 15).
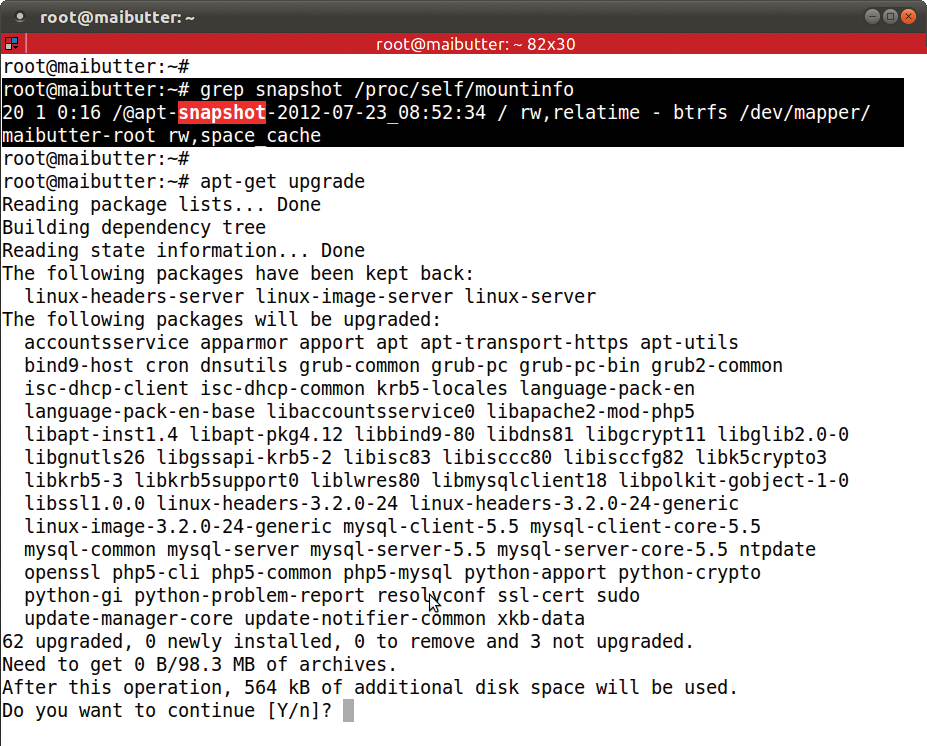
/proc/self/mountinfo confirms that the snapshot is now mounted. An update of all packages again shows 62 possible updates.You can easily delete the obsolete old root volume (called @) and rename the snapshot volume currently in use; you just need to mount the top-level volume because it contains all subvolumes in the form of folders. Thanks to its subvolume ID of 0, the top-level volume is easy to access. Deleting an unused subvolume and subsequently renaming a subvolume can be done on the fly (Figure 16):
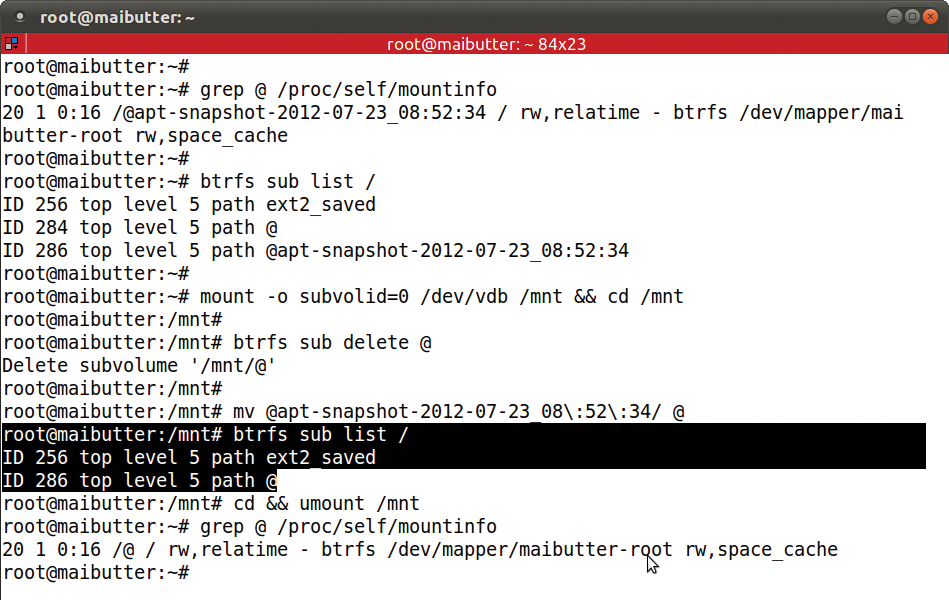
mount -o subvolid=0 /dev/dm-0 /mnt && cd /mnt
btrfs sub delete @
mv @apt-snapshot-2012-07-23_08\:52\:34/ @
cd && umount /mnt
Now you just need to check the entry for the mounted subvol=@ in /etc/fstab and issue an update-grub. This step completes the rollback after the system update.
Conclusions
Btrfs already offers an amazing number of practical functions that can simplify operations significantly on computer systems. Both SUSE and Oracle regard this as sufficient reason to use Btrfs, even though development is not yet complete.
Here, I've shown that Btrfs still has rough edges that make trouble-free use of the filesystem a thing of the future. You should expect stable and simple basic functionality coupled with simple and straightforward administration tools of a filesystem to which you entrust your valuable data.
Although Btrfs is on the right path to becoming the default filesystem on Linux, it will take a number of kernel releases until it equals ext3's reputation in terms of stability and reliability. Administrators should keep an eye on Btrfs as the future enterprise filesystem, and its main characteristics can be meaningfully tested right now. However, if you plan to put Btrfs into production use today, you should have a complete backup plan at hand – but you should have that anyway, no matter what the filesystem!
