Creating RAID systems with Raider
Parachute
If you are looking for more performance or more security, RAID storage is always a useful solution. Whereas the non-redundant RAID 0 speeds up data access, RAID 1 duplicates your data and therefore gives you more resilience. The combination of the two is called RAID level 10, which offers the user the best of mirroring and striping. Creating a RAID system on two partitions of a hard disk makes little sense because, if the disk fails, both "disks" in your RAID are goners. However, you can create multiple partitions on a hard disk and assign them to different RAID arrays. I'll provide an example later in the article.
If you are installing a new Linux system, you can create a RAID system during the installation process, provided the system has enough hard drives. For example, with Red Hat or CentOS, during the installation you would first select Basic Storage Devices and then in a subsequent step Create Custom Layout. When you create a new partition, instead of choosing a filesystem, select Create Software RAID. After creating at least two RAID partitions, the installer gives you a RAID device option, where you can select the partitions you just created. The installer checks for the minimum number of partitions and refuses, for example, to create a RAID 6 with only two RAID partitions.
However, what do you do if the machine has already been used for a length of time with a simple filesystem? In principle, it is not difficult to build a RAID manually from a conventional filesystem, but there are some things to note. A script by the name of Raider makes the process easier by converting a simple Linux installation to RAID. It checks the prerequisites, copies the data, sets up a new RAID, and binds all necessary partitions.
After downloading and unpacking the Raider package from the website [1], you'll need a few other items before you can install Raider: It depends on the bc, mdadm, parted, and rsync packages, which are all very easy to install with your package manager:
yum install bc mdadm rsync parted
Another dependency is a program that lets you create an initial RAM disk (e.g., dracut, mkinitramfs, etc.), which will typically be preinstalled. Next, you can run the /install.sh in the Raider directory to copy the files to your hard disk. The script installs a couple of programs, of which only raider and raiderl are of interest to the user. The /usr/bin/raider script is just a relatively short wrapper that evaluates the command line before handing over the real work to one of the 23 scripts stored below /usr/lib/raider (Figure 1).

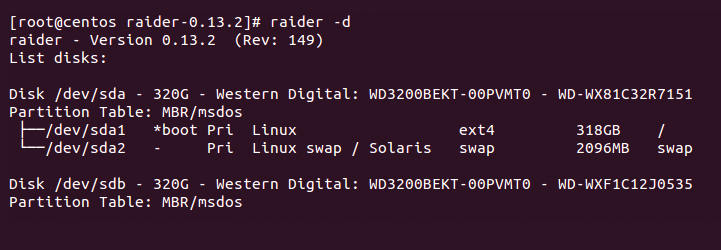
Calling raider --help displays the available parameters. The raider -d command provides an overview of the built-in hard drives and partitions. In Figure 2, you can see the results for a Linux server with two hard disks, of which the first contains two partitions, and the second is empty. To set up a RAID 1, you can simply run Raider with the -R1 option:

raider -R1
You don't need to state the disks/partitions here, in contrast to the usual approach, because Raider simply takes the two disks required for the RAID 1 array. It constructs a command to create the initial RAM disk and copy the partition information from the first to the second disk – thus creating a RAID, then it copies the data from the first disk to the RAID (which currently only comprises the second disk). Raider then generates the RAM disk and changes to a chroot environment to write the GRUB bootloader to the second disk. Raider needs an empty hard disk to do this. If the disk contains partitions, Raider cancels the operation. A call to
raider --erase /dev/sdb
deletes the data. Incidentally, setting the additional -t option, as in raider -t -R1 tells Raider to perform a test.
How long the copy will take depends on the payload data on your first hard disk. In this example, I only had a few gigabytes, so the operation was completed within a few minutes. At this point, Raider prompts the user to swap the first and last disks in the server; for RAID 1, this means the only two existing disks. This action is designed to ensure that all data has been copied to the RAID system. After the swap, the system boots from what was formerly the second disk, which now should have all of the data from the original root disk. If SE Linux was enabled on the old system, Raider will mark the partition for relabeling, which requires another reboot. After logging in, a quick look at the mount table shows that the root filesystem is now a RAID:
$ mount
/dev/md0 on / type ext4 (rw)
...
Checking the kernel status file for RAIDs
# cat /proc/mdstat
Personalities : [raid1]
md0 : active raid1 sda1[0]
      310522816 blocks [2/1] [U_]
shows that you have a RAID 1, and that only one of the two necessary disks is present, that is, you have a degraded RAID. You can tell this by the [U_] read: A full RAID array would have [UU] here instead. For more information, run the
mdadm -D /dev/md0
command. The next step is to enter
raider --run
After swapping the hard disks, Raider refuses to continue working. Otherwise, the program goes on to partition the second (formerly first) hard disk, if this is necessary, and adds it to the array, which automatically triggers a RAID rebuild. Because this happens blockwise and relies on the respective RAID algorithm, the process is much slower than a normal copy. In particular, the entire partition is copied and not just the area occupied with data.
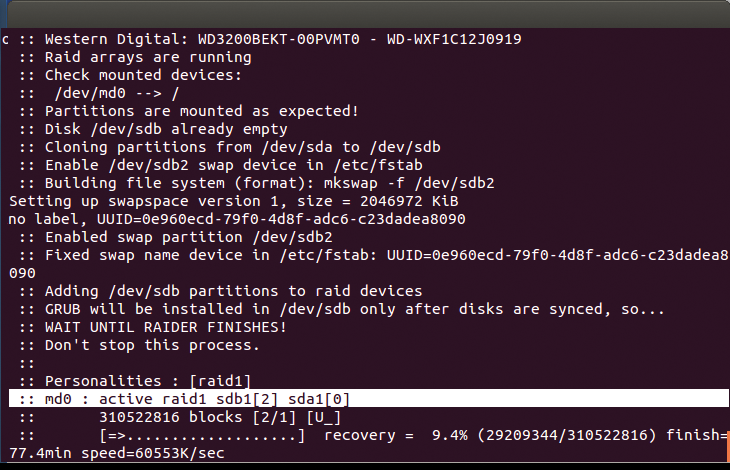
With RAID 1 and hard disks of 320GB, the whole operation takes one and a half hours (Figure 3). You can view the logfile at any time with the raiderl command. Raider writes the current RAID configuration to the /etc/mdadm.conf file. You can do this manually by typing:

mdadm --detail --scan > /etc/mdadm.conf
Given today's terabyte-capacity hard drives, rebuilding a RAID can take whole days under certain circumstances. During this time, the degraded RAIDs are particularly at risk. Because one disk has already failed, the failure of a second disk would be a disaster. RAIDs with double parity, which save the parity data twice, can cope with the failure of a second disk. Some experts see a need for triple-parity RAID with a view to the increasing volumes of data and corresponding disk sizes; this is implemented in ZFS, which continues working in the event of a failure of three disks [2].
Limited
Raider works with the popular Linux filesystems, such as ext2/3/4, XFS, JFS, and ReiserFS, and can also handle logical volumes based on LVM2. Support for Btrfs does not exist to date, nor support for encrypted partitions. Raider can read partition information in the legacy MBR format and from GPT tables. It doesn't currently support UEFI partition information, but this is planned for version 0.20.
Also, Raider can only convert Linux installations to RAID systems that contain a hard disk with a Linux filesystems.
If you also have a Windows partition, the program cannot help you. Converting a root partition to RAID 1 doesn't take much skill; it's probably something most readers could handle without the help of Raider. However, Raider can do more; for example, it can convert several disks and RAID systems to levels 4, 5, 6, and 10, given the required number of disks (see Table 1).
Tabelle 1: RAID Level Minimum Configurations
|
Level |
Min. No. of Disks |
Read Speed |
Write Speed |
Capacity |
|---|---|---|---|---|
|
1 |
1+1 |
1x |
1x |
1x |
|
5 |
1+2 |
2x |
1/2x |
2x |
|
6 |
1+3 |
2x |
1/3x |
2x |
|
10 |
1+3 |
1x |
1x |
2x |
Additionally, Raider can handle logical volumes, which is the default installation mode in Fedora, Red Hat, and CentOS, for example. Creating a RAID from this original material requires some effort, and Raider can take the burden off your shoulders. The starting point for this installation is shown in Listing 1.
Listing 1: LVM Partitions
<§§nonumber>
# df -h
File system           Size  Used  Avail  Use%  Mounted on
/dev/mapper/VolGroup-lv_root
                       50G  1,7G    46G    4%  /
tmpfs                 3,9G     0   3,9G    0%  /dev/shm
/dev/sda1             485M   35M   425M    8%  /boot
/dev/mapper/VolGroup-lv_home
                      235G  188M   222G    1%  /home
The command
raider -R5 sda sdb sdc sdd
starts a conversion to RAID 5 with three additional hard disks. It distributes the data over the disks and writes parity information to safeguard the data, thus combining high performance and reliability.
Because a boot partition already exists in the current case, Raider again converts it into a RAID. If you do not have a boot partition, and you select a RAID level other than 0, Raider changes the partitioning. Because the Linux bootloader can usually boot only from RAID 1 – at least while the RAID is degraded – Raider then creates a boot partition of 500MB on each of the new hard drives, which it later combines to form the RAID 1 array.
If one disk fails, the system can always boot from one of the remaining boot disks. After running the command, power the computer off and then swap the first and last hard disks on the bus; the other two can stay where they are.
After rebooting, the following command starts the RAID rebuild:
raider --run
Because a running system cannot have two volume groups with the same name, Raider has created a volume group with a similar but slightly different name on the new RAID (Listing 2). It is created simply by Raider appending __raider to the original name. However, you can change this with the -l command-line option. In many of my tests with Raider, everything went well, but once the program refused to add the remaining disk to the new RAID array in the second phase, it added a less than useful comment of:
Listing 2: Raider LVM
<§§nonumber>
# df -h
File system          Size  Used  Avail  Use%  Mounted on
/dev/mapper/VolGroup__raider-lv_root
                      50G  1,9G    45G    4%  /
tmpfs                3,9G     0   3,9G    0%  /dev/shm
/dev/md0             485M   61M   399M   14%  /boot
/dev/mapper/VolGroup__raider-lv_home
                     235G  188M   222G    1%  /home
Failed to add a device in /dev/md1 array
Nor did the logfile listed by raiderl provide any useful details. For more information, you need to look at the other logfiles in /var/log/raider. For example, /var/log/raider/raider_debug_STEP3_.log meticulously logs each command that Raider calls while working. I finally found this line:
mdadm: Cannot open /dev/sdd1: \
   Device or resource busy
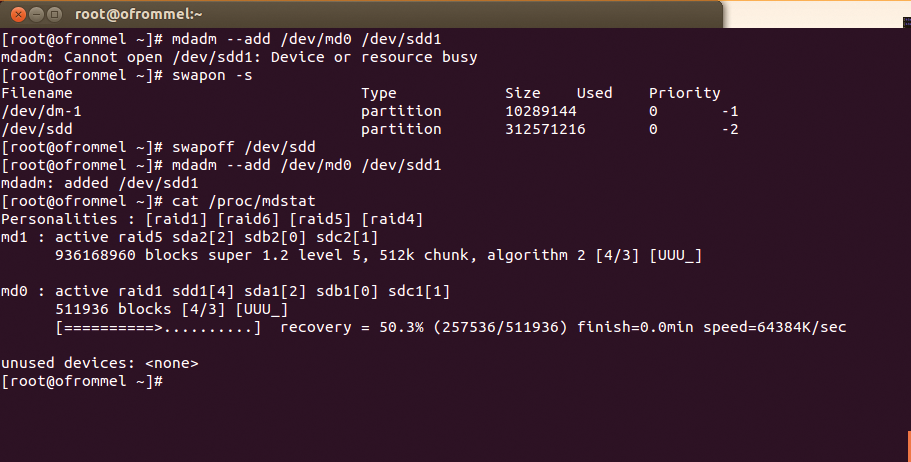
It is typically not easy to find the cause for such an error message in Linux. The mount command indicated that the partition was not mounted, and lsof did not reveal anything new. Finally, swapon -s showed that the system was using the entire hard disk drive for swapping for some strange reason (Figure 4). Switching off the swap by issuing the swapoff /dev/sdd command finally resolved the issue.

Next, I was able to add the sdd1 device to the RAID 1 array (md0). A quick look at /proc/mdstat showed that the boot RAID synchronized in about a minute. The second partition belonging to the RAID with the volume group was added to the RAID using the following command:
mdadm --add /dev/md1 /dev/sdd2
The subsequent, automatic rebuild then took about an hour and a half. Raider stores all variables and working data in the /var/lib/raider directory and its subdirectories, such as DB, where experienced administrators can intervene manually if necessary.
This example already shows how to replace failed disks in a RAID, as long as the RAID is still working – that is, as long as it has the minimum number of disks. If a disk fails, the RAID subsystem automatically removes it from the array. However, you need to monitor the RAID with a monitoring tool like Nagios to detect such a failure; otherwise, the RAID will continue to run with a failed disk in a minimum configuration, and disaster waits just around the corner.
If you want to replace a hard disk before a total loss occurs – for example, because of errors reported by SMART – you can simulate the failure of a RAID component, and mdadm provides a command for this:
mdadm --fail /dev/md0 /dev/sda1
The RAID now reports that the disk is defective. The command that lets you remove it from the array is:
mdadm --remove
After installing a new disk, you can use --add again, as shown previously, and the rebuild will begin automatically. Table 2 shows an overview of the most important mdadm commands.
Tabelle 2: RAID Commands
|
Command |
Function |
|---|---|
|
|
Switches a partition to failed state. |
|
|
Adds a partition to the RAID. |
|
|
Removes a partition. |
|
|
Stops a RAID. |
|
|
Information on device or RAID. |
|
|
More details. |
|
|
Shows detailed information. |
Hand-Crafted
Briefly, here is the procedure for creating a new RAID that you could use, for example, to store user data on a file server without affecting the root partition. To begin, define the appropriate partitions, which will optimally encompass the entire disk and be the same size on all disks.
In the various RAID levels, different-sized partitions might also work, but the array would then use the lowest common denominator, which wastes space. Disks of the same type simplify the configuration.
On the other hand, experienced administrators also recommend using disks from different vendors, or series, to minimize the likelihood that all disks could suffer from the same factory error.
You can use the partitioning tools (fdisk, sfdisk, etc.) to set the partition type to Linux raid autodetect, which has a code of FD. You can simply transfer the partition data of a disk using sfdisk:
sfdisk -d /dev/sda | sfdisk /dev/sdd
To create the RAID, use the mdadm --create command with the desired RAID level and the required partitions:
mdadm --create /dev/md0 --level=5 \
      --raid \
      --devices=3 /dev/sdb1 /dev/sdc1 /dev/sdd1
Alternatively, you can create a RAID with fewer disks than necessary, if you reduce --devices accordingly or specify missing instead of a partition. After reaching the preset number of devices, the RAID subsystem synchronizes the new array, even if you have not yet stored any data on it. You can now create a filesystem or logical volumes. For more information on creating logical volumes, refer to the article "LVM Basics" by Charly Kühnast [3].
Conclusions
Raider helps administrators convert conventional Linux partitions to RAID systems. It supports a number of filesystems – RAID levels 1, 4, 5, 6, and 10 – as well as partition tables in the MBR and GPT formats. The tool is reliable and prompts the user to swap two disks to ensure that a workable system is created and to allow a safe return to the initial state.
