Live migration of virtual machines on Hyper-V
Movers
In Windows Server 2012, Microsoft has improved its high-availability feature across the board and added options for smaller businesses. You can now perform a live migration of Hyper-V hosts without using a cluster, and you can replicate virtual machines between Hyper-V hosts without needing to cluster them.
In the free Hyper-V Server 2012, Microsoft offers the hypervisor functions of the Windows Server 2012 Datacenter Edition completely free of charge. With this variant of Windows Server 2012, you can also install a cluster and take advantage of the capabilities described in this article.
Replicas
Hyper-V replicas let administrators replicate virtual servers between Hyper-V hosts – that is, copy them from a source host to a target server. This process can be done on the fly or can be scheduled. The virtual server on the source host always remains active, whereas the virtual server on the target server is switched off. Administrators can perform a failover of a virtual server manually or replicate a virtual server again at any time.
Thanks to live migration without clustering, admins can move a virtual server from the source to the target server on the fly and then enable the server. A new feature in Windows Server 2012 is the option to perform multiple live migrations simultaneously. In contrast to a replication, the virtual server is still only available on one server and can be moved on the fly.
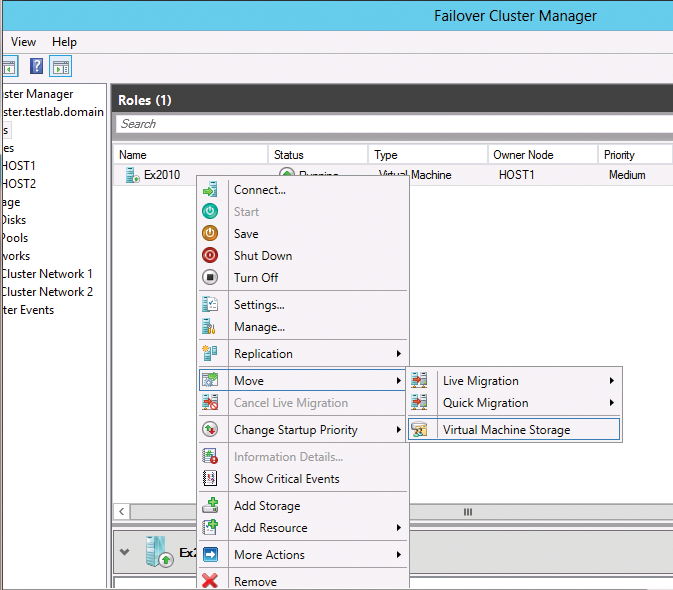
Additionally, Windows Server 2012 lets you run Hyper-V in a cluster and define virtual server cluster resources. This makes moving virtual servers between nodes quick and easy. You can now also build a cluster of this kind with the Standard Edition (Figure 1). All of these features are also available free of charge on Hyper-V Server 2012.

Replication configuration is a wizard-driven process that is handled in the Hyper-V Manager or PowerShell. This feature is interesting, for example, if you want to run a lab server or a backup server.
For Hyper-V-hosts to support this kind of replication, however, you first need to enable Hyper-V on all the systems involved. To do this, launch the wizard via the context menu of the virtual server on the source host and enter the target server – that is, the Hyper-V host to which you will be replicating the virtual machine.
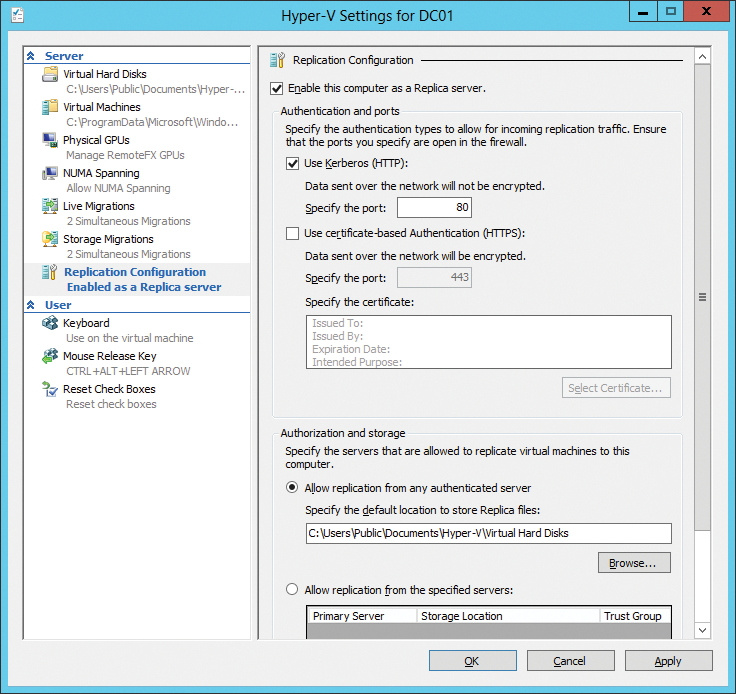
For a Hyper-V host to be available for replicas, you first need to enable and configure this option on the appropriate server in the Hyper-V Settings | Replication Configuration feature. Here, you also define the machines from which the current server accepts replicas. (Figure 2).

If you did not complete the configuration before enabling replication on the host, the replica wizard will detect this and offer to configure the destination host during the replication process. This configuration is also possible across the network.
To replicate a virtual server on another Hyper-V host with Windows Server 2012 or Hyper-V Server 2012, after configuring the host, right-click on the appropriate virtual server and select the Enable Replication option. This step launches a wizard, in which you specify how to replicate the selected server from the source host to the target server.
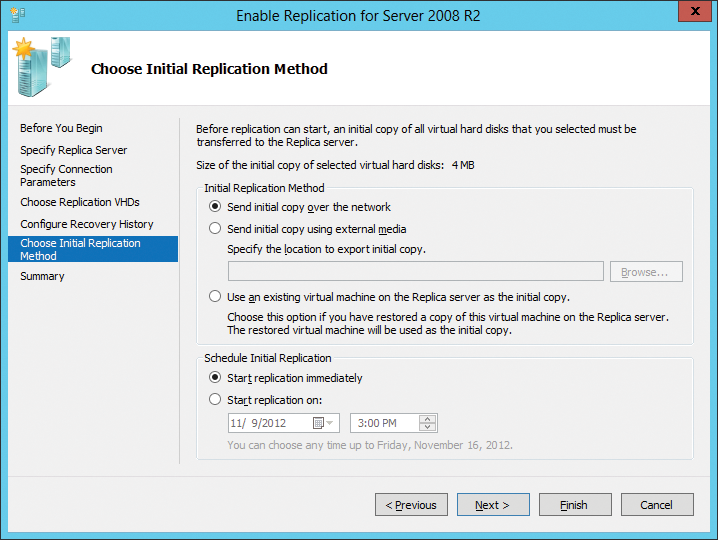
In the wizard, you also set the target server and the authentication type. What authentication the destination server accepts is defined on the target server in the Hyper-V settings (under Replication Configuration). You can also use the wizard to define which virtual hard drives you want to replicate and to transfer the snapshots of the server. Additionally, here you can define whether you want to perform the first replication via a storage medium, such as an external hard drive, or directly across the network. You can also set up a schedule (Figure 3).

For the replication to work, you must enable the rules for the HTTP or HTTPS listener on the target server in the advanced settings of Windows Firewall (wf.msc). The rules are already there but are not enabled.
After completing replication, the virtual server now resides on the target server but is inactive. You can use the context menu for the virtual server on the source host to configure the replication behavior and retrieve the status in Replication. You can even replicate between different editions of Windows Server 2012 and Hyper-V Server 2012 as source and target servers. The easiest way to replicate is to have an Active Directory structure for authentication.
You can also use the context menu and the Replication item to perform a failover. In this case, the virtual server on the target server (replica) can take over the tasks of the virtual server on the source host (original). You can terminate this replication at any time. For each new replication, Hyper-V creates a snapshot of the virtual server on the target server.
Improved Access to Shares
The significantly improved and accelerated access to file shares on Windows Server 2012 is also important for Hyper-V. Because of this feature, you can now also save virtual disks on shares, which in turn accelerates replication and live migration. Windows machines use the Server Message Protocol (SMB) to access file servers; this is implemented by Samba on Linux servers.
Windows 8 and Windows Server 2012 introduce the new SMB protocol 2.2. It accelerates access to data on the network that has normally been stored locally, such as SQL Server databases or files from Hyper-V computers. The new version supports multiple parallel requests to file shares. Thus, individual requests over the network no longer interfere with one other.
Additionally, SMB 2.2 allows improved failover behavior between cluster nodes when deployed on clustered file servers. In doing so, Windows Server 2012 takes into account the user and server SMB sessions and keeps them when virtual file servers are moved between cluster nodes.
Live Migration Without a Cluster
As I mentioned previously, virtual servers can be moved to other Hyper-V hosts with the new live migration feature, even if they are not part of a cluster. For this process, the corresponding virtual machine must be running. For the live migration, both servers must use the same processor type; otherwise, the process will terminate with an error. In this case, you will want to use Hyper-V replication, which does not require identical processors.
To use live migration without a cluster, the appropriate Hyper-V hosts must be members of the same Active Directory domain. To move a virtual server with a Hyper-V role, you must also be a domain admin. Furthermore, the account must be a member of the Local Administrators group on the two Hyper-V hosts. To perform live migrations between Hyper-V hosts without a cluster, you will need to modify the Kerberos authentication settings for the corresponding computer accounts in Active Directory settings.
To begin, go to Active Directory Users and Computers and access the properties of the two computers. Next, go to the Delegation tab. Enable the Trust this computer for delegation to specified services only and the Use Kerberos only options. Then, click on Add and select the server and the services that need permissions for the appropriate computer account.
To do this for the live migration, select the server, and from Available services choose cifs, Microsoft Virtual System Migration Service, and Microsoft Virtual Control Service. Complete these settings on all Hyper-V hosts whose virtual machines you want to replace. Again, you can choose virtual servers from the various editions of Windows Server 2012 and Hyper-V Server 2012.
In the next step, you need to configure live migration on two Hyper-V hosts in the Hyper-V settings of the Hyper-V Manager. You will find these settings in the Live Migrations section. Check the option Enable incoming and outgoing live migrations. Then, as the Authentication protocol option, enable Use Kerberos. Next, specify how many live migrations are allowed at any one time on the server. The default value here is 2. For Incoming live migrations, you can choose Use any available network for live migration or you can define the IP addresses manually.
Like most settings in Windows Server 2012, you can also configure these setting in PowerShell. To do this, use the following commandlets:
Enable-VMMigration
Set-VMMigrationNetwork <IP address>
Set-VMHost \
  -VirtualMachineMigrationAuthenticationType \
   Kerberos
You can then move the virtual servers. Right-click the virtual server you want to move between the Hyper-V hosts and select the Move option from the shortcut menu. Then, from the Choose Move Type dialog, select the Move the virtual machine option. Finally, you can select the target computer to which you want to move the corresponding computer.
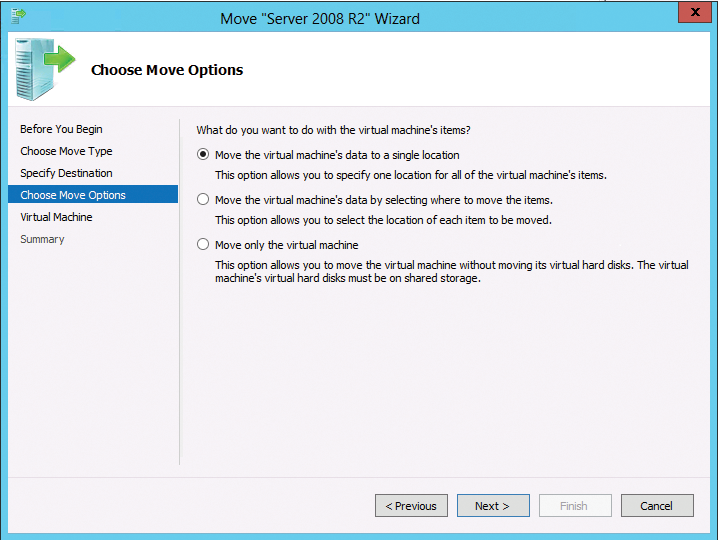
In the next window, you can specify the live migration more precisely. Here you have the option of moving various data off the virtual server to different directories or moving all of the server data, including the virtual disks, to a common folder (Figure 4). If the virtual hard drive on a virtual server resides on a share, you can also choose to move only the configuration files between the Hyper-V hosts.

After you choose a move option, the wizard connects the remote server using the remote file browser, and you can select the local directory to which you are moving the Hyper-V virtual hard disks and configuration data for the virtual server. Finally, you will see a summary and can start the move by pressing Finish.
You can also script this process. To do this, open a PowerShell session on the source server and enter the following command:
Move-VM <Virtual Server> <Target Server> \
   -IncludeStorage \
   -DestinationStoragePath \
    <Local path on target server>
For the transfer to work, the Hyper-V hosts' processors must be compatible. If they are not, you will see an error message, and the server cannot complete the move on the fly. In this case, you can shut down the virtual server and restart the procedure. If the name of the virtual switch on the destination server is not identical to that of the source host, you will also see an error message, and you can select the new virtual switch on the target host to give the virtual server a network connection on the new host.
