VAX emulation with OpenVMS
Time Machine
Yesterday's computers – and not just old home computers and game consoles – still hold a great deal of charm for many people today. This is especially true of computers that, at the time, were prohibitively expensive, even for many businesses. Now you can experience some of these historical computers with the help of SIMH [1], which emulates a number of antiquities, including the VAX and PDP series of DEC computers, the MITS Altair, and computers by Hewlett Packard and Honeywell. Many of these dinosaurs were milestones in the development of information technology and marked the rise of entire companies.
One example is the series of VAX machines by Digital Equipment Corporation (DEC), which wrote the history book with its PDP series of computers. The VAX was groundbreaking in that it introduced a 32-bit architecture with virtual memory; it soon became the market leader in the business computer segment.
For their new computer, DEC released a new operating system called VMS; it implemented support for user terminals and advanced features such as clustering. VMS was also known for its sophisticated security concepts, including Access Control Lists (ACLs), and auditing capabilities. The VMS operating system still runs on many bank computers.
Resurrection
The SIMH emulator was written by DEC veteran Bob Supnik, who now works at Unisys. He was inspired by his colleague Larry Stewart, who pointed out that computer history was doomed to extinction if somebody didn't do something about it. This somebody was Supnik, who took the suggestion as an opportunity to move from assembler to the C programming language and begin the SIMH project.
SIMH is available in the repositories of some Linux distributions, but with some files missing. Installing from source, however, is easy. After you have downloaded the approximately 3MB ZIP file, create a folder before you unpack, because the archive does not contain one. If you simply unzip, all the files and directories end up in the current directory.
Build It Yourself
Assuming you have the files in the simh directory, change to it and type make. If you only want the VAX emulator, make vax will suffice. The results end up in the BIN directory and go by the name vax. It is best to copy the binary into a directory that is in the path, for example, /usr/bin or $HOME/bin. To give the emulator networking capabilities, you need to install the developer package for libpcap before compiling (on Debian/Ubuntu, libpcap-dev).
The cleanest approach is to create a separate directory for the VAX emulator (e.g., /home/oliver/vax). Copy the firmware file ka655x.bin to this directory; it is located in simh/VAX. Additionally, you need the configuration file, vax.ini, in the same place.
This file specifies the hardware configuration of the virtual VAX beginning with a statement that loads the firmware and then an instruction to attach a file for the non-volatile (NV) RAM, in which the boot parameters are permanently stored. The rest of the instructions are devoted to configuring the disks and the network interface. At the very end are a few special boot instructions, which I will talk more about later.
VMS on VAX
If you now call vax in the vax directory, you will see a few debug messages followed by a language selection. At this point, you don't have many other options because you are still missing a boot disk with an operating system that the VAX can boot. To leave the emulator at any time, press Ctrl+e, which sends you to an input prompt where you can control the emulator. Entering help shows the available commands; exit terminates the emulator.
Besides VMS, VAX also could use Ultrix, a Unix system. Then again, you could save yourself some trouble and just use Linux; however, the operating system for the VAX in this example will be good old VMS. Originally, VMS was known as VAX-11/VMS (like the first VAX 11/780). Later, the number was dropped, and DEC changed the name again in the early 1990s to OpenVMS. The system is still available under this name, but only for the Itanium architecture.
If you have a CD with OpenVMS for VAX, you can create a CD image; otherwise, you need to visit the OpenVMS Hobbyist program [2] to enroll and obtain a license for the operating system and all the other available software. Until recently, you also could order physical installation media, but now you can email a request for a link to the disk image download site. You will receive a license key by email.
In line with the configuration in Listing 1, the image must be named cdrom.iso and reside in the vax directory. Type the boot dua3 command at the boot prompt and the system will boot from the CD, which comes up with the OpenVMS trademark and version number and then prompts you to enter the date. It completely does without modern bells and whistles but expects the input in exactly one format:
22-APR-2013 11:54
that is, the day, month as a three-letter abbreviation, year, and time. Then the system searches for devices. After finding all the devices, in particular, the disks DUA0 to DUA2, confirm by pressing YES, and you are taken to a kind of minimal VMS.
Listing 1: vax.ini
01 load -r ka655x.bin
02 attach nvr nvram.bin
03 set cpu 64m
04
05 set rq0 ra92
06 set rq1 ra92
07 set rq2 ra92
08 set rq3 cdrom
09
10 attach rq0 d0.dsk
11 attach rq1 d1.dsk
12 attach rq2 d2.dsk
13
14 attach -r rq3 cdrom.iso
15
16 set rl disable
17 set ts disable
18
19 set xq mac=08-00-2B-AA-BB-CC
20 attach xq eth0
21
22 set cpu idle
23 boot cpu
The first step in the OpenVMS installation is to write a so-called "save set" of the operating system from the CD to the hard drive:
backup dua3:vms073.b/save_set dua0:
After doing this, you can boot from the hard disk for the first time and then continue with the installation. Ctrl+e changes to the emulator prompt, where exit ends the program. After restarting vax, this time enter
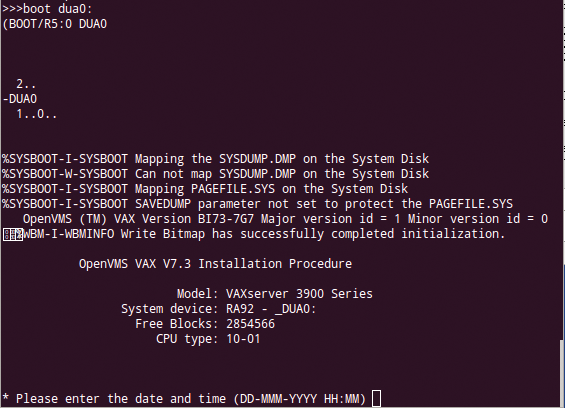
boot dua0:
and the system on the disk now boots (Figure 1). Again, you need to enter the date, then a label for the system disk, where you can simply accept the default. For the drive holding the OpenVMS distribution media, type DUA3 and then press Y.
DECnet Optional
For the selection of packages that follows, you mostly just confirm the defaults or select the package as offered by pressing Y. You can usually do without DECnet and DECwindows. At the end, the installer wants you to confirm once again, and then writes the data to disk.
When installation is complete, you need to set up passwords for the accounts SYSTEM, SYSTEST, and FIELD. To make things easy, simply enter the same password for all accounts.
Finally, the installer will prompt you with SCSNODE name; what it wants here is a name for the computer; for SCSSYSTEMID, you can simply type 1025.
Licensing
The installer waits for the license key you were sent after registering for the OpenVMS Hobbyist program. After selecting menu option 1, answer YES to the question Do you have your Product Authorization Key?. Now copy the data from the email you were sent to the input mask, line by line. The operating system product is listed in the license file as VAX VMS. In this section, you will find the authorization number, which looks like:
HOBBYIST-VA-KEY11234-123456
The product name is VAX VMS, and the Number of Units is 0. In the same way, copy the termination date (TERMINATION_DATE), the activity table code (ACTIVITY), and the checksum (CHECKSUM). The fields Version, Product Release Date, Availability Table Code, Key Options, Product Token, and Hardware ID can stay blank. Confirm the input, and the system checks to see whether it is correct and offers to load the license. Otherwise, you need to correct your entries.
At the end, you should see the message:
%LICENSE-I-LOADED, DEC VAX-VMS was successfully loaded with 0 units
When you quit the licensing tool, the installer prompts you to configure the time zone, including optional summer time.
Finally, it creates a new system image and shuts down the VMS, ending up at firmware level again where you can either reboot or press Ctrl+e to change to the emulator and then exit to quit.
Automatic Boot
To remove the need to specify the boot device on each boot, you can configure it in the firmware or NVRAM. To do so, enter
set boot dua0
Now, exit the emulator, reboot again and type
show boot
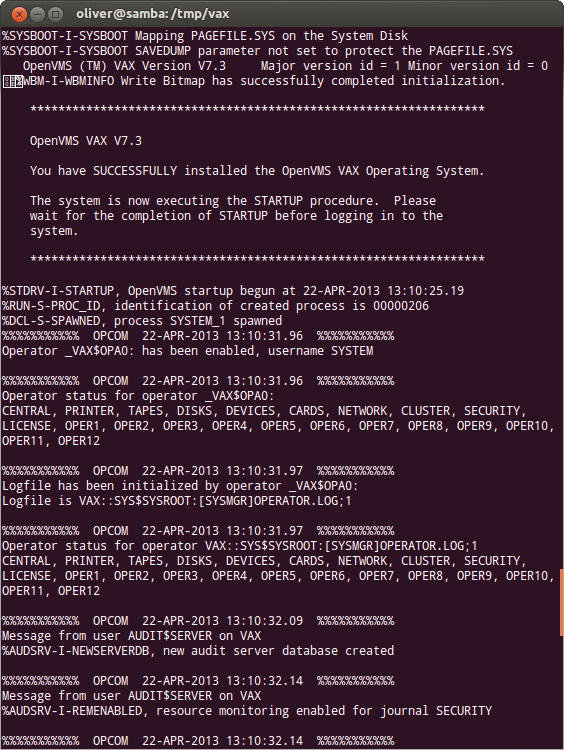
You should see DUA0 as the boot device. However, the VAX will still not boot automatically at startup time. To do this, you will need the dep bdr 0 command in your vax.ini file's set cpu idle line. This sets the corresponding bit in the register to ensure that the computer automatically starts the preset boot device. Now restart vax, which should automatically boot up the installed OpenVMS (Figure 2).
First Login
You can now log in for the first time with the system account and the previously assigned password. The login prompt is not shown automatically at the system console. You must first press the Enter key to make it visible. Now you can initialize and mount the other two configured disks with the following:
$ initialize dua1: DATA1
$ Initialize dua2: DATA2
$ mount/system dua1 data1
%MOUNT-I-MOUNTED, DATA1 mounted on _ADVAX$DUA1:
$ mount/system dua2 data2
%MOUNT-I-MOUNTED, DATA2 mounted on _ADVAX$DUA2:
To mount the disks at every boot, you need to add them to the startup file, which OpenVMS runs on every reboot. To do so, define the terminal settings and then open the file in the editor:
set term/vt100
edit sys$manager:systartup_vms.com
You can use the mouse buttons and even the scroll buttons to move through the file. Go to the very end and add two new lines in front of $ **EXIT:
$ mount/system dua1 data1
$ mount/system dua2 data2
You need the dollar signs, too (comment lines start with $!). Pressing Ctrl+z saves the file and exits the editor. Alternatively, pressing F4 enters command mode; then, type write to store and exit to quit. The @sys$system:shutdown command shuts down the system after you have answered a few questions.
The VMS filesystem model takes some getting used to for Unix users [3] because it has no standard filesystem tree, just several drives (duaX) in a style similar to DOS and Windows. However, VMS stays in the same subdirectory when you change drive. For example, if you are in dua1:[ofr] and you change to dua3, VMS assumes dua3:[ofr]. To do this, you would use set default (Unix: cd) and show default (pwd). In VMS, commands can be abbreviated as long as they are unique, so they are usually shortened to set def and sh def. All of this is case-insensitive. An overview can be found in Table 1.
Tabelle 1: VMS Survival Kit
|
Unix Command |
VMS Command |
|---|---|
|
|
|
|
|
|
|
|
|
|
|
|
|
|
|
|
|
|
|
|
|
User Management
As on Linux, the system user account is only used for administrative tasks. To create a new account, first type
set def sys$system
r authorize
to change to the system directory and go to the interface for editing the User Authorization File (UAF). Once there, enter the command:
UAF> add Login/password=temp/owner="FirstnameLastname"/dev=dua1/dir=[Homedir]/uic=[200,201]/flag=nodisuser/priv=all
The last part, priv = all, basically gives the user all available privileges; the user can then type
set proc/priv=all
to escalate privileges, as with sudo on Ubuntu Linux. exit finishes editing the UAF. You still don't have a home directory; but you can create one with
create/dir dua1:[Homedir]
Permissions are set as follows:
set directory/owner=Login dua1:[Homedir]
When you reboot, you can log in with the new user account and use it.
Network
Right now, your VAX is an island, so it's time find a connection to the network. With the libpcap code built in, the SIMH emulator can use the computer's network interface card. However, you need to start the emulator with root privileges or ensure access to the device in some other way. The configuration is in vax.ini, which if called with normal user privileges, gets a File open error from SIMH. If you start vax as root, you should see a success message:
vax.ini> attach xq eth0
Eth: opened eth0
Your VAX now has a network card.
For a long time, DEC relied on its proprietary DECnet, but at some point, it finally gave way to the facts and offered customers an optional TCP/IP stack (now, even with IPv6). Because it requires slightly more resources than the DECnet stack, you need to create a new system image with more virtual memory before you start up TCP/IP. To do so, either you can type
set proc/priv=all
set def sys$system
edit MODPARAMS.DAT
to assume the necessary privileges, change to the system directory, and enter edit (if your screen is full of garbage, remember to set term/vt100), or you can use the system account and enter edit. Paste the following lines into the MODPARAMS.DAT file
ADD_GBLPAGES=10000
ADD_GBLSECTIONS=100
ADD_NPAGEDYN=800000
ADD_NPAGEVIR=800000
MIN_SPTREQ=6000
and quit the editor by pressing Ctrl+z. Now, type
set def sys$update
@autogen getdata shutdown nofeedback
to change to the update directory and generate a new system.
After the shutdown, you end up back at the emulator prompt, where you can reboot the machine using boot cpu. Log in again as the system user and restart the system generation utility to change another parameter:
r sys$system:sysgen
SYSGEN> SET INTSTKPAGES 20
SYSGEN> WRITE CURRENT
SYSGEN> EXIT
Now, when you reboot the system, all the requirements for installing TCP/IP are met. On the installation CD, a directory named TCPIP_VAX05 has the necessary software. To install it, mount the CD, go to the kit subdirectory in TCPIP_VAX051, and start the install:
mount/over=id dua3:
set def [.TCPIP_VAX051.kit]
product install *
The following product has been selected:
    DEC VAXVMS TCPIP V5.1-15         ....
Do you want to continue? [YES]
When installation is complete, you need to license the product. You can do this interactively – as described earlier – or use a call that you can copy from the email sent you by the Hobbyist program: The entire attachment is a single batch file that you could run if you manage to copy it to your VMS emulation. The TCP/IP product is called UCX, and the necessary command lines are between $ LICENSE REGISTER UCX - and / CHECKSUM = ... . Finally, you can type:
load UCX license
@sys$manager:tcpip$config
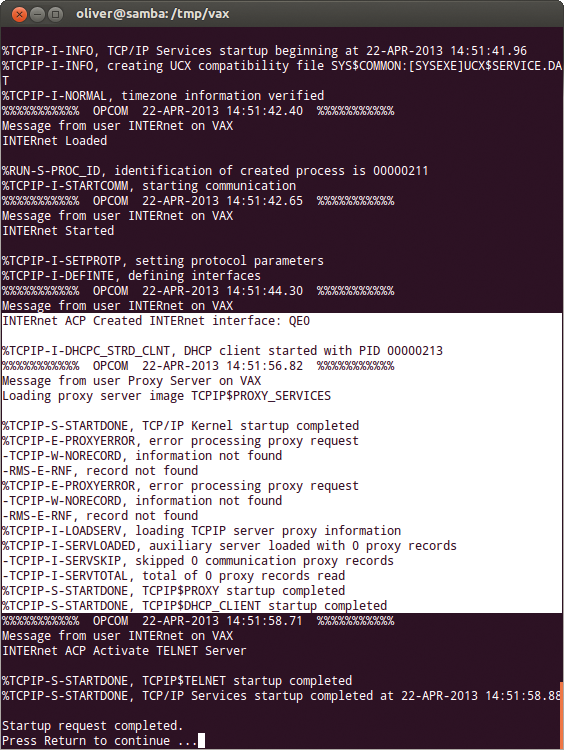
to load the license and start the menu-driven configuration. You can then set the IP address (or choose DHCP), network mask, DNS servers, and so on. When you are done, start the services by selecting the main menu item 6. If all goes well, the result looks like Figure 3.
To enable logging in to the computer, enable the Telnet daemon in the TCP/IP menu below Client components. It should be clear that the emulated VAX has no place on the Internet without further action.
To enable the TCP/IP services at each system boot, add @sys$manager:tcpip$config to the startup script (as described above when mounting the disks). The entry already exists, so you just need to uncomment by removing the ! from the line with the call.
Ping et al.
Commands such as ping also exist on OpenVMS, but they are not available by default, so enter:
run sys$system:tcpip$ping
Alternatively, you can call
@sys$startup:tcpip$define_commands
to make the commands available directly.
Communication with the host computer on which the emulator is running is not possible using this solution but can be done with tunnel devices and similar hacks. I will be talking about this approach in a future article on VMS, and about connecting to the VAX with a terminal in the web browser.
With network connection working, many things are easier, but not necessarily automatic. It is quite difficult even to find an FTP server that has binaries for VAX/VMS. In the beginning, in particular, you have to work your way up by bootstrapping. First, retrieve a binary wget via FTP to makes it easier to access the HTTP server. Also binaries for tar and unzip prove to be helpful. Compilers or interpreters for BASIC, PASCAL, C, and COBOL are also available from the Hobbyist program. Batch programs are written in the DIGITAL Command Language (DCL) that comes with the package.
Conclusions
As you delve more deeply into OpenVMS, you might be surprised at how coherent the operating system is during use – especially if you're used to the chaos of Linux distributions that have grown over the years. Add to this the charm of a classic minicomputer system that completely does away with any ballast (Figure 4).
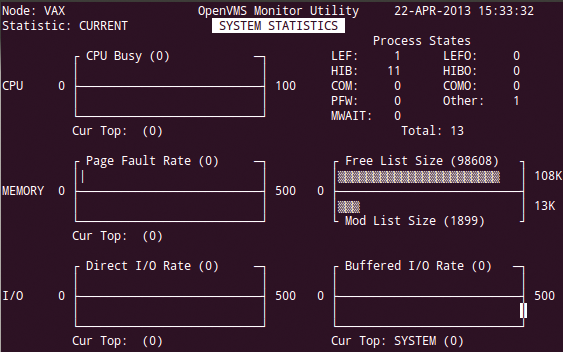
Of course, many concepts, such as the structure of and navigation in the filesystem appear outdated, but OpenVMS has clearly demonstrated its suitability as a stable server in its more than 30-year history.
It is unlikely that anyone will want to set up business on a new installation of OpenVMS in 2013, but it makes an interesting object of study, and the occasional job offers for VMS installations are still out there.
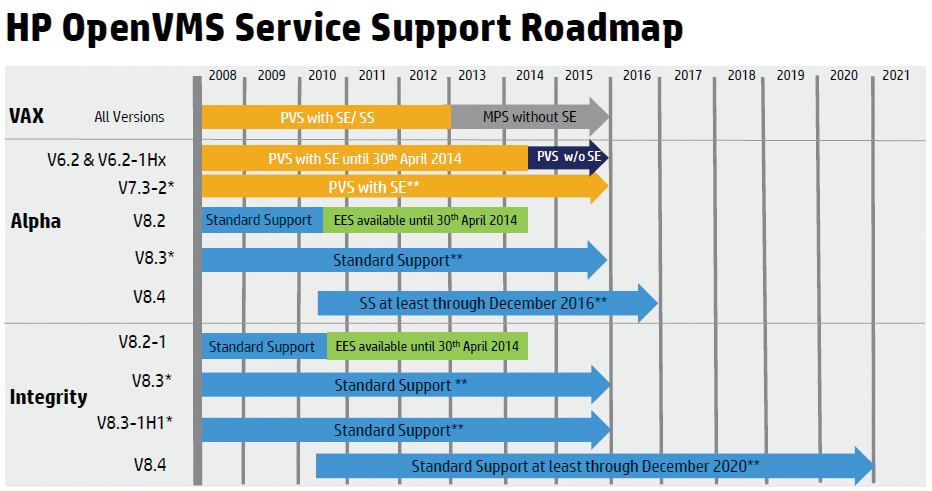
DEC missed the opportunity to say goodbye to the VAX at the right time. Although the group prolonged its suffering with Alpha-based computers, in the end, all that remained of DEC was sold to rival Compaq. Via this stopover, the intellectual property came into the possession of HP, which manages the DEC heritage today. OpenVMS itself is not dead, yet. HP offers support for VAX systems up to 2016 and for Itanium-based systems up to 2020 (Figure 5) [4].
