Setting up SSL connections on Apache 2
Safe Service
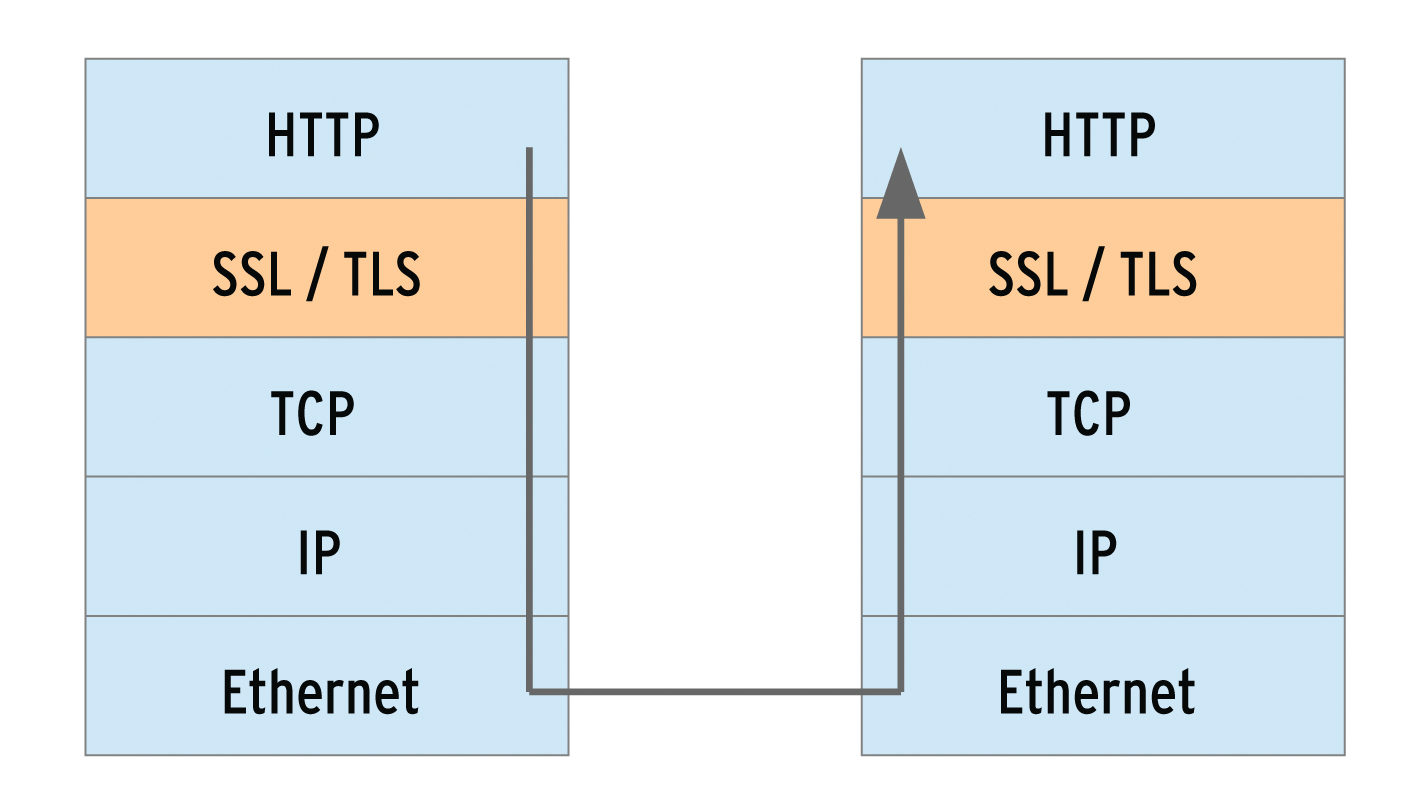
An attacker who captures the credentials for a blog can both spy on the user and break into the blog. By breaking into the blog, that attacker has actually broken into the web server. As an administrator, you should take all possible steps to secure sensitive areas of a website. Transport Layer Security (TLS) lets the web server and browser conduct their communication over an encrypted connection. TLS is a later version of Secure Sockets Layer (SSL), and this kind of connection is often still called an SSL connection. The box titled "Tap-Proof" shows how to set up an encrypted connection.

The Apache web server module mod_ssl takes care of encryption via SSL and TLS. mod_ssl has been included in the package since Apache version 2, and it relies on the OpenSSL package [3]. The OpenSSL libraries implement the SSL protocol, thus performing the actual encryption. OpenSSL is included with most Linux distributions out of the box. Windows users should go for the Apache binary package with built-in OpenSSL. The file is named -openssl and can be found on the Apache Foundation download page [4] in Other files, below the binaries/win32 directories. In CentOS 6.4, the mod_ssl module is not part of the Apache2 package; you have to install the mod_ssl package explicitly.
Face Check
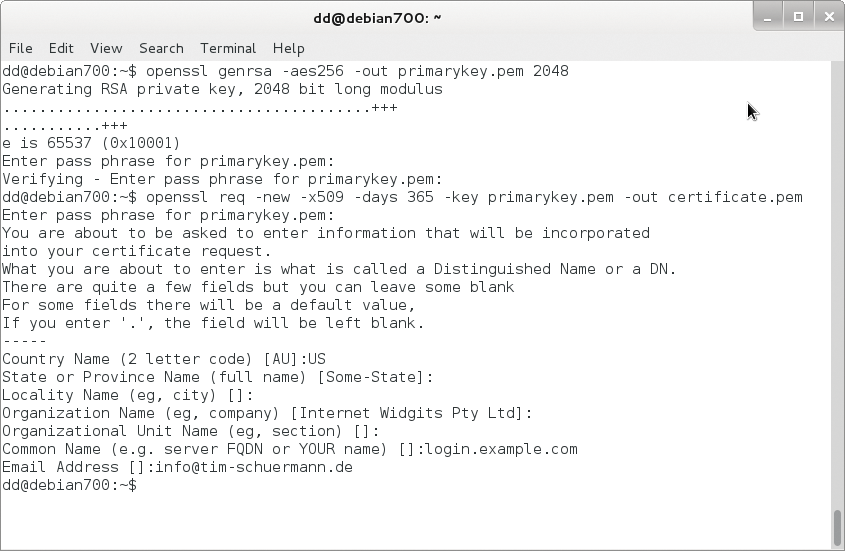
So that browsers know who is at the other end of an encrypted connection, the web server sends a certificate. Administrators can quickly create a certificate using the openssl command-line utility from the OpenSSL package. Windows users of the Apache binary package can find it in the bin directory of their Apache installations. Certificates are based on asymmetric cryptography (public key cryptography), in which each party has two keys. To create a certificate, you must first generate a private key for the server:
openssl genrsa -aes256 -out privaterschluessel.pem 2048
The key length is 2048 bits in this case. For security reasons, the command encrypts the key using the AES256 method, which is why you need to enter a passphrase (i.e., a longer password). Armed with the private key and the passphrase, you can then generate a certificate:
openssl req -new -x509 -days 365 -key privatekey.pem -out certificate.pem
On Windows, you must explicitly reference the OpenSSL configuration file:
openssl req -config ..\conf\openssl.cnf -new -x509 -days 365 -key privatekey.pem -out certificate.pem
In any case, the command creates a new certificate (-new), whose structure follows the X.509 standard (-X509), is valid for 365 days, and ends up in the certificate.pem file. After calling the command, you are asked many questions. Even if you say yes to all the defaults by pressing the Enter key, be sure to specify the domain name under which the secured HTTPS pages are accessible when prompted for the Common Name. Otherwise, browsers will later refuse the connection. If the website is https://login.example.com, the answer to the Common Name prompt is login.example.com (Figure 2). Keep the certificate, the private key, and the passphrase somewhere safe; better yet, memorize the passphrase.

Fide Sed Cui Vide
A self-signed certificate has the disadvantage that browsers initially consider it unsafe – after all, anyone could issue such a certificate. The user must explicitly classify it as correct and reliable on first access to the server. On a public web server, it is a good idea to have the certificate signed by a certificate authority. Several commercial providers act as certificate authorities, the best-known being Verisign Security (now owned by Symantec [5]). Browsers already include signatures from this certificate authority and accept any certificate signed or issued by it. If the CA wants a certificate request, you can create it with the following command:
openssl req -new -key privatekey.pem -out request.csr
You then submit the request in the request.csr file to a certificate authority. On a corporate network, you could alternatively add your own certificates to browsers up front or even run your own certification authority.
In any case, you now have a file with the certificate and the private key. The duo are best kept in a separate subdirectory with the other configuration files. On Linux systems, configuration files are typically found in /etc/apache2 or /etc/httpd, and on Windows they are typically in conf below the Apache directory. Create an ssl subdirectory and copy the certificate and the private key to it:
mkdir -p /etc/apache2/ssl
cp *.pem /etc/apache2/ssl
Normally, these commands will require root privileges.
Components
The Apache mod_ssl module takes care of encrypted SSL connections. Many, but not all, Linux distributions enable it by default. The Apache server loads mod_ssl if the following line appears somewhere in its configuration files:
LoadModule ssl_module modules/mod_ssl.so
Usually, it is found in the central httpd.conf; CentOS stores the line in /etc/httpd/conf.d/ssl.conf. If you use the default configuration files, you only need to remove the hash mark from the line. Alternatively, some Linux distributions, including Debian, Ubuntu, and openSUSE, come with a script named a2enmod to enable dynamically loadable Apache modules. The root user thus enables mod_ssl as follows:
a2enmod ssl
On openSUSE, you additionally need the a2enflag SSL command. If the script a2enmod is available, you should use it. The distributions then usually rely on several configuration files, some of which are automatically generated. Debian uses symbolic links to enable and disable individual modules.
Requests via HTTPS normally arrive on port 443. To ensure that Apache listens on that port, you have to add the following section to the configuration:
<IfModule mod_ssl.c>
        Listen 443
</IfModule>
Which configuration file this section belongs in depends on the Apache installation. On Debian-based systems, it is already in the /etc/apache2/ports.conf file; openSUSE 12.3 uses /etc/apache2/listen.conf, and on CentOS it's in /etc/httpd/conf.d/ssl.conf. If necessary, remove the hash signs (#) that comment out the section. If you use the default configuration file, like the one included with the Apache Windows binary package, you only need to uncomment this line in httpd.conf:
#Include conf/extra/httpd-ssl.conf
This line tells Apache to parse httpd-ssl.conf in the extra subdirectory for the required section.
New Host
For Apache to respond to HTTPS requests, you need a new virtual host. Listing 1 gives an example. (See also the box labeled "Server Name Identification.") After setting the server name and document root, SSLEngine **On enables encryption. The document root directory is something you should choose carefully: If it is identical to the globally set document root directory, visitors can view the local sites via both secured and an unsecured connections (which is usually the case if you leave out the DocumentRoot directive on the SSL host). One should therefore use different document roots, where possible, or restrict access to the relevant parts of the website using a tool such as the Rewrite module.
Listing 1: Virtual host TLS
01 <VirtualHost *:443>
02    ServerName login.example.com
03    DocumentRoot "/var/www"
04
05    SSLEngine on
06    SSLCertificateFile    /etc/apache2/ssl/zertifikat.pem
07    SSLCertificateKeyFile /etc/apache2/ssl/privatekey.pem
08
09    <Directory "/var/www">
10        Options Indexes FollowSymLinks
11    </Directory>
12
13    CustomLog /var/log/apache2/ssl_request_log   ssl_combined
14    ErrorLog /var/log/apache2/ssl_error_log
15    TransferLog /var/log/apache2/ssl_access_log
16 </VirtualHost>
SSLCertificateFile points to the location of the certificate; SSLCertificateKeyFile reveals the file containing the private key. If a certificate is used, in which the private key is embedded, you can leave out SSLCertificateKeyFile. For security reasons, however, you should always outsource the private key to a separate file.
Access attempts via SSL are logged in /var/log/apache2/ssl_request_log. Error messages are sent to the ssl_error_log, and ssl_access_log collects all requests. Access to the pages of the domain is managed, as usual, by a Directory section.
Listing 1 is best stored in a separate configuration file. The directory in which it belongs again depends on the Apache installation. Debian admins put it under /etc/apache2/sites-available and name it after the ServerName. Then you need to enable the file explicitly with a2ensite login.example.com, replacing login.example.com with the name of the new configuration file. For openSUSE, the file in Listing 1 needs the extension .conf and resides in /etc/apache2/vhosts.d. CentOS and the Windows binary package for Apache include a sample configuration for a virtual host, which can be easily adjusted to match Listing 1. In CentOS, you can find the sample configuration in /etc/httpd/conf.d/ssl.conf; on Windows it is in httpd-ssl.conf, below the configure\extra folder of the Apache installation.
Passphrase to Start
Finally, you have to restart Apache again; if you are using Debian, use this: /etc/init.d/apache2 restart. Apache prompts you for the passphrase for the private key. You can only prevent this prompt by removing the encryption. If multiple SSL-secured virtual hosts are used, Apache attempts to use the passphrase for all the other private keys. Ideally, you only have to type in a passphrase once.
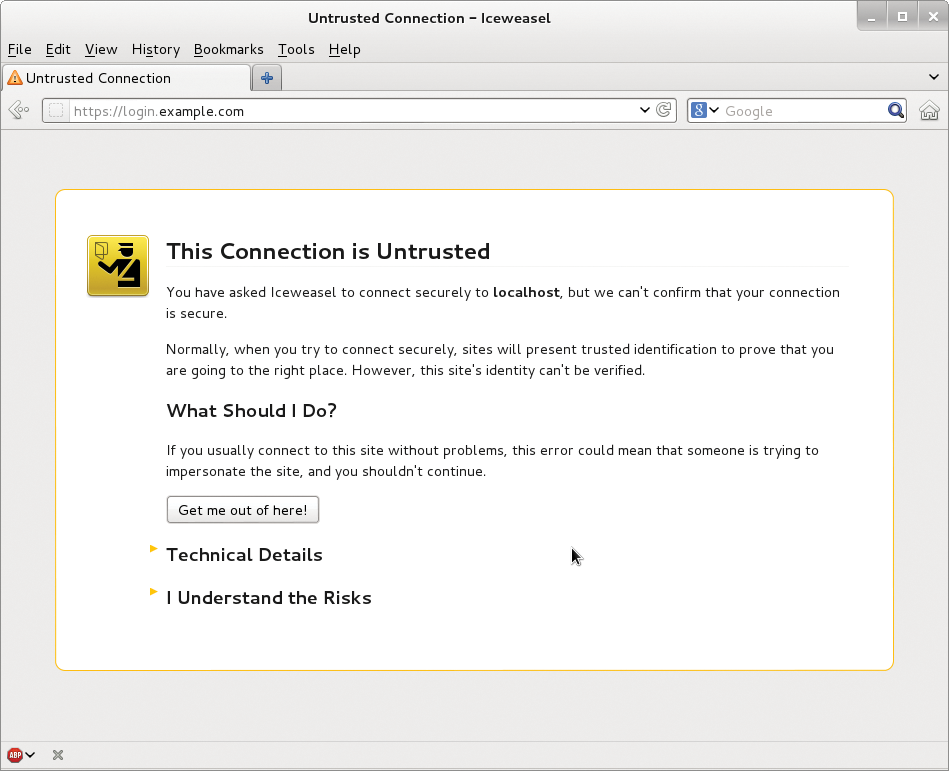
Now, when a user accesses the encrypted site – in the previous examples https://login.example.com – the browser warns them about the self-signed certificate, which might not be secure (Figure 3). Users can decide whether to classify the certificate manually as trusted, then encrypted communications can start.

Spoiled for Choice
In addition to the three SSL directives in Listing 1, Apache knows a few more. SSLCipherSuite is particularly interesting. The SSLCipherSuite directive specifies which encryption algorithms the server accepts for the SSL handshake. The directive is followed by a colon-separated list of possible algorithms. You have to specify, in each case, at least one algorithm for the key exchange, authentication, encryption, and integrity checking. An example of such a selection would be:
SSLCipherSuite ALL:!ADH:RC4+RSA:+HIGH:+MEDIUM:+LOW:+SSLv2:+EXP
Each algorithm is abbreviated; RC4 is, for example, the RC4 algorithm. The algorithm abbreviations are given in Table 1. To avoid typing your fingers to the bone, you can rely on abbreviations or aliases. For example, SSLv2 means all algorithms supported by the SSL2 protocol; ALL means all possible algorithms. Other aliases are listed in Table 2. "Exportable" refers to the export restrictions of the United States, which dictate that particularly strong encryption methods cannot be exported. EXP thus contains only methods with low key lengths.
Tabelle 1: Possible Algorithms for SSLCipherSuite
|
Abbreviation |
Meaning |
|---|---|
|
Algorithms for key exchange |
|
|
kRSA |
RSA |
|
kDHr |
Diffie-Hellman with RSA key |
|
kDHd |
Diffie-Hellman with DSA key |
|
kEDH |
Ephemeral Diffie-Hellman (temporary key without certificate) |
|
kSRP |
Key exchange via Secure Remote Password (SRP) |
|
Authentication algorithms |
|
|
aNULL |
No authentication |
|
aRSA |
RSA |
|
aDSS |
DSS |
|
ADH |
Diffie-Hellman |
|
Encryption algorithms |
|
|
eNULL |
No encryption |
|
NULL |
Like eNULL |
|
AES |
AES |
|
DES |
DES |
|
3DES |
Triple DES |
|
RC4 |
RC4 |
|
RC2 |
RC2 |
|
IDEA |
IDEA |
|
Algorithms for integrity checking (MAC digest algorithm) |
|
|
MD5 |
MD5 |
|
SHA1 |
SHA1 |
|
SHA |
Like SHA1 |
|
SHA256 |
SHA256 |
|
SHA384 |
SHA384 |
Tabelle 2: Aliases for SSLCipherSuite
|
Abbreviation |
Meaning |
|---|---|
|
SSLv3 |
All algorithms supported by SSL 3.0 |
|
TLSv1 |
All algorithms supported by TLS 1.0 |
|
EXP |
All exportable algorithms |
|
EXPORT40 |
Exportable algorithms with 40 bits |
|
EXPORT56 |
Exportable algorithms with 56 bits |
|
LOW |
Weak but not exportable algorithms (single DES) |
|
MEDIUM |
All algorithms with 128 bits |
|
HIGH |
All algorithms that use triple DES |
|
RSA |
All algorithms that use an RSA key exchange |
|
DH |
All algorithms that use a Diffie-Hellman key exchange |
|
EDH |
All algorithms that use a key exchange with ephemeral Diffie-Hellman |
|
ECDH |
Key exchange using Elliptic Curve Diffie-Hellman |
|
ADH |
All algorithms that use an anonymous Diffie-Hellman key exchange |
|
AECDH |
All algorithms that use a key exchange with Elliptic Curve Diffie-Hellman |
|
SRP |
All algorithms that use a key exchange with the Secure Remote Password (SRP) |
|
DSS |
All algorithms that use a DSS authentication |
|
ECDSA |
All algorithms that use an ECDSA authentication |
|
NULL |
All algorithms that do not use authentication |
Finally, you can prefer or exclude certain algorithms. This is shown by special characters + , - and !, which are prefixed to the shortcuts. The ! prohibits an algorithm, so the !ADH entry in the preceding example thus excludes all algorithms that use Anonymous Diffie-Hellman. The minus sign - also removes an algorithm, but you can add it to the chain again later. Using the plus sign, you can explicitly set an algorithm at the corresponding position in the list and thus influence the order. In the above example, the web server would prefer the algorithms from the HIGH group before those from the MEDIUM group. Finally, you can also select multiple cipher suites by adding a + between abbreviations. In the above example, RC4+RSA would enable all possible cipher suites that include RC4 and RSA. The example is also the default in Apache 2.2. Apache 2.4, however, accepts the default settings of OpenSSL.
What combinations of algorithms are possible in a setting is revealed by the openssl ciphers-v command. Just add the tail of options to be examined to the command:
openssl ciphers -v 'ALL:!ADH:RC4+RSA:+HIGH:+MEDIUM:+LOW:+SSLv2:+EXP'
The result is a table like Figure 4. The first column lists the names of the cipher suites; the second column states the SSL standard. Also included are algorithms for the key exchange, authentication, encryption, and integrity checking.

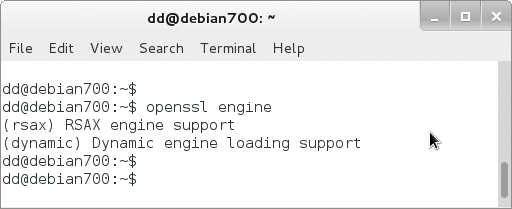
openssl.The major browsers normally prefer secure algorithms, currently mainly AES, which are computationally more expensive. Administrators who rely instead on faster, simpler methods live dangerously: RC4 recently hit the headlines. The "TLS" article elsewhere in this issue reveals more problems with TLS. You should not overrule the secure method proposed by the client with your own SSLCipherSuite. You can speed up encoding by deploying OpenSSL crypto hardware. But this assumes that OpenSSL was built with engine support (Figure 5), which is the case from OpenSSL 0.9.7 onward. To discover the available hardware accelerators, type:

openssl engine
Choose one of the accelerators and add the name in the parentheses after the SSLCryptoDevice directive, as in:
SSLCryptoDevice rsax
Additionally, you can set up a cache for the session data:
SSLSessionCache dbm:/tmp/cachefile
In this case, Apache would use the DBM file /tmp/cachefile.
Roll the Dice
The algorithms used by TLS rely on a random number generator. The default is mod_ssl, which creates random numbers from the current time, the process ID, and a randomly chosen 1KB chunk of the internal scoreboard memory, which Apache uses for inter-process communication. However, the result is not a true random number; instead, you can use SSLRandomSeed to select another source and thus improve security. In the simplest case, you can pick the random values from a file, such as from /dev/random in Linux:
SSLRandomSeed connect file:/dev/random
connect indicates that Apache retrieves the random number when connecting. The alternative, startup, would only retrieve a random number on starting the web server. SSLRandomSeed must also be in the global server context (i.e., outside the <VirtualServer> container). In addition to a file as the source, a program can deliver the data. The program must write the random values to standard output:
SSLRandomSeed startup exec:/bin/myprg
Finally, on Unix systems, you can use the data from a network socket as a source of random numbers:
SSLRandomSeed startup egd:/path/to/socket
A reference to all mod_ssl-provided directives is available for Apache 2.2 [6] and Apache 2.4 [7].
Once you have created a certificate, setting up mod_ssl is no problem, but SSL/TLS only encrypt traffic, and so only offer privacy against potential sniffers. Thus, it is not enough simply to enable the SSL module. The web application must also handle the received data confidentially and encrypt the data for storage in a database. TLS is thus only one small component in a comprehensive security strategy.
