
Open Source VDI solution with RHEV and oVirt
Production Line Desktop
The Red Hat Enterprise Virtualization (RHEV) KVM management platform offers a cost-effective and stable alternative to building a virtual desktop infrastructure (VDI) solution. RHEV is originally based on a development by KVM specialist Qumranet. In 2008, Red Hat acquired the company and ported the software step by step from C# and .NET to Java. RHEV's current version 3.2 has been available since June 2012.
If you can manage without support from Red Hat, you can turn to the Red Hat-initiated open source oVirt project. This project is a starting point for Red Hat's RHEV product. However for business purposes, you will not want to use it in a production environment because of the lack of oVirt support as a VDI platform. Red Hat offers a 60-day trial subscription with support, installation instructions, and extensive documentation for testing the RHEV platform [1].
Architecture
A typical RHEV VDI environment (Figure 1) consists of the RHEV-M management server and one or more KVM-based RHEV-H hypervisor hosts. The RHEV Manager coordinates the RHEV-H server workloads; manages the VDI configuration, templates, and desktop pools; and takes care of automatically rolling out and deleting virtual machines. The RHEV Manager includes a JBoss application server with the RHEV engine and an SDK written in Python and Java. The available web applications include the administrator portal for administrators and the user portal for users, as well as a reporting engine. Since RHEV 3.2, RHEV and oVirt have offered a framework for the integration of third-party components directly in the RHEV Manager (Table 1).
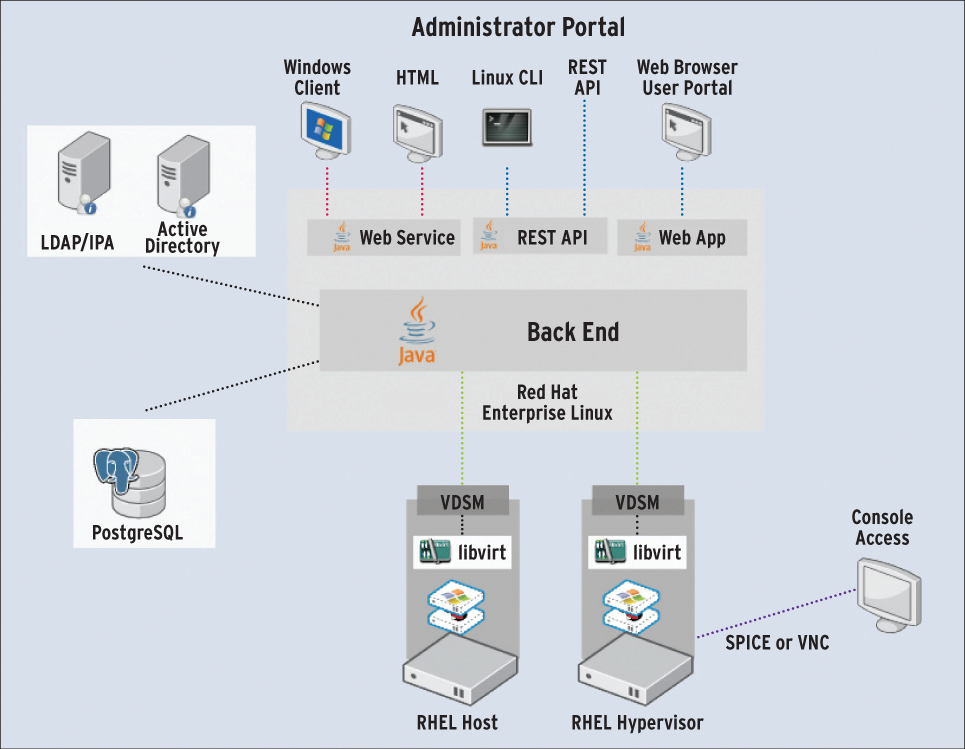
Tabelle 1: UI Plugin
|
UI Plugin |
URL |
|
Commercial UI plugins |
|
|
NetApp Virtual Storage Console (VSC) |
|
|
Symantec Veritas Cluster Server for RHEV |
|
|
HP Insight Control for RHEV |
http://www.hp.com/products/servers/management/integration.html |
|
Community UI plugins |
|
|
ShellInABox |
http://derezvir.blogspot.co.il/2013/01/ovirt-webadmin-shellinabox-ui-plugin.html |
|
oVirt Foreman |
http://ovedou.blogspot.co.il/2012/12/ovirt-foreman-ui-plugin.html |
|
Nagios/Icinga monitoring |
http://labs.ovido.at/monitoring/wiki/ovirt-monitoring-ui-plugin |
RHEV-H servers provide the virtual machines. Each active VDI instance requires one. RHEV-H and RHEV-M server communication takes place via the libvirt stack and VDSM (Virtual Desktop and Server Manager) daemon.
Central storage is also necessary for virtual machines and templates. The following storage systems are supported: NFS, iSCSI, Fibre Channel, a local storage implementation using LVM, and other POSIX-compliant filesystems.
A thin client with SPICE (Simple Protocol for Independent Computing Environments) support or another terminal device (laptop, PC) will ideally be in place on the user side. The open source SPICE software and SPICE protocol of the same name act as the communication medium between desktop virtual machines (VMs) and the terminal device. User access to launch the connection to a virtual desktop always occurs through a web browser and the user portal. Depending on the thin client manufacturer, this process can also be hidden from the user. After successful authentication, one or more virtual desktops (and virtual servers) are available to VDI users on the user portal. A VM can be started by double-clicking the desired system.
SPICE
Open source SPICE is available free of charge. It allows a virtual desktop to be displayed over the network and ensures interaction between the VDI user and the virtualized desktop system. The guest system needs the SPICE agent to use SPICE. It communicates with the libspice library on the RHEV hypervisor. This library is in turn responsible for communication with the client.
The SPICE vdagent [2] is available as a package with many Linux distributions and supports SPICE operation on a Linux guest VM. For a Windows guest VM, the spice-guest-tools package [2] is used; it contains the additional drivers necessary for Windows.
SPICE has all the features that are important for users in daily operations. USB redirection makes it possible to pass on almost all USB devices from the thin client to the guest VM. Clipboard sharing allows users to copy between the guest VM and thin clients via the clipboard. Use of up to four screens with a guest VM is possible with multimonitor support.
Thanks to live migration, a VDI user can carry on working without interruption while their guest VM is migrated to a different hypervisor. Bi-directional audio and video transmission allows VoIP telephony, video conferencing, and movie playback in full HD. Transmission can be optionally encrypted through OpenSSL.
For rendering and hardware acceleration, SPICE uses OpenGL and GDI. Graphic computations are not performed by the client device CPU, but directly by the GPU. However, this requires corresponding support in the graphics chipset, which is almost always provided with modern devices.
SPICE usually creates very little network load; the protocol compares very well with other VDI protocols.
Templates and Pools
Templates and pools are essential components in a VDI setup with RHEV or oVirt. A template is the basis for a virtual machine in a VDI environment. Once a VM is configured with your desired system, software, and configurations, you can create a template from it.
A pool contains configuration for deploying virtual desktops for certain tasks or departments, such as, for example, offices at universities provided with desktops that have the necessary office software, but which users may change, or desktops used in exams, whose status is then reset after the event (stateless mode).
Building an Environment
In this section, I illustrate how to build a test environment with RHEV. Before starting the installation, you should consider the sizing of the environment. As a rule of thumb in a typical VDI environment with RHEV, you can assume 80 to 120 VMs per server with two six-core processors. Ultimately, however, packing density depends on the applications and user behavior, all of which needs to be taken into account. At least two hypervisor hosts are required for redundancy.
The choice of the storage system is determined by the I/O requirements of the VDI environment. The RHEV-H server network connection depends on the network to which it needs access. In general, 4Gb interfaces (2Gb for VDI desktops and 2Gb for management) are sufficient.
A functioning DNS resolution (A and PTR records) for the RHEV-M and RHEV-H hosts is absolutely necessary for the install. A RHEV desktop environment also requires a directory service. Active Directory, IPA, and Red Hat Directory Server 9 are supported. An administrative user who can perform domain joins and modify group memberships is required to communicate with the directory service. Ideally, you will want to create a new user. More details can be found in the extensive RHEV documentation [3] provided by Red Hat.
Installation
RHEV-H is a Red Hat Enterprise Linux 6 (RHEL6)-based minimal system for hypervisor mode. The RHEV hypervisor supports all processors with a 64-bit address space, AMD-V or Intel VT virtualization extension, and a maximum of 1TB of RAM. The memory requirement for a local installation of hypervisor is around 2GB without a swap partition, which is mainly reserved for logging. The swap partition's space requirement can be estimated according to the formula:
GB swap = (GB RAM x 0.5) + 16
According to the documentation [3], installing the RHEV Hypervisor involves just a few steps.
As an alternative to the RHEV Hypervisor, the hypervisor packages can be installed on a RHEL6 system. Use of RHEL6 in the substructures brings many advantages in terms of hardware support and useful software packages for operating and debugging.
The RHEV Manager is installed on a RHEL6 host. Red Hat recommends the following minimum hardware requirements: dual-core processor, 4GB of RAM, 50GB of local disk space, and 1Gb NIC. The RHEV-M host provides management, as well as the administrator portal, user portal, RESTful API, and ISO domain. The ISO domain is bound to the RHEV data center and includes all ISO images.
After configuring the necessary RHN channel (see the "Required Red Hat Network Channels" box), the RHEV-M packages can be installed:
# yum install rhevm
After installing the software, the RHEV Manager can be configured by the root user:
# rhevm-setup
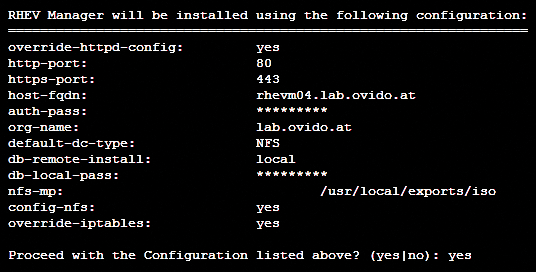
To complete the installation, then enable the configuration (Figure 2).
Configuring RHEV
You need a supported web browser (Internet Explorer 8+, Mozilla Firefox 10+) to set up and configure the RHEV-M environments. The administrator portal is launched with the command:
# https://rhevm.lab.ovido.at/webadmin
After logging in, a number of tabs are visible in the RHEV administrator portal (Figure 3); details are only provided where necessary for this particular setup. The Data Centers tab is a RHEV-M environment's parent container. It includes a number of clusters, hosts, networks, and storage pools. Only one storage type can ever be used at one time in a data center, so the simultaneous use of NFS and Fibre Channel, for example, is not possible. If you are using several types of storage, you need to operate multiple data centers in RHEV.
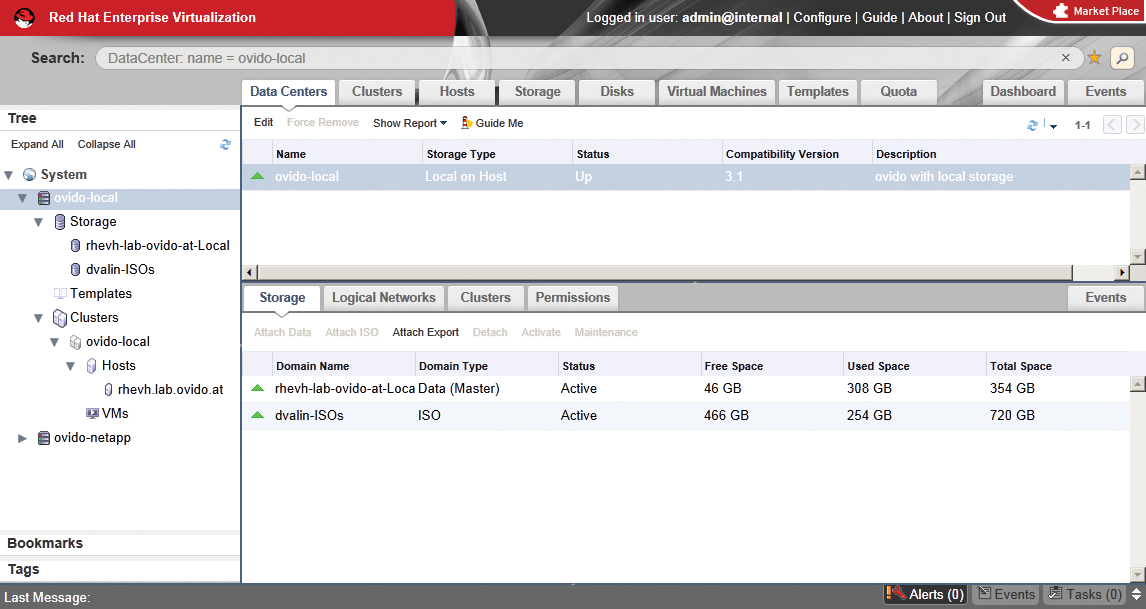
Other reasons for setting up multiple data centers are different user roles or organizational structures, which could mean, for example, creating one data center each for production and development environments. Normally, however, one data center is sufficient for a VDI environment's use case.
A cluster in RHEV-M combines a number of RHEV-H servers and resources, such as storage and network, into a composite designed to guarantee high availability of virtual machines. In this way, VMs are migrated as required between RHEV-H servers. One cluster is sufficient for a VDI environment. When creating the cluster, you need to choose Optimized for Desktop Load in the Memory Optimization tab for a VDI environment.
The storage systems are configured in the Storage tab. A storage domain must be configured for each storage source. Therefore, a storage domain is, for example, an integrated LUN, an NFS share, or the like. Existing storage domains (e.g., from other RHEV or oVirt environments and test setups) can be imported using the import function.
For each data center, you need to define logical networks, which form the interface between one or more physical networks and virtual machines. VLAN tagging is supported in various standardized types, and interface bonding is possible in four modes: active backup, XOR policy, load balancing, and IEEE802.3ad.
Creating a Virtual Desktop
The actual VDI environment setup begins by installing a New Desktop Virtual Machine in the Virtual Machines tab.
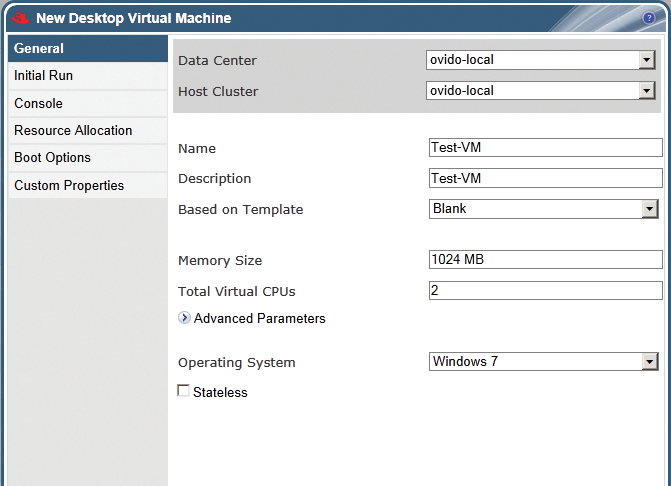
The desired number of CPU cores, the memory allocated, and the name all need to be specified in the dialog for creating the VM (Figure 4). You need to include the VirtIO driver in the setup when installing Windows systems from scratch; this ensures that the use of VirtIO hardware is possible right from the outset. An existing PC system can be converted using third-party software like Acronis (e.g., True Image) or Red Hat's V2V tool. No additional drivers are needed for Linux desktops.
Once the virtual machine has been installed and tested with all of the required software components, you can then start preparing your future template for automatic deployment of virtual machines. You need to run the Sysprep tool for Windows. On a Windows 7 guest system, you open the registry editor regedit and search for the following key:
HKEY_LOCAL_MACHINE\SYSTEM\SETUP
Create a new string here and run sysprep:
Value name: UnattendFile
Value data: a:\sysprep.inf
START/RUN: C:\Windows\System32\sysprep\sysprep.exe
Select the Enter System Out-of-Box Experience (OOBE) item below System Cleanup Action in the Sysprep tool. You also need to enable Generalize option to change the SID. Select Shutdown as the value under Shutdown Options. Complete the process by pressing OK – the virtual machine shuts down automatically. You also need to configure the Volume License Product Key via the shell on the RHEV Manager:
# rhevm-config --set ProductKeyWindow7=product-key --cver=general
Other Windows systems (like XP) require different configurations, which can be found in the RHEV documentation.
A Linux guest system can also be prepared for automatic deployment:
# touch /.unconfigured
# rm -rf /etc/ssh/ssh_host_*
Set HOSTNAME=localhost.localdomain in /etc/sysconfig/network
# rm -rf /etc/udev/rules.d/70-*
# poweroff
To generate a template, select the appropriate item in the context menu of the desired VM. A quick check of the Templates tab reveals that the template has been created successfully and now stores all of the virtual machine settings.
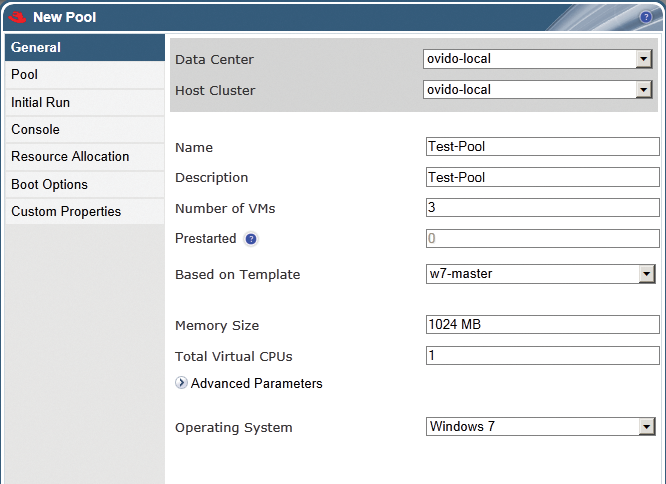
Next, press New in the Pools tab to create a desktop pool for the desired VDI application. A pool is responsible for providing an arbitrary number of desktop VMs on the basis of a template. The name, the number of allocated VMs, the template to be used, the memory size and the number of required CPU cores, as well as the operating system, can be selected in the dialog (Figure 5).
Once the pool has been created, you can move on to configure user access. To do this, use the Permissions tab in the pool settings. You can either assign user rights to a single user or to groups from the directory service. The UserRole gives VDI users sufficient permissions.
Another variant on VDI desktop deployment is to provide one or more dedicated virtual machines (either desktops or servers) for a particular user or for whole user groups. Roles are then assigned in the virtual machine's permissions. With this basic system, users could now work with the VDI environment.
The User Portal
A user's access to virtual desktops is via the user portal:
# https://rhevm.lab.ovido.at/UserPortal/
If you use a standard PC as a client device, you need to install virt-viewer as the SPICE agent on Windows from the SPICE website [2]. On a Linux client, you need the SPICE browser plugin for the Firefox browser.
A thin client is the easiest way to provide user access [4]. To test functionality, use a free trial (e.g., IGEL [5]). For a test with RHEV, I recommend either the IGEL UD3 or UD5 Dual-Core, Linux Advanced thin clients.
To log on to the user portal, use your account details from the directory system. Single sign-on also is an option on an IGEL thin client.
Figure 6 shows the user portal with several virtual desktops available. You can open these virtual workstations by double-clicking on the system.
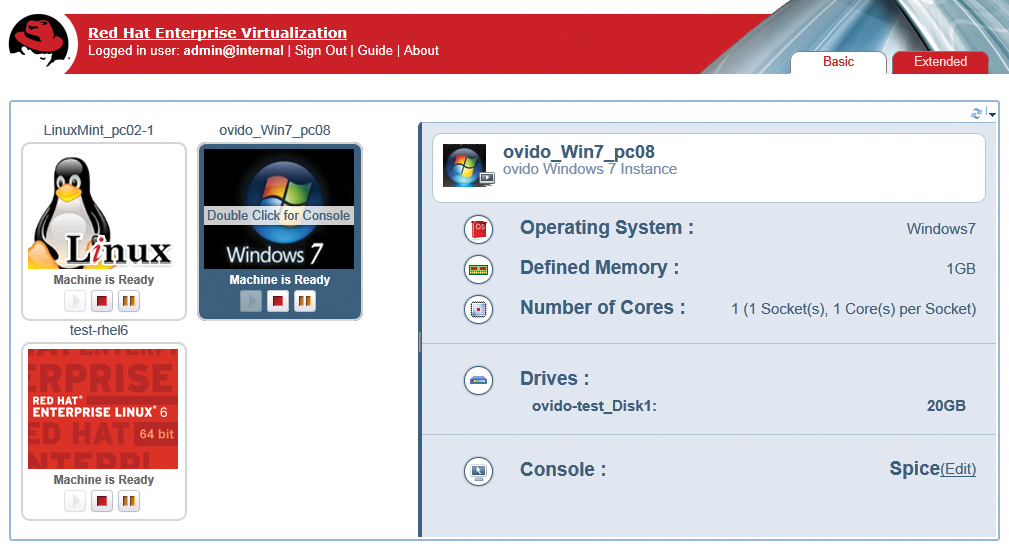
The user portal also offers even more advanced features.
If the administrator has granted VDI users advanced user rights, they can reconfigure these virtual machines or provision virtual machines for themselves or other people with a template. Thanks to this feature, it is possible, for example, to provide internal software developers with the necessary resources for testing and development.
Conclusions
Creating a VDI solution with RHEV provides a solid platform for image-based desktop virtualization that goes beyond the beaten track of app center functionality or application virtualization.
Proprietary solutions available on the market today undoubtedly offer a more feature-rich environment. However, when requirements and applications do not change on a daily basis, RHEV is a good and very cheap alternative.
It is important to remember the application options in the context of paravirtualization, where RHEV offers interesting features. Any Linux-supported hardware can be the basis for RHEV or oVirt.
