
Exploring PowerDNS
Power Zone
PowerDNS [1] is an amazing, feature-rich and versatile domain name system (DNS) server solution. Originally created by PowerDNS.com BV as a commercial product, it was later opened up and licensed under the GPL. Today, PowerDNS thrives with both commercial [2] and community contributions, making it an outstanding DNS server alternative.
DNS, of course, is the distributed, hierarchical naming system that allows us to map what would be IP addresses to much more humanly digestible addresses. Thankfully, we no longer live in the early days of the Arpanet (precursor to today's Internet), where we had to transfer large host files from node to node. Its compact codebase and focus on security, scalability, and reliability make PowerDNS a great nameserver choice; it is jam packed with features that would impress any network or sys admin (Table 1).
Tabelle 1: PowerDNS Features
|
Authoritative DNS server (hosting) |
|
Resolving DNS server (caching) |
|
API to provision zones and records |
|
DNSSEC support (as of 3.x) |
|
Web-based management options |
|
DNS data stored in plain text (BIND compatible) |
|
IPv4 and IPv6, UDP/TCP, 100% compliant [3] |
|
MySQL, PostgreSQL, Microsoft SQL Server, Oracle, Sybase database back ends |
|
Load balancing/failover algorithms |
|
SNMP support |
|
Remotely pollable statistics for real-time graphing |
|
Optional built-in web server |
|
Debugging tools |
|
Support for Linux, BSD, Unix |
PowerDNS Key Components
PowerDNS has two key distinct components: the authoritative server and the recursor. Other DNS servers combine these roles into one, but PowerDNS holds them separately, and you can configure PowerDNS as either option. An authoritative name server is just what it sounds like: It is the original and conclusive source of DNS zone information for a particular domain, where a zone is merely a portion or set of administrative space. Authoritative domain servers are of two types: primary and secondary.
- The primary name server is sometimes called a master server, which is the original and definitive source for all zone records for a domain.
- The secondary name server, often called a slave server, is an identical replica used to provide redundancy and high availability.
The PowerDNS recursor, on the other hand, simply provides caching or a standalone recursive resolver for clients accessing your network or the greater Internet (i.e., it is your first line of DNS for client machines). Recall that it isn't authoritative but simply provides query resolution to the network client resolver (the client-side portion used to perform DNS queries) on your local machine. The PowerDNS recursor supports:
- All relevant standards
- Advanced anti-spoofing measures
- Reconfiguration without downtime
- Plain BIND zone files for "resolved hosting"
- Question interception, answer reconditioning, NXDOMAIN redirection (including "block lists" and security measures)
- The
rec_controlutility, an API for direct control of the PowerDNS recursor and for data output to MRTG and RDD for pretty network graphs - Local and remote access
- DNS64
Another PowerDNS component is the supermaster/superslave feature set, which allows you to automate the provisioning of slaves. Superslaves can configure themselves automatically as a slave for a zone when they receive notification from a known supermaster.
PowerDNS Back Ends
It is important to note that PowerDNS has many back-end configuration options to hold zone data. It can use static BIND compatibility configuration files or a number of popular databases – so many, in fact, that one could easily write an entire book on each. As such, I will limit my coverage herein to its use with a PowerDNS server with BIND-compatible configuration and a MySQL back end with the Poweradmin [4] web GUI configuration. Because of scope constraints and the well-documented nature of the project, I'm sure you will be able to build configurations as needed.
Installing and Patching Ubuntu Server
For this portion of the article, I'll assume you've installed Ubuntu Server 12.04 LTS and updated and patched fully with:
sudo aptitude update && aptitude dist-upgrade
Moving forward, I want to automate updates for my PowerDNS server. To do so, I will use the unattended-upgrades package for Ubuntu Server 12.04 LTS:
sudo aptitude install unattended-upgrades
If you chose to load security updates when setting up Ubuntu, this package will already be installed. Configure it by uncommenting and changing the items in Listing 1 in the configuration file.
Listing 1: Configuring unattended-upgrades
primary:~$nano /etc/apt/apt.conf.d/50unattended-upgrades
// Automatically upgrade packages from these (origin:archive) pairs
Unattended-Upgrade::Allowed-Origins {
        "${distro_id}:${distro_codename}-security";
        "${distro_id}:${distro_codename}-updates";
// Send email to this address for problems or packages upgrades
// If empty or unset then no email is sent, make sure that you
// have a working mail setup on your system. A package that provides
// 'mailx' must be installed. E.g. "user@example.com"
Unattended-Upgrade::Mail "username@yourdomain.com";
Next, edit the file /etc/apt/apt.conf.d/10periodic to check for updates once a day:
APT::Periodic::Update-Package-Lists "1";
APT::Periodic::Download-Upgradeable-Packages "1";
APT::Periodic::AutocleanInterval "7";
APT::Periodic::Unattended-Upgrade "1";
Be aware that all unattended upgrades are logged in /var/log/unattended-upgrades, so you might want to review it periodically, along with your other logs. Additionally, you could do much the same with the commercial, and more feature-rich, Ubuntu Landscape. Now that the base system is set, you can fire up your first install of PowerDNS.
Installing the PowerDNS Recursor
For this article, I'll assume Ubuntu Server 12.04 LTS is placed in my local LAN behind a firewall. I am placing this server behind my hardware firewall on an internal network because making a caching server available on the public Internet is as unwise as doing so with a proxy or open mail relay. Installing is as easy as entering:
sudo apt-get install pdns-recursor
Now I need to customize my configuration file by editing /etc/powerdns/recursor.conf. For brevity's sake, I only include the configuration variables I have changed herein (Listing 2). With my modified recursor.conf file, I restart my pdns-recursor:
sudo service pdns-recursor restart
Ubuntu has moved to Upstart instead of using SysVinit, so rather than the old school method of /etc/init.d start/stop/restart, I now use Upstart with the syntax sudo service <servicename> stop/start/restart.
Listing 2: Customizing recursor.conf
allow-from=192.168.1.0/24
# The 'allow-from' address specifies the network address space you want to service queries to with your PowerDNS recursor. Note you can use comma- separated individual IPs or networks in CIDR notation.
#
local-address=192.168.1.10
# 'local-address' specifies the address or addresses on which the recursor is to listen for queries.
#
version-string=Wait, this ain't no host file
# Give out bogus version information when queried with 'dig @ns1.example.com -c CH -t txt version.bind'. I'd rather add some mystery. =)
rec_control
A bundled program, rec_control, lets you interact and control the PowerDNS recursor, which you can use to get statistics, check the status of the recursor, or even shut down the recursor. In this example,
$ sudo rec_control ping
$ sudo rec_control get-all
$ sudo rec_control get variable
$ sudo rec_control quit
the commands (1) test if the server is up, (2) grab variable statistics, (3) grab a specific variable, and (4) quit PowerDNS. Note that you can query many variables with rec_control, which you can use for RDD graphing.
As I said before, PowerDNS supports a variety of back-end databases to hold zone data. Often, PowerDNS is configured with a database back end (MySQL, PostgreSQL, Microsoft SQL Server, Oracle, Sybase) and not flat text files (BIND back end).
In the first part of this article, I will explore using a BIND-compatible configuration for the situations in which you might not want to use a database. For example, a small organization might already be comfortable with a BIND configuration or not want the complexity of maintaining a database for DNS, or maybe you are in transition from BIND to PowerDNS.
Whatever the reason, PowerDNS has an easy way for you to use your existing BIND master zone configuration files to configure your PowerDNS server. In the second part of this article, I will cover the use of PowerDNS with a MySQL back end.
I. PowerDNS Authoritative Server (BIND-Compatible)
In this setup, you would create two servers (or even VM or cloud instances) for your primary and secondary servers in your DMZ for publicly accessible services. To begin, you need to install PowerDNS on your primary or master server:
sudo apt-get install pdns-server
The example PowerDNS primary DNS server configuration in /etc/powerdns for example.com is shown in Listing 3. (For simplicity, the example omits the reverse DNS zone, but I recommend you create it. Unlike the forward zone, which maps the hostname to the IP address, the reverse zone maps the opposite – IP address to hostname.)
Listing 3: Primary DNS Server Configuration
sudo nano example.com.zone
example.com. 84600    IN   SOA    ns1.example.com.  hostmaster.example.com. (
    2013062901    ; serial
    21600         ; refresh (6 hours)
    900           ; retry  (15 minutes)
    604800        ; expire (1 week)
    3600          ; minimum (1 hour)
    )
                  NS  ns1.example.com
                  NS  ns2.example.com
                  MX  10 mail.example.com
ns1               A  192.168.1.10
ns2               A  192.168.1.11
mail              A  192.168.1.13
www               A  192.168.1.14
Many network services and applications require reverse zone mapping, so it is a good idea to add it. Now, create a slimmed-down version of an old favorite, named.conf (BIND configuration file), in /etc/powerdns containing the bare essentials (Listing 4).
Listing 4: bindbackend.conf
sudo nano bindbackend.conf
options  {
    directory "/etc/powerdns";
};
zone "example.com" {
    type master;
    file "example.com.zone";
};
PowerDNS Configuration File
General PowerDNS service is governed by a single configuration file, /etc/powerdns/pdns.conf, to which you need to add the lines in Listing 5. When properly configured, enter
sudo service pdns restart
to restart your PowerDNS service.
Listing 5: pdns.conf Additions
allow-axfr-ips=192.168.1.11
# IP Address allowed to perform AXFR.
#
bind-check-interval=300
# Tell server how often to check for zone changes.
#
launch=bindbind-config=/etc/powerdns/bindbackend.conf
# Tell PowerDNS to launch with BIND back end using the specified configuration file.
#
local-address=192.168.1.10
# Specifies the local IP on which PowerDNS listens.
#
master=yes
# Tells PowerDNS to run this as the primary server. This primary server will send out a special notify packet to notify the secondary or slave of updates.
#
setgid=pdns
# Sets Group ID to pdns for improved security
#
setuid=pdns
# Sets user id to pdns for improved security
#
version-string=anonymous
# No server version is divulged via dig query (e.g., dig @ns1.example.com -c CH -t txt version.bind). I'd rather make script kiddies work harder. =)
Secondary Server (BIND Back End)
To get your configuration going, you first need to install PowerDNS on the secondary, or slave, server:
sudo apt-get install pdns-server
Just as with the primary sever, you create a slimmed-down version of named.conf (the old BIND configuration file), in /etc/powerdns/bindbackend.conf, containing only the bare essentials:
sudo nano bindbackend.conf
options  {
      directory "/etc/powerdns";
};
zone "example.com" {
      type slave;
      file "example.com.zone";
      masters { 192.168.1.10; };
};
Note that because you are running with the setgid/setuid of the pdns user on the slave server, you need to change owner and group to that user:
sudo chown -R pdns:pdns /etc/powerdns
To configure a secondary DNS server with a BIND back end (BIND-compatible text configuration files), you need to add the lines in Listing 6 to pdns.conf (located in /etc/powerdns). Finally, you want to HUP or restart the PowerDNS service:
sudo service pdns restart
Once you have the servers up and running, you can dig query them to check the records and take a peek at /var/log/syslog to assure they are indeed talking. (See the box "Testing the PowerDNS Server.) Now, go ahead and experiment with your newly created domain. As with the recursor, PowerDNS has even more tools and utilities on offer, and pdns_control is among them (Table 2).
Listing 6: Secondary DNS Server Configuration
launch=bind
bind-config=/etc/powerdns/bindbackend.conf
# Tell PowerDNS to launch with BIND back end using the specified   configuration file
#
bind-check-interval=300
# Tell server how often to check for zone changes
#
local-address=192.168.1.11
# Specifies the local IP on which PowerDNS listens
#
setgid=pdns
# Sets Group ID to pdns for improved security
#
setuid=pdns
# Sets user id to pdns for improved security
#
slave=yes
# Variable identifies this server as a secondary or slave server
#
version-string=anonymous
# No server version is divulged via a dig inquiry   (e.g., dig @ns1.example.com -c CH -t txt version.bind). Oh, the mystery!
Tabelle 2: Using pdns_control
|
Action |
Command |
|---|---|
|
Test to see whether the server is alive |
|
|
Purge the cache entries |
|
|
Inform the back ends that contents of the domains have changed |
|
|
Show usage statistics |
|
|
Show a specific statistic (use |
|
|
Restart a PowerDNS instance |
|
II. PowerDNS Authoritative Server (MySQL Back End)
As stated before, PowerDNS supports an outstanding array of databases to hold zone data; however, I will limit my coverage for the remainder of this article to its use with a primary server with a MySQL back end with the Poweradmin web GUI.
The example environment will be built upon Ubuntu Server 12.04 LTS Precise Pangolin, and I'm assuming you have built your server and patched it as described above before continuing with the rest of this exercise:
Creating a Master DNS Server
To get your configuration going, you need to install PowerDNS on your primary or master server by modifying the lines shown in Listing 7 in /etc/powerdns/pdns.d/pdns.local.gmysql. Finally, you want to restart your PowerDNS service with:
sudo service pdns restart
With a base PowerDNS configuration and your servers up and running, you can now install your packages and set up your MySQL back end. (Also see the box "Testing the PowerDNS Server.)
Listing 7: Creating a Master DNS Server
#
# MySQL back end configuration
#
launch=gmysql
# Tells our PowerDNS server we are using MySQL backend
config-dir=/etc/powerdns/pdns.d/
# Specifies our configuration file
gmysql-host=127.0.0.1
# Configures the IP address that PowerDNS will listen on gmysql-user=puser
# Our configured PowerDNS username
gmysql-password=pleasepickastrongpassword
# This is our MySQL password. Please, for the love of all that is sacred, stop using weak passwords!
gmysql-dbname=pdns
# This details which MySQL database PowerDNS should use.
local-address=192.168.1.10
# Specifies the local IP for PowerDNS to listen on.
master=yes
# This tells PowerDNS to run this as the primary server. This primary server will send out a special notify packet to notify the secondary or slave of updates.
setgid=pdns
# Sets Group ID to this one for improved security
setuid=pdns
# Sets user id to this for improved security
version-string=Hostfile 0.1 Alpha
# Bogus server version is divulged via dig quiry, such as dig @ns1.example.com -c CH -t txt version.bind. There is no security through obscurity, but there is certainly absurdity... =P
MySQL Database
To begin, simply install MySQL with the command:
primary:~$sudo apt-get install mysql-server mysql-common
As part of the installer, you will be asked to set your MySQL root passwords. Please choose a strong password. Your yet-to-be-configured server needs a bit of tweaking before you can add databases and users, so navigate over to edit /etc/mysql/my.cnf in your favorite text editor. In this case, you are going to change the address to which the MySQL servicer listens on your server localhost:
Bind-address = 127.0.0.1
Now you can connect to your newly minted MySQL server and begin configuring it:
primary:~$mysql -h localhost -u root -p
Next, create and configure a MySQL database,
create database pdns;
then add a user that will have access to that database:
GRANT ALL ON pdns.* TO 'puser'@'localhost' IDENTIFIED BY 'pleasepickastrongpassword';
GRANT ALL ON pdns.* TO 'puser'@'localhost.localdomain' IDENTIFIED BY 'pleasepickastrongpassword';
FLUSH PRIVILEGES;
Now you can create the database required for your install of PowerDNS (Listing 8). Of course, you can do much more to secure MySQL [5], but for the sake of brevity, I don't include much detail. Like any other application, it needs some extra attention to improve security from its default installed state.
Listing 8: Creating the Database
use pdns;
create table domains (
  id              INT auto_increment,
  name            VARCHAR(255) NOT NULL,
  master          VARCHAR(128) DEFAULT NULL,
  last_check      INT DEFAULT NULL,
  type            VARCHAR(6) NOT NULL,
  notified_serial INT DEFAULT NULL,
  account         VARCHAR(40) DEFAULT NULL,
  primary key (id)
) Engine=InnoDB;
CREATE UNIQUE INDEX name_index ON domains(name);
CREATE TABLE records (
  id              INT auto_increment,
  domain_id       INT DEFAULT NULL,
  name            VARCHAR(255) DEFAULT NULL,
  type            VARCHAR(10) DEFAULT NULL,
  content         VARCHAR(64000) DEFAULT NULL,
  ttl             INT DEFAULT NULL,
  prio            INT DEFAULT NULL,
  change_date     INT DEFAULT NULL,
  primary key(id)
) Engine=InnoDB;
CREATE INDEX nametype_index ON records(name,type);
CREATE INDEX domain_id ON records(domain_id);
create table supermasters (
  ip         VARCHAR(64) NOT NULL,
  nameserver VARCHAR(255) NOT NULL,
  account    VARCHAR(40) DEFAULT NULL
) Engine=InnoDB;
quit;
Poweradmin
At this point, you could manage this PowerDNS configuration back end in many ways. Unlike simple text-file-based configuration (the BIND-compatible back end covered in the first part of this article), you would have to use any number of database management tools, bake your own scripts, or use a web administration interface. Generally, if you don't plan to script or code your own solution, going with a web GUI is a good choice. A graphical interface has many benefits: easing administration, encouraging proper syntax, and decreasing syntactic errors.
Poweradmin is an open source, friendly, and easy-to-use web GUI for PowerDNS that supports key features. With this feature-rich web application, you will be managing your DNS environment in no time flat. However, before starting, you need to install it. Like most applications, it has a few prerequisites:
- MySQL or PostgreSQL
- Apache
- PHP
-
session,gettext,mcryptPHP modules -
PEAR,PEAR::MDB2 - GNU
gettext
Because a nifty Poweradmin package is lacking, you have to install the prerequisites and then grab the binaries:
primary:~$sudo apt-get install apache2 libapache2-mod-php5 php5 php5-common php5-curl php5-dev php5-gd php-pear php5-imap php5-mcrypt php5-common php5-ming php5-mysql php5-xmlrpc gettext
primary:~$sudo pear install MDB2
primary:~$sudo pear install MDB2_Driver_mysql
Now that you have your prerequisites, you can install the Poweradmin application itself :
primary:~$cd /tmp
primary:~$wget https://github.com/downloads/Poweradmin/Poweradmin/Poweradmin-2.1.6.tgz
primary:~$tar xvfz Poweradmin-2.1.4.tgz
primary:~$mv Poweradmin-2.1.4 /var/www/Poweradmin
primary:~$touch /var/www/Poweradmin/inc/config.inc.php
primary:~$chown -R www-data:www-data /var/www/Poweradmin/
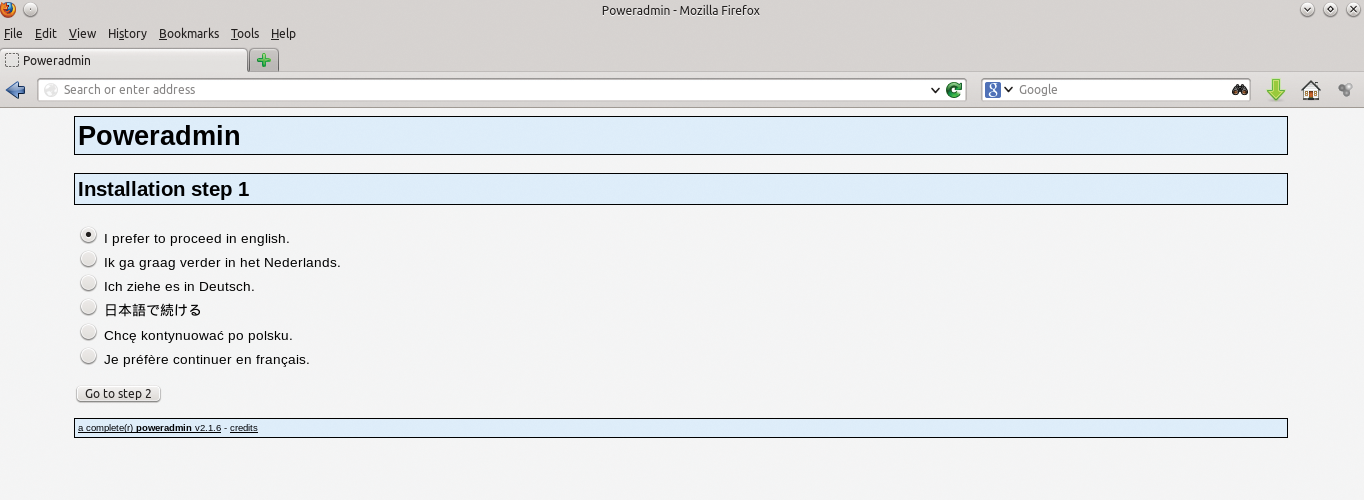
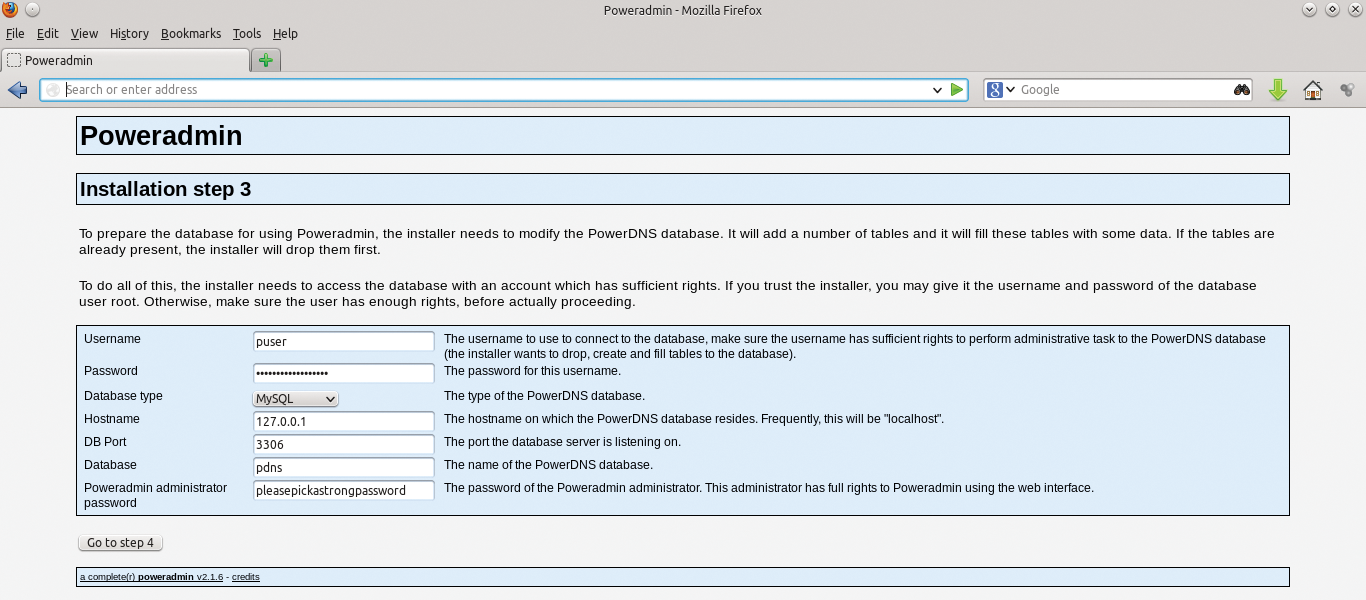
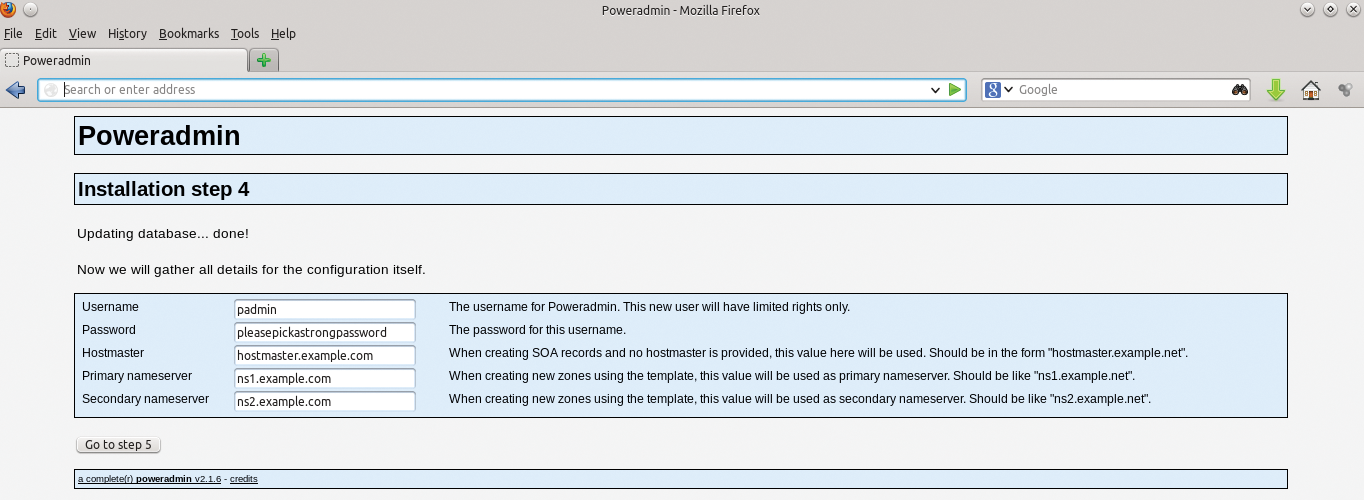
Note that I've only highlighted the steps that might require some user customization. Obvious steps (shown in Figures 1-4) were explicitly excluded. Once you've set up Poweradmin, you can fire up the browser of your choice and connect to http://primary/Poweradmin/install/index.php.
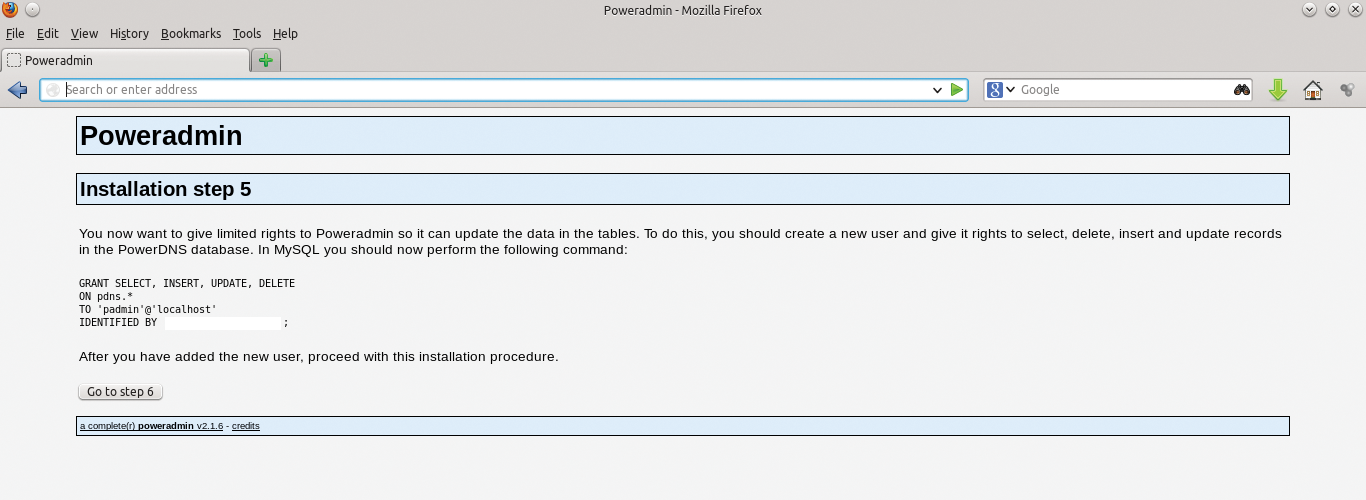
For Poweradmin to update data in the tables, you need to give it some limited rights. To do this, you should create a new user and give it rights to select, delete, insert, and update records in the PowerDNS database. After you have added the new user, go back to MySQL and execute:
primary:~$mysql -h localhost -u root -p
use pdns;
GRANT SELECT, INSERT, UPDATE, DELETE
ON pdns.*
TO 'padmin'@'localhost'
IDENTIFIED BY 'pleasepickastrongpassword';
quit;
Once you are finished with the initial setup, you should do one more thing for security's sake,
primary:~$rm -fr /var/www/Poweradmin/install/
which removes the install directory.
Like other PHP-based web applications, Poweradmin has a core configuration file that you can edit and customize to your heart's content in the file /var/www/Poweradmin/inc/config.inc.php. If you want to further customize your config file, you can edit this or explore the rest of this application's subdirectories.
Logging In to Poweradmin
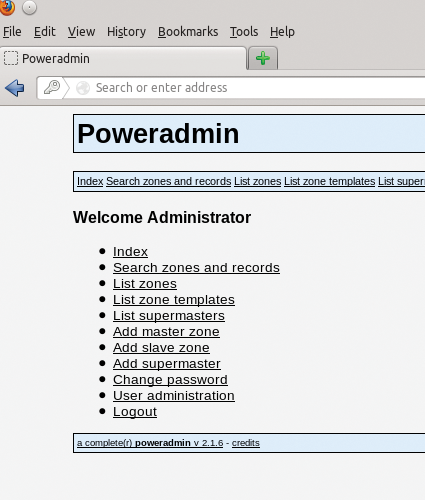
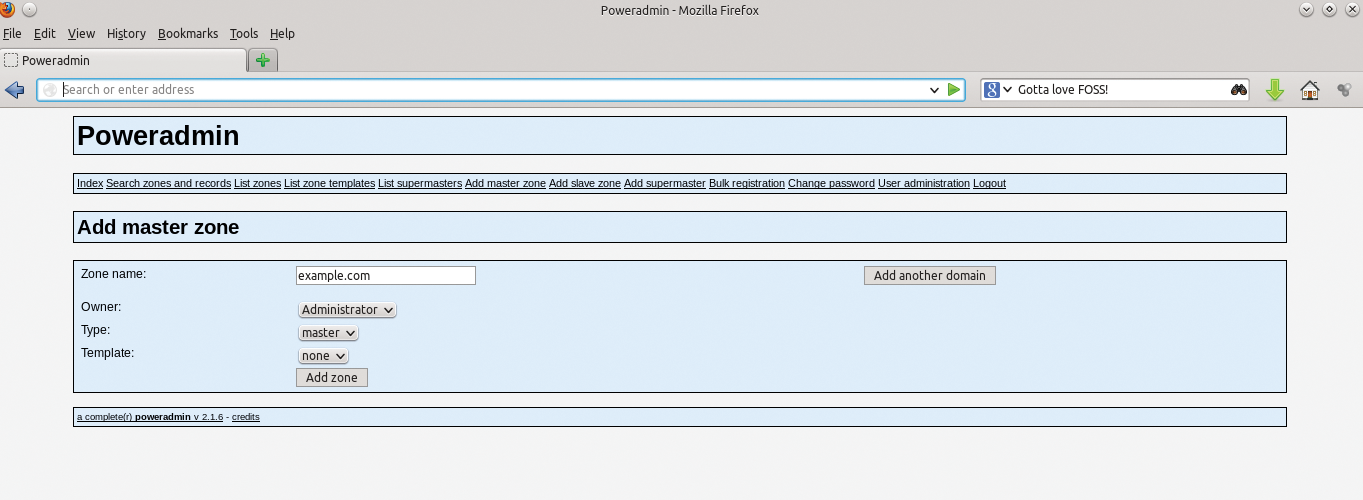
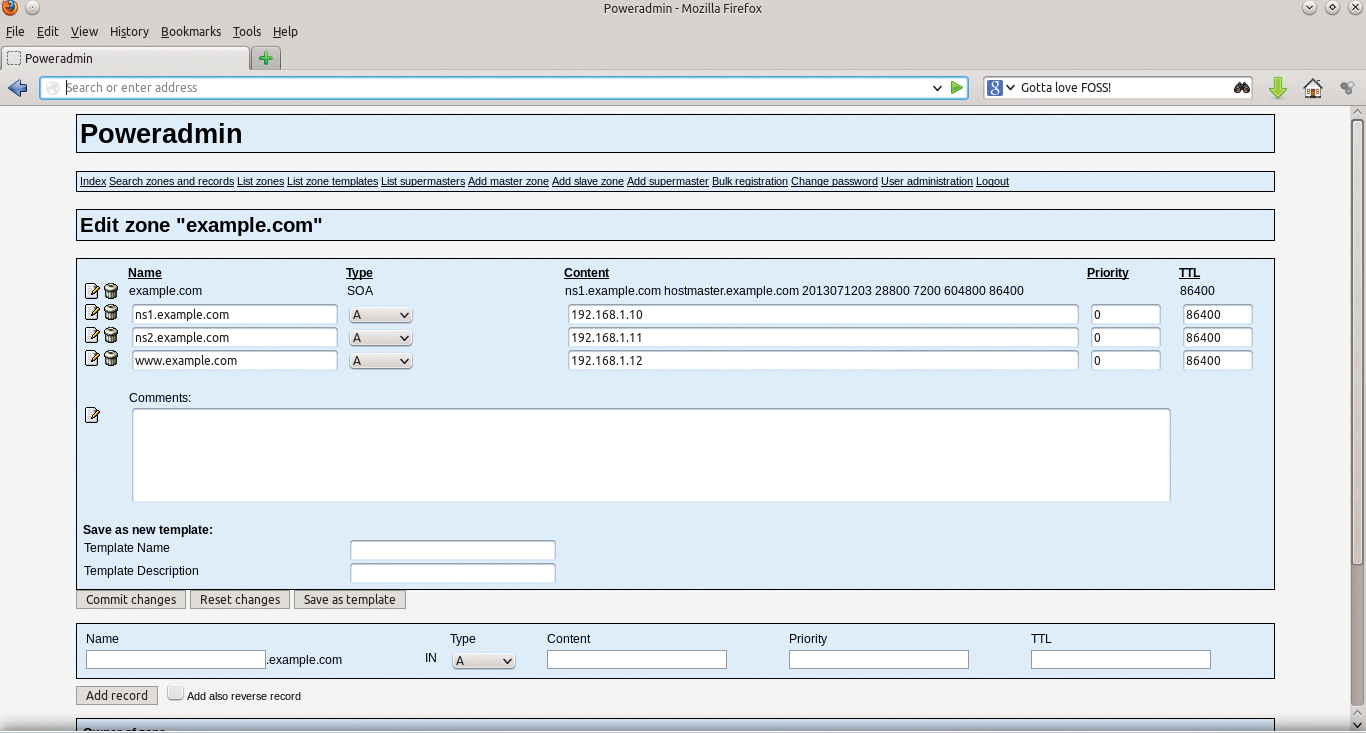
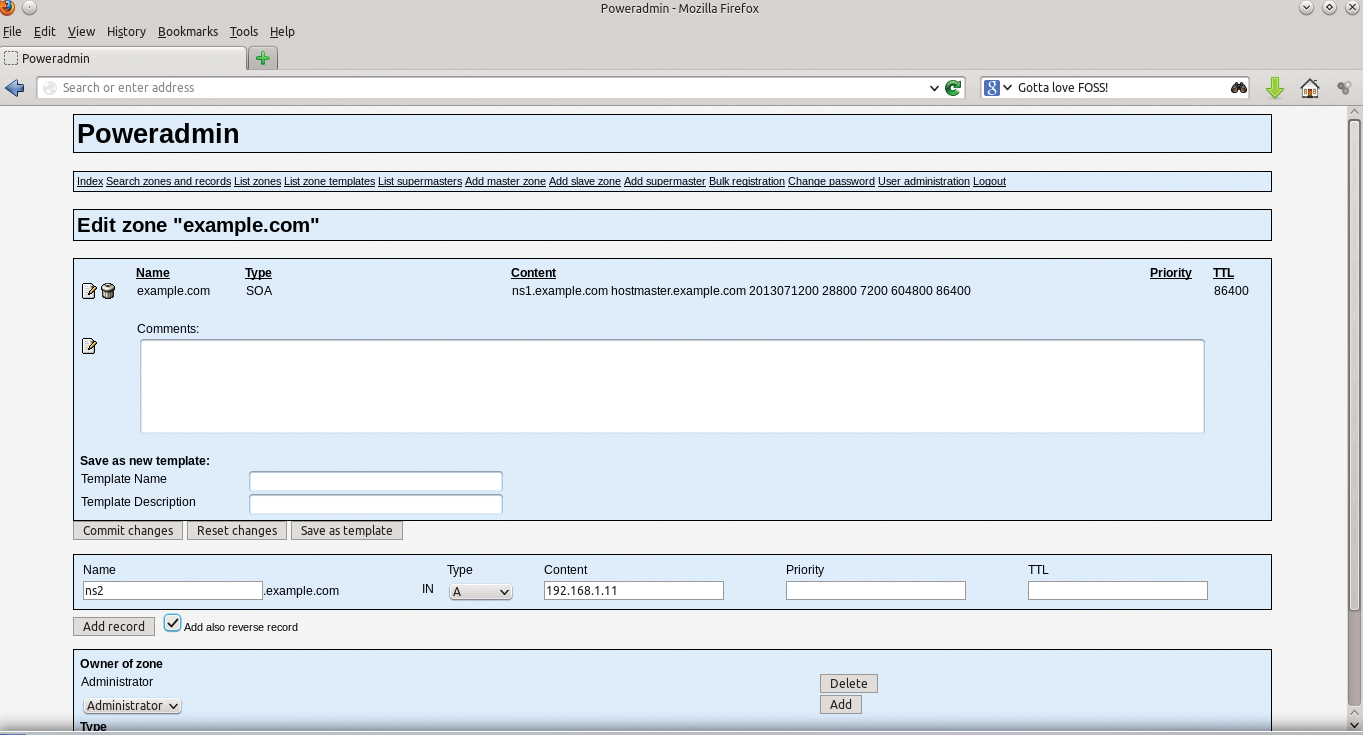
To access your Poweradmin server, go to http://primary/Poweradmin/index.php. Once there, you should add your master zone by clicking Add master zone in the initial login screen (Figure 5), add the information required for your base domain, and click Add zone (Figure 6). From here, click on List zones (Figure 7) and then Edit an existing example.com zone, as in Figure 8. As you can see, the GUI is very simple and will guide you through the process of creating your basic required DNS records. Once done, go back to the same domain and add any additional records you would like.
Redundancy
Redundancy is a must. Like any service as vital as DNS, you should build redundancy into your infrastructure – which means at least two or more of everything – or else you will need much more than two aspirins to deal with the headaches caused by downtime. In the case of PowerDNS, that means two or three DNS servers. If you are using a database back end, you should not have a single back end for your entire infrastructure; rather, you should match them up with one back end per PowerDNS server.
DNS and Security
DNS is a commonly exploited service, which means you need to take your time in the engineering stages to deploy it properly. Unfortunately, DNS has supernumerary attack vectors. The risks to a service as critical as DNS to the functioning of your network are many, but you can take some simple steps to ameliorate this:
Patch, Patch, Patch. As silly as it sounds, some people don't believe or invest in automating patch management; however, doing so will solve quite a few issues.
Split Servers Across Networks. Placing all your DNS servers on a single network space could be highly problematic if that core router dies or that network suffers a distributed denial of service attack. Split your servers across several, properly redundant and fault-tolerant network/server infrastructures.
Set Up Firewalls. Although firewalls are by no means perfect, they are still good practice. Firing up iptables on your DNS box will at the very least add additional layers to keep out those with malicious intent. Besides, thinking about ingress and egress rules with network services is always a good discipline. One option in Ubuntu is to use its "uncomplicated firewall" tool, which helps you create iptables rules in a rather simple fashion. For my example, I create the following uncomplicated firewall rules:
sudo ufw enable
primary:~$ufw logging on
primary:~$ufw default deny
primary:~$ufw allow 22/tcp
primary:~$ufw allow 80/tcp
primary:~$ufw allow 53/udp
primary:~$ufw allow 53/tcp
primary:~$ufw status
Of course, if you are more comfortable doing this with iptables, go right ahead. More stringent rules might be in order, depending on your environment and goals.
Explore and Deploy TSIG/TKEY and DNSSEC. Use TSIG/TKEY [6] [7] for securing zone transfers and deploy DNSSEC [8] to help protect against cache poisoning. Copious documentation [9] is available on these features.
I'm a big proponent of thinking of security as a priority in every aspect of Information Technology, and I see a rising consciousness of its importance. When you build with security as step 0, your problem set is reduced dramatically.
Creating Secondary (and Tertiary) Servers
Now that you have created a primary server and it is up and running, you have more work to do to create true redundancy. As I said before, having any single point of failure (SPOF) is always unwise. To that end, you have a number of ways to create a secondary server. Because of scope constraints and the well-documented [10] [11] nature of the project, I'm sure you will be able to add secondary and tertiary servers as needed.
PowerDNS Community and Support Options
As with most open source projects, support is available along many avenues. PowerDNS is supported by its community via mailing lists, forums, IRC [12], an ecosystem of partners and professional service organizations, and even direct commercial support from PowerDNS BV [13]. Often, commercial backing helps breathe life, at least in the form of resources and community support, into an open source project; this is certainly the case with PowerDNS. High-quality community and corporate support make this project great for users of any stripe – corporate or otherwise. Open source projects thrive when individuals become involved, and PowerDNS has a host of opportunities, including:
- Reviving OS X support
- Resolving Solaris package problems
- Testing back ends
- Writing regression tests [14]
- Collecting and documenting the plethora of web front ends
- Managing tickets: verifying that bugs reported for old versions still apply to new versions, making unclear tickets clear, and writing patches
- Choosing among the many other to-do list items [15]
If you are so inclined, these tasks offer a great way to get involved in a cool FOSS project. Learning opportunities abound, and your contributions will improve the critical infrastructure of today's Internet.
I hope this short article whets your appetite to explore this powerful, feature-rich, and flexible DNS software. Happy Hacking!
