Dealing with VHDX files
Modern Art
Hyper-V virtual hard disk (VHDX) files not only have more capacity than the standard VHD files, they are also far less likely to be corrupted as the result of a server failure or hard reset. VHD files can be destroyed very quickly when the host system encounters problems – but not so with VHDX files. If you use Windows Server 2012, you normally create VHD files as an iSCSI target; Windows Server 2012 already supports VHDX files but can only use them with Hyper-V, not iSCSI, targets.
Now Available for iSCSI
The new Windows Server 2012 R2, however, can use VHDX disks as iSCSI targets. The VHDX hard drives you create also can be managed directly in the System Center products as of Windows Server 2012 R2 and System Center 2012 R2. Windows Server 2012 R2 provides the option of assigning the disk to multiple virtual servers. Shared VHDX technology primarily offers benefits in operations with Hyper-V R2 2012.
Also new in Windows Server 2012 R2 is the option to change the size of virtual hard disks on the fly, but you need to shut down the associated virtual server in Windows Server 2012. Also, you can now export and copy virtual servers on the fly in Windows Server 2012 R2.
Using VHDX Files
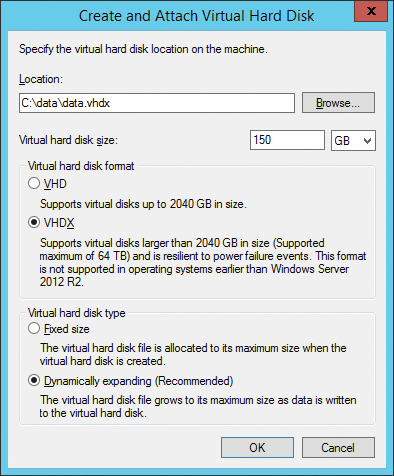
To manage virtual hard disks outside of Hyper-V, right-click Disk Management and choose Create VHD, which starts the wizard. In the wizard, you need to decide where you want to save the VHDX file on your hard drive and what size the hard disk should be. At this point, you also determine whether the disk can grow or whether you want to use a fixed size.
If you select Attach VHD, you can connect an existing disk to the computer (Figure 1). You can double-click a VHD(X) file to this, too. After you have created the virtual hard disk, Windows displays it in Disk Management, and you can manage it like any other disk.

If you still use VHD files, you can convert these to VHDX files with the Hyper-V Manager or the Convert-VHD PowerShell cmdlet. In Hyper-V Manager, click the Edit Disk action to launch the corresponding wizard. Load the VHD file and start the conversion in the wizard by choosing Convert.
Converting
In the scope of the conversion, you can select the disk format and also change the disk type (i.e., Fixed size or Dynamically expanding). The Convert-VHD cmdlet is available after installing Hyper-V on Windows 8, as well.
One of the advantages of cmdlets is the ability not just to convert files VHD files to VHDX files but also to convert the opposite direction. Thus, you can benefit from the advantages of the new format but revert in case of emergency (e.g., you need to mount a virtual hard disk on another system some time later). The syntax is very simple:
Convert-VHD -Path <Path to VHD(X) file> -DestinationPath <path to target file>
It is also possible to change the type of hard disk, for example, to a differencing disk:
Convert-VHD -Path <Path to VHD/VHDX file> -DestinationPath <target path and file> -VHDType Differencing -ParentPath <parent disk>
or a dynamic disk:
Convert-VHD -Path hd1.vhd -DestinationPath hd1.vhdx -VHDType Dynamic
You will find all the options for this cmdlet on Microsoft's TechNet site [1]. Besides using PowerShell to convert hard disk formats, you can customize the hard disk size with the Resize-VHD cmdlet:
Resize-VHD -Path c:\vm\owa.vhdx -SizeBytes 1TB
In addition to these special tasks, you can simply use New-VHD to create new disks and Get-VHD to display information about the hard disks. Virtual hard disks can be connected directly to virtual servers in PowerShell with:
Add-VMHardDiskDrive -VMName <VM> -Path <VHDX file>
Of course, you can connect virtual hard drives to the host system. For example, to copy data and integrate it with the virtual server, issue:
Mount-VHD <VHD file>
The Dismount-VHD cmdlet disconnects the virtual disk from the system.
Microsoft helps administrators migrate virtual servers from VMware vSphere to Hyper-V with the free Microsoft Virtual Machine Converter [2]. The current version is already optimized for Windows Server 2012 and Hyper-V Server 2012, but it does not support the new VHDX disk format of Windows Server 2012 as yet.
However, with Hyper-V Manager – or with Convert-VHD – you can convert the VHD file that is created to a VHDX disk. System Center Virtual Machine Manager 2012 with SP1 can convert VHDX hard disks from Hyper-V 3.0 and VHD files to VHDX format.
Adding to Servers
Virtual hard drives can be attached to virtual SCSI controllers on the fly, but to build a virtual SCSI controller, you need to shut down the virtual server.
To add a new hard disk, right-click the virtual server and select Settings. Select the controller to which you are connecting the new virtual hard disk. Press Virtual Hard Disk and then press Add. Select the option Virtual hard disk and press New to launch the wizard for a new hard disk.
Confirm the wizard's welcome page, and select the format for the new hard disk, that is, VHD (up to 2TB) or VHDX (up to 64TB). Next, you can choose whether the hard disk has a Fixed size, is Dynamically expanding, or extends an existing hard drive (Differencing).
You need to specify the name and location under which Windows Server 2012 will save the VHDX file. On the next page, decide on the size of the virtual hard disk; you can also copy the contents of a physical hard disk to the virtual disk.
You will then see a summary and can press Finish to finalize creating the virtual hard disk. Then, in the window, just press Apply to integrate the virtual hard disk with the virtual server.
Storage Migration
On Windows Server 2012 you have the option of moving the VHDs to Hyper-V hosts – even on the fly. To do this, right-click the virtual server whose disks you want to move between the Hyper-V hosts, and select the Move option.
In the wizard, you can then select Move the virtual machine's storage. On the page that follows, you can choose whether you want to move the data from the virtual server or just the virtual hard disks.
Next, select the corresponding folder in which Hyper-V will store the information for the computer. The virtual server continues to run during the process. You can see the status in Hyper-V Manager.
If you want to save the data in different folders, you can select the appropriate option and, in the next window, specify separate locations for configuration files, virtual hard disks, and snapshots.
You can save smart paging files separately. Smart paging is designed to prevent virtual servers from failing to start because the total available memory is already assigned. This new feature allows virtual servers to use parts of the host's hard disk as memory for the reboot. Again, you can move this area separately. After the successful boot, the disk space is released again and the virtual server regains its memory through dynamic memory.
Optimization
In the Actions section of Hyper-V Manager, you will find two menu items on the right Edit disk and Inspect disk. The latter lets you scan any VHD, then a new window with the data for the hard disk opens. This tells you whether it is a dynamically expanding or fixed-size hard disk.

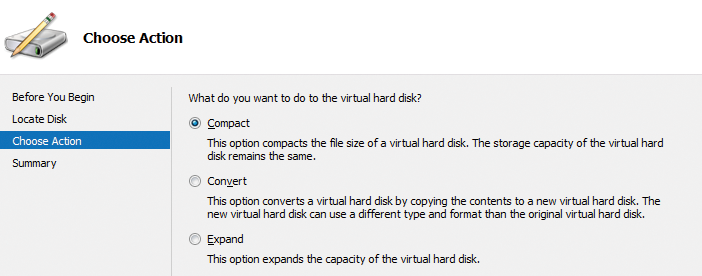
The window displays the maximum size and the current amount of data. Edit disk offers a variety of options (Figure 2):
- Compact is only available for dynamically expanding disks. The operation deletes empty areas in the VHD(X) file making it significantly smaller. However, this is only useful if you have previously deleted a large volume of data from the disk.
- Convert converts dynamically expanding disks into fixed-size hard disks and vice versa.
- Expand allows you to increase the maximum disk space available to a VHD(X) file.
- Merge is only displayed if you select a differencing disk, such as the AVHD(X) file of a snapshot. Because this file only contains the changes stored in the differencing disk, the data can be merged with the VHD(X) source file to create a common denominator VHD(X) file that contains all the data. The two source disks are preserved in this process; the wizard creates a new virtual hard disk.
- Reconnect is displayed for differencing disks whose source VHD(X) file is unknown, which you must specify. However, one differentiating disk can reference another differentiating file that in turn references the VHD(X) file in a long chain. This situation can occur if several snapshots build on each other. Note that if the chain is destroyed, for example, because the path of a disk has changed, the connection cannot be restored with this option.
