Hands-on Exchange rights management
Rigorous Rights
Starting with Exchange 2013, Microsoft changed its messaging server to role-based access control (RBAC). Among other things, this approach makes it easier for Windows administrators to manage user rights.
Two types of roles can be assigned: end user and administrator. Administrator roles include permissions that can be assigned to administrators who manage a particular area of the Exchange organization. If a user is a member of several role groups, Exchange grants the user the privileges of these groups.
End-user roles begin with a prefix of My. For example, members of the MyDistributionGroups user role are allowed to create their own distribution groups and delete their own groups. This is not always desirable in an enterprise environment. By modifying the permissions, you can revoke these rights for normal users. The easiest way is to create a new role based on the existing MyDistributionGroups user role, then revoke the rights and assign the role to your users.
For existing role groups, whether administrative or end-user, you can add or remove roles and add or remove members.
When you copy a role group, you create a new name and optionally add or remove roles to the new group, all without affecting the original role group.
For standard groups, it makes sense to make copies before you change the groups.
In Exchange Server 2013, the administrative role groups are located in the Permissions area. The Get-RoleGroup commandlet (cmdlet) lets you check out the various groups in the management shell. Get-RoleGroupMember shows the members of a group (e.g., Get-RoleGroupMember "Organization Management"). To add a user to a group, you can use the Exchange Management Console (Figure 1) or the Exchange Management Shell:
Add-RoleGroupMember "<management role group>" -Member "<UserMailbox>"
To remove members from a management role group, you also use the Exchange Management Console or issue the following Exchange Management Shell cmdlet:
Remove-RoleGroupMember "<management role group>" -Member "<UserMailbox>"
If you click on a group in the management console, you can see on the right-hand side which rights the group has and which members are assigned to it. To add a user to a group, double-click the group. You can then add new Members or removing existing ones.
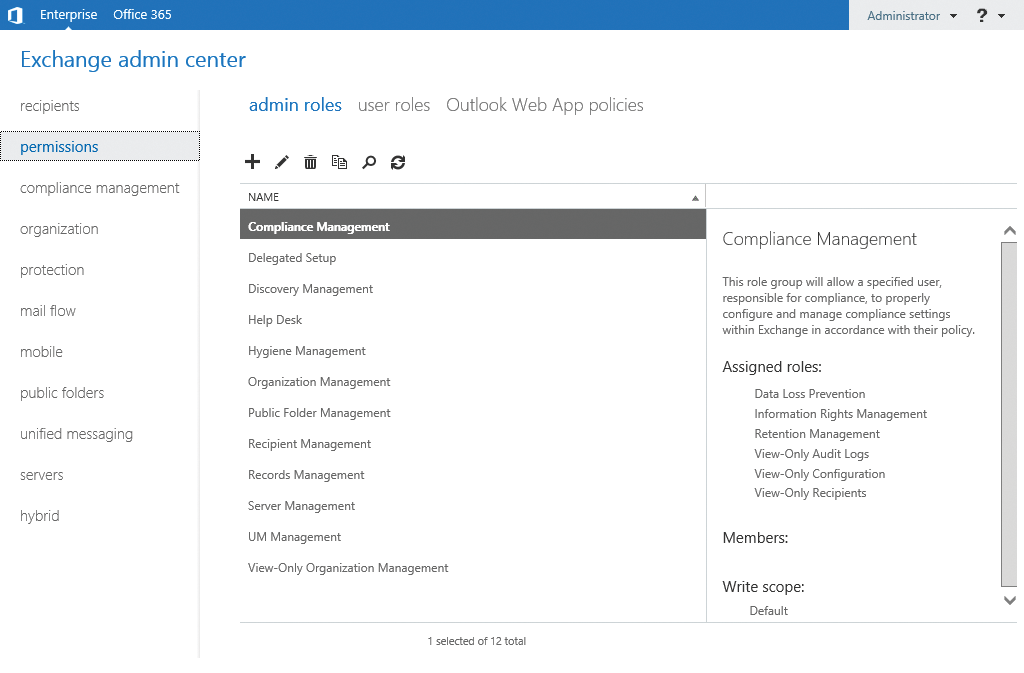
Management roles summarize the cmdlets used to manage Exchange components (Figure 2). Users who are members of a management role group are allowed to use the cmdlets stored in the administrative roles, which in turn are part of the management role groups.

Delegating Maintenance
Management role group substitutes can add or remove members from management role groups and modify the properties of a role group, but they do not have the right to use the functions of the management role group themselves.
The substitute configuration is handled by the ManagedBy option in the Set-RoleGroup or New-RoleGroup cmdlets. If you want to assign the user the rights to the group as well, you need to include them as a member of the role group. The ManagedBy option for the Set-RoleGroup cmdlet always overwrites the entire managed-by list for a role group.

To add individual substitutes to a role group without deleting the entire proxy list, you must save existing members, add the new member, and then save the list again (Figure 3):
1. $RoleGroup = Get-RoleGroup "<management role group>" saves the role group settings in a variable.
2. $RoleGroup.ManagedBy += <Get-User mailbox to add>.Identity adds the substitute to the role group you saved as a variable in step 1. To add a universal group, use the Get-Group cmdlet.
3. Repeat step 2 for each substitute you want to add.
4. Set-RoleGroup "<management role group>" -ManagedBy $RoleGroup.ManagedBy adds the list of variables to the real management role group.
To view the users who are allowed to manage the group, you can use the cmdlet:
Get-RoleGroup | fl ManagedBy
In addition to the default groups, you can create your own management role groups and assign users to them. New management role groups are created with the New-RoleGroup cmdlet (Listing 1).
Listing 1: New Management Role Group
New-RoleGroup -Name "Contoso Recipient Management" \
              -Roles "Mail Recipients", "Distribution Groups", "Move Mailboxes", "UM Mailboxes", "Reset Password" \
              -CustomRecipientWriteScope "Contoso Users", \
              -ManagedBy "Thomas", "Tami", "Fynn" \
              -Members "Stefan", "Marc", "Marco", "Hans", "Michael"
If you want to create role groups that apply limited rights, you can copy existing role groups. Again, it is best to use the Exchange Management Shell for the copy.
In the first step, save the role group in a variable:
$RoleGroup = Get-RoleGroup "<group to copy>"
To create a new role group, add the role group members and define who can delegate the new role group to other users with:
New-RoleGroup -Name "<new role group>" \
              -Roles $RoleGroup.Roles \
              -Members <Member1>, <...> \
              -ManagedBy <User1>, <User2>, <...>
For example, you can copy the Organization Management role group with
$RoleGroup = Get-RoleGroup "Management"
New-RoleGroup "Limited Management" \
              -Roles $RoleGroup.Roles-Members Thomas, Michael, Hans-ManagedBy Jean, Fritz
to create a new group with fewer rights.
RBAC Manager
If you want a more convenient management option, the RBAC Manager [1] is your choice. It requires no installation and comprises a single EXE file and an XML control file. If the Exchange Management Tools are installed on a workstation, you can use RBAC Manager on a workstation (Figure 4).
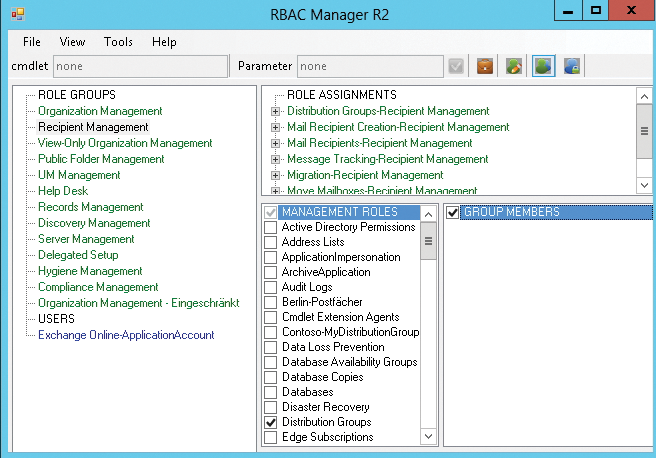
RBAC Manager lets you manage management roles, management role assignment policies, and management groups. Once the program is started, you can type the name of the server with which you want to connect and your credentials. Subsequently, the RBAC Manager connects to the Exchange organization and uses the logged-in user's rights. You have to install .NET Framework 3.5 on the server.
On Windows Server 2012, you can use the Server Manager for this. In the upper area, you can switch between managing management roles, assignment policies, management role groups, and management scopes. Role Groups let you manage the members, management roles, and role assignments.
You can create your own role groups or modify existing ones. RBAC Manager saves the changes to a logfile, which you can access from the Tools menu. In the logfile, you can see the PowerShell cmdlet that RBAC Manager uses to handle configuration tasks.
Monitoring the Management of Role Groups
In the Exchange Management Console, you can see who has made changes to the rights – that is, who has assigned administrator rights to other users – by:
- selecting Compliance management | Auditing | Run an administrator role group report,
- choosing the role group you want to monitor, and clicking Search.
In the window, you will see all the changes. In the Exchange Management Shell, you can view the administrators and their permissions. The GetEffectiveUsers option for the Get-ManagementRoleAssignment cmdlet shows you the rights:
Get-ManagementRoleAssignment -Role "<management role>" -GetEffectiveUsers
Use the call
Get-ManagementRoleAssignment -Role "<management role>" -GetEffectiveUsers | \
   Where { $_.EffectiveUserName -Eq "<username>" }
to view a specific user, or use
Get-ManagementRoleAssignment -GetEffectiveUsers | \
   Where {$_.EffectiveUserName -Eq "<username>"}
if you want to view all the management roles for a user.
End User Roles
In addition to the administrative roles for managing your Exchange server, you can also control user rights for their own mailboxes and distribution groups in Exchange. Role assignment policies let you control which users can modify configuration settings for mailboxes and distribution groups.
To view all the mailboxes that have a specific assignment policy assignment, use the Get-Mailbox cmdlet and pass the results to the Where cmdlet:
Get-Mailbox | Where {$_.RoleAssignmentPolicy -Eq "assignment policy"}
To view the assignment policy for a user account in the account's properties and change the assignment, in the Exchange Management Console, access the Mailbox Features menu. To change the default assignment policy that Exchange automatically assigns to new mailboxes, use:
Set-RoleAssignmentPolicy "<assignmentpolicy>" -IsDefault
Exchange always assigns the default policy to new mailboxes, even if it does not contain any management roles. A mailbox can only use one role assignment policy. If you want to assign different rights to certain users, you must create and assign separate role assignment policies for these mailboxes.
After creating a new role assignment policy in Permissions | User Roles, you assign it to the desired management roles. You can then assign the role assignment policy to the desired mailboxes. To change the policy for all mailboxes assigned to a particular assignment policy, use the cmdlet:
Get-Mailbox | Where { $_.RoleAssignmentPolicy -Eq "<old assignment policy>" } | \
   Set-Mailbox -RoleAssignmentPolicy <new policy>
At the end of the command, you can use the WhatIf option to see what the command would do, but without actually executing the changes.
The MyDistributionGroups management role group in Exchange Server 2010/2013 can add or remove members of certain distribution groups and remove and create distribution groups.
These are the kinds of operations that administrators might want to prevent. Often, it is sufficient for certain users to manage memberships. To view the rights for the MyDistributionGroups user role group, you can also use the Exchange Management Shell cmdlet
Get-ManagementRoleEntry -Identity MyDistributionGroups\*
although it is easier to use the RBAC Manager.
Management Role Groups
Rather than adjust the settings of existing management role groups, it is preferable to create a new management role group and assign the appropriate memberships and rights. In the Exchange Management Shell, you use the New-ManagementRole cmdlet to manage distribution groups:
New-ManagementRole -Parent "MyDistributionGroups" \
                   -Name Contoso-MyDistributionGroups
Now you can create a new group and assign the rights of the parent group to it. In RBAC Manager, right-click the appropriate group and select New Role from Here. Then enter a name. You can now adjust rights for the group by unchecking the rights from the parent role group to remove them from the child group. You can also manage rights with the Exchange Management Shell. For example, to keep users from creating and deleting distribution groups in the future, use:
Get-ManagementRoleEntry \
   -Identity "Contoso-MyDistributionGroups\New-DistributionGroup" | \
   Remove-ManagementRoleEntry
and use:
Get-ManagementRoleEntry -Identity \
   "Contoso-MyDistributionGroups\Remove-DistributionGroup" | \
   Remove-ManagementRoleEntry
After configuring the rights, you can assign them to the users in the Exchange Control Panel via the Role Assignment Policy. On Exchange Server 2013, you use the Exchange Management Console Permissions | User Roles section for this.
In the properties of the Default Role Assignment Policy, assign the newly created management role group and confirm the change. If you copied a role group, uncheck the box for the previously assigned policy and check the box for the policy you created that restricts the users' rights to those newly assigned.
Now you can use the policy to assign this management role group to all users through the RBAC Manager. Just press the Show Assignment Policies button, select the Default Role Assignment Policy, and assign the management role group you created.
Assigning the policy to the appropriate users grants them the rights you have assigned to the management role group. To discover which policy is assigned to a user, check the settings for the corresponding mailbox. On Exchange Server 2013, you will find the setting in Recipient | Mailbox Features. If you are making major changes, it is useful to restart the Exchange Server.
A naming policy for groups allows for standardization of distribution groups created by users and other administrators in your organization. You can stipulate that new distribution group names start with a specific prefix and end with a specific suffix, and you can also prohibit the use of certain words.
Ignored Policies
Group naming rules are applied to groups that are created by users. If you or other administrators use the Exchange Management Console to create distribution groups, the group naming policy is ignored.
It is best to create group naming policies in the Exchange Management Console:
- Select Groups | More | Configure group naming policies
- In the Group Naming Policy section of the dialog, configure a prefix or suffix by selecting either Attribute or Text in the appropriate drop-down box (Figure 5). After entering the desired text string, press OK. The text string entered or the selected attribute is displayed as a link. Clicking on the link lets you change the text string or the attribute.
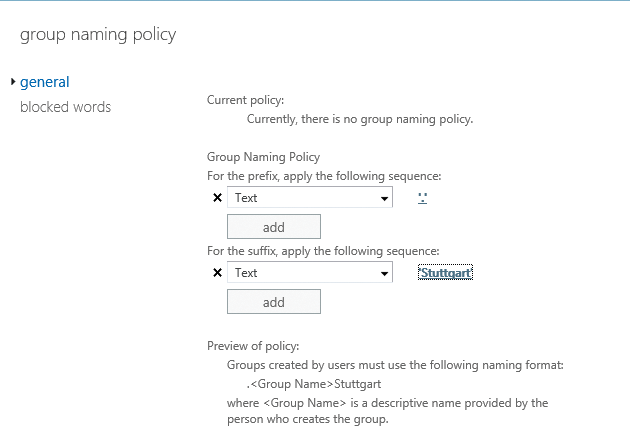
- To add more prefixes, click Add.
In the Exchange Management Shell, you can also manage the policy you created. To do this, use:
Get-OrganizationConfig | fl DistributionGroupNamingPolicy
Additionally, you can run the following cmdlet:
New-DistributionGroup -Name "<Group>" -IgnoreNamingPolicy
to override a group naming policy.
Group Memberships
The Membership approval page in the properties of distribution groups presents several configuration options that allow you to decide whether the owner's permission is required to join the group (Figure 6).
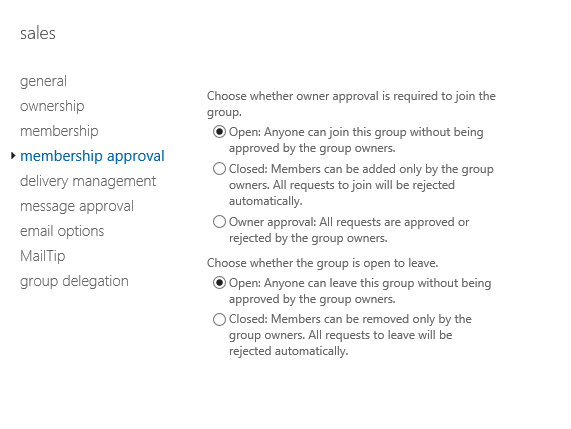
Recipients can now join distribution lists and also remove themselves from the groups by using the Outlook Web App and selecting Options | Groups.
As you can see, you have many ways to delegate rights and configure distribution groups for low-maintenance overhead after setting them up on Exchange. With a little effort and some modifications to rights, administrators can save a huge amount of time managing groups of users during operations.
