
Clusters with Windows Server 2012 R2
Strong Together
Windows Server 2012 rolled out a new, easier way to build a high-availability cluster. And, with Windows Server 2012 R2, you can even build the cluster with virtual servers and use virtual disks as shared storage.
This article describes how to set up a cluster with Windows Server 2012 R2. The process is largely the same for virtual servers and physical clusters. The only difference is in the configuration of virtual disks as shared VHDX files [1]. You can, of course, continue to work with other shared storage for your cluster, even if you are running a virtual cluster.
Windows Server 2012 also offers the ability to define VHD disks as iSCSI-based, shared cluster storage on a server. Starting with Windows Server 2012 R2, this feature also works with VHDX hard drives. One advantage of iSCSI targets as shared storage is that you can also integrate physical clusters, whereas shared VHDX disks only support virtual clusters.
Companies that virtualize servers with Hyper-V and want to achieve high availability rely on the live migration of VMs in the cluster. However, you can only achieve live migration with physical shared storage or iSCSI targets. Shared storage on the basis of shared VHDX does not support clusters for live migration with Hyper-V.
If you run Hyper-V in a cluster, you can ensure that all virtual servers are automatically taken over by another host if one physical host fails.
iSCSI Targets
Windows Server 2012 R2 serves up virtual disks based on VHDX files as iSCSI targets on the network (Figure 1). These virtual disks can serve as shared storage for a cluster. To use virtual disks as iSCSI targets, you must install the iSCSI Target Server role service in Server Manager by clicking Add Roles and Features | Server Roles | File and Storage Services | File and iSCSI Services. After installing the role service, you can use Server Manager to select File and Storage Services | iSCSI and create virtual disks, which can be configured as iSCSI targets on the network. It is a good idea to use a server on the network that is not part of the cluster.
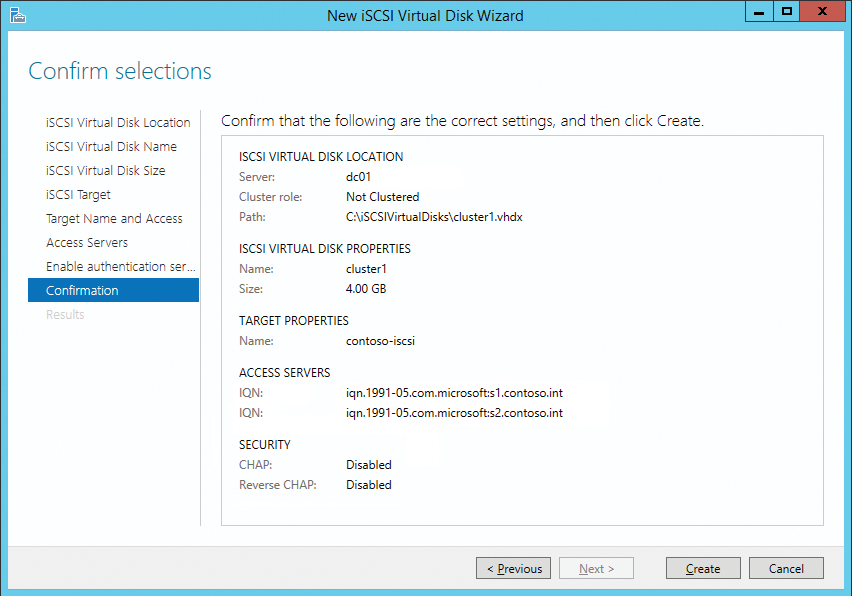
In the scope of the setup, you can define the size and the location of the VHD(X) file. You can use the wizard to control which server on the network is allowed to access the iSCSI target. If you want to use the disks as cluster storage, you can restrict access here. You can also use a single iSCSI target to provide multiple virtual iSCSI disks on a server. To do this, simply restart the wizard and select an existing target.
After generating the individual virtual disks and assigning iSCSI target(s), you can connect them to the cluster nodes. After integration, the virtual disks are displayed as normal drives in the server's local disk manager and can be managed accordingly.
Connecting iSCSI Targets
To connect cluster nodes to virtual iSCSI disks, you need the iSCSI Initiator, which is one of the built-in tools on Windows Server 2012 R2. Search for iscsi in the home screen and then launch the tool. When you first call the tool, you need to confirm the start of the corresponding system service and unblock the service on the Windows Firewall.
To integrate iSCSI storage, first go to the Discovery tab. Click on Discover Portal and enter the IP address or name of the server that provides the virtual disks. Go to the Targets tab, which Windows uses to display the iSCSI targets on the server. You can then connect the target with the available disk drives, which you created with the iSCSI target on the target server.
Press Connect, and the server opens a connection with the server and creates virtual disks (Figure 2). Check Add this connection to the list of Favorite Targets box. This option must be set for all disks. Confirm all windows by pressing OK. If you create a cluster with iSCSI, connect the target with the second server and all other cluster nodes that you want to include in the cluster.
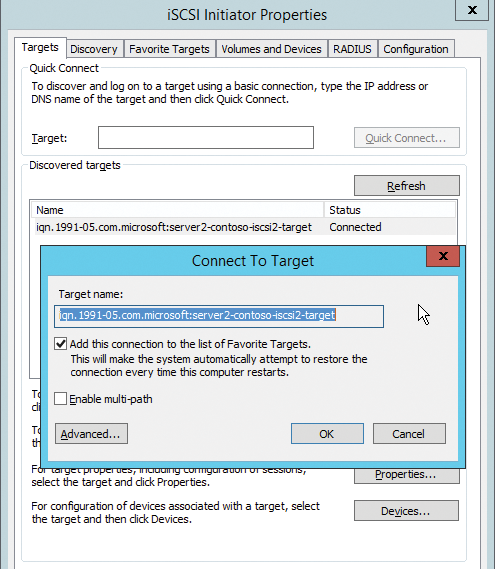
You can select Enable multi-path to specify that Windows Server 2012 R2 also uses alternative network paths between the server and target system. This is an important factor in increasing reliability.
Configuring iSCSI Disks
Once you have connected iSCSI targets, the drives associated with a iSCSI target become available in Disk Manager. You can launch Disk Manager by typing diskmgmt.msc.
Once the drives are connected to the first server node, they must be switched online, initialized, partitioned, and formatted in Disk Manager. Converting to dynamic disks is not recommended for use in a cluster. However, because the medium has already been initialized and formatted on the first node, you need not repeat this step on the second. On the second node, you just need to switch the Status to Online and change the drive letter, which must match the first node. Using the context menu, switch the iSCSI targets to Online, then initialize the target and create a volume and format it NTFS.
Preparing the Cluster Nodes
In addition to the shared storage to which all cluster nodes have access, the cluster also needs a name. This name does not belong to a computer account but is used for administration of the cluster. Each node of the cluster is given a computer account in the same domain; therefore, each physical node needs an appropriate computer name.
You need multiple IP addresses for the cluster: one IP address for each physical node, one IP address for the cluster as a whole, and one IP address in a separate subnet for private communication between cluster nodes. Communication with the network and internal cluster communication should only take place on a single network in test environments. In this case, you do not need to modify anything. For test purposes, a cluster can consist of just a single node.
Clusters with Windows Server 2012 R2
To run Hyper-V or other services in a cluster, you first need to install a conventional cluster with Windows Server 2012 R2. You can install clustering in Windows Server 2012 R2 as a feature through Server Manager or PowerShell. During the installation, do not change any settings. Make sure the shared storage is connected to all nodes and uses the same drive letter. You can also use PowerShell to install the features required for a Hyper-V cluster (Figure 3):
Install-WindowsFeature Hyper-V
Install-WindowsFeature Failover-Clustering
Install-WindowsFeatureMultipath-IO
After installing the required features, start Failover Cluster Manager on the first node by going to the home screen and typing failover. Press Validate Configuration. In the window, select the potential cluster nodes and decide which tests you want the tool to perform (Figure 4). Cluster management is only available if you install the management tools on a server. You do this using Server Manager or PowerShell.

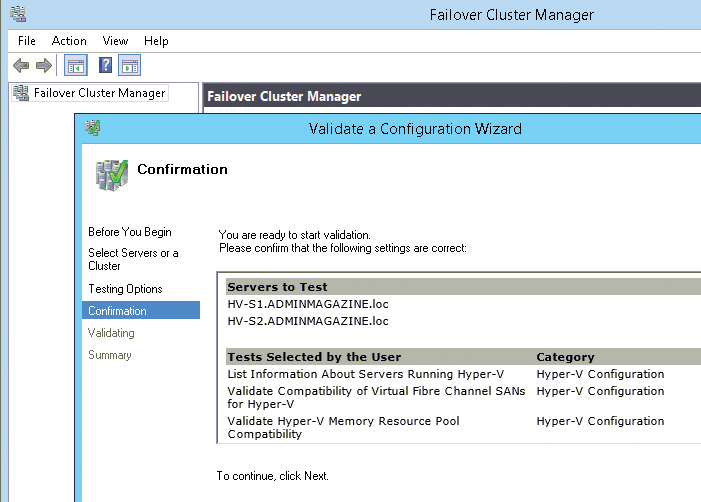
After the wizard has successfully tested all the important points, you can create the cluster in PowerShell (Figure 5),
New-Cluster -Name <Cluster-Name>-StaticAddress <Cluster-Address-Node>-Node <Node1>,<Node2>
or in the wizard.

Enabling Cluster Shared Volumes
Cluster Shared Volumes (CSVs) are important for live migration in Hyper-V. They allow multiple servers to access shared storage simultaneously. To run Hyper-V with live migration in a cluster, enable Cluster Shared Volumes after creating the cluster. Windows then stores some data in the Cluster Storage folder on the operating system partition. However, the data does not reside on disk C: of the node, but on the shared disk; the call to the C:\Cluster Storage folder is rerouted.
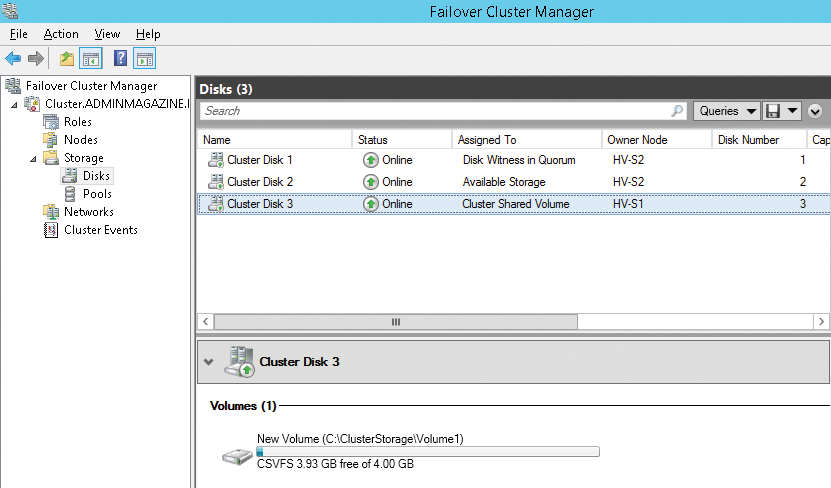
To enable CSV on a cluster, start the Failover Cluster Manager program (Figure 6) and right-click the disk that you want to use for Hyper-V in the Storage | Disks section. Then, select Add to Cluster Shared Volumes.
Dynamic I/O
Clusters on Windows Server 2012 R2 support dynamic I/O. If the data connection of a node fails, the cluster can automatically route the traffic that is necessary for communication to the virtual machines on the SAN through the lines of the second node, without having to perform a failover. You can configure a cluster so that the cluster node prioritizes network traffic between the nodes and to CSVs.
Managing Virtual Servers in the Cluster
To create a virtual server in a cluster, use the Failover Cluster Manager. Right-click Roles | Virtual Machines | New Virtual Machine to launch the wizard. Select the cluster node on which you want to deploy this server. The rest of the wizard is similar to the virtual server configuration. Where created, the virtual servers appear in the Roles section of the Failover Cluster Manager. Use the context menu to manage the virtual server.
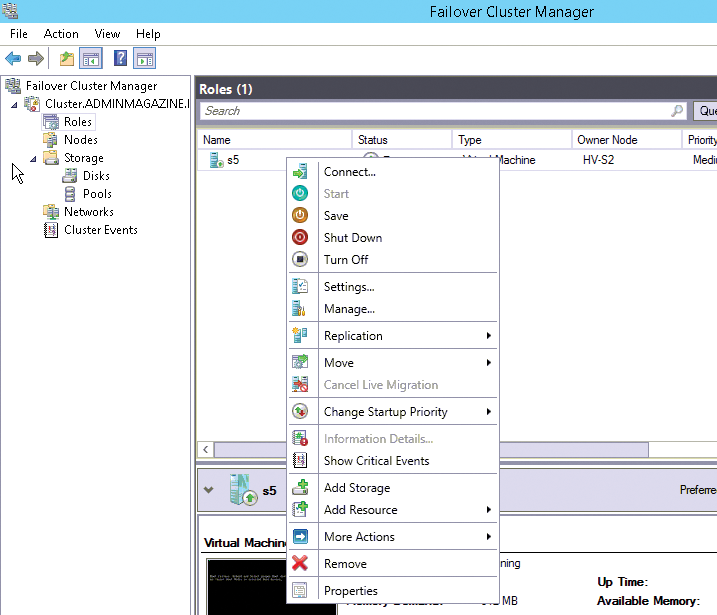
To start a live migration, right-click the virtual machine (Figure 7), select the Move | Live Migration context menu entry, and then select the node. First, however, you need to configure live migration in the Hyper-V settings on the appropriate Hyper-V hosts. The difference between live migration and quick migration is that machines remain active while crossing the wire for a live migration and the memory content is transferred between the servers. In fast migration, Hyper-V disables the machines before migrating.
You can configure a 2012 R2 cluster with Windows Server so that the cluster nodes prioritize network traffic between the nodes and the shared volumes. To learn which network settings the cluster uses to communicate with the cluster shared volume, start a PowerShell session on the server and run the commandlet Get-ClusterNetwork.
Another new feature in Windows Server 2012 is the Change Startup Priority section in the context menu of virtual servers. Here, you can specify when virtual servers are allowed to start. Another new feature is the ability to set up monitoring for virtual servers in the cluster. You can find this setting in More Actions | Configure Monitoring. Then, select the services to be monitored by the cluster. If one of the selected services fails on the virtual machine, the cluster can restart the VM or migrate it to another node.
VHDX Shared Disks
Besides being able to use physical disks and iSCSI targets for the cluster, you can use the new sharing function for VHDX disks in Windows Server 2012 R2. To do so, you create one or more virtual disks that you then assign to one of the virtual cluster nodes via a virtual SCSI controller.
Go to the settings for the virtual server and select SCSI Controller | Hard Drive | Advanced Features. Click the checkbox for Enable virtual hard disk sharing (Figure 8). Now you have the ability to assign this virtual disk to different virtual servers and, thus, use it as shared storage. On the basis of this virtual disk, you then build a cluster with virtual servers in Hyper-V or some other virtualization solution. This makes it very easy to build virtual clusters.

To be able to use the shared VHDX function, the virtual servers need to be located in a cluster. Additionally, the virtual disks provided by shared VHDX must be stored on a shared disk in the cluster. It is best to use the configured CSV for this. That means that you cannot use shared VHDX disks in Windows 8.1, even if this function is theoretically available. For test purposes, you can also easily create a cluster with only one node. Although this scenario is not officially supported, it does work.
You cannot modify shared storage on the fly, for example, to change the size of disks. This process is only allowed for normal virtual disks, which are assigned to virtual SCSI controllers. This feature is new in Windows Server 2012 R2. Also, it is impossible to perform live migration of the memory for virtual hard disks that you use as shared VHDX in the cluster. Again, that is only possible with normal hard disks, even on Windows Server 2012.
Example of a Test Environment
To use a virtual cluster as a file server, for example, and store the data of the virtual file server cluster in shared VHDX files, you need to create a normal cluster as described. For a test environment, the cluster can consist of just a single server.
To store the shared VHDX disks on a particular drive, type the following command at the command line:
FLTMC.EXE attach svhdxflt drive
Then, you can add virtual disks to the individual virtual servers in the cluster and configure them as shared VHDX. After doing so, create the virtual cluster just like a physical cluster.
If you create more shared disks, you can group them together in this way to create a storage pool that can also be used in the cluster. You create the pool in the Storage | Pools section.
Cluster-Aware Updating
In Windows Server 2012, Microsoft introduced the concept of Cluster-Aware Updating (CAU), which allows the installation of software updates via the cluster service. This means that operating system and server applications can be updated without the cluster services failing.
When configuring CAU, you need to create a new role that can perform software updates completely independently in the future. This role also handles the configuration of the maintenance mode on the cluster nodes; it can restart cluster nodes, move cluster roles back to the correct cluster nodes, and much more. You can start the update manually and define a schedule for updates.
To create CAU for a new cluster, first create a new computer object in the Active Directory Users and Computers snap-in. This procedure is optional, because the CAU wizard can also create the computer object itself. This computer object represents the basis for the cluster role for setting up automatic updates. You don't need to configure the settings for the object – just create it. You can name it after the cluster, adding the extension CAU (e.g., cluster-cau).
Additionally, you should create an inbound firewall rule on all cluster nodes that participate in CAU and select Predefined | Remote Shutdown as the rule type. The management console is started by typing wf.msc. If the rule already exists, select it from the context menu.
Once done, search for the Cluster-Aware Update setup program on the home screen and start the tool. In the first step, connect to the cluster for which you want to enable CAU. Then, click on the link Analyze cluster updating readiness. The wizard checks to see if you can enable CAU in the cluster (Figure 9).
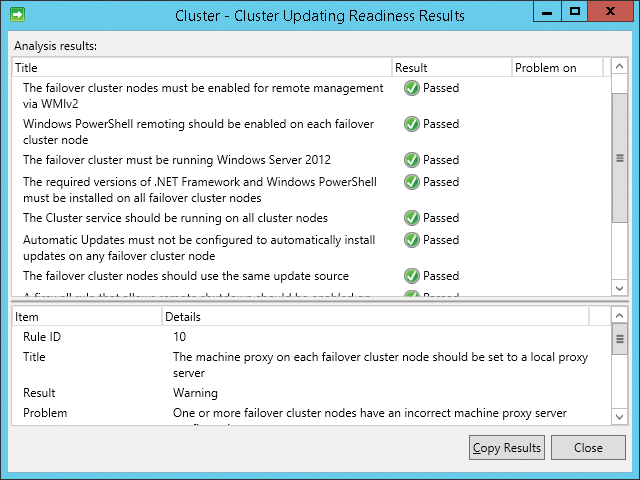
Once you have connected to the desired cluster and carried out the analysis, you can start the setup by running the wizard. You launch it as Configure cluster self-updating options. On the first page, you will see some information about what the wizard configures. On the next page, select Add the CAU clustered role, with self-updating mode enabled, to this cluster. Then, enable the option I have a prestaged computer object for the CAU clustered role and enter the name of the computer object in the box. The wizard can also automatically create the object, which simplifies the configuration in a test environment.
On the next page, you need to specify the schedule that the cluster and each node follow for automatic updates. In the Advanced Options, you can configure some additional settings, but these are optional. For example, the option specifying that the update only launches if all cluster nodes are accessible makes a lot of sense. To do this, set the option RequireAllNodesOnline option to True. Other options include defining scripts to run before or after updating the cluster service.
On the next page, you can specify how the cluster service should deal with the recommended updates and whether these play the same role as critical updates. You then see a summary, and the service is created. If an error occurs, check the computer object's rights for the cluster upgrade. In the object's properties, give the cluster account full access to the new account. Alternatively, you can let the wizard create the computer object. After setting up CAU, run the analysis again.
Patch Management
You can decide which patches the service installs by releasing patches to a WSUS server or enabling local update management on the server. You can view the list of patches to be installed by the service in the CAU management tool by clicking Preview updates for this cluster.
To start the update immediately, click Apply updates to this cluster. You can view the status of the current installations in the CAU management tool, which you used to set up the service. During an update, the corresponding node is switched to maintenance mode. The cluster resources, such as the VMs, are moved to other nodes, then the update is started; finally, the resources are transferred back, then the next node is updated. The CAU FAQ [2] provides more descriptions of this service.
