
Open Source Security Information and Event Management system
Security Management
A mind-numbing array of applications, operating systems, routers, firewalls, VPNs, and cloud resources confront IT security professionals, with no shortage of logs and security events that need to be correlated and interpreted. The "old-school" way of one-off solutions for various security challenges just won't work anymore. What is needed is a comprehensive solution that integrates disparate data and processes and provides knowledge and insight into security threats and a capacity to manage risks more effectively.
The Open Source Security Information and Event Management (OSSIM) system [1] is a Security Information and Event Management (SIEM) application. SIEMs are multipurpose tools for the security operations professional. They offer asset discovery, behavioral monitoring, data aggregation and correlation, security/threat intelligence, threat detection, and vulnerability assessment, among other features. SIEMs are a necessary evolution in the technology used to manage modern threats, and OSSIM is a key leader in the space.
OSSIM offers an expansive array of features that would leave any IT security professional duly impressed, including:
- Security information management
- Security event management
- Asset management and discovery
- Log management
- Network management
- IDS (intrusion detection)
- HID (host intrusion detection)
- Vulnerability assessment
- Threat detection
- Behavioral monitoring
- Netflow support
- Incident response
- Reporting
- Powerful and user-friendly web interface
- Simple-to-install, prepackaged virtual machines
OSSIM has many core components born of the open source community. It takes all of these disparate, often time-consuming-to-integrate tools and puts them under one beautifully usable web interface.
It takes the complexity of configuring these single-use tools and brings them together into a powerhouse of information security insight and control. Or, as OSSIM/AlienVault usually speaks of it, provides visibility without complexity. A few critical open source projects are listed in the "OSSIM Open Source Projects" box. As you may note, many of these tools are commonly deployed and may already be in use in your organization. OSSIM, however, takes the process one step further by bringing these separate tools to a single place and making the whole even better than its astounding parts. All these amazing open source applications work as one cohesive whole for your information security insights.
OSSIM vs. USM
OSSIM, like most successful open source products, has many commercially supported options for the needs of corporations and larger organizations that want enhanced features and support. OSSIM is the community open source version of the project, and Alien Vault Unified Security Management (USM) [3] offers even more in the way of features, scalability, and support. Additionally, it is worth noting that all USM versions offer a key feature not available in stock OSSIM: long-term forensic storage of events.
USM All-In-One
Squarely focused on small businesses, this version starts at US$ 3,600 and provides most of the features of the enterprise-focused USM Standard and Enterprise. Critical differences are seen in capacities such as administration, performance, and reporting.
Among the key features of USM All-In-One is support for PCI, HIPAA, GPG13, and ISO 27001 (SOX). This support helps you maintain critical compliance with the constant quagmire of regulatory frameworks. Also present is enhanced log management and threat intelligence from AlienVault Labs, a service that provides continuous intelligence on IP reputation, which helps you make more informed decisions. The All-In-One option includes 100+ compliance and threat reports and support from AlienVault.
USM Standard/Enterprise
The Standard and Enterprise USM versions offer even more expansive features, in addition to those detailed in the USM All-In-One above, including options and multi-tier deployment options for large-scale environments. If your corporate overlords need a SIEM, AlienVault commercial solutions might be right up their alley. That said, my focus in this article is the open source, community-driven OSSIM, not its commercial big brothers.
OSSIM
Like any thriving open source ecosystem, OSSIM is propped up by commercial entities that support and develop it alongside the community. Both elements help support its growth and prosperity. As always, open source and capitalism have a relationship that allows for the growth of a project and underlying technology while still respecting the freedom and community aspect of FOSS. Technologist and industry both get what they want.
OSSIM remains the technology underpinning the collaborative efforts of the community and AlienVault – just like Fedora/Red Hat or WordPress/Automattic. These symbiotic relationships make for successful projects.
OSSIM Architecture Core Components
OSSIM has four main components: sensor, database, framework, and server. These are vital to understand in architecting your OSSIM installation.
- Sensor – The sensor connects your security devices and your management server(s). Sensors use plugins to parse data from your security devices and forward it to your management servers.
- Management server – This includes the OSSIM server itself and Framework daemon that controls its components. Simple deployments (e.g., an all-in-one install) have a single server, but in more complex environments, where high availability is required, there can be many servers with different roles in strategic locations.
- Front end – The framework provides the user interface to manage OSSIM, either in the form of the slick and easy-to-use web management interface or through the good old console.
- Database – A MySQL database is used to store configuration and events. As noted before, OSSIM provides real-time event correlation and forensic analysis but lacks the more advanced long-term storage features of AlienVault USM.
OSSIM Install and Setup
Setting up OSSIM was once quite a bit more complex than it is today. It involved downloading a long list of dependencies, difficult configurations, and compiling – just to get OSSIM up and running. Today's OSSIM takes a simpler approach, with a VM that you can download and run in your favorite virtualization technology, such as VMware, KVM, or VirtualBox, among others. For those with a presence in Amazon AWS, an easy-to-deploy Amazon AMI is available to deliver the benefits of OSSIM for your Amazon Cloud Environment.
In the test setup, I will use the ready-to-go ISO image [4] to get OSSIM up and running. This virtual machine, based on Debian Linux, has all the dependencies and requirements ready to go. This approach dramatically reduces the setup time of your SEIM, so you can get right to defending and managing your network without the technical setup headaches.
The AlienVault website lists the following bare minimum system requirements:
- 2GB of RAM
- 25GB hard drive
- 32- or 64-bit processor
- Two NICs that support the e1000 driver on Debian Linux
OSSIM is designed to be installed in a virtual environment, so you should consider a few more detailed specifications for right sizing [5] the configuration of your virtual machines. As a more general rule, your hardware specifications should scale to your environment; that is, it should be capable of the number of events per second and the general throughput of your network.
As noted in the systems requirements, two NICs are needed: one for the administrative interface and one for packet capture features needed for intrusion detection and passive asset detection. This process is first done by adding the interface in your virtual machine; be careful to select promiscuous mode so the virtual NIC can, in fact, see the traffic you seek to view. Finally, you can add it to OSSIM under the web interface under Configuration | Deployment and then click on the OSSIM server itself. Remember, setting the NIC to promiscuous mode is only half the battle. In order to capture traffic we need to set up a span port or network tap.
Fire up your virtual environment and install OSSIM. The setup is standard fare for those with systems experience, so I will only detail the highlights. Once you start up the VM, you want to choose the all-in-one profile (Figure 1), which includes all necessary components, such as sensor, server, framework, and database.
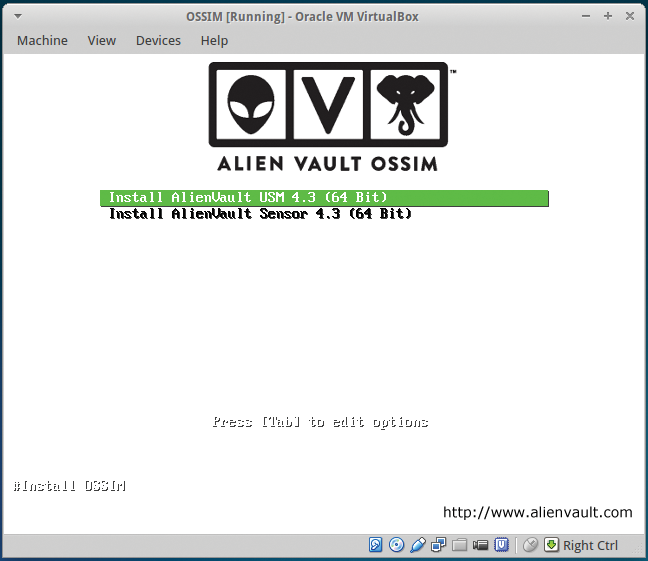
The default install makes the assumption that you will install all components on the same server. In a more complex setup, these may be split up for architectural, scalability, and infrastructure reasons. Once completed, you will see the console login screen (Figure 2).
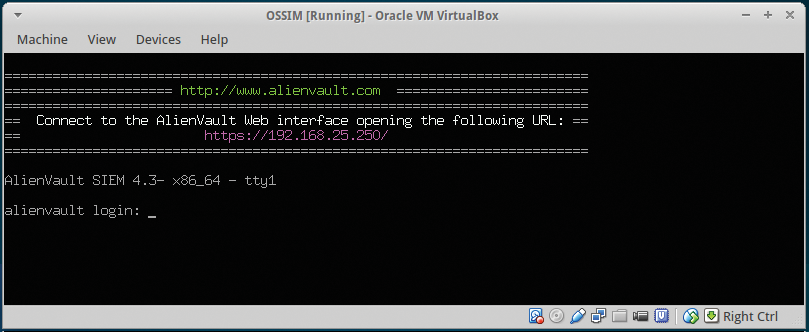
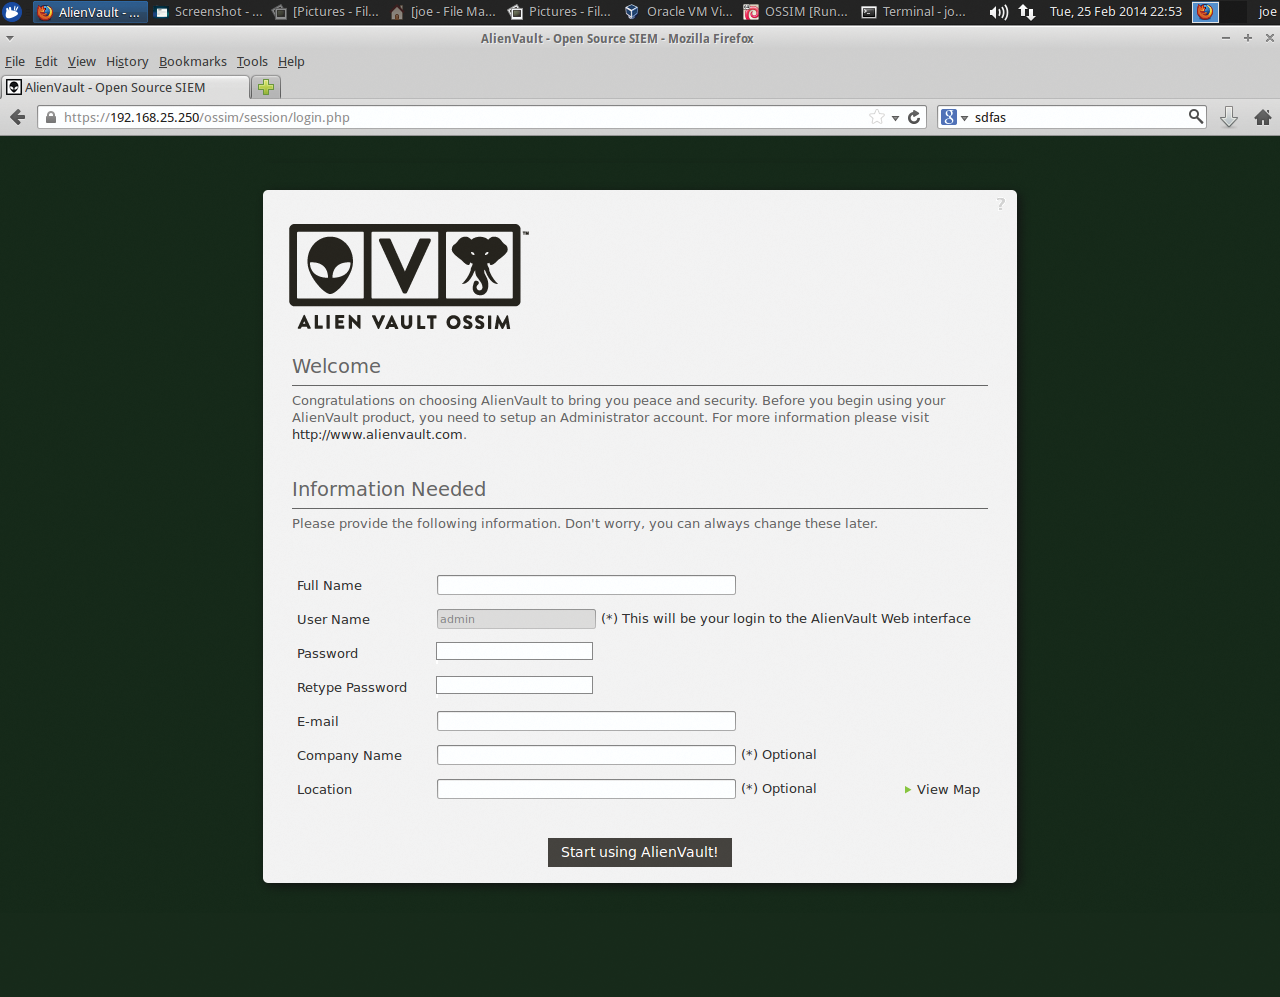
Now you can log in via web interface by going to the static IP address you set during the install (Figure 3) and using the default user/password (admin/admin). Of course, you will be required to change your sign-in credentials once you log in. To update your OSSIM install, enter alienvault-update.
Configuration from the Console
Accessing OSSIM from the console is easy by logging in with the root login and password you specified during the install. If you prefer, you can use the ncurses interface; but, in this example, I will exit. I favor this approach for updates because it brings me back to the comfy familiarity of Debian. Figure 4 shows a number of operations you can perform directly from the console by entering:
alienvault-setup
When you are done, simply issue
alienvault-reconfig
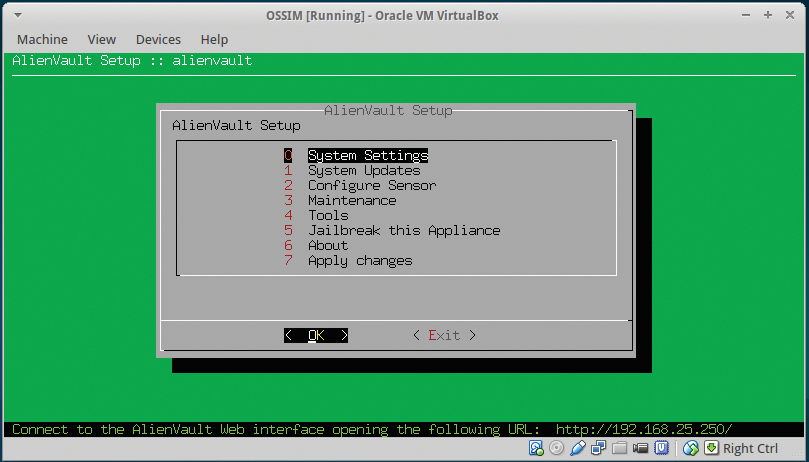
to write your changes to memory. As always, you can issue the help command to get an idea of what is available. When you are done, simply type exit. Note that this article is based on the newest version of OSSIM 4.4.1. If you are using a previous version, the interface may be a bit different. (Oh, and BTW – upgrade!)
Post-Install Setup
In a real-world install, you would have most of your work ahead of you, after having installed and configured the base all-in-one OSSIM virtual machine.
From there, you would want to make decisions on your architecture using the many capabilities this powerful open source SIEM provides. I will look at only a subset of the many operations you might deploy for a full-blown installation. To begin, I will set up asset discovery and configuration.
Asset Discovery and Configuration
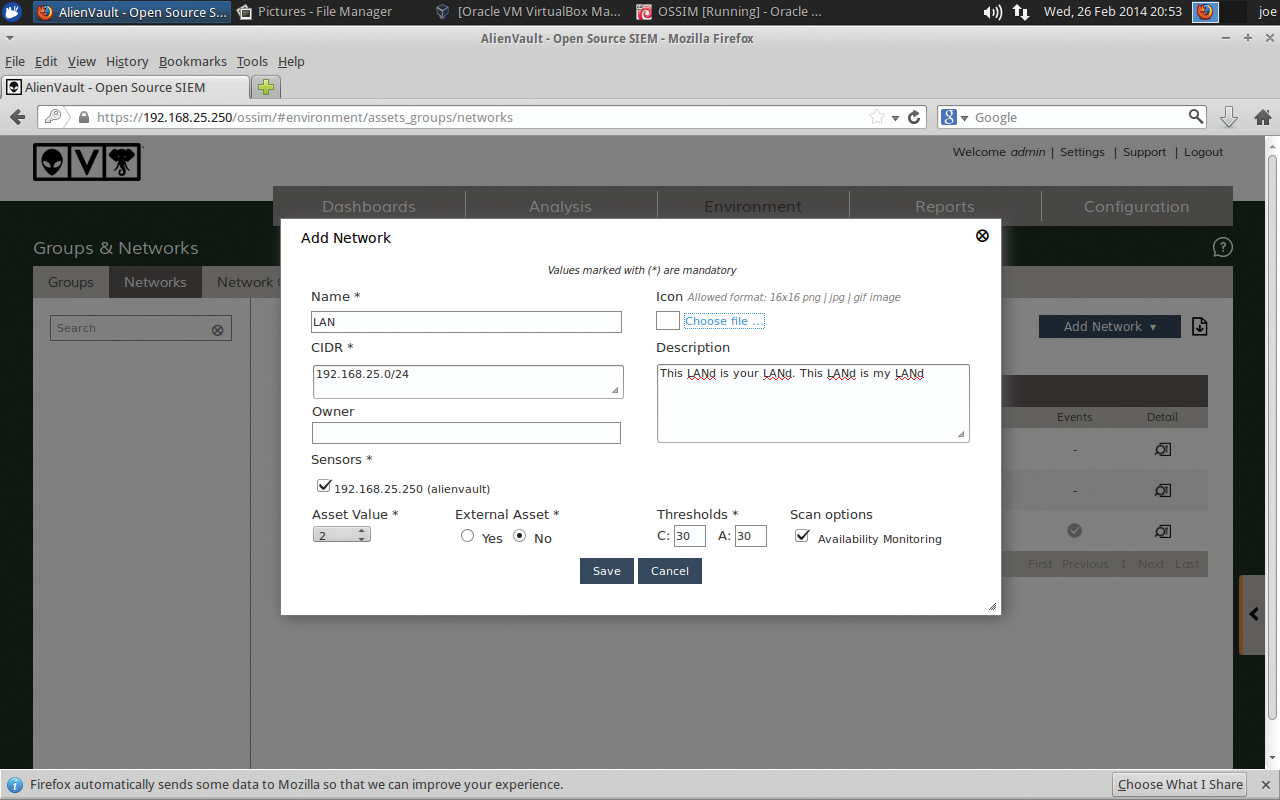
In this step, I populate my networks and associated assets in OSSIM. To begin, I log in to the web interface and go to Environments | Groups & Networks | Networks | Add Network (Figure 5). Simply name your network and add the IP space with CIDR notation. Also select under the Scan options Availability Monitoring, which adds these machines to Nagios for monitoring, then click Save to exit.
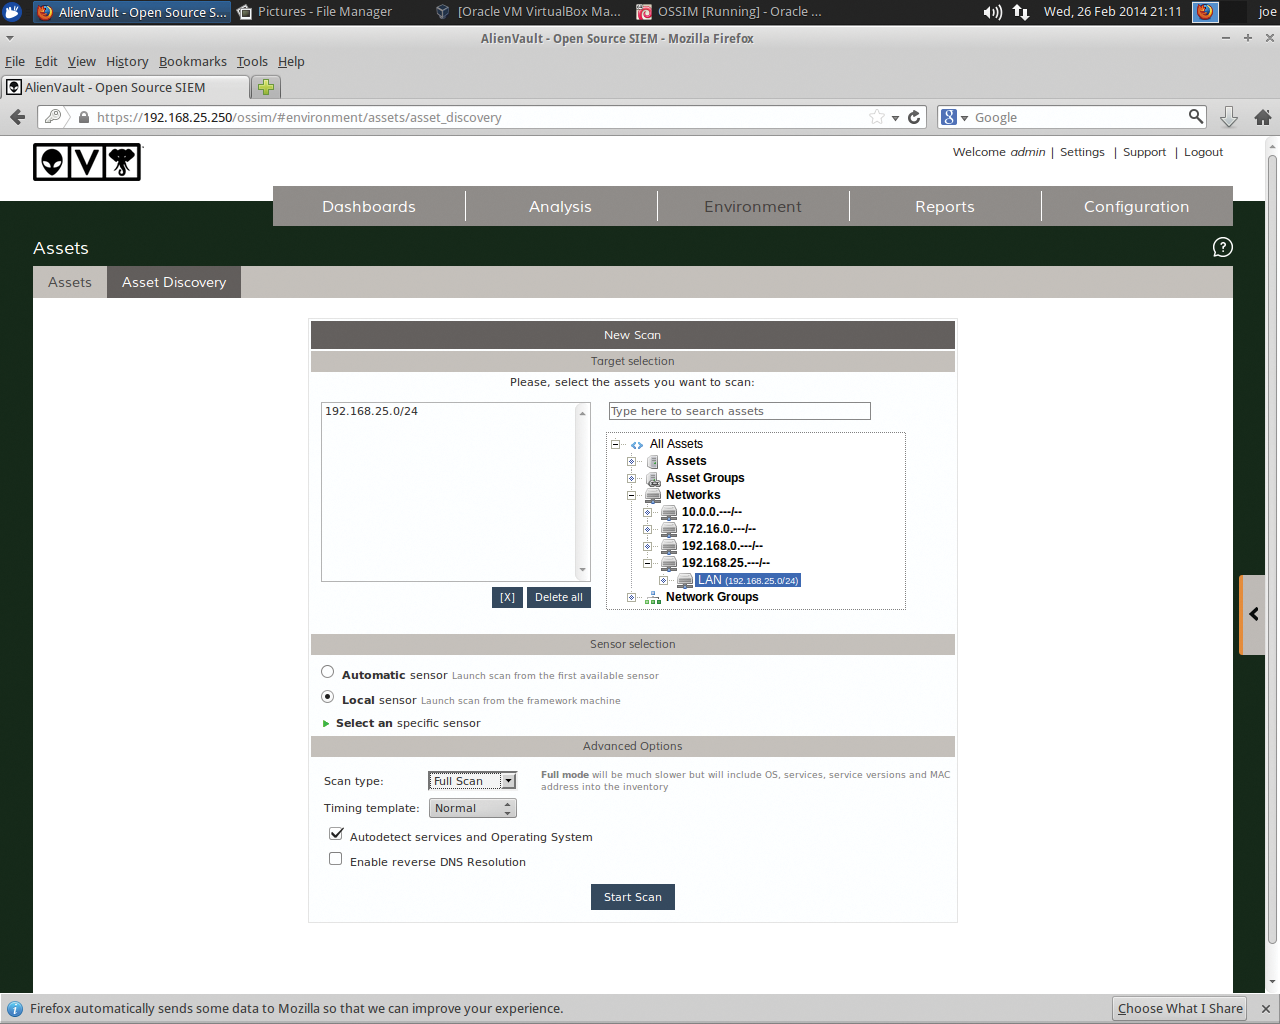
The next step is asset discovery via Environment | Assets | Asset Discovery (Figure 6). This screen has several options to configure asset scanning. In my case, I expand Networks on the right, add in my previously added subnet, and select a Full Scan scan type from the drop-down under Advanced Options. From here, Nmap does its magic and finds all hosts, related services, and OS details. Once completed, you will see output similar to Figure 7.
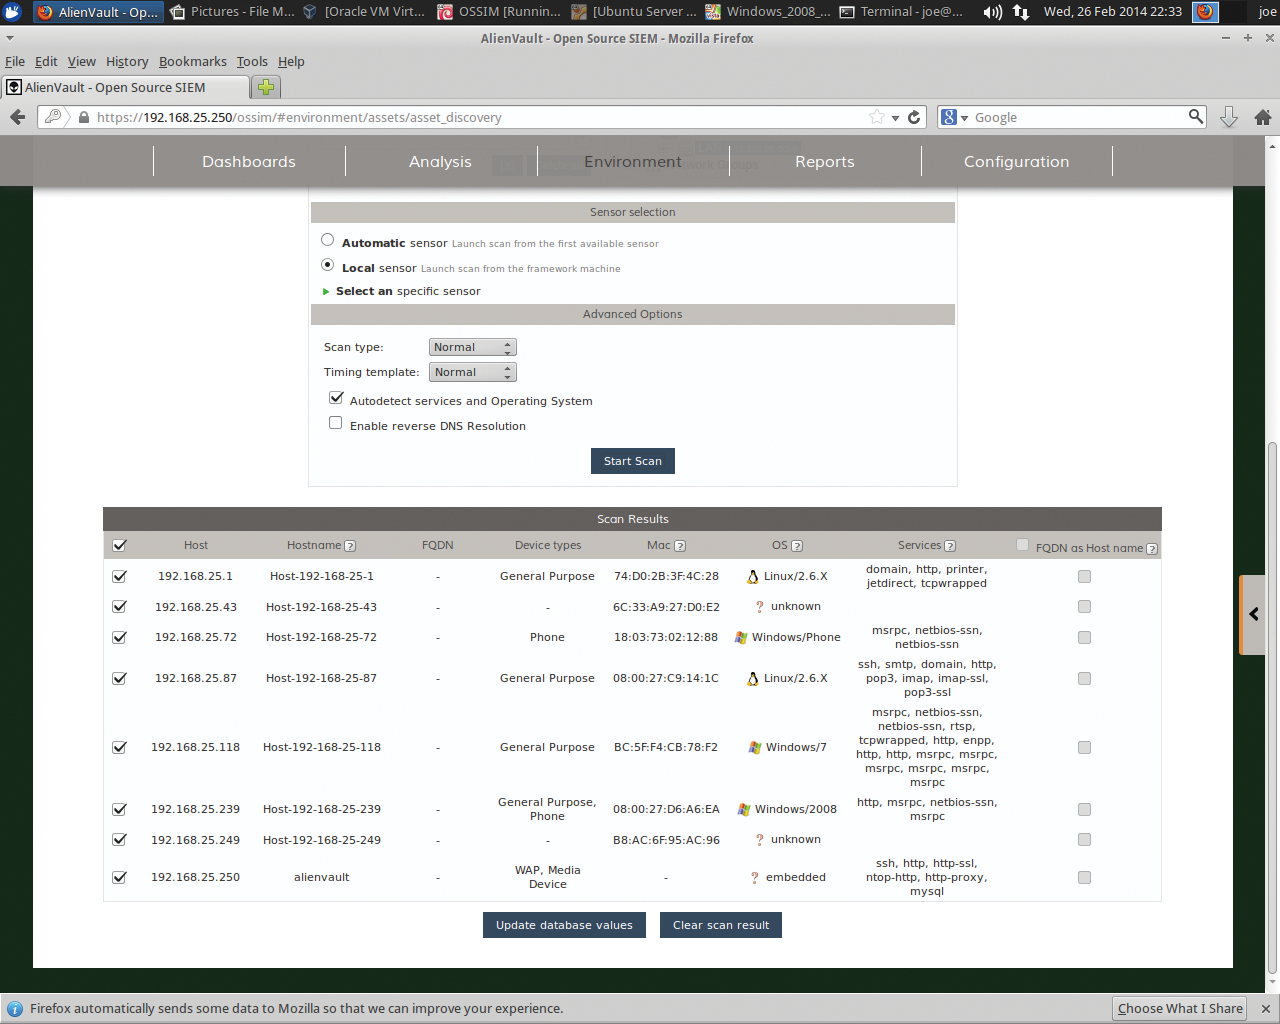
Simply click Update database values at the bottom to continue. From here, you can add any additional details to any of the assets discovered in this step. If you explore a bit, you will see that OSSIM has now added in the networks and assets. If you poke around the Environment pull-down, you see that the machines are now being monitored and you have insight into those nodes. For example, take a peek at Environment | Availability.
Setting Up a Vulnerability Scan
Once you have defined your networks and added in your assets, you can move on to vulnerability scanning. This feature alone is powerful in remediating risk, but OSSIM takes it to the next level by cross-correlating data from what were once separate sources (e.g., IDS and vulnerability scanning) to paint a clearer picture of what threats you need to address.
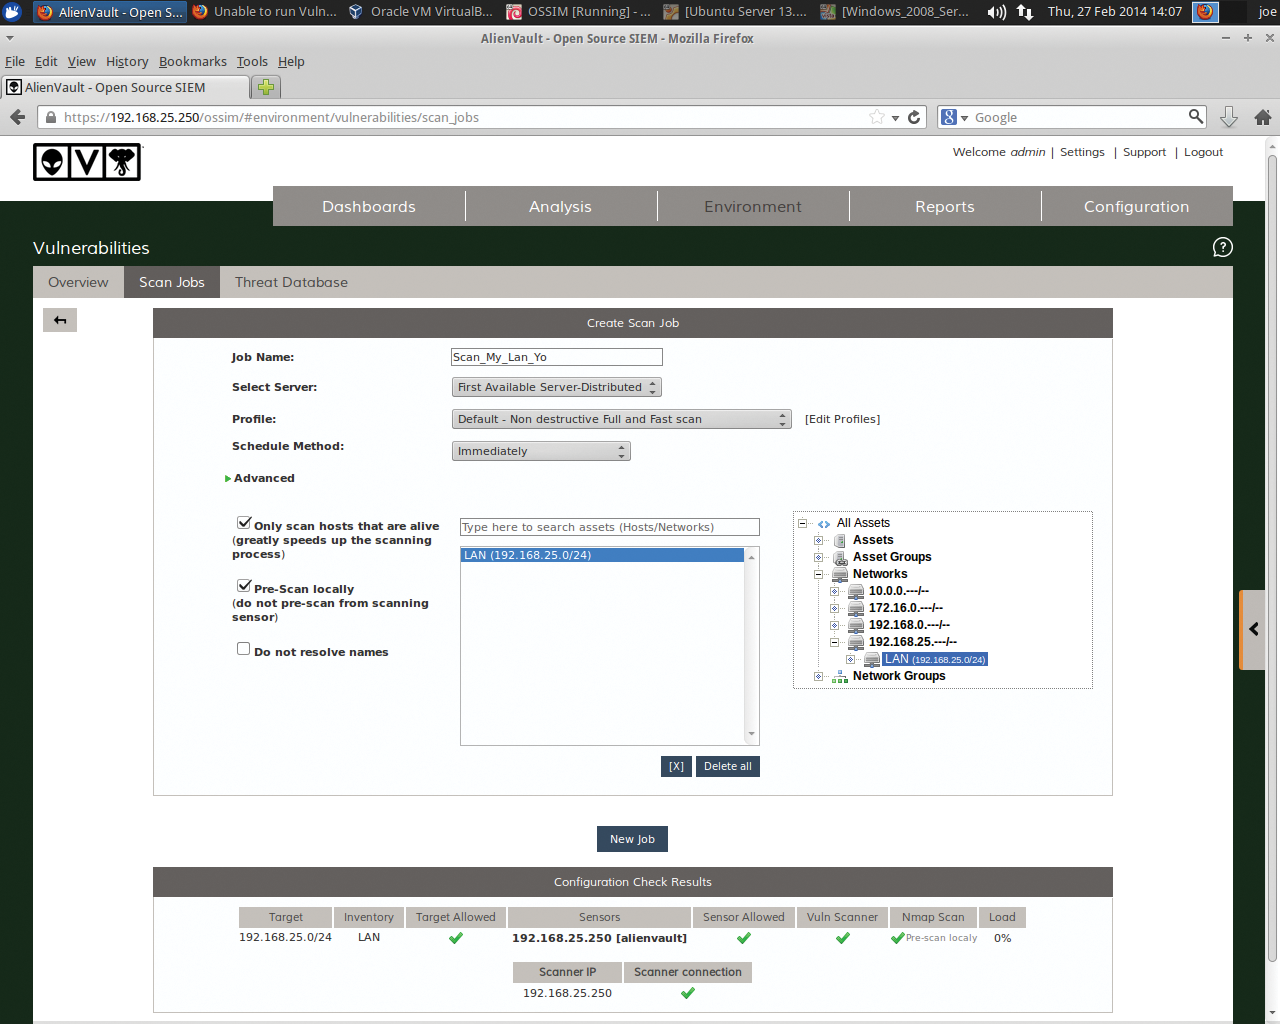
To set up periodic scanning, go to the web interface by clicking on Environment | Vulnerabilities | Scan Job | New Scan Job (Figure 8). Enter a job name of your choosing, select the server to use (in this case, I have only one), and on the right-hand side, select the Assets or Networks you want to scan. As seen in Figure 9, the scan produced output on current vulnerabilities that need remediation.
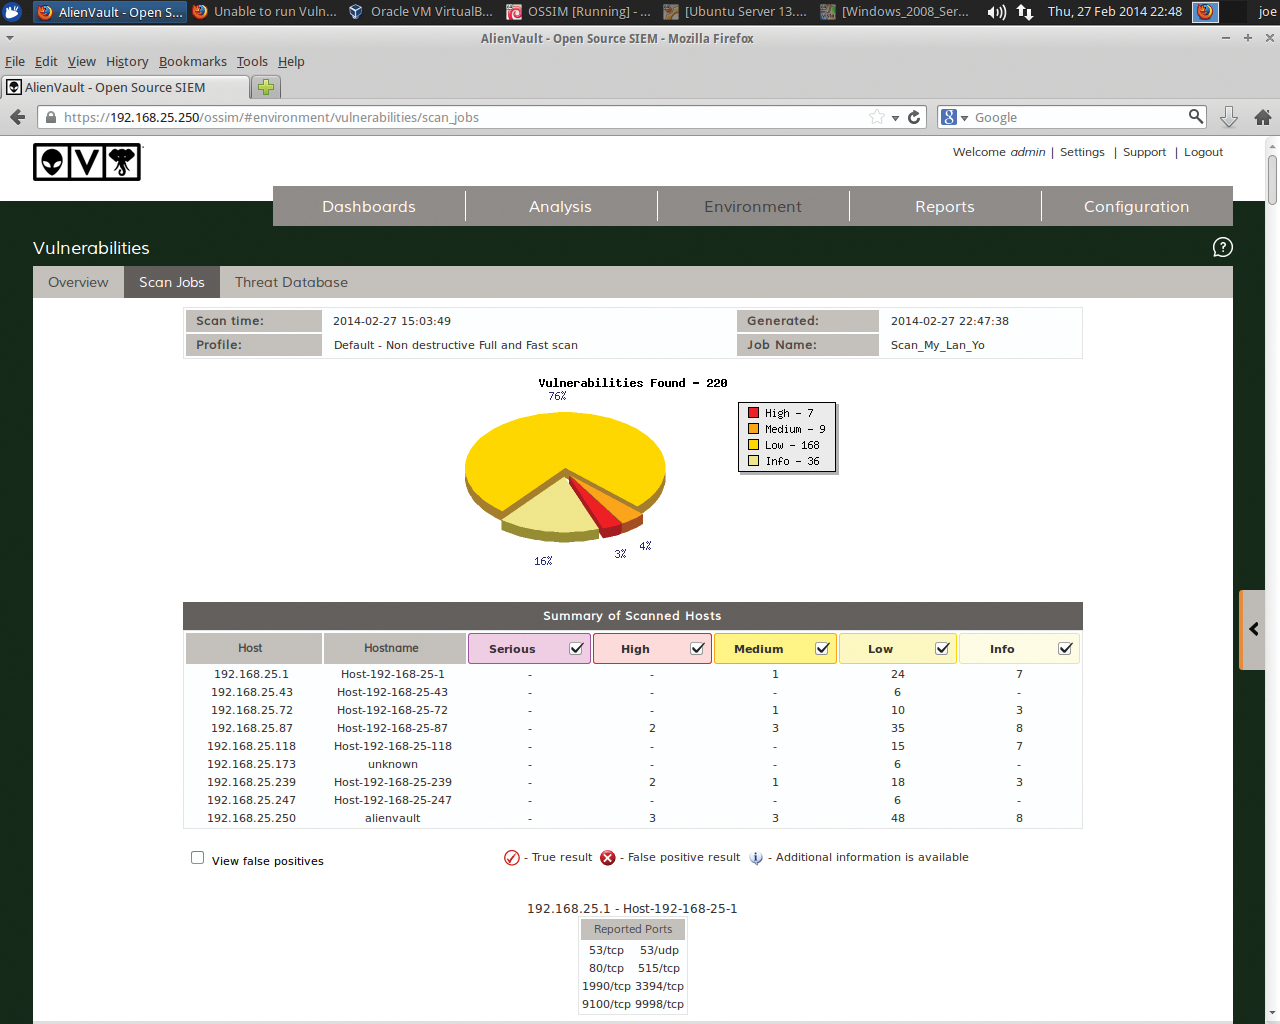
Note that you should take care when running vulnerability scans so that you don't create problems with production systems or networks. Choosing the "ultimate" profile in a scan job is a bit dangerous during peak system hours.
OSSIM Plugins
Plugins allow OSSIM to translate data from many sources (applications, systems, networks, devices, etc.) and create associated security events in the OSSIM server. Plugins connect of your data source (whatever device you have) to the OSSIM server. According to the AlienVault website, OSSIM comes with plugins for a long list of more than 2,000 well-known devices and technologies.
Both open source and commercial plugins allow great coverage for the vast majority of anything almost anyone might be running. Of course, you can also create custom plugins. Table 1 lists some important plugins that are available.
Tabelle 1: OSSIM Plugins
|
Name |
Name |
|---|---|
|
Apache |
P0f |
|
Arpwatch |
PADS |
|
Cisco IDS, Router, VPN |
Pam_unix |
|
IPTables |
Postfix |
|
Monowall |
Snare |
|
Nagios |
Snort |
|
Nessus |
SpamAssassin |
|
Netgear |
Squid |
|
Nmap Monitor |
SSH |
|
Ntop Monitor |
Sudo |
|
OpenNMS |
Syslog |
|
Osiris |
TCPTrack |
|
OSSEC |
Windows WMI |
|
Ossim |
Plugin to Collect Syslog from Another Server
Next, I'll show you how to set up a plugin to collect syslog data from your network servers. To accomplish this, go to the web management interface with Configuration | Deployment and select your listed OSSIM server with Sensor Configuration | Collection Link (on the right above the System Status bar; Figure 10).
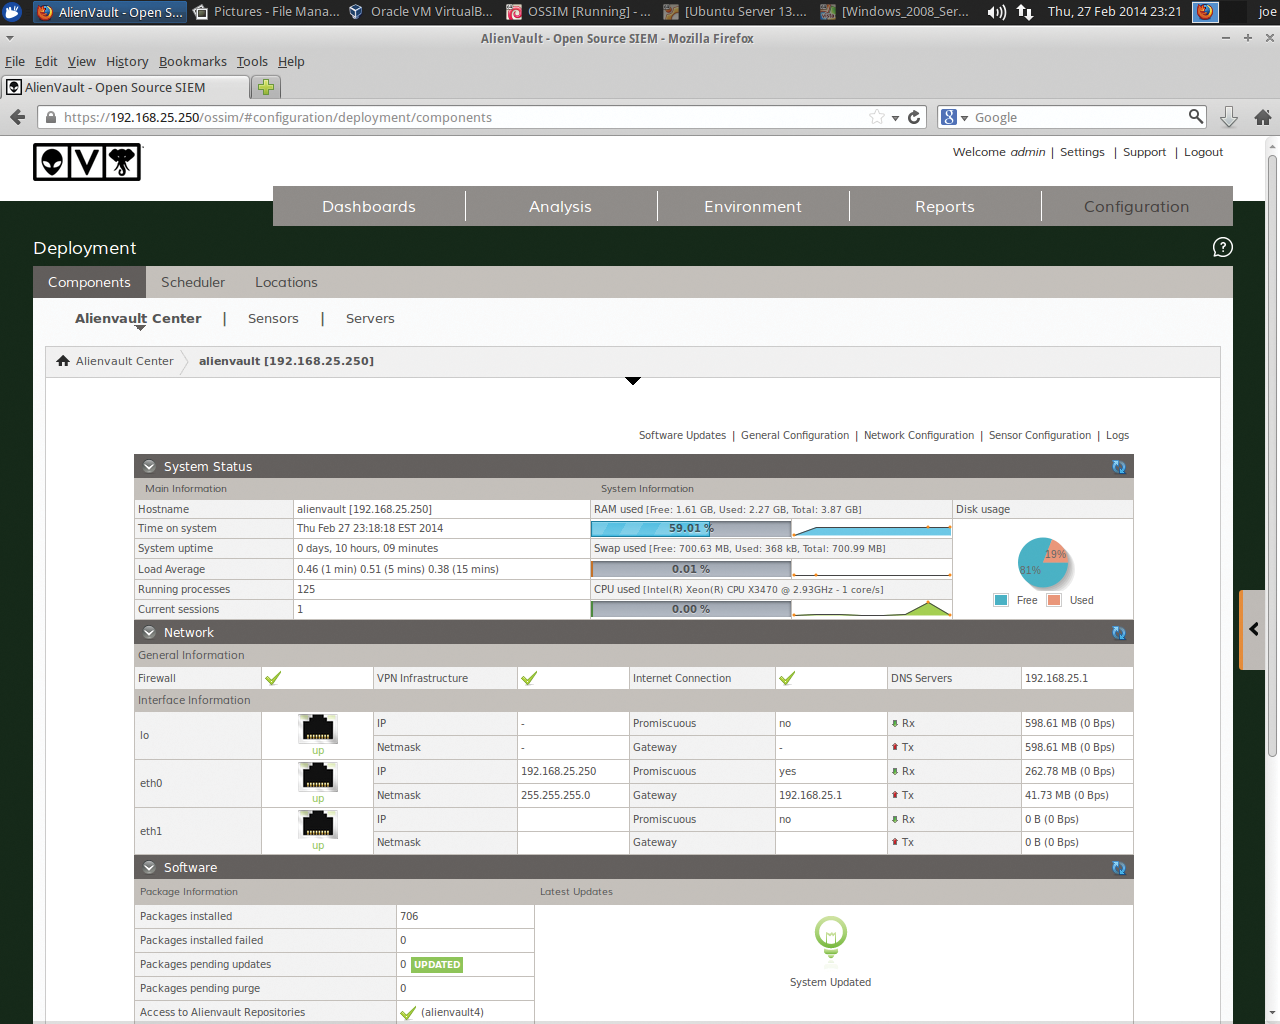
You can activate the plugins you need to enable by going to the right-hand column of plugins available. Click first on the plus sign, then click on Syslog and Apply Changes.
Next, I want to set up log rotation on the OSSIM server for this syslog plugin to conserve space on the OSSIM instance. To do so, I create a new log rotation configuration file by opening the syslog for editing,
nano --w /etc/logrotate.d/syslog
and adding the lines in Listing 1 to the file.
Listing 1: syslog Additions
01 /var/log/syslog.log
02 {
03   rotate 4 # save 4 days of logs
04   daily # rotate files daily
05   missingok
06   notifempty
07   compress
08   delaycompress
09   sharedscripts
10   postrotate
11   invoke-rc.d rsyslog reload > /dev/null
12   endscript
13 }
Finally, to see the syslog data in OSSIM, click on Analysis | Security Events (SIEM). If you see your syslog entries from the device that you just set up, you are golden.
Installing OSSEC HID
OSSEC is a robust, cross-platform HID that offers log analysis, system integrity checking, policy monitoring, rootkit detection, and real-time alerting. In this example, I install a HID on an Ubuntu server.
On the example Ubuntu server, enter the following:
apt-get install build-essential
then wget the latest version of OSSEC:
wget http://www.ossec.net/files/ossec-hids-2.7.1.tar.gz
tar -zxvf ossec-hids-2.7.1.tar.gz
./install.sh
Install OSSEC in defaults/var/ossec, specify the IP of your OSSIM server as your OSSEC HID server, and select YES to run an integrity check and rootkit detection daemons.
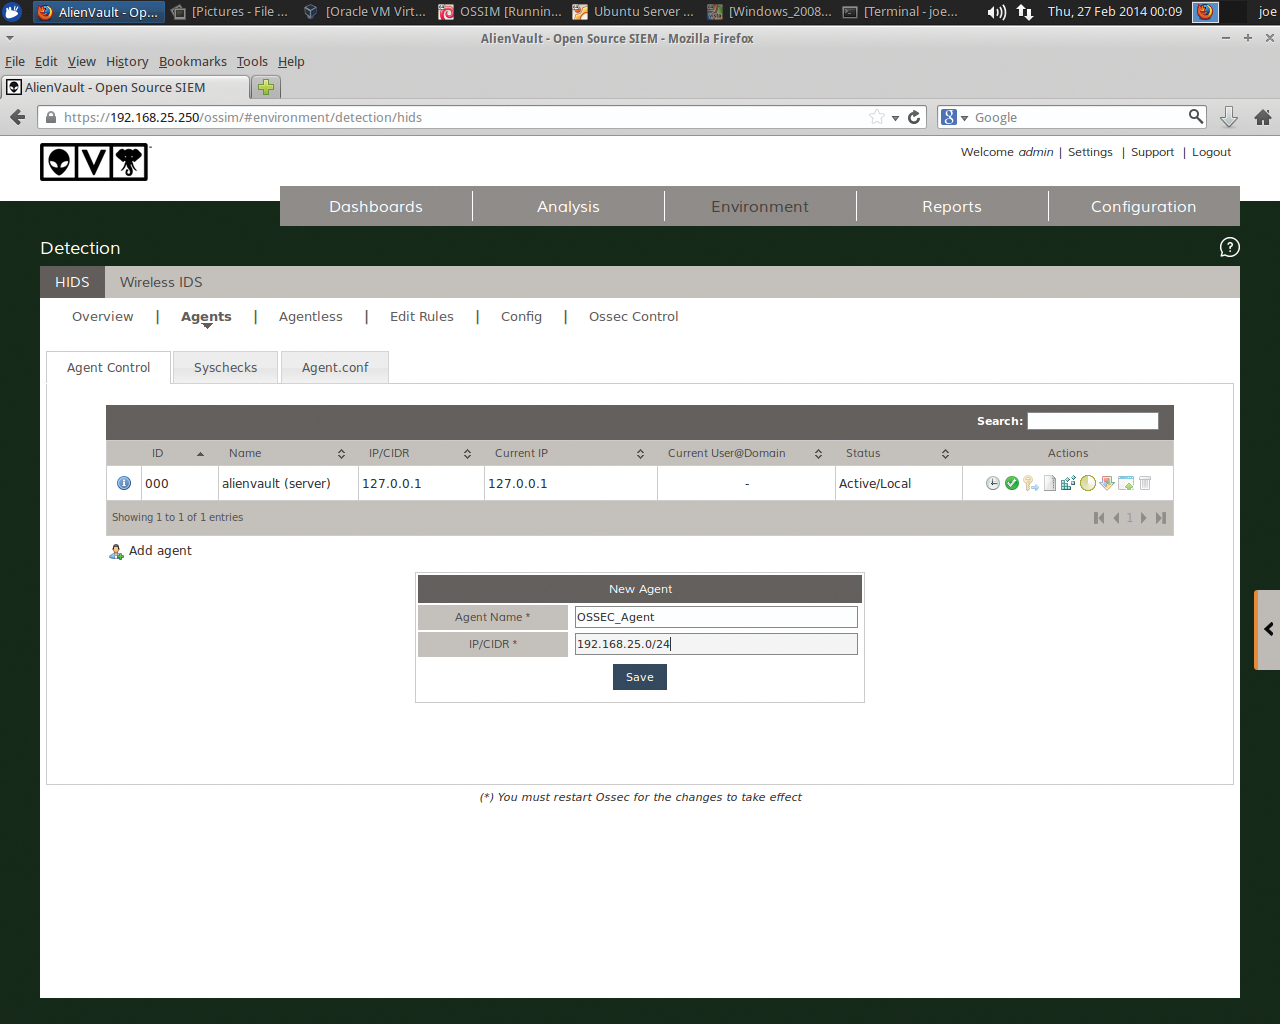
After you have OSSEC HID installed, you'll want to return to the OSSIM web interface and go to Environment | Detection | Add Agent (Figure 11) to enter the Agent Name of your choosing and the IP of the agent. Click Save.
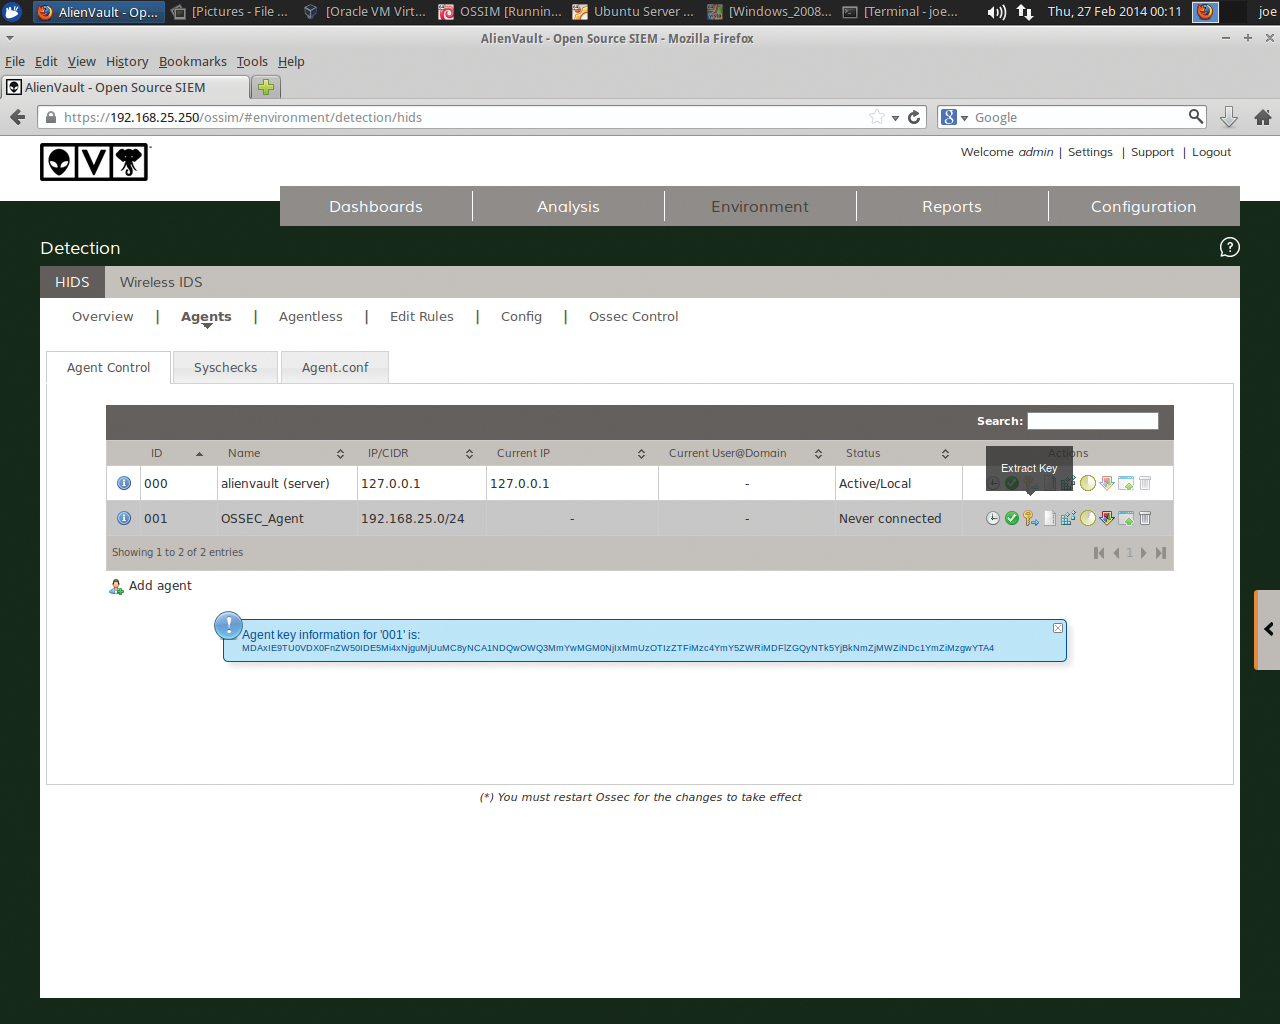
Hereafter, you can simply go to the agent record and select the Extract Key icon shown in Figure 12. The agent key will then be displayed, which you can paste into your Ubuntu OSSEC agent. Now, SSH back into the OSSEC agent server on your Ubuntu server and run:
/var/ossec/bin/manage_agents
Enter I to import the key from your server, and then select Q to quit.
Next, you can restart OSSEC on your server using:
sudo service ossec restart
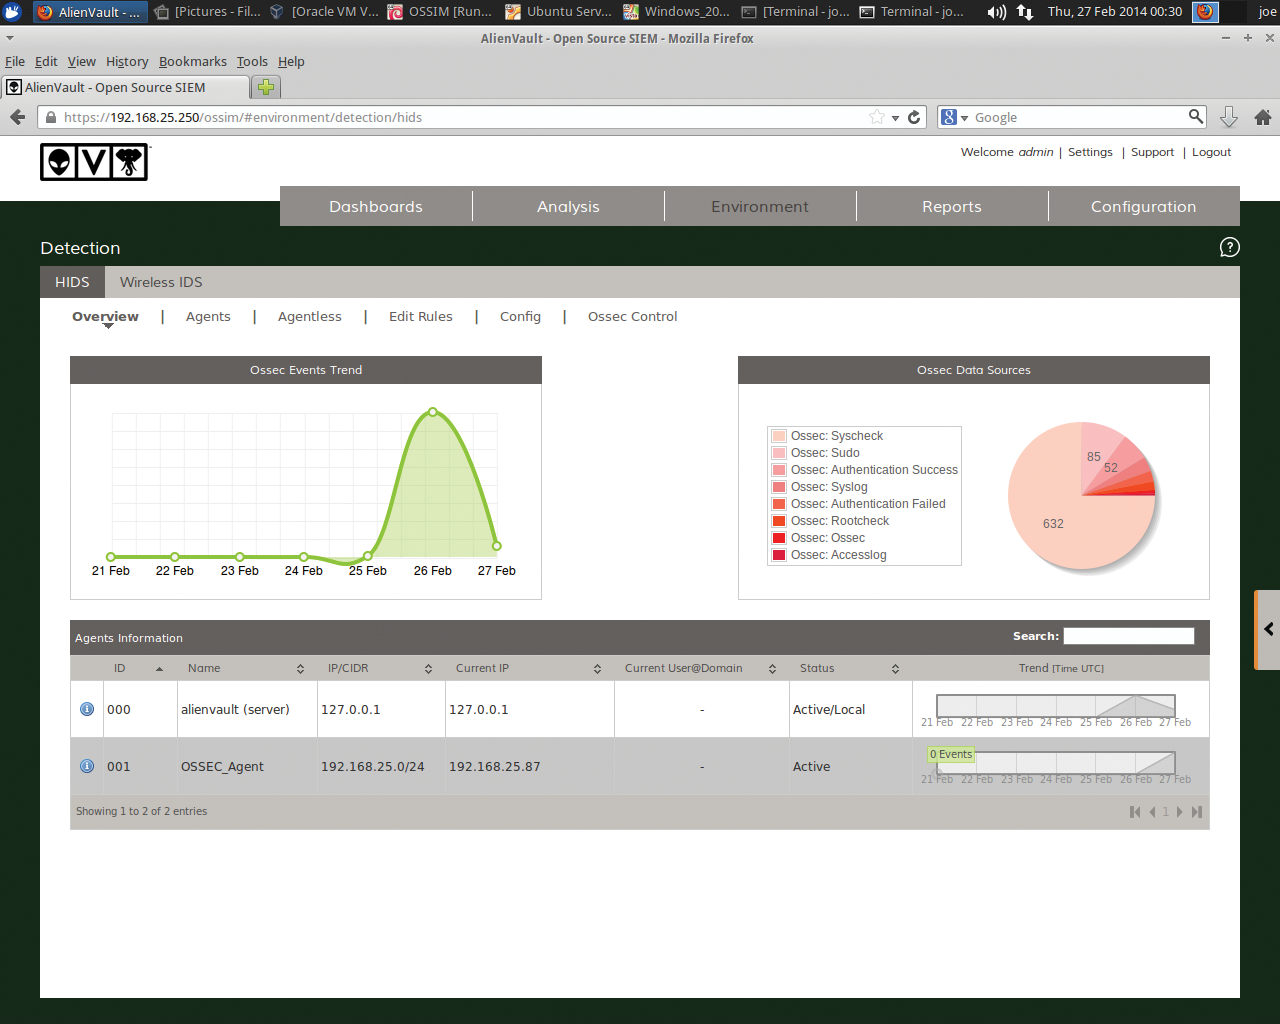
Finally, restart your OSSIM server. Once you are back in the web interface, you will see the new agent in all its glory (Figure 13).
Summary
In this article, I gave you an introductory taste of OSSIM. Although I have only shown you the basic setup, you should have some understanding of its overall capabilities. Now, you should be able to deploy your OSSIM in your existing environment. With patience and some documentation in hand, you can explore this stellar SIEM.
