
Making Small Business Server 2011 fit for 2014
Up-to-date
Although Microsoft is already offering a successor to the successor, in the form of Windows Server 2012 R2, many companies continue to work with Small Business Server (SBS) 2011. In particular, the standard version, with its fully functioning Exchange server, is very popular. The Essentials edition is practically no different from Windows Server 2012 R2 Essentials, which also means that many users will see no change.
Small businesses that rely on SBS often do not have an administrator to take care of the server full-time, which means occasionally someone must step into the breech and update virus protection and install security updates. These tasks do not take much IT know-how; nevertheless, before you change the settings or install patches, you should create a full backup, just in case something goes wrong.
Preparations
To bring SBS 2011 Standard up to the current level, you need to install three service packs that update the main system components in the right order: Windows Server 2008 R2 for the operating system, SharePoint Foundation 2010 for the company web, and Exchange Server 2010 as a mail server. Start by downloading the following packages:
- Windows Server 2008 R2 Service Pack 1 [1]
- Exchange Server 2010 Service Pack 3 [2]
- Update Rollup 4 for Exchange Server 2010 Service Pack 3 [3]
- SharePoint Foundation 2010 SP2 [4],
- Redo Backup for the system backup [5].
Data Backup
Before making any changes to the server, save it to an external hard disk. Redo Backup is an open source program available as a free download that comes with drivers for most devices. Compared with a piecemeal update, a complete backup as a disk image is your easiest approach with Redo Backup: Boot the server with Redo Backup and back up the system to the external hard disk.
To start the backup, press the corresponding button after launching Redo Backup. In the wizard, select the system disk that contains the operating system and system components of SBS (Figure 1). An image backup is not necessary for any data that may be present on another disk. You just need to copy the files to the external hard drive using Explorer.
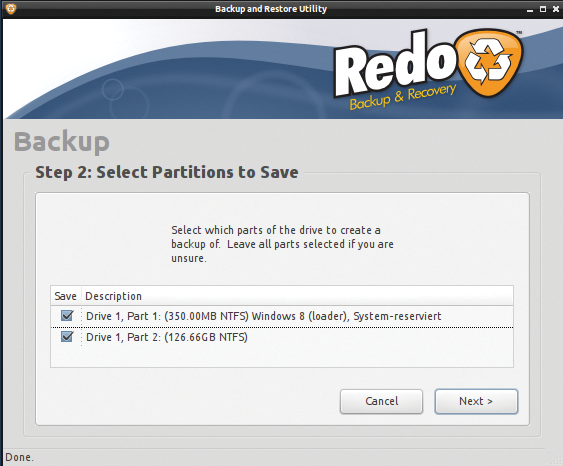
You should only update a healthy server. Be sure to check beforehand whether the dashboard or the Event Viewer indicates errors. The first of these tools provides a monitoring function in the right panel that shows you any problems with the server.
Managing Updates
Before installing larger service packs on the server, check the settings of the Windows Update feature and install all the updates on the server and the clients. You manage updates in the SBS console below Security. To discover whether your clients have the latest patches, check the right-hand panel in the home screen of the management console.
Use the Change the software update settings link under Security | Updates to specify the basic settings for patch management. First, synchronize the server with the Windows Update servers by pressing Synchronize Now. Then, define the update settings as follows:
- Server Updates – This setting controls which updates are installed on the SBS server and the other servers on the network. The default level Medium means that the SBS server automatically installs all critical security updates (Figure 2). This or a higher level needs to be set to install the SBS update rollup. Currently, Update Rollup 4 is available for SBS. You definitely want to enable this SBS patch management.
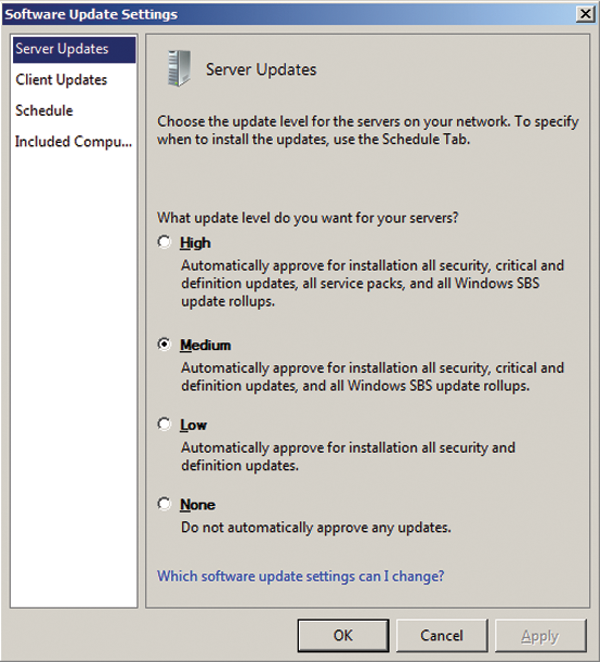
- Client Updates – Controls the installation of patches on the workstations. Here the setting is set by default to High so that all new updates are automatically installed on the clients. When updating the server, make sure that the clients have the latest updates in place, including those for additional programs such as Microsoft Office and Internet Explorer.
Operating System
The base operating system of SBS 2011 is Windows Server 2008 R2. If you have not already done so, first install Service Pack 1 [6] on the server. It fixes numerous vulnerabilities and other defects. This requires at least 4GB of free hard disk space, and all drivers should be up-to-date. Remove any UPS devices before installing and run a filesystem check with chkdsk c: /F. After successfully completing this test, sfc /scannow checks the important system files. To speed up the update, disable any antivirus solutions during the process.
To install the service pack, you just need to run the setup file. It detects whether you can install SP1 on Windows 7 or Windows Server 2008 R2 with SBS 2011 and takes about 30 minutes to complete.
During the installation, the computer may reboot several times; this depends on the patches already installed. If you want to prevent the automatic reboot, uncheck Automatically restart the computer (Figure 3).
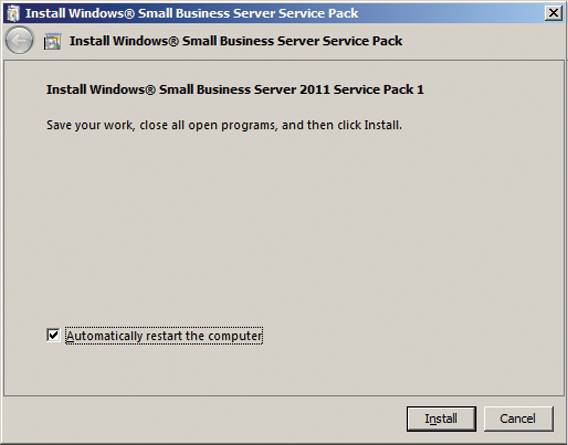
The success of this operation is confirmed in the SBS console below Information. After installing the service pack, the new version level is Build 7601: Service Pack 1.
Best Practices Analyzer
Once you have installed the patches and the service pack, test the basic installation of the server with the free Windows Server Solutions Best Practices Analyzer tool (WSSBPA [7]). It adheres to the rules set by the SBS developers and also detects and diagnoses hidden problems and sources of error. WSSBPA requires the Microsoft Baseline Configuration Analyzer 2.0 [8].
Additionally, the analyzer reports can be integrated into the dashboard. If this option is enabled, the tool checks the server periodically for errors and displays them. This step is recommended in virtually all cases, because it involves practically no additional load on the server. After the scan, the analyzer will present its findings, which can be sorted to suit your needs. Resolve all errors before the SBS upgrade. WSSBPA is also updated via the patch feature (Figure 4).
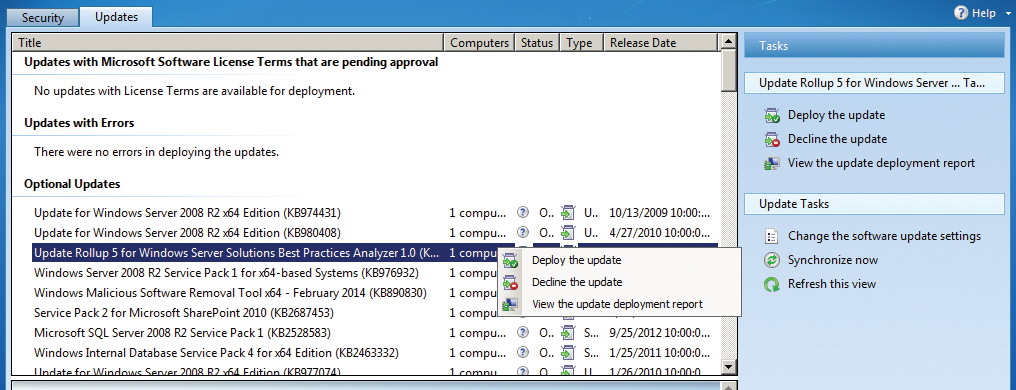
After you have installed all the patches, synchronize the patch database in the management console. In many cases, new updates become available after you complete the current installation. You should install Service Pack 3 for Exchange Server 2010 only after installing all the optional and mandatory updates.
The Exchange component of SBS 2011 should always be kept up to date. To do this, now install Service Pack 3 for Exchange Server 2010. After completing the download, launch the installation with setup.exe. In the wizard, you trigger the server upgrade by selecting Install Microsoft Exchange Server upgrade. This process also restarts some services and takes down any existing client connections to the mailboxes at this point.
At the beginning of the update, the wizard checks whether all prerequisites for the update are satisfied. If it gives you the thumbs up, clicking Upgrade starts the process, which takes up to half an hour depending on system performance (Figure 5).
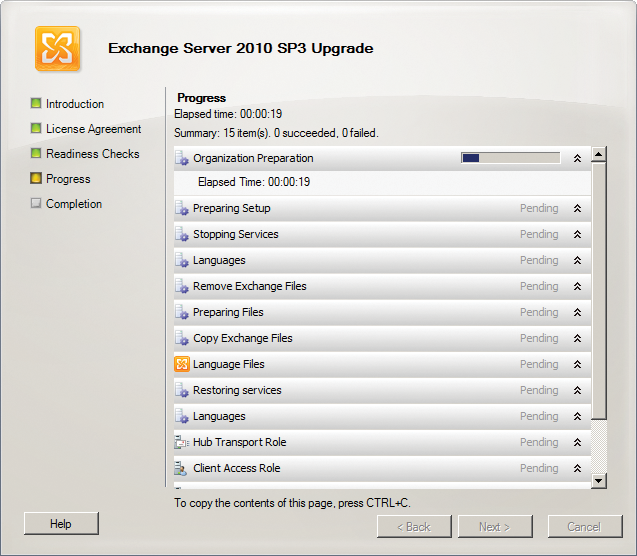
The status of the update is also logged in the C:\ExchangeSetupsLogs directory. The current server version can be found in the Exchange Management Console under Server Configuration. After the upgrade and rebooting, you can see that Service Pack 3 is installed.
Exchange Update Rollup
Service Pack 3 puts the Exchange Server back on a steady footing. Update Rollup 4 then installs minor updates issued since the release of SP3. If you see an error message when installing Rollup 4, you probably have a problem with the Windows Management Framework 3. In this case, uninstall the KB2506143 update. To do this, go to Run and type appwiz.cpl; next, select the window View installed updates. You can then uninstall the update. If the rollup installation still does not work, it is probably a permissions issue; the instructions online [9] describe the necessary settings in detail.
Once again, you will want to stop your antivirus software for the duration of the update, because it could otherwise prevent access to the Exchange system files. Also check with the manufacturer to ensure that your protection program supports the latest server version.
The installation of these patches always follows the same pattern. You first download the current package, which is normally in msp format. Next, double-click the msp file to install the update rollup. This step can take about 20 minutes, depending on the files the package exchanges. This process also kills some Exchange services, so the server may not be available to users during the updates. After the installation, the wizard automatically restarts all services. A subsequent system restart is not required, but it does give you the assurance that all the services fire up as desired.
Defragmentation
Over time, the Exchange database files grow significantly. Although the system automatically groups empty areas together and uses them, at least partially, the total size of the database files still continues to grow. This is counteracted by offline defragmentation, which also removes defective areas from the database. To keep a Small Business Server stable, you should defragment the Exchange database at least once a year.
Offline defragmentation of large databases often takes several hours. The database is not available to users during this time, but defragmentation does ensure that the database files are completely okay after the repairs.
For offline defragmentation, you need to unprovision the database or stop the Microsoft Exchange Information Store system service from using services.msc. Then, launch Eseutil with the /d option and the path to the database: In Small Business Server 2011, this path is normally C:\Program Files\Microsoft\Exchange Server\V14\Mailbox\Mailbox Database.
Before getting to work, the tool creates a temporary copy of the database file and defragments this copy. Finally, it overwrites the original version with the updated copy; thus, you need sufficient free space on the hard disk. For example, the following:
Eseutil /d "Mailbox Database.edb"
is the syntax at the command line for an offline defragmentation.
SharePoint
You can download Service Pack 2 for SharePoint Foundation [4] or enable it in patch management. First, launch SharePoint 2010 Central Administration and click on System Settings | Manage servers in this farm. Make sure that no actions are necessary under Status.
Run the installer and follow the instructions. When it finishes, open a command prompt with administrator privileges and change to the c:\program files\common files\microsoft shared\web server extensions\14\bin directory [10]. Finally, enter the command:
PSConfig.exe -cmd upgrade -inplace b2b -force -cmd applicationcontent -install -cmd installfeatures
