
Maintaining Android in the enterprise
Risk Management
Admins and security experts are losing more and more control over devices within the enterprise, as the presenters of the SUSECon keynotes largely agreed in early November in Orlando [1]. SUSE's CEO Nils Brauckmann was the first to address the problem, and people at IBM, SAP, and Cisco are also aware of the drama.
New management tools, cloud solutions, and mobile computing are adding complications to the quest for better enterprise security. A main concern for many admins is the flood of insecure personal devices that are now used to check email, update calendars, and even access the home network through remote login. The wave of Bring Your Own Device (BYOD) networking is turning the LAN into unsafe terrain.
BYOD Destroys Security Concepts
Integrating mobile devices into the rapidly changing networking landscape (with deep packet inspection, software-defined networking, etc.) would be difficult enough, even in the best of circumstances. Compounding the issue, the majority of endpoints are inherently insecure [2]. Admins need to come to terms with the fact that Google ignores basic security concepts of the Unix and Linux world in Android.
If you have a large enough budget and enough power in your company, you can impose policies on users, turn to expensive crypto phones, or implement one of many commercial offers for mobile device management software. If not, you can use Linux to improve the situation without investing in expensive mobile device management software.
In this article, we show how you can use tools from the Android SDK [3] to retrieve information about the state of the device. You'll learn about apps that are useful in the analysis, and we'll explain how admins can restore equipment to a safe condition – including by backing up user data and flashing a bootloader. These techniques require a high level of access to the Android device, and this discussion is intended for cases in which the phones belong to the company or the owner gives permission for significant modifications.
Rooting Android
Because Google has overturned the popular Linux architecture, anyone who needs to do a little more on an Android device than Google allows first needs root access. Root access is not always easy to come by; in fact, rooting is most likely to succeed if the equipment manufacturer is cooperative. Cooperative vendors include Google with its Nexus devices, as well as Samsung's Galaxy; Sony and HTC usually play along, too.
Caution: If you want to do this (like almost everything in this article) on a third-party device – for example, one owned by an employee – you need the owner's written consent. The following text assumes that the admin has obtained the consent of the employee or has equipment that can be issued to employees. Although this scenario is not strictly BYOD, the problems remain the same because of Android's vulnerabilities.
Superuser Apps
The approaches to gaining root access are so diverse that providing a generic guide is impossible. The only solution here is to search for each device in the developer forums and the usual websites – from XDA Developers [4] to AndroidPIT [5]. If you have managed to root the device with an app like Superuser [6], you can access a number of apps that Google does not want you use that offer advanced features.
These features range from defining a proxy for the browser, setting an ad blocker, and sniffing traffic to the secure configuration of the default route or the DNS server. They also include various settings that would involve major overhead if you wanted to implement them on a desktop PC (e.g., individual firewall rules for each app).
Don't forget that security experts cannot agree whether or not to root their Androids. We subscribe to the principle of equality of arms: An attacker could root the device at any time through exploits with malware. Why should the owner give up this right? Additionally, the features that rooting opens up are likely to convince an experienced Linux user pretty quickly.
Sniffing, Logging, Hardening
With apps such as Network Log [7], smartphones can sniff network traffic caused by the device over longer periods of time. With this information filtered or packaged in easily understandable charts (Figure 1), admins and users can track which app causes how much data traffic.
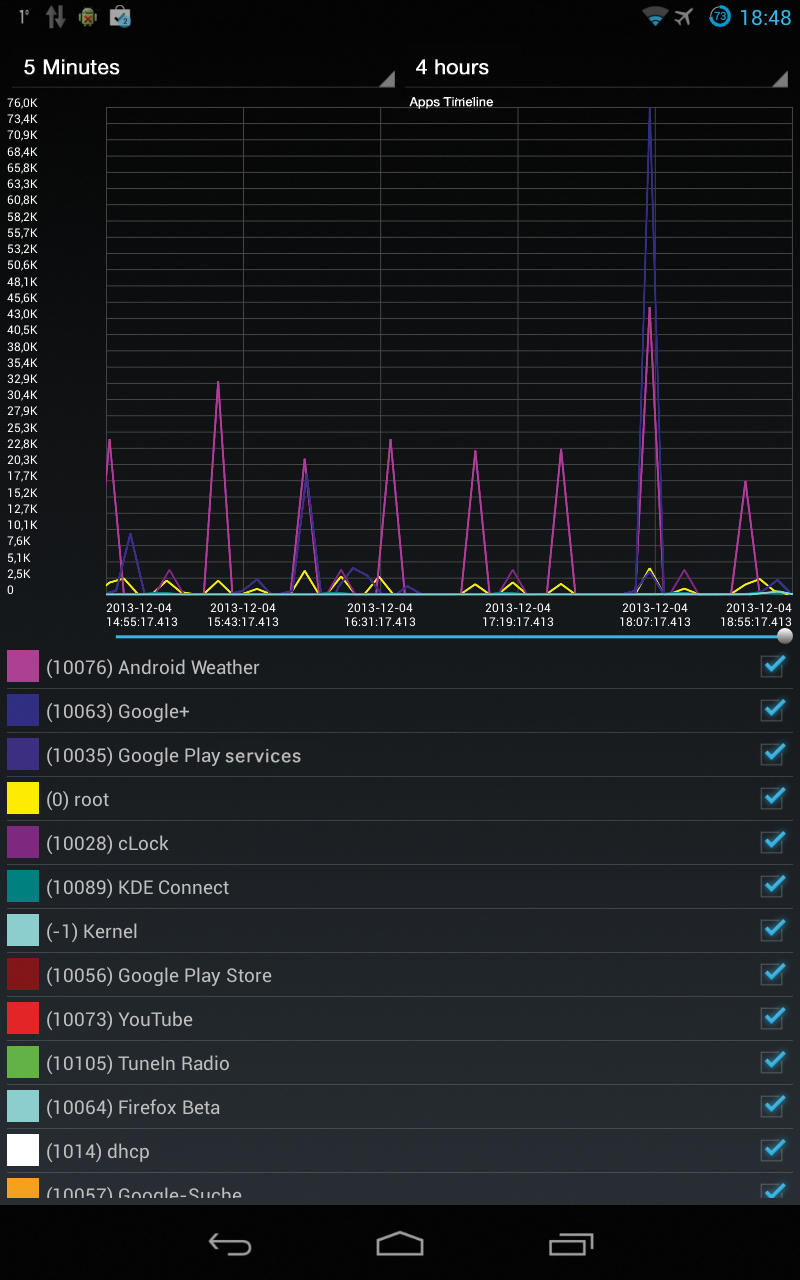
A Flashlight app, for example, that transmits data on a regular basis would at least cause an attentive user some thought. Malware or break-in tools that want to transfer large amounts of data unnoticed would have to be prepared for this or change the TCP stack to remain undetected. Again, you can monitor individual applications, set filters, and much more. Surprisingly, excessive battery consumption is not an issue during logging.
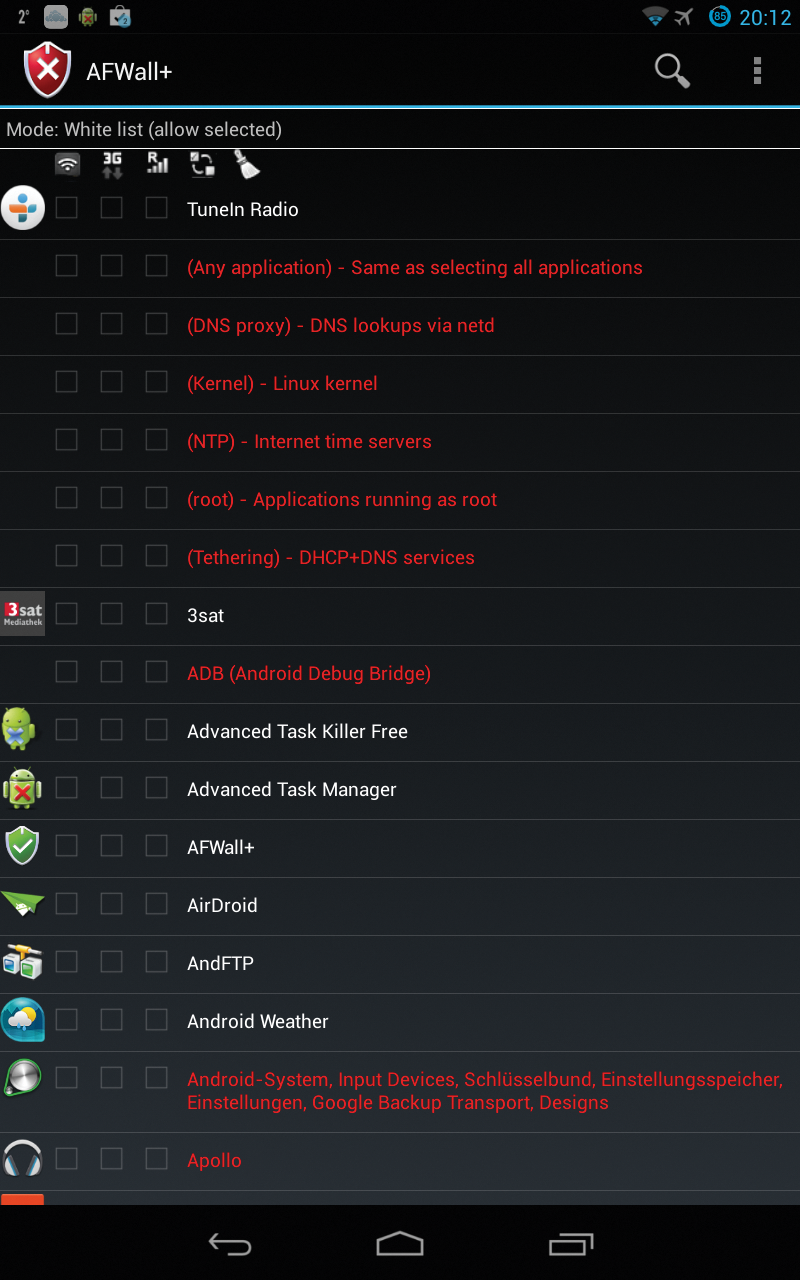
Such useful tools are a dime a dozen in the Google Play store or alternative app stores. Apparently, many websites offer top 10, top 20, or even top 30 lists of the best root apps. We gained a positive impression of tools such as Android Tuner, Cron Tasker, Adblock Plus, zAnti, or the WiFi inspection tool and PCAP sniffer WiFinspect. The AFWall [8] firewall application (Figure 2), which allows application-specific Internet access, seems similarly successful. It gives smartphone owners an easy option for preventing individual apps connecting on GSM networks and explicitly restricting access to WiFi.
An equally large collection of backup and restore tools lets users back up apps and their data in the Android GUI – for example, the popular Titanium Backup [9]. Other apps for admins are described in an article in Linux Magazine [10]. Many admins and owners of smartphones, however, do not know that the Linux or Android console also offers many tools.
ADB: Android Debug Bridge
The Android SDK [3], includes the Android Debug Bridge (ADB). This small tool, together with a daemon using the same name, sets up a terminal connection to a USB-connected smartphone (Listing 1). Both the adb tool and the Android shell itself offer a variety of useful commands for monitoring, backing up, and restoring devices to a predefined state.
Listing 1: Using ADB
01 [mfeilner@pc]# adb devices
02 List of devices attached
03
04 [mfeilner@pc]# su
05 Password:
06 [root@pc]# killall adb
07 [...]
08 [root@pc]# adb devices
09 * daemon not running. starting it now on port 5037 *
10 * daemon started successfully *
11 List of devices attached
12 015d8bed0d3c0814        device
If you use the commands from the SDK regularly, it makes sense to add its path, preferably like this:
PATH= $PATH:/home/mfeilner/bin/adt-bundle-linux-x86_64 \
  -20130917/sdk/platform-tools/
to your Linux path, and ideally via the start files for the shell. If you want to provide the SDK to multiple users, the best idea is to unpack it in /opt.
Listing 1 shows that sometimes root privileges are needed to detect Androids connected to USB. For this to work, root may need to kill the ADB daemon started by the user; after doing this, the smartphone appears. (For this reason, the command only works in line 8 of Listing 1.) After confirmation on the Android display, the status changes in line 12 from unauthorized to device. Listing 2 shows some initial information from the Nexus 7.
Listing 2: The ADB Shell
01 [root@pc]# adb shell
02 shell@android:/ $ uname -a
03 Linux localhost 3.1.10-gd08812a #1 SMP PREEMPT Wed Sep 4 19:55:23 PDT \
   2013 armv7l GNU/Linux
04 shell@android:/ $ cat /proc/version
05 Linux version 3.1.10-gd08812a (build03@cyanogenmod) (gcc version \
   4.6.x-google 20120106 (prerelease) (GCC) ) #1 SMP PREEMPT Wed Sep 4 \
   19:55:23 PDT 2013
06 shell@android:/ $ free
07       total   used    free    shared   buffers
08 Mem:  997720  880472  117248  0        12320
09 -/+ buffers:  868152  129568
10 Swap:   0  0  0
11 shell@android:/ $ cat /proc/cpuinfo
12 Processor       : ARMv7 Processor rev 9 (v7l)
13 processor       : 0
14 BogoMIPS        : 1993.93
15 processor       : 1
16 BogoMIPS        : 1993.93
17 processor       : 2
18 BogoMIPS        : 1993.93
19 processor       : 3
20 BogoMIPS        : 1993.93
21 Features        : swp half thumb fastmult vfp edsp neon vfpv3 tls
22 CPU implementer : 0x41
23 CPU architecture: 7
24 CPU variant     : 0x2
25 CPU part        : 0xc09
26 CPU revision    : 9
27 Hardware        : grouper
28 Revision        : 0000
29 Serial          : 0f410a0001440200
USB Debugging
The whole process only works if USB debugging is enabled on the Android, and the Android user taps the OK button in the confirmation dialog for the PC – a radio button lets you optionally connect individual machines immediately and without prompting.
Incidentally, you can enable USB debugging on newer versions of Android by tapping the Settings | About Phone/Tablet | Build Number entry seven times. On the fourth tap, you see a pop-up; then a new entry appears in the settings where you can enable USB debugging. After doing this, the tweaks described below with ADB, Fastboot, and flashing the device's ROM become possible.
Logcat and Dumpsys
More useful information about the system is provided by commands such as adb logcat (Figure 3), which displays the Android's FIFO buffer – a very interesting source of information of which hackers have occasionally also made use [2]. The dumpsys and bugreport tools in the ADB shell are similarly helpful. An interactive call to adb bugreport >/tmp/bugreport outputs a complete dump of the running system's configuration. Figure 4 uses a dumpsys example with more to show how it can be used with classic Unix tools to improve readability with the use of a pipe or output redirection to a file.
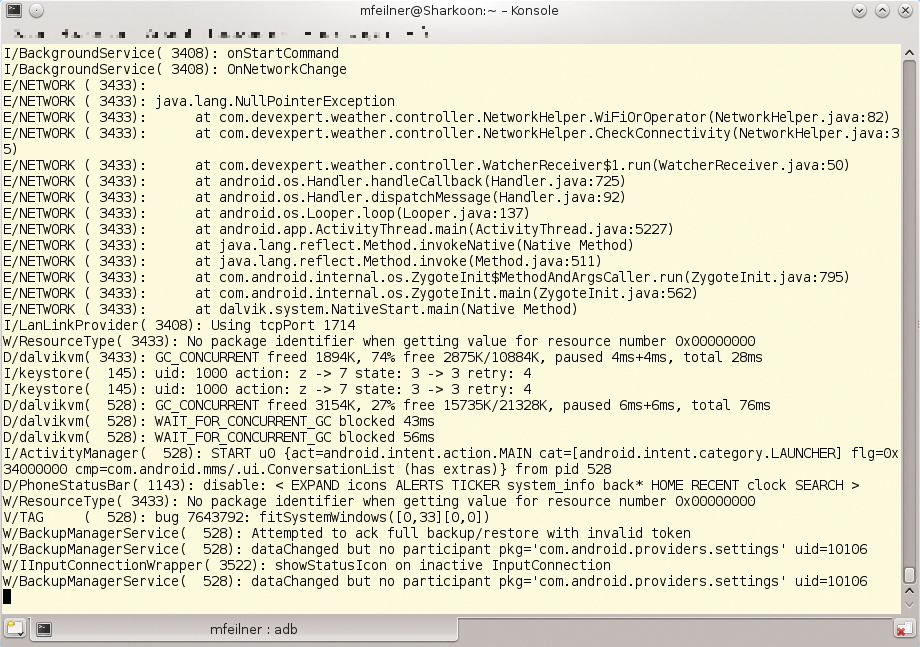
adb logcat outputs the system log. This output shows unlocking the display and an attempted backup.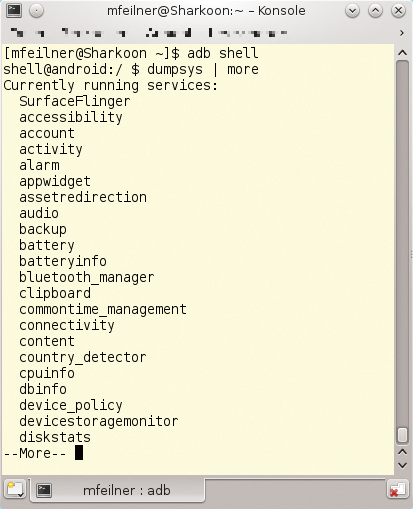
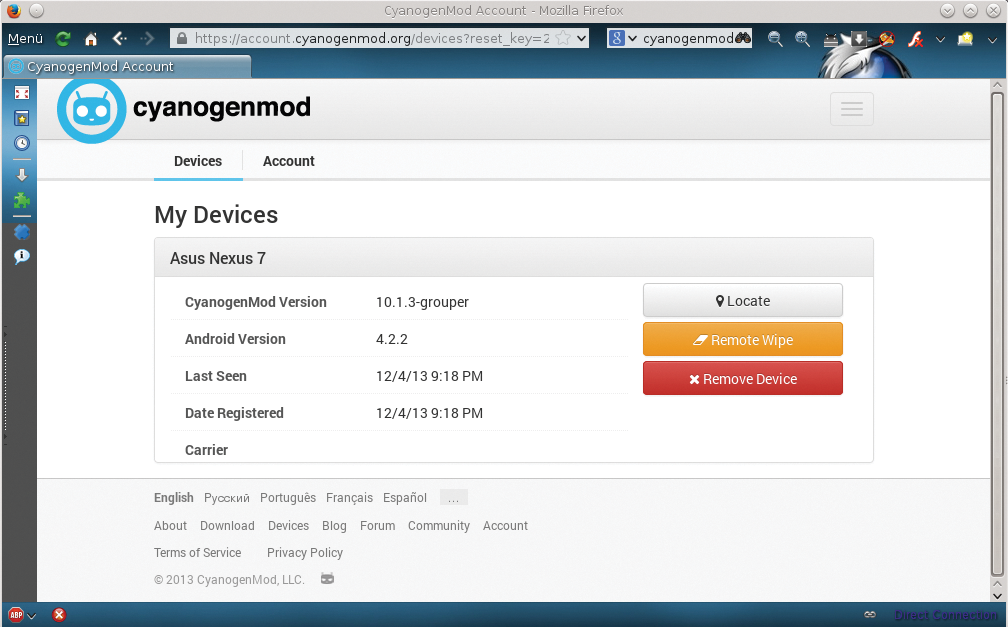
dumpsys command first lists the process list of the active system.On tablets, you can run CyanogenMod 10.1.3, which gives users and admins far more configuration options in many cases; it is a rooted system whose more recent versions include the critical remote wipe button in the web interface (Figure 5).
Always Create a Backup Before Flashing
Before installing an alternative – typically a more recent, faster, and more reliable – image on a tablet or smartphone, admins should always create a backup. As indicated, you can do this with no trouble at the command line. ADB not only supports a shell mode but can also be used interactively with options such as push and pull for file transfer or with backup and restore as a backup tool. Using adb backup <file> writes all user data to a file; similarly, adb restore <file> restores the previous state. Caution: A file created in this way can be several gigabytes, and creating it will take a while.
That said, backing up and restoring can save the admin time and anxiety, especially compared with completely restoring an Android, along with searching for login data or configuration details. Full restore reinstates a defined, secure original state.
Like the Very First Time
However, this process is usually not very useful for restoring a broken or compromised system. If you need to analyze a damaged system, including traces of a break-in, you can do so at your leisure in a virtual Android environment that comes with the SDK tools. A look at the backup options using adb help explains how you can back up and restore an Android device used by multiple users (e.g., with a shared area).
To restore Androids by different manufacturers to a reasonably safe original state free of bloat and spyware at the same time, installing a free image is recommended. To do this, in this example, you need a Nexus 7 tablet (the 2013 model for around US$ 200/EUR 200), three matching files, and another tool from the SDK: Fastboot.
Fastboot, Flashing, and Recovery Images
Listing 3 shows – in a fast-forward overview – how to flash the device with the free and lean CyanogenMod 10.2. You can do this without Windows and the snazzy installer specially written for this purpose: If you are working on Linux, first upload the image you downloaded from the CyanogenMod website [11] to the smartphone by typing adb push. Then, grab the basic Google apps (e.g., the Play Store) that are not included in the image. To unlock the bootloader (fastboot oem unlock) and flash a recovery system (fastboot flash recovery <file>) we used fastboot; its options are shown in Listing 3.
Listing 3: Flashing with Fastboot
01 [root@pc]# adb push cm-10.2-grouper.zip /sdcard/Download/cm.zip
02 [root@pc]# adb push gapps-jb-20130301-signed.zip /sdcard/Download/gapps.zip
03 [root@pc]# fastboot --help
04 usage: fastboot [ <option> ] <command>
05
06 commands:
07   update <filename>                reflash device from update.zip
08   flashall                         flash boot + recovery + system
09   flash <partition> [ <filename> ] write a file to a flash partition
10   erase <partition>                erase a flash partition
11   format <partition>               format a flash partition
12   getvar <variable>                display a bootloader variable
13   boot <kernel> [ <ramdisk> ]      download and boot kernel
14   flash:raw boot <kernel> [ <ramdisk> ]  create bootimage and flash it
15   devices                          list all connected devices
16   continue                         continue with autoboot
17   reboot                           reboot device normally
18   reboot-bootloader                reboot device into bootloader
19   help                             show this help message
20 options:
21   -w                  erase userdata and cache (and format if supported by partition type)
22   -u                  do not first erase partition before formatting
23   -s <specific device>  specify device serial number or path to device port
24   -l                  with "devices", lists device paths
25   -p <product>        specify product name
26   -c <cmdline>        override kernel commandline
27   -i <vendor id>      specify a custom USB vendor id
28   -b <base_addr>      specify a custom kernel base address. default: 0x10000000
29   -n <page size>      specify the nand page size. default: 2048
30   -S <size>[K|M|G]    automatically sparse files greater than size.  0 to disable
31
32 [root@pc]# fastboot oem unlock
33 [root@pc]# fastboot flash recovery recovery-clockwork-touch-6.0.2.3-grouper.img
34 [root@pc]# adb reboot bootloader
35 [...]
If all of this works, adb reboot boots the Android device in its plain vanilla state. To save yourself the work of pushing files, check out the sideload ADB option, with which you can directly load files from your PC to the device. Fastboot is no exception: Often, root privileges are required on the PC. To check whether the tool finds the device, you can type fastboot devices. Just because adb devices works does not automatically mean that Fastboot recognizes the device.
Android Reboot from Linux
After rebooting Android, the next task is to select the images you pushed onto the smartphone or tablet and boot from them. Many devices require a wipe of the partitions and caches beforehand – recovery mode provides menu items; you can select them with volume +/- and Off buttons. The Android operating system then initializes. By now, at the latest, all the data previously on the device is deleted. After completing the configuration and restoring your backup, you should now – hopefully – have the desired original, and more secure, state.
Deep Analysis
In the worst case, admins need to investigate an Android device that is probably compromised – or at least its unusual behavior gives reason to suspect a compromise. If you discover suspicious traces with the tools described previously, you will certainly want more details about who infected the tablet – how and when – in addition to reverting to a safe initial state. Popular Linux tools like Sleuth Kit [12] are also useful for Android.
Each operating system stores its configuration details in a typical form; Linux uses readable configuration files, Windows uses the Registry, and Android mainly uses SQLite databases, which are also popular with many desktop programs, such as Firefox. It does not matter whether you run Firefox on Windows, Linux, or OS X, the history is always found in places.sqlite; only the storage location varies. Google's Android browser stores its history in a file called browser.db.
SQLite Examined
If you want to analyze such databases (e.g., to obtain a history of past web actions), you first need to grab the database off the Android device. The virtualization capabilities of the Android SDK provide a useful tool for testing and learning techniques – you can perform open heart surgery on the system to your heart's content without bricking a device. However, you do need to provide the required content yourself via adb push and adb pull.
For a faster approach, you can simply search the Internet for existing images with preconfigured data. Many practice images are available; viaForensics, for example, offers various free image downloads [13].
Yaffs Nandump Image and Sleuth Kit
As an example, in the following, we will look at the yaffs2-nexus-one-postpopulation.nanddump image. Its file name extension, nandump, is indicative of the Yaffs filesystem, which only a few programs can read. Linux drivers are now available from the Yaffs project [14].
Even though these drivers can be added to the system that you need to evaluate at run time, using the Sleuth Kit 4.1 extensions seems more elegant. For the first time, they come with direct support for Yaffs and ext4. Because most repositories still offered legacy versions of Sleuth Kit when this issue went to press, admins wanting to follow these analysis steps need to build the program from the source code. You can do this with the four commands from Sleuth Kit in Listing 4.
Listing 4: Sleuth Kit
01 [root@pc]# fls -V
02 The Sleuth Kit ver 4.1.0
03
04 [root@pc]# fls -f list
05 Supported file system types:
06         ntfs (NTFS)
07         fat (FAT (Auto Detection))
08         ext (ExtX (Auto Detection))
09         iso9660 (ISO9660 CD)
10         hfs (HFS+)
11         ufs (UFS (Auto Detection))
12         raw (Raw Data)
13         swap (Swap Space)
14         fat12 (FAT12)
15         fat16 (FAT16)
16         fat32 (FAT32)
17         ext2 (Ext2)
18         ext3 (Ext3)
19         ext4 (Ext4)
20         ufs1 (UFS1)
21         ufs2 (UFS2)
22         yaffs2 (YAFFS2)
23
24 [root@pc]# fls yaffs2-nexus-one-postpopulation.nanddump
25 d/d 2:          lost+found
26 d/d 261:        dontpanic
27 d/d 262:        misc
28 d/d 268:        Local
29 d/d 270:        data
30 d/d 271:        app-private
31 d/d 272:        app
32 d/d 273:        property
33 d/d 274:        dalvik-cache
34 d/d 291:        anr
35 d/d 292:        system
36 d/d 394:        backup
37 d/d 3:          <unlinked>
38 d/d 4:          <deleted>
39 d/d 61867264:   $OrphanFiles
40 [...]
41
42 [root@pc]#  fls -r yaffs2-nexus-one-postpopulation.nanddump | grep browser.db
43 +++ r/r * 1573464:  browser.db-journal#600,6
44 +++ r/r * 3670621:  browser.db-journal#605,14
45 +++ r/r * 3408487:  browser.db-journal#615,13
46 +++ r/r 656:        browser.db
47 +++ r/r * 8913552:  browser.db#656,34
48 +++ r/r * 8651408:  browser.db#656,33
49 [...]
You can now start your investigations. The Sleuth Kit version used in the listing is 4.1.0 (4.1.3 is now available); it supports Yaffs, the filesystem is readable, and you can discover directories and files.
In this example, the admin wants to find and reconstruct the browser history of the Android browser. The requested file is browser.db with inode 656. This search result was missing in Listing 4 because the search was not performed recursively. However, it is interesting to see that older versions (journals) of the file also exist here.
Wear Leveling Generates Journal Files
This situation is a result of wear leveling [15], which involves the flash memory under Yaffs attempting to distribute writes conservatively among the memory cells. Forensic scientists love this; they can evaluate several files even if the user has been deleted or the history purged. To do this, you need to extract browser.db with the icat command,
[root@pc]# icat  yaffs2-nexus-one-\
  postpopulation.nanddump 656 > browser.db
along with the meta-information from the image, and view it with the graphical sqlitebrowser (Figure 6).
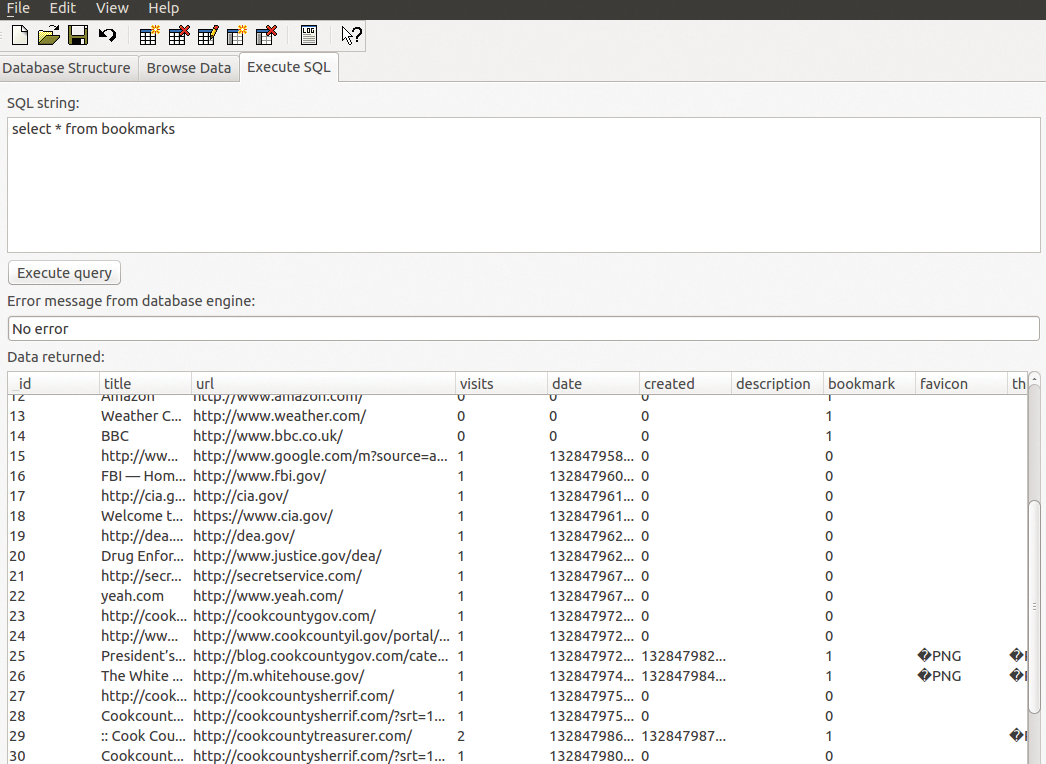
As seen in the figure, the Date field is still in PRTIme format, along with the hard-to-read Unix timestamps. An Awk script generates meaningful values:
[root@pc]# awk '{print strftime("%a, \
  %d %b %Y.%H:%M:%S",($1/1000000-11644473600))}'
Similar information can be read from the image for almost any installed application; the backup or the push and pull commands generated by ADB already allow similar analyses on the running system. If you do this on a regular basis, and possibly automate the process, including measures as prescribed by corporate policy, you have at least a good chance of reducing the time window for break-ins.
If that's not enough, memory dump analysis can help: Memory dump analysis of a running system with Volatility [16] also is available for Android.
Volatility
Since version 2.2, Volatility has been available for Linux, as well as for Android and Mac OS X since the beta 2.3.1. Quickly creating a memory dump of the Android system proves more problematic than running Volatility. As on Linux, each kernel and each version of Android needs customized Lime drivers, and building them can frighten even die-hard Linux specialists. Thank goodness test images are available for Volatility [17].
If you download the Rodeo2012.tgz file from the Google repository (link to DFRWS 2012 Rodeo) and uncompress, you will find two files: Evo4GRodeo.lime and Evo4G.zip. The first is the memory dump created with Lime; the second is the profile [16], which according to the Volatility project, is copied to the plugins/overlays/linux directory. If the profile matches the image, you can get started:
[root@pc]# vol.py --info | grep Linux
Volatile Systems Volatility
  Framework 2.3_beta
LinuxEvo4GARM - A Profile for
  Linux Evo4G ARM
Listing 5 shows the filesystems mounted at the time of the dump; the linux_dentry_cache command helps you search for files, such as browser.db, which is perhaps not stored on the hard disk.
Listing 5: Filesystems
01 [root@pc]# vol.py -f Evo4GRodeo.lime --profile=LinuxEvo4GARM linux_mount
02 Volatile Systems Volatility Framework 2.3_beta
03 WARNING : volatility.obj      : Overlay structure tty_struct not present in vtypes
04 tmpfs                     /app-cache  tmpfs   rw,relatime
05 tmpfs                     /mnt/obb    tmpfs   rw,relatime
06 tmpfs                     /mnt/asec   tmpfs   rw,relatime
07 /dev/block/vold/179:1     /mnt/secure/asec/.android_secure    vfat     rw,relatime,nosuid,nodev,noexec
08 /dev/block/mtdblock5      /cache      yaffs2  rw,relatime,nosuid,nodev
09 /dev/block/mtdblock6      /data       yaffs2  rw,relatime,nosuid,nodev
10 none                  /acct        cgroup rw,relatime
11 tmpfs                 /mnt/sdcard/.android_secure  tmpfs  ro,relatime
12 htcfs                 /data/htcfs  fuse   rw,relatime,nosuid,nodev
13 /dev/block/vold/179:1 /mnt/sdcard  vfat   rw,relatime,nosuid,nodev,noexec
14 none                  /dev/cpuctl  cgroup rw,relatime
15 tmpfs                 /dev         tmpfs  rw,relatime
16 devpts                /dev/pts     devpts rw,relatime
17 /dev/block/mtdblock4  /system      yaffs2 ro,relatime
18 sysfs                 /sys         sysfs  rw,relatime
19 /sys/kernel/debug     /sys/kernel/debug       debugfs    rw,relatime
20 proc                  /proc        proc   rw,relatime
[root@pc]# vol.py -f Evo4GRodeo.lime \
  --profile=LinuxEvo4GARM linux_dentry_cache> filelist
The filelist file contains the information you need, but only in the body file format, which is a raw data format that MACB-Time (from Sleuth Kit) converts into a readable MACB format (mactime -d filelist > filelist.mac). Figure 7 shows how a
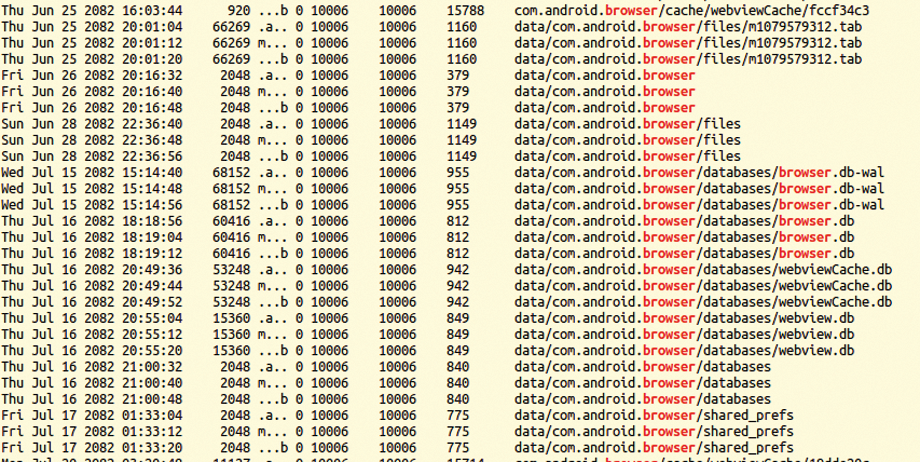
grep browser.db filelist.mac
command line provides the desired information. Volatility then provides the number of inodes required for the administrator to restore a file:
[root@pc]# vol.py linux_find_file \
  -F "/data/data/com.android.browser/databases/browser.db"
[...]
[root@pc]# vol.py linux_find_file -i 0xd3aebd20 -O browser.db
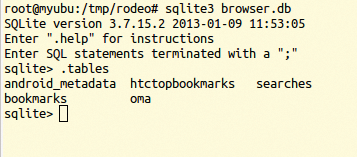
In contrast to Sleuth Kit, the virtual inode 0xd3aebd20 is used for identification purposes. You could use sqlitebrowser here, but the command line is also good for the analysis. Figure 8 shows a successful operation with sqlite3 browser.db and the list of tables contained (.tables). As you can see, the database obviously contains HTC bookmarks. They are revealed by a select * from htctopbookmarks; (Listing 6).
Listing 6: select * from htctopbookmarks
01 1|HTC|http://www.htc.com/|2|11|h|ht|htc
02 2|Google|http://www.google.com/|2|11|g|go|goo
03 3|Facebook|http://www.facebook.com/|2|11|f|fa|fac
04 4|Yahoo!|http://www.yahoo.com/|2|11|y|ya|yah
05 5|YouTube|http://www.youtube.com/|2|11|y|yo|you
06 6|Windows Live|http://www.live.com/|2|11|l|li|liv
07 7|Wikipedia|http://www.wikipedia.org/|2|11|w|wi|wik
08 8|Blogger.com|http://www.blogger.com/|2|11|b|bl|blo
09 9|Baidu.com|http://www.baidu.com/|2|11|b|ba|bai
10 [...]
The Memory Dump Problem
If you want to create your own memory dumps, the process currently involves a huge amount of manual work related to source code, kernel, modules, and more. The following example describes a procedure that worked in our lab with Android 4.4 (KitKat uses kernel 3.4) and an HTC device. An illustrative – but not always consistent – guide from Google itself can be found online [18]. The prerequisite for success is the Android SDK, developer tools, and a cross compiler.
The example does not use the cross compiler from Google's Native Development Kit (NDK) [19], but the existing Ubuntu GNU cross compiler for ARM, because it was easier to talk this tool into cooperating. Just before a deadline, the authors received reports of success from employees of the Swiss Federal Office for Computer Science and Telecommunications, who managed to extract memory dumps using the NDK compiler. For Ubuntu, Listing 7 shows how to retrieve the Android kernel sources from Google's Git.
Listing 7: Preparations on Ubuntu
01 [root@pc]# aptitude install gcc-arm-linux-gnueabi
02 [...]
03 [root@pc]# git clone https://android.googlesource.com/kernel/goldfish.git /opt/android-source
04 [...]
05 [root@pc]# cd /opt/android-source/
06 [root@pc]# git branch -a
07 * master
08   remotes/origin/HEAD -> origin/master
09   remotes/origin/android-goldfish-2.6.29
10   remotes/origin/android-goldfish-3.4
11   remotes/origin/linux-goldfish-3.0-wip
12   remotes/origin/master
13 [...]
14 [root@pc]# git checkout -t remotes/origin/android-goldfish-3.4 -b goldfish-3.4
15 [...]
16 [root@pc]# export ARCH=arm
17 [root@pc]# export SUBARCH=arm
18 [root@pc]# export CROSS_
Now for the tricky bit: Before you compile the kernel sources, you need the right config for the kernel. This is zipped under /proc/config.gz on most devices; other manufacturers make life difficult for the forensic scientist by not installing the file. You sometimes even have to grab it from the source code archives. If the configuration files cannot be found either in forums or in installable open source mods, your only remaining option is painstaking trial and error.
Such a file should also reside on each virtual guest machine (that can launch the SDK); in rare cases, you might even find the file you need in the smartphone recovery system. Once you overcome this hurdle, you can unpack and edit the config file. You typically just need to insert or edit the three MODULES lines:
CONFIG_BASE_SMALL=0
CONFIG_MODULES=y
CONFIG_MODULES_UNLOAD=y
CONFIG_MODULES_FORCE_UNLOAD=y
CONFIG_BLOCK=y
Next, save the file in the source directory and call Make. If the kernel resides in /opt/android-source/arch/arm/boot/, for example, then the command (when run in this directory)
[root@pc]# svn checkout http://lime-forensics.googlecode.com/\
  svn/trunk/lime-android
downloads the Lime driver for Android, including the Makefile for Linux environments, heralding the start of individual problems with the specific devices.
As a general rule, KDIR_GOLD := /opt/android-source must point to the right path, but even the CROSS_COMPILE instruction options differ from device to device. What the approaches have in common is that they both do
ARCH=arm CROSS_COMPILE=$(CCPATH)/arm-linux -gnueabi
to invoke the cross compiler.
Loading the Lime Module
Referring to the example of an Android emulated by the SDK, Listing 8 shows how the Lime module ends up on the smartphone. Immediately after the module is loaded (once only, not on each restart; thus, insmod instead of modprobe), it saves a dump on the (virtual) SD card, which can be downloaded with the usual tricks.
Listing 8: Installing the Kernel and Lime Module
01 [root@pc]# emulator -avd goldfish -kernel  /opt/android-source/arch/arm/boot/zImage -show-kernel -verbose
02 [root@pc]# adb push lime-goldfish.ko /sdcard/lime.ko
03 [root@pc]# adb shell
04 [shell@android]## insmod /sdcard/lime.ko "format=lime path=/sdcard/goldfish.lime"
Here, it makes sense to set up a Netcat connection (nc), if only because the data transfer is faster than going through the SD card.
Even if all of these steps have worked, however, Volatility still needs the correct extensions. Similar to the Linux kernels in a previous article [16], you need to run Make to produce system.map and module.dwarf, which end up as ZIP files in the Volatility profile directory. After entering
zip Goldfish-3_4.zip module.dwarf /opt/android-source/System.map
Vol.py now finds the new profile named Goldfish (Figure 9).

After doing this and selecting the correct settings for your device in the makefiles and the kernel config, you can now start analyzing the memory dump. The command:
vol.py -f goldfish.lime \
  --profile=LinuxGoldfish-3_4ARM linux_mount
lists the existing mounts, even on Android, as described above.
Conclusions
Android is insecure; the add-on software that many manufacturers offer does nothing to change this. Add-ons are not enough to instill confidence in an insecure OS. If you want to avoid big expenditures, you need to take steps yourself to provide a clean, working device to your employees if worst comes to worst.
With the right analysis tools, you can perhaps also find out which door was left open and then use apps such as the AFWall+ firewall to introduce appropriate measures and close the door in the future. There is no alternative to hoping your employees act sensibly and building up mutual trust.
Security experts, such as those at the it-sa IT Security Expo, agree: Android and Apple devices in the enterprise are like PCs in Internet cafes: They are insecure and constantly exposed to threats that cannot be controlled. The only remedy is a regular reinstall.
