
Disaster recovery for Windows servers
Window Repairs
When a server fails to start, you need a carefully considered but fast response. Experts have some quick and easy ways to put Windows servers back on their feet, but some of these powerful techniques could render your system completely useless if you don't get them right. Generally, you should prepare for the worst case in a test environment. Admins who are familiar with the various possibilities can restore a server quickly in an emergency.
In this article, I show you how to fix problems with Windows if the operating system will not boot. The instructions have been tested with Windows Server 2012 R2, but most settings also work in previous versions and with Windows 7/8. You will learn how to restore entire servers and repair virtualized environments based on Windows, as well as how to get special services, such as Active Directory, running again.
Boot Manager Failure
If a server fails to boot, the cause can be a defective boot manager. You can repair it by booting from a Windows Server DVD and calling up the computer repair options. At the command line, you have various options for reactivating a defective boot manager.
The bootrec /fixmbr command overwrites the master boot record at the beginning of the disk, whereas bootrec /scanos lets you view the operating systems that are not currently listed in the boot manager. The bootrec /rebuildbcd command reinstates the systems found in the boot manager, and bootrec /fixboot creates the bootmgr boot manager again.
Further commands for repairing the boot manager are bootsect /nt60 SYS and bootsect /nt60 ALL. You can enter the commands in this section one after another at the command line. Of course, this is only useful if the boot manager has stopped working. If the server starts to boot but then cancels, the boot manager is not defective; the problem is with the operating system.
Windows Will Boot But Not Start
Sometimes Windows stops working or crashes after upgrading drivers. This situation applies to servers and clients. In some cases, Windows system files are destroyed so that Windows still boots, but errors appear or some features fail to launch.
In this case, you can either go back to a system restore point or call the computer repair options on the installation DVD. If you want to repair the system files on the fly, open a command prompt with administrator privileges and enter the sfc /scannow command. Windows scans important system files and restores them if problems arise.
Testing RAM and Hard Disks
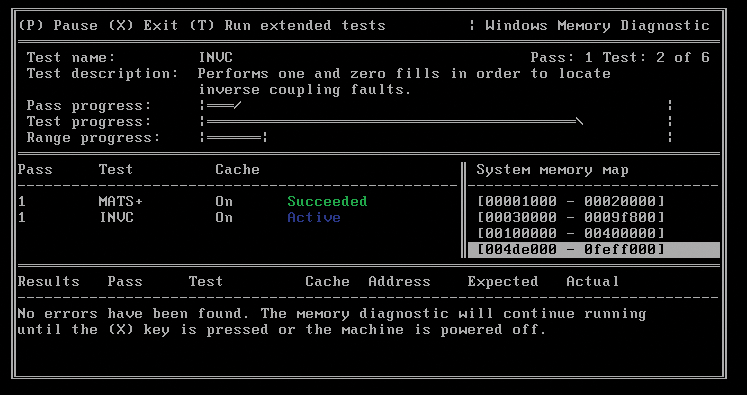
Windows machines display blue screens if they discover a hardware fault in the computer (e.g., in RAM). Thus, it makes sense to test memory before trying a software repair (Figure 1). The BlueScreenView [1] tool is helpful if you need to find out the cause of blue screens. The tool does not require any installation and can be called from a USB stick.
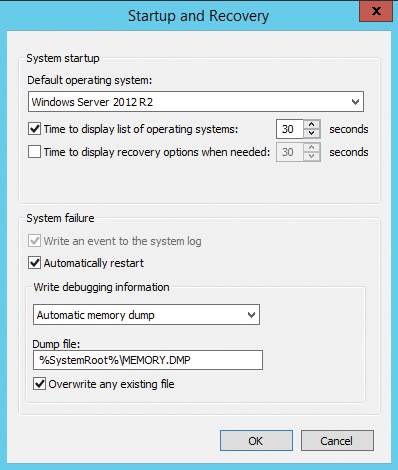
Windows Server 2012 R2 is set up by default to restart automatically after a blue screen. If you experience a blue screen on every restart, the server ends up in a loop. The settings that define how Windows should behave after a blue screen, can be found in Control Panel | System and Security | System | Advanced System Settings.
Under Startup and Recovery, press Settings (Figure 2). First, you should disable the automatic restart. Then, under Write debugging information, choose what kind of information the operating system should save. Your best choice is Automatic memory dump or Small memory dump. BlueScreenView then parses the memory.dmp file that Windows created for the blue screens.
If you suspect an error on the hard disk, for example, because of clicking noises and entries in the Windows Event Viewer (Windows Logs | System), you should test the hard disk and the filesystem. Open a the command prompt with administrative privileges and enter chkdsk /f /r. For further testing of hard disks, you can use something like the free Seatools by Seagate. The program tests most hard disks for errors – not just those manufactured by Seagate. You can find the Seatools and other information for rescuing hard disks online [2]. Western Digital Data Lifeguard is a similar tool [3], which is also available as a Windows application. Hitachi publishes its Drive fitness tool as an ISO file [4].
Restoring a Complete Server
To restore 2012 R2 Windows Server from a full backup, you do not have to rely on third-party software. If you install Windows Server Backup via the Server Manager and back up the complete server on an external drive, you can restore completely on the basis of this backup.
To use Windows Server Backup, you need to install it using Server Manager. Windows Server 2012 R2 offers a Windows Server Backup feature. After the install, launch the backup from the Tools menu in Server Manager, by selecting Windows Server Backup. Alternatively, you can search for wbadmin.msc on the home screen.
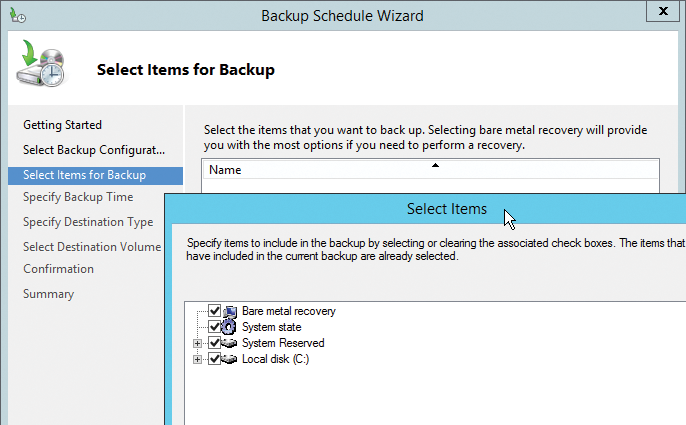
The program will perform a complete block-based backup of the disk. Microsoft recommends backing up an external drive that is formatted automatically by the backup program so that all previously stored data is lost. To create a new job, select Action | Backup Schedule. For a custom backup, you can select which partitions to back up (Figure 3).
For scripts or core servers, the command-line tool wbadmin manages your backups. The most important commands:
- Display information about the available backups:
wbadmin get versions
- Indicate the status of a current backup or restore:
wbadmin get status
- Restore the system state:
wbadmin start systemstaterecovery
- Start a full system backup that can be restored via the computer repair options on the installation DVD of Windows Server 2012 R2:
wbadmin start sysrecovery/systemstatebackup
- Start the backup immediately using
-quietto avoid the need to confirm entries:
wbadmin start backup -allCritical -backupTarget:<targetdisk> -quiet
- Display all assigned partitions that are included in the backup:
wbadmin start backup -include:<Partition1>:,...,<PartitionN>:-backupTarget:<targetdisk>: -quiet
The partitions are comma-separated without spaces.
Instead of using wbadmin, you can manage your backup in PowerShell. The Get-Command-Module WindowsServerBackup Cmdlet in Windows Server 2012 R2 shows you the matching Cmdlets.
After creating a full backup on the server, you can use it to restore the complete server if it fails to boot. To do this, the media containing the backup must be connected to the server, and you must boot to Windows Server 2012 R2 DVD.
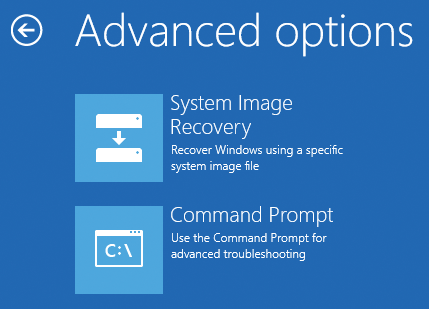
When the Installation Wizard comes up, select Next then Repair your computer to bring up the system restore features. To select the option to restore a system image backup, click on Troubleshoot then System Image Recovery (Figure 4).
Bare Metal Restore on New Hardware
Windows Server 2008 R2 and Windows Server 2012/2012 R2 let you restore a system backup on different hardware. In the wizard, you can select the backup image by date and time of the backup (Figure 5); then, be sure to select the Bare metal recovery option.
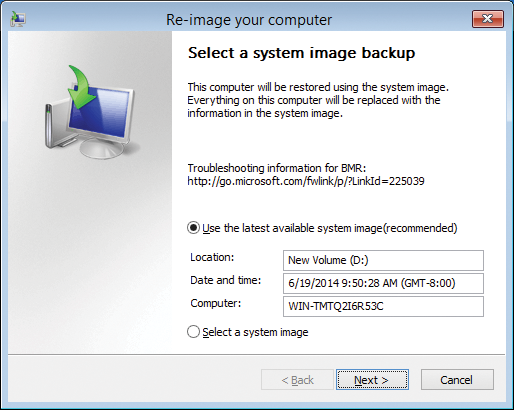
Use the Exclude disks button to select a disk that you will not be restoring, because, for example, it only contains data and no operating system files. Selecting Install drivers lets you integrate important drivers that are required for the recovery. In the options under Advanced, you can specify that the server should start automatically after the restore and verify the disk for defects.
Backing Up and Restoring Active Directory
Active Directory is backed up together with other important system components of a server. This backup, which can be carried out by the native Windows Backup program, also saves all the data required by Active Directory. For the backup, enable the options System state and System Reserved so that the data required for recovery of Active Directory is also backed up. You will also want to back up the bare metal data. To perform a restore, start the domain controller and, directly after starting, press the F8 key until the boot menu appears. Make sure the file containing the backup resides locally on the server, because it is needed for recovery.
In the Boot Options menu, select Directory Services Restore Mode, and Windows will then start. Log in to the application with the password for Active Directory restore mode. After you have logged in, you can complete the restore. You also can enable directory services restore mode via an RDP session or a command-line command on the local console.
If you want to boot a domain controller into the directory services restore mode, enter bcdedit /set safeboot dsrepair. If the server is in directory services restore mode, you can enter bcdedit /deletevalue safeboot to tell it to boot normally next time. This saves you from pressing the F8 key if you are not, for example, sitting directly in front of the console. The shutdown t 0 -r command reboots the server in the configured mode. You must install the same version of the operating system as before the failure.
The approach of rejoining the domain with a domain controller, rather than restoring a backup, is often faster and cleaner. However, you should clean up the Active Directory metadata before rejoining a domain to ensure that no stale data exists in the Active Directory preventing you from promoting the domain controller.
Cleaning Up Active Directory
When a domain controller is removed from Active Directory, you need to make some preparations so that users are not affected by its loss. Make sure the domain controller is not used as the preferred or alternative DNS server by any other computers in the domain (not even as a DNS forwarding server).
If possible, remove the DNS service from this domain controller before downgrading. In the DNS Manager on another DNS server, check in Properties that the server removed is no longer listed in the Name Servers tab. Do not remove the host entry for the server, as it is still needed for the downgrade.
Make sure that the domain controller is not explicitly registered as a domain controller at any point (e.g., on a Linux server or an Exchange server). Then, remove all Active Directory-based services, such as VPN, certificate authority, or other programs that will not work after the downgrade. Before the downgrade, first migrate all FSMO roles to other servers.
If there is a global catalog on this server, configure another server as the global catalog server and – in the Active Directory Sites and Services snap-in tool – under Sites | <Sitename> | Servers | <Servername>, right-click NTDS Settings, choose Properties, and uncheck Global Catalog in the General tab to remove the services for the old domain controller.
To downgrade a domain controller, your best bet is to use the PowerShell Uninstall ADDSDomainController Cmdlet (Figure 6). You still need to set the local administrator password via the command, which must be defined as a secure string in PowerShell. The syntax for doing this is:
Uninstall-ADDSDomainController -LocalAdministratorPassword (Read-\
  Host-Prompt password -AsSecureString)

The Get-Help Uninstall-ADDSDomainController command gives you more information.
If you do not want to reinstall a domain controller that has lost its connection to the Active Directory, you can remove Active Directory, despite the lack of connection. In this case, use the -force option. The Active Directory metadata contains all the entries and server names that belong to Active Directory. If a domain controller is down or forcibly removed from Active Directory, the metadata needs to be modified retroactively.
To do this, you need to start the ntdsutil tool at the command line (Figure 7) and type metadata cleanup, followed by connections. Use connect to server <domain controller> to connect to the domain controller and enter quit to return to the metadata cleanup menu.
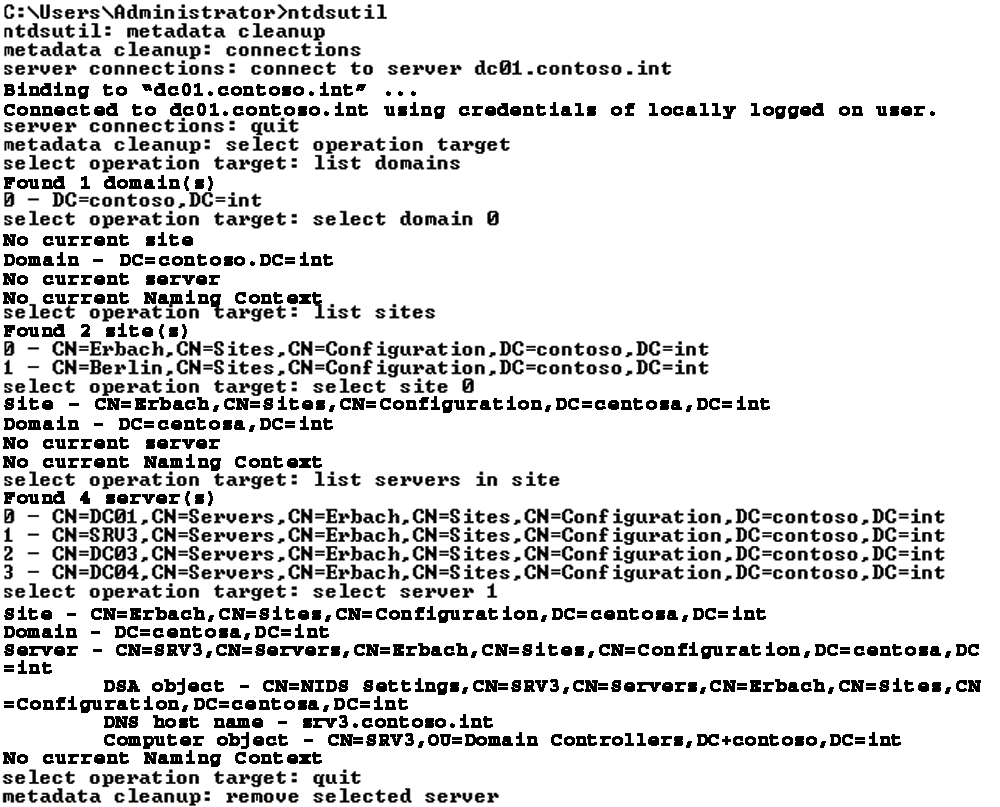
Enter select operation target and list domains for a list of all domains in the forest. Enter select domain <number of domain> to select the number of the domain from which you want to remove a domain controller. Entering list sites gives you all the locations in the forest; you can select one of them with select site <number of site>. The list servers in site command shows you all the domain controllers that are associated with this location, and select server <number of server> removes a server from the domain.
Again, enter quit to return to the metadata cleanup menu. The remove selected server command first prompts you and then removes the server after confirmation.
After cleaning up the metadata in Active Directory, you still need to clean up the DNS entries. Start by removing all the SRV records that still point to the old server from the DNS zone of the domain; then, you can then delete the server's computer account. Delete the account under Domain Controllers in the Active Directory Users and Computers snap-in.
In the next step, you need to delete the domain controller from the site to which it was assigned. To do this, again use the Active Directory Sites and Services snap-in. Navigate to the location of the domain controller, select Delete in the pop-up menu, or press the Del key. Next, check the NTDS Settings of each domain controller in Active Directory to make sure that the domain controller is not registered as a replication partner and remove the connection if it is.
Fixing the AD Database
In some circumstances, the Active Directory database may stop working. Before you install a domain controller, you can try to repair the AD database. To do so, start the server in Directory Services Restore Mode and call ntdsutil. Enter activate instance ntds, then files; this starts file maintenance. Next, enter integrity; enter quit to leave file maintenance.
Database analysis is launched by the semantic database analysis command. For a detailed report, choose verbose on. If you enter go fixup the tool starts the diagnostics and repairs the database on request. Next, quit ntdsutil and restart the domain controller.
Exchange Backup
You can back up Exchange 2013 with the internal Backup Wizard in Windows Server 2008 R2/2012; the program also backs up the Exchange databases and supports online backups for Exchange databases. During the backup, the program performs a consistency check of Exchange files. Only when you restore can you select the Exchange databases.
Start a restore in the backup program via the Action menu. The Backup Wizard automatically de-provisions the database you are restoring and then provisions it again after the backup. The wizard guides you through selecting one of the local servers and defining the date and time of the backup you want to restore.
To begin, click Select Application in Select Recovery Type (Figure 8). The Exchange option must be listed under Applications. Then, you must ensure that an Exchange-compatible backup is available. View Details displays the backed up Exchange databases.
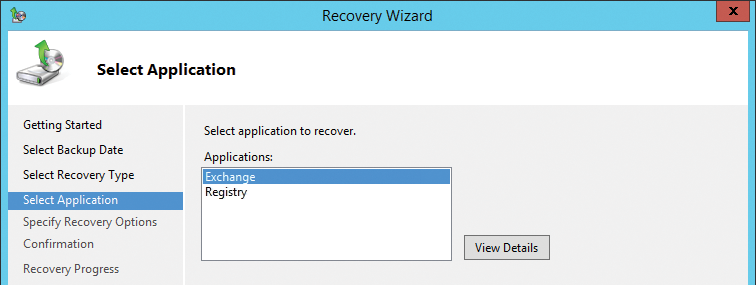
If the backup is the current version, a checkbox appears suggesting Do not perform a roll-forward recovery of the application databases. For a roll-forward recovery, you need the transaction logs that were created after the backup. Exchange then writes them to the database to complete the recovery. If you enable the Recover to Original Location option, the backup program restores all backed up databases in their original locations.
After restoring, you can integrate the data files into a recovery database and then manually move them back to their original location, or you can restore individual data from the backup.
