ZFS on Linux helps if the ZFS FUSE service refuses to work
Dancing with the Devil
The differences between Linux and BSD start with everyday tools, such as ifconfig and fdisk. When it comes to the popular and powerful ZFS filesystem [1], the incompatibilities extend to hard disk images. The new FreeBSD 10 in particular can cause Linux admins problems when reconstructing data from ZFS pools.
As a case in point, an expert in a recent court case was tasked with evaluating a disk image: The injured party created a dd image of his server and saved the image to a hard disk connected to a FreeNAS [2] system, which is based on BSD. The idea was for experts to analyze the server image directly from the data disk on a Linux forensics station. Windows was ruled out from the start because it cannot handle the ZFS system.
Missing Info
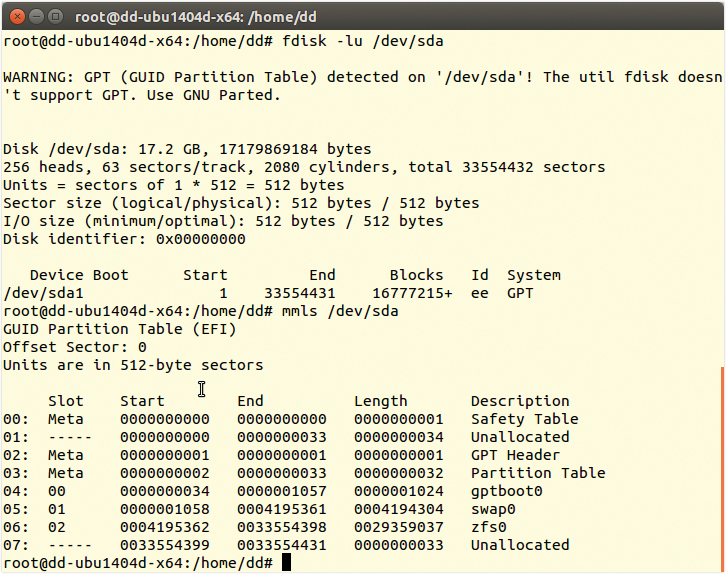
Surprisingly, the data disk had no partition information in the form of a master boot record (MBR) or a GUID partition table (GPT) [3]. The tricks the expert used to revive RAID systems (Figure 1) did not help: Neither fdisk nor mmls – the forensic counterpart from The Sleuth Kit – were willing to cooperate.
Because the victim had stored the image on a FreeNAS system, the standard file format should have provided UFS information. However, the filesystem information was unavailable. Was this disk using ZFS?
The recently released FreeBSD 10 [4] uses ZFS, which will boost the number of ZFS installations. That means more admins will be confronted with this scenario in the future.
Solution
If you remove a ZFS drive and try to mount it on a Linux system, you are likely to face the same problem as the forensics expert in the example: The installed ZFS FUSE detects a zpool, but mounting it is impossible because the FUSE driver currently uses an obsolete version of ZFS. The solution comes courtesy of the ZFS on Linux project [5].
In contrast to the FUSE driver from the default repository, ZFS on Linux works with kernel drivers that offer comparable performance. You need to add the PPA with:
add-apt-repository ppa: zfs-native/stable
The aptitude update command lists the necessary programs (Listing 1).
Importing the Zpool
The aptitude install ubuntu-zfs command installs all the programs and drivers. DKMS automatically completes the upgrade after fairly frequent Ubuntu kernel upgrades. Now, when you use fdisk and mmls, you see some (fairly) useful information (Figure 1).

What you need is access to the filesystem, which could reside in 06:zfs0; however, to determine the name of the pool, you need a zpool import (Listing 2). The name of the pool is zroot (line 2); you can finally mount it under this name.
Listing 2: zpool import Output
01 zpool import
02    pool: zroot
03      id: 8592000589434241473
04   state: ONLINE
05  status: The pool was last accessed by another system.
06  action: The pool can be imported using its name or numeric identifier and
07         the '-f' flag.
08    see: http://zfsonlinux.org/msg/ZFS-8000-EY
09  config:
10
11         zroot                      ONLINE
12           ata-ST380215AS_9QZ68Z7S  ONLINE
Not Under Root
Caution is advised here: Without specifying any options, the zpool would be mounted in the root directory of the active system. The /var directory it contains then ends up in the active Linux system – on top of the existing /var. This just reeks of problems; it makes much more sense to specify a new / structure.
The following example uses /media/zfs,
zpool import -f -R /media/zfs/ zroot
where -f stands for --force, -R sets a new target root, and zroot is the name of the pool found in Listing 1.
Listing 1: ZFS Packages
01 p   libzfs-dev                          - Native ZFS filesystem development files for Linux
02 p   libzfs-dev:i386                     - Native ZFS filesystem development files for Linux
03 p   libzfs1                             - Native ZFS filesystem library for Linux
04 p   libzfs1:i386                        - Native ZFS filesystem library for Linux
05 p   libzfs1-dbg                         - Debugging symbols for libzfs1
06 p   libzfs1-dbg:i386                    - Debugging symbols for libzfs1
07 i A libzfs2                             - Native ZFS filesystem library for Linux
08 p   libzfs2:i386                        - Native ZFS filesystem library for Linux
09 p   libzfs2-dbg                         - Debugging symbols for libzfs2
10 p   libzfs2-dbg:i386                    - Debugging symbols for libzfs2
11 v   lzfs                                -
12 v   lzfs:i386                           -
13 v   lzfs-dkms                           -
14 v   lzfs-dkms:i386                      -
15 i   ubuntu-zfs                          - Native ZFS filesystem metapackage for Ubuntu.
16 p   ubuntu-zfs:i386                     - Native ZFS filesystem metapackage for Ubuntu.
17 p   zfs-auto-snapshot                   - ZFS Automatic Snapshot Service
18 i   zfs-dkms                            - Native ZFS filesystem kernel modules for Linux
19 p   zfs-dkms:i386                       - Native ZFS filesystem kernel modules for Linux
20 v   zfs-dkms-build-depends              -
21 c   zfs-fuse                            - ZFS als FUSE
22 p   zfs-fuse:i386                       - ZFS als FUSE
23 p   zfs-initramfs                       - Native ZFS root filesystem capabilities for Linux
24 p   zfs-initramfs:i386                  - Native ZFS root filesystem capabilities for Linux
25 v   zfs-mountall                        -
26 v   zfs-mountall:i386                   -
27 i   zfsutils                            - Native ZFS management utilities for Linux
28 p   zfsutils:i386                       - Native ZFS management utilities for Linux
29 p   zfsutils-dbg                        - Debugging symbols for zfsutils
30 p   zfsutils-dbg:i386                   - Debugging symbols for zfsutils
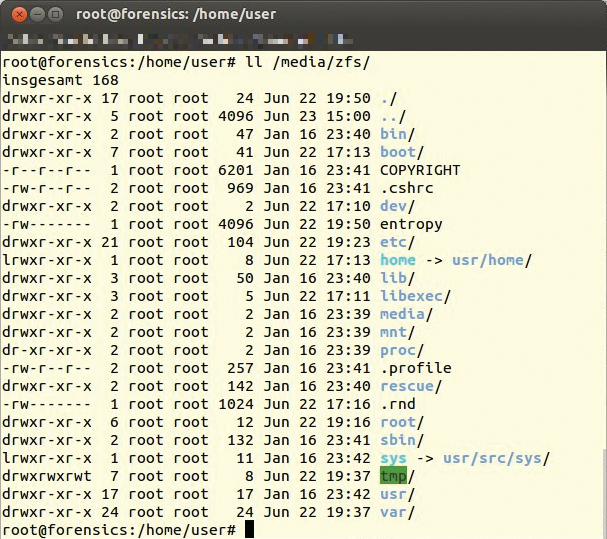
A look at /media/zfs shows that the admin has full access to the filesystem; the case is solved at that level, at least (Figure 2).

/media/zfs.Other Complications
Of course, the court insists on solid evidence. The forensic scientist works with images and never on the original system, because of the obligation to provide evidence of not having made any changes and the risk of destroying evidence.
This requirement turns out to be tricky with ZFS and Linux: The zpool can't use the dd image because it only displays physical devices. The only solution here is a loopback device:
losetup -o $((4195362*512)) /dev/loop0 image.dd
The ZFS partition converts root into a loop device; it then informs the zpool that the ZFS pool data does not physically exist but is available as a loop device below /dev. The sector offset for the zfs0 partition is 4195362. Because this value needs to be converted into bytes, the command line shows a multiplication (*512). The adjusted zpool command is now:
zpool import -f -d /dev -R /media/zfs
This step also ensures logical access for the forensic scientist to an image with a ZFS filesystem. Because forensics experts usually prefer to work with the "Expert Witness" format, rather than using unwieldy raw images, the next step would be to use xmount to embed and convert the image on the fly:
xmount --in ewf --out dd --cache /tmp/zfs.ovl image.E* /ewf
losetup -o $((4195362*512)) /dev/loop0 /ewf/image.dd
zpool import -f -d /dev -R /media/zfs
