Automated builds using CentOS 7 and Kickstart
Rapid Install
Automating builds can have a huge effect in time savings when building new Linux servers and workstations. However, time is not the only advantage; automated builds can also ensure you meet PCI data security standards (DSS), internal audits, patching requirements, and other security controls and measures that make up the reality of today's system administrator's responsibilities.
Automating builds using Kickstart [1] comprises two key parts: booting the system off the network and installing the system. The booting portion typically involves DHCP relaying and PXE boot network support, which is beyond the scope of this article, so I will focus on the automated system installation.
Installing CentOS 7
The first step in building out a Kickstart infrastructure is to install the CentOS 7 operating system on the Kickstart server. The X Window system is not needed, so the hardware doesn't need to be high end; however, a faster system with a good network connection will make standard builds quicker. Here are the steps involved in installing CentOS 7:
1. Download the ISO [2].
2. Burn the ISO to DVD.
3. Configure the server to boot from DVD.
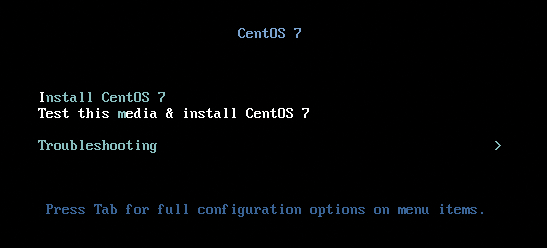
4. Start the install. Once the server boots, you'll see the Install CentOS 7 prompt (Figure 1).

5. Complete the several steps of the install process. A minimal install should be the default.
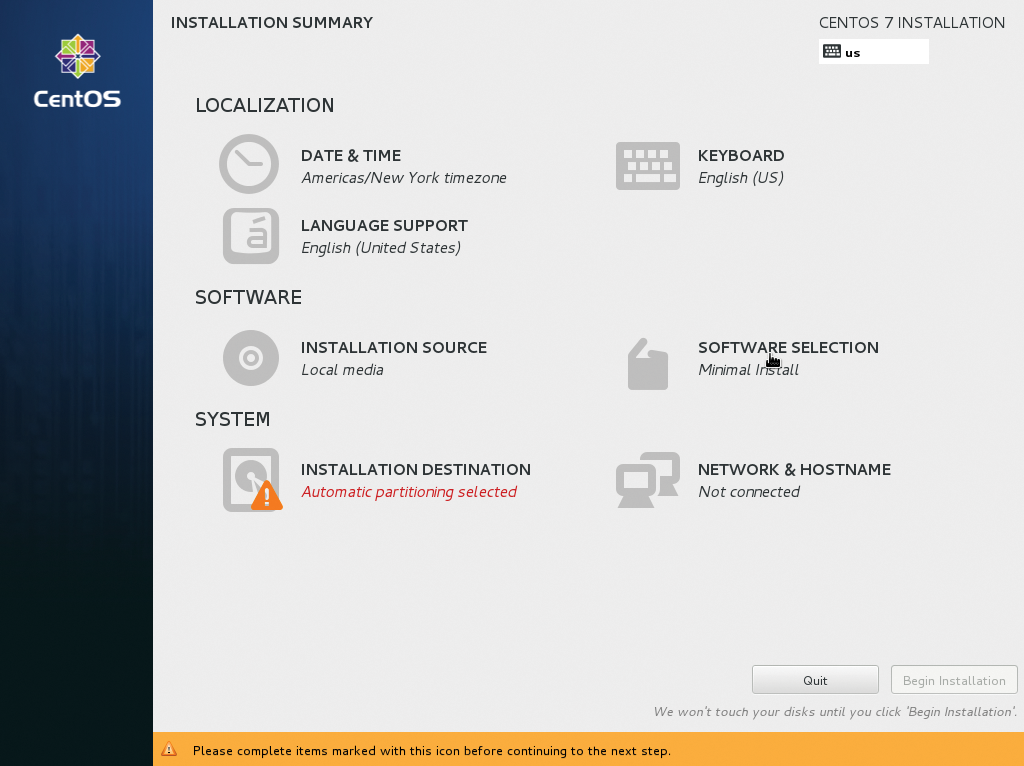
Once you've completed the steps, the installation should show up as a Minimal Install under Software Selection on the Installation Summary page, as shown in Figure 2.

Network Configuration
Once the server is booted, the system must be configured with an IP address. To identify the appropriate Ethernet interface, enter the command
ip addr show
which lists the interfaces recognized by the system. In my case, the Ethernet interface was identified as enp0s3. Next, you can edit the network configuration file for the interface with:
nmtui
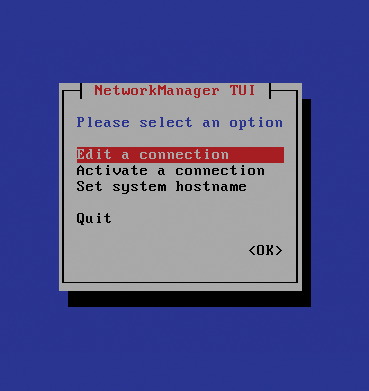
This will bring up the NetworkManager TUI screen as shown in Figure 3.

Select Edit a connection for the appropriate interface. Then enter the IP network information specific to your network. My network configuration is shown in Figure 4. Be sure to activate Automatically connect in the lower half of the screen as you scroll down. This tells the system to bring up the interface at boot time. Next, set the system hostname by editing the /etc/hostname file. In this case, I used the hostname kickstart. Reboot the system and ensure you have network access by opening an SSH session to the system.

Installing Apache
Once the system is up and running, you can install the Apache web server, which will be used to install the files. As root, execute yum install httpd (Listing 1).
Listing 1: Install Apache
[root@kickstart ~]# yum install http
Loaded plugins: fastestmirror
Loading mirror speeds from cached hostfile
 * base: yum.tamu.edu
 * extras: mirror.raystedman.net
 * updates: mirror.thelinuxfix.com
No package http available.
Error: Nothing to do
[root@kickstart ~]# yum install httpd
Loaded plugins: fastestmirror
~...
  Verifying  : apr-util-1.5.2-6.el7.x86_64           3/5
  Verifying  : apr-1.4.8-3.el7.x86_64                4/5
  Verifying  : httpd-2.4.6-18.el7.CentOS.x86_64      5/5
Installed:
  httpd.x86_64 0:2.4.6-18.el7.CentOS
Dependency Installed:
  apr.x86_64 0:1.4.8-3.el7                     apr-util.x86_64 0:1.5.2-6.el7
  httpd-tools.x86_64 0:2.4.6-18.el7.CentOS     mailcap.noarch 0:2.1.41-2.el7
Complete!
Now, Apache can be started with:
[root@kickstart ~]# systemctl start httpd.service
and provisioned to start at system boot (Listing 2).
Listing 2: Start Apache at System Boot
[root@kickstart ~]# systemctl enable httpd.service
ln -s '/usr/lib/systemd/system/httpd.service' \
      '/etc/systemd/system/multi-user.target.wants/httpd.service'
The Firewall daemon also needs to be provisioned to allow Apache to receive network connections. You can do this by adding the firewall rule to be active at startup:
firewall-cmd --permanent --add-service http
Then, enter
firewall-cmd --add-service http
to allow the traffic through immediately for Apache.
Syncing Repos
To ease administration of keeping the Kickstart repo in sync, I install the yum-utils packages (Listing 3), which includes the useful program reposync.
Listing 3: Install yum-utils
[root@kickstart ~]# yum install yum-utils
Loaded plugins: fastestmirror
Loading mirror speeds from cached hostfile
 * base: yum.tamu.edu
 * extras: mirror.raystedman.net
 * updates: mirror.thelinuxfix.com
Resolving Dependencies
--> Running transaction check
---> Package yum-utils.noarch 0:1.1.31-25.el7_0 will be installed
--> Processing Dependency: python-kitchen for package: yum-utils-1.1.31-25.el7_0.noarch
~...
-kitchen-1.1.1-5.el7.noarch                            2/3
  Installing : yum-utils-1.1.31-25.el7_0.noarch                             3/3
  Verifying  : python-chardet-2.0.1-7.el7.noarch                            1/3
  Verifying  : python-kitchen-1.1.1-5.el7.noarch                            2/3
  Verifying  : yum-utils-1.1.31-25.el7_0.noarch                             3/3
Installed:
  yum-utils.noarch 0:1.1.31-25.el7_0
Dependency Installed:
  python-chardet.noarch 0:2.0.1-7.el7       python-kitchen.noarch 0:1.1.1-5.el7
Complete!
Creating a Repository
I can now use reposync to create the repository in the /var/www/html directory with:
[root@kickstart ~]# cd /var/www/html/
[root@kickstart base]# reposync -r base -a x86_64 -n
Reposync will look for the base repo in /etc/yum.repos.d/ and then sync from the particular web server found. Because the system was created from a CentOS DVD, it points to the CentOS repository.
This process will churn along for quite a while, because the repository is more than 4GB in size. Once it is complete, you can then install creatrepo with yum install createrepo, as shown in Listing 4.
Listing 4: Install createrepo
[root@localhost ~]# yum install createrepo
Loaded plugins: fastestmirror
Loading mirror speeds from cached hostfile
 * base: mirror.umd.edu
 * extras: mirror.net.cen.ct.gov
 * updates: mirror.fdcservers.net
Resolving Dependencies
--> Running transaction check
---> Package createrepo.noarch 0:0.9.9-23.el7 will be installed
~...                                1/6
  Installing : python-deltarpm-3.6-3.el7.x86_64                             2/6
  Updating   : libxml2-2.9.1-5.el7_0.1.x86_64                               3/6
  Installing : libxml2-python-2.9.1-5.el7_0.1.x86_64                        4/6
  Installing : createrepo-0.9.9-23.el7.noarch                               5/6
  Cleanup    : libxml2-2.9.1-5.el7.x86_64                                   6/6
  Verifying  : python-deltarpm-3.6-3.el7.x86_64                             1/6
  Verifying  : libxml2-python-2.9.1-5.el7_0.1.x86_64                        2/6
  Verifying  : deltarpm-3.6-3.el7.x86_64                                    3/6
  Verifying  : createrepo-0.9.9-23.el7.noarch                               4/6
  Verifying  : libxml2-2.9.1-5.el7_0.1.x86_64                               5/6
  Verifying  : libxml2-2.9.1-5.el7.x86_64                                   6/6
Installed:
  createrepo.noarch 0:0.9.9-23.el7
Dependency Installed:
  deltarpm.x86_64 0:3.6-3.el7           libxml2-python.x86_64 0:2.9.1-5.el7_0.1
  python-deltarpm.x86_64 0:3.6-3.el7
Dependency Updated:
  libxml2.x86_64 0:2.9.1-5.el7_0.1
Complete!
Creating the repo does not provide a context for the groups used by CentOS (Red Hat). For example, there is no concept of a minimal install, web server install, or the like. To support this, you must set up the repo to support groups:
[root@localhost ~]# cd /var/www/html/
[root@localhost ~]# mkdir repodata
Now, mount the DVD media into the DVD drive and mount it on the filesystem (Listing 5). The actual repository metadata can now be created as shown in Listing 6.
Listing 5: Mount the DVD
01 [root@localhost ~]# mount /dev/sr0 /media/
02 [root@localhost ~]# cp /media/repodata/4b9ac2454536a901fecbc1a5ad080b0efd
   74680c6e1f4b28fb2c7ff419872418-c7-x86_64-comps.xml.gz
   /var/www/html/repodata/
03 [root@localhost ~]# gunzip /var/www/html/repodata/4b9ac2454536a901
   fecbc1a5ad080b0efd74680c6e1f4b28fb2c7ff419872418-c7-x86_64-comps.xml.gz
04 [root@localhost ~]# rm /var/www/html/repodata/4b9ac2454536a901fecbc1
   a5ad080b0efd74680c6e1f4b28fb2c7ff419872418-c7-x86_64-comps.xml.gz
Listing 6: createrepo Metadata
01 [root@localhost ~]# cd /var/www/htm/base/
02 [root@localhost ~]# createrepo -g repodata/4b9ac2454536a901fecbc1a5ad
   080b0efd74680c6e1f4b28fb2c7ff419872418-c7-x86_64-comps.xml
   .Spawning worker 0 with 8465 pkgs
03 Workers Finished
04 Saving Primary metadata
05 Saving file lists metadata
06 Saving other metadata
07 Generating sqlite DBs
08 Sqlite DBs complete
09 [root@localhost ~]#
Kickstart
Although I am not going to go through DHCP and PXE boot configuration here, I can still test the Kickstart process using the DVD and Kickstart file created to build the Kickstart server:
[root@localhost html]# cd /root/
[root@localhost ~]# cp anaconda-ks.cfg /var/www/html/kickstart.ks
Because I installed from DVD, I need to change the new Kickstart file so that it will read the packages from the new Apache server. To do this, edit the /var/www/html/kickstart.ks file and change the entry that says cdrom to this entry:
url --url http://192.168.1.70/base
Replace 192.168.1.70 with the IP address of your Kickstart server. Also, you need to find the clearpart entry that looks like this
clearpart --none --initlable
and change it to:
clearpart ---drives --all initlabel
Warning: Do not kickstart a system for which you do not intend to erase the drives, because the clearpart --all parameter will create new file partitions on the drive.
Although this is a basic Kickstart setup, it makes for a great start on which to build out any customizations. To use the Kickstart and repository I set up here, boot up another system with the CentOS 7 DVD; then, when you see Install CentOS 7, instead of selecting an option, hit the Escape key and enter the following at the boot prompt:
linux ks=http://192.168.1.70/kickstart.ks
About five minutes later, on an average network, the new server will be built.
Additional Automations
In this article, I covered only the fundamentals for setting up the Apache server to serve up the Kickstart and RPM files needed for the automated build process. Take a look at Red Hat's documentation [3] for additional features supported by Kickstart. The process includes postprocesses and installing and removing additional packages, and because it is based on Linux, the customization is almost limitless.
Common automation tasks include network configuration, adding standard user accounts, assigning hostnames, and so on. Give a couple of these a try.
