
Setting up FreeNAS
Flexible Storage
Whether you need a network storage solution for your enterprise or small business or a place to store your multimedia library, FreeNAS can help. It provides a powerful array of features that can be adapted to meet almost any storage needs.
Various aspects of FreeNAS [1] have been covered in previous issues of ADMIN magazine, including a look at version 9.1.1 in Issue 17 [2]. However, if you are new to FreeNAS and the general topic of Network-Attached Storage (NAS), this might be a good time to get to know FreeNAS from the ground up.
In this first of two articles about FreeNAS, I will accomplish the initial setup of a FreeNAS box. The next article will dive into integrating with Windows Active Directory, snapshots, replication, and backup. FreeNAS is a behemoth when it comes to features (see the "FreeNAS Features" box for details).
FreeNAS
Early versions of FreeNAS originate from the embedded firewall project m0n0wall, and the software has since undergone a complete metamorphosis. The current version is built on powerful open source technologies of FreeBSD, Python, and many others.
iXsystems
Many successful open source projects have some form of corporate backing. This provides a powerful financial base to help drive a project's development and support its existence. iXsystems [3] is the sponsor behind the FreeNAS project, but it doesn't end there. They, like most other open source companies, take it a step further by offering enhanced software, hardware, and support options. They offer a souped-up version of FreeNAS called TrueNAS for enterprise deployments. It differs in the options for performance enhancements, high-availability clustering, manageability improvements designed for large deployments, robust reporting, automated drive replacement, and others.
TrueNAS [4] is coupled with the company's own hardware and support. Hardware offerings are available from small home office systems to large enterprise storage solutions. These high-quality hardware options are great if you want a single point for support or don't care to engineer a storage solution yourself.
ZFS
One of the key powerful features of FreeNAS is the ZFS [5] filesystem originally created by Sun Microsystems, now Oracle Corporation. Note that ZFS combines the roles of both a filesystem and a volume manager. This revolutionary filesystem packs a powerful punch of features (see the "ZFS Features" box).
Installing FreeNAS
I assume you are starting from scratch with a brand-new FreeNAS install. To this end, I'll give you a step-by-step overview of a basic FreeNAS installation. By the end of the article, you'll have a fully functional FreeNAS box.
FreeNAS does require some hardware planning, but it is well documented. Because the system is based on FreeBSD 9.3 [6], you can find lots of details on the FreeBSD Hardware Compatibility List [7]. If you have specific questions, you can head over to the FreeNAS forums [8] and the many helpful community members. General recommendations for this setup are:
- 64-bit processor (FreeNAS is 64-bit only)
- At least 8GB RAM (more is better)
- Minimum 8GB compact flash, SSD, USB flash drive, or regular hard drive for boot device
- Size and number of drives required for your chosen RAID configuration
In this case, I'm using an HP MicroServer with the following:
- 16GB RAM
- Two 3TB (storage) hard drives
- One 500GB (FreeNAS) drive
FreeNAS can be installed to compact flash, USB flash drive, SSD, or regular SATA hard drive for boot device. It is important to note that entire devices will be unavailable for use as storage and will be dedicated to FreeNAS. In this setup, the two 3TB hard drives will be used for storage and the 500GB hard drive will be the FreeNAS drive.
As you may notice, I am only using a single SATA drive for the FreeNAS drive. This represents a single point of failure, because it isn't fault tolerant. If needed, you can mirror your FreeNAS drive and add fault tolerance to your configuration. To do so, simply add another drive and select them both on install so that they are configured as a mirror.
To begin, download FreeNAS from FreeNAS.org and validate the checksum of the downloaded file. Note that Windows has no built-in checksum validation tool. However, you can download an official File Checksum Integrity Verifier (FCIV) utility [9] from Microsoft, and dozens of open source tools are available. For Windows, I recommend the open source application WinHasher [10]. Next, write the image to disk (USB flash drive).
On OS X, Linux, and Unix, you use the dd command to write the image to your install disk. If you are on Windows, you can use Win32 Disk Imager [11]. Of course, you could also burn a CD if you have an optical drive on the machine you are building.
Installing the FreeNAS Box
Once you have written the image to the FreeNAS install storage option of your choice, plug it into your FreeNAS box. In my case, I used an internal drive that was already connected.
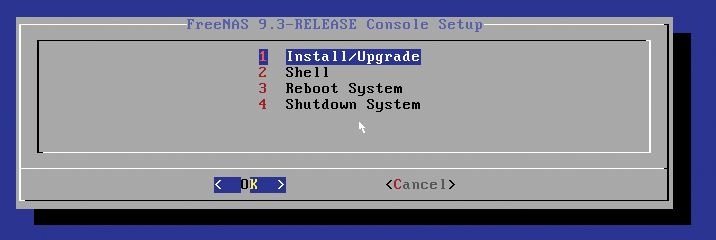
On boot, you will see a sweet text-based menu (Figure 1). In the console setup, choose option 1 Install/Upgrade. Next, select the target drive on which to install FreeNAS and set a secure root password. You have now completed your install.
Post-Install Configuration
Once you have installed your FreeNAS box, reboot, and you will be presented with the FreeNAS console menu (Figure 2). Here you can do all of the basic setup options listed here.
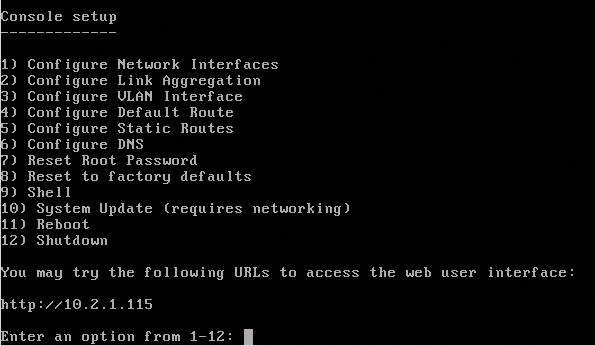
1) Configure Network Interfaces: Provides a configuration wizard to configure the system's network interfaces.
2) Configure Link Aggregation: Allows you to either create a new link aggregation or to delete an existing link aggregation.
3) Configure VLAN Interface: Used to create or delete a VLAN interface.
4) Configure Default Route: Used to set the IPv4 or IPv6 default gateway. When prompted, input the IP address of the default gateway.
5) Configure Static Routes: Prompts for the destination network and the gateway IP address. Re-enter this option for each route you need to add.
6) Configure DNS: Prompts for the name of the DNS domain, then the IP address of the first DNS server. To input multiple DNS servers, press Enter to input the next until all have been entered. When finished, press Enter twice to leave this option.
7) Reset Root Password: If you are unable to log in to the graphical administrative interface, select this option and follow the prompts to set the root password.
8) Reset to factory defaults: If you want to delete all of the configuration changes made in the administrative GUI, select this option. Once the configuration is reset, the system will reboot. You will need to go to Storage | Volumes | Auto Import Volume to re-import your volume.
9) Shell: Enters a shell to run FreeBSD commands. To leave the shell, type exit.
10) System Update: If any system updates are available, they will automatically be downloaded and applied.
11) Reboot: Reboots the system.
12) Shutdown: Halts the system.
The first step in this example will be to set a static IP address.
Setting a Static IP
By default, FreeNAS will boot up and get a DHCP address that it will list on its console setup menu. In this case, you will set it to a static address by choosing option 1, Configure Network Interfaces. Then, follow the steps shown in Listing 1.
Listing 1: Configuring Network Interfaces
Enter an option from 1-11: 1
1) em0
Select an interface (q to quit): 1
Delete existing config? (y/n) n
Configure interface for DHCP? (y/n) n
Configure IPv4? (y/n) y
Interface name: (press enter as can be blank)
Several input formats are supported
Example 1 CIDR Notation: 192.168.1.1/24
Example 2 IP and Netmask separate:
IP: 192.168.1.1
Netmask: 255.255.255.0, or /24 or 24
IPv4 Address: 192.168.1.120/24
Saving interface configuration: Ok
Configure IPv6? (y/n) n
Restarting network: ok
You may try the following URLs to access the web user interface:
http://192.168.1.120
Next, fire up the browser of your choice (in my case, Firefox) and go to http://<ip-of-freenas>. Behold FreeNAS in all its glory (Figure 3).

FreeNAS is built on FreeBSD Unix, so the default username is root. This is configurable in the Account | Users section of the web interface. Thankfully, FreeNAS comes with some sane security defaults, such as disabled SSH and no root SSH login, to leave you in a more secure place from the start.
After you have logged in to FreeNAS for the first time, you will see the setup wizard. However, I am going to close this and come back to it. First things first: You need to update.
Checking for Updates
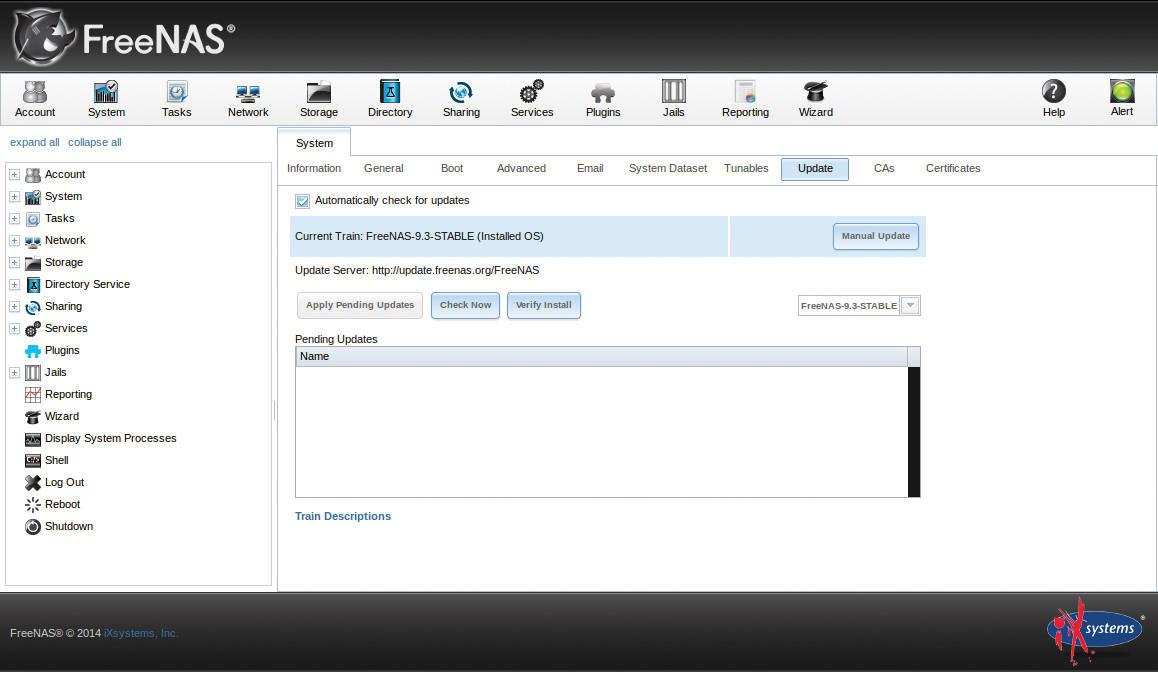
Once you have a base configuration, you should check for updates. Do this by going to System | Update. Then click Check Now (Figure 4). If an update exists, apply it. Patches should always be done proactively.
Now that you have updated and set your static IP, you can start configuring. To do so, you will use the FreeNAS setup wizard.
FreeNAS Setup Wizard
I'm a big fan of wizards. That sentence alone probably makes me seem far too geeky; however, the FreeNAS setup wizard takes you through the setup process with unparalleled ease. To access it, simply click on the wizard icon in the FreeNAS web GUI. From there, you can select your language and time zone.
Pool Setup
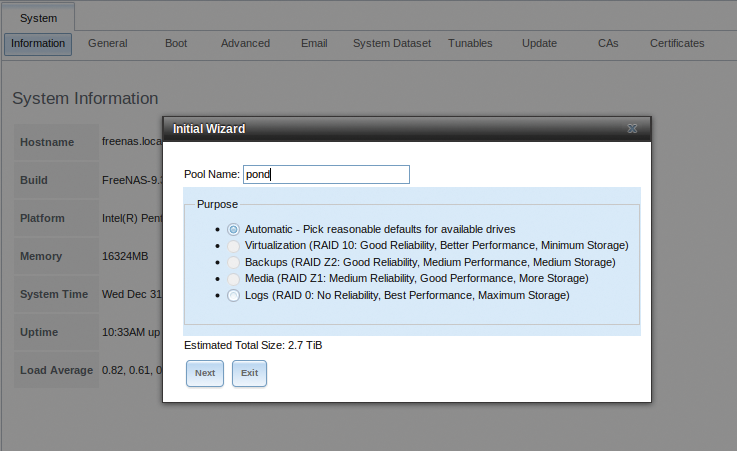
Next, you need to set up your pool (Figure 5). Pools are a core storage unit of ZFS. To do this, you simply give your storage pool a name and select your RAID configuration. In this case, provide a name of your choosing, and because you only have two disks (and you want fault tolerance), select Automatic.
Several redundancy options are available when you create a volume. You can choose from the following:
- Automatic: Automatically creates a mirrored, RAIDZ1, or RAIDZ2 pool, depending on the number of disks. If you prefer to control the type of redundancy, select one of the other options.
- RAID 10: Creates a striped mirror and requires a minimum of four disks.
- RAIDZ2: Requires a minimum of four disks. Up to two disks can fail without data loss.
- RAIDZ1: Requires a minimum of three disks. Up to one disk can fail without data loss.
- Stripe: Requires a minimum of one disk. Provides no redundancy, which means that if any of the disks in the stripe fail, all data in the stripe is lost.
Again, because you have two disks here, you should choose Automatic. This setting will create a mirrored or RAID 1 configuration providing some fault tolerance at a less expensive price point compared with the many other options requiring many more disks.
Directory Options
Your FreeNAS system can easily integrate with your existing network directory services [12] or use its own local user configuration (Figure 6). If you are running Windows Active Directory, LDAP, NIS, or NT4 (I hope not!), you can pull the usernames/passwords directly from your directory. Because I am not integrating with Active Directory in this example, simply click Next to use local FreeNAS authentication and then click Next.
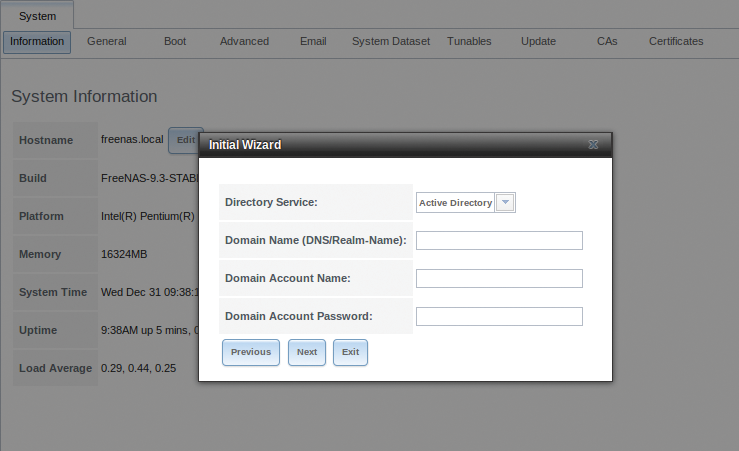
If you are running Windows NT4 (Windows < Windows 2000) or NIS, please plan an upgrade with all due swiftness. These are antiquated, insecure technologies that should only be exhibited in museums.
Thanks to the powerful web interface, integrating FreeNAS into your environment is a trivial task. Now that you have configured your FreeNAS to use local authentication, you can continue setting up the network share.
Creating a Share
Using the wizard, it is very easy to create many kinds of shares (Figure 7). Supported share types include:
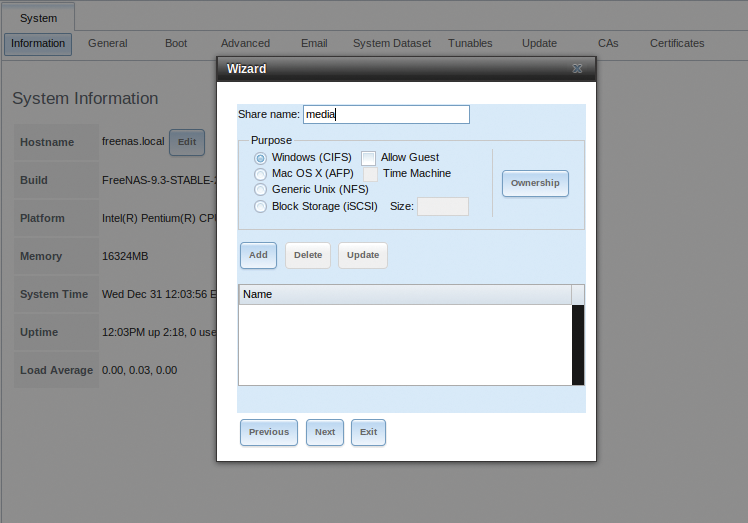
- Windows (CIFS): This type of share can be accessed by any operating system using a CIFS client. Check the box for Allow Guest if users should not be prompted for a password to access the share. If you make any CIFS shares using the wizard, you can fine-tune them afterward using Sharing | Windows (CIFS) Shares.
- Mac OS X (AFP): This type of share can be accessed by Mac OS X users. Check the box for Time Machine if Mac users will be using the FreeNAS system as a backup device. If you make any AFP shares using the wizard, you can fine-tune them afterwards using Sharing | Apple (AFP) Shares.
- Generic Unix (NFS): This type of share can be accessed by any operating system using an NFS client. If you make any NFS shares using the wizard, you can fine-tune them afterwards under Sharing | Unix (NFS) Shares.
- Block Storage (iSCSI): This type of share can be accessed by any operating system using iSCSI initiator software. Input the size of the block storage to create in the format 20G (for 20GB). If you make any iSCSI shares using the wizard, you can fine-tune them afterward using iSCSI.
In this setup, you have a network of Windows and Linux machines, so you can create a CIFS share by doing the following. First, give the share a name and set any options you may need. Next, click on Ownership. In the field, add a new local username, password, and group that you will use to access this FreeNAS share. Under mode, change the permissions to fit your security needs.
The next screen sets a console message that can be configured to be forwarded to your email. Do so if needed. If not, click Next.
Connecting to Your Share
Now that you have created your share, you can connect to it. On Windows, you simply do the following:
\\<ip-of-freenas>
You will then see the media share that you created with the FreeNAS setup wizard.
If you like, you can also map this as a network drive. Simply go to Computer and select Map Network Drive. Pick a drive letter, fill in the path to \\<ip-of-freenas>, and you are good to go.
Conclusion
There you have it. A simple, quick FreeNAS setup is ready for whatever task you want to throw at it. In the next installment, I will cover integrating with Windows Active Directory, snapshots, replication, and backup.
I hope this exploration of FreeNAS will have you building your own solutions at work and at play with this amazing software. Bravo to the FreeNAS community and iXsystems for this amazing contribution to the world of computing. Happy hacking!
