
Integrating FreeNAS with Windows Active Directory
Fun with FreeNAS
Whether you need a network-attached storage (NAS) solution for your enterprise or small business or just want to build a storage solution for your Windows network, FreeNAS has got you covered.
In a previous issue [1], I showed you how to install FreeNAS, configure sharing, and set up a basic client node. In this article, I dive into more advanced features, such as integrating Windows Active Directory, snapshots, replication, and backup.
Directory Options
Your FreeNAS system [2] can easily integrate with your existing network directory services or use its own local user configuration. If you are running Windows Active Directory, LDAP (e.g., OpenLDAP), NIS (Network Information Service), or NT4 (I hope not!), you can pull the usernames and passwords directly from your directory. In this article, I focus on integrating your FreeNAS box with Windows Active Directory.
In this example, I am building on Windows 2012 R2, but you could build this many other ways. For example, if you have an open source environment, you might build this on Samba 4, which can provide much of the same technology.
Unlike the last installment on FreeNAS, in which I used a local FreeNAS authentication system, this time, I instead point the FreeNAS system to a Windows 2012 Active Directory server. This effectively means that I don't have to recreate users in FreeNAS; instead, I refer to Windows AD for authentication.
In this configuration, FreeNAS polls the Windows 2012 Active Directory domain controller and imports the users into FreeNAS. Keep in mind that FreeNAS also supports being a domain controller (DC) itself or being an additional DC alongside your others. Here, I use it for authentication only, not as a full active directory implementation.
Prerequisites
Before beginning, you must take care of a few prerequisites. To check your configuration in the web management interface, go to Network | Global Configuration (Figure 1). Double-check your network settings (IP, Gateway, etc.) and make sure the correct domain is listed and you are pointed at the correct DNS server. This is easily accomplished by going to the FreeNAS shell in the web GUI or the Console. In this case, assure you are pointing to your Active Directory (AD) domain controller.
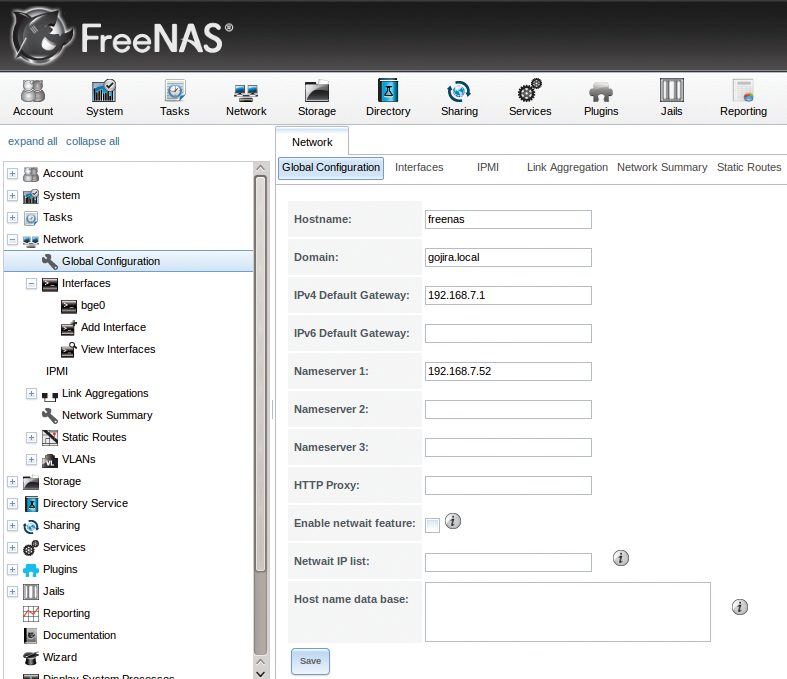
Next, you should go to your DNS server (which happens to be your AD domain controller as well) and add a DNS record for your FreeNAS box. Finally, test the name resolution and network availability from the shell on FreeNAS with ping or dig.
Network Time Protocol (NTP) synchronizes time on a network. Time is of vital importance to many services such as Kerberos and logging, among others. In this case, you want to assure both your Windows 2012 R2 server and FreeNAS box are pointing to the same NTP server. In FreeNAS, you can do so by going to System | General | NTP Servers.
If you are running an End-of-Support/End-of-Life version of any software, it is time to upgrade. Systems such as Windows NT4 to 2003 (end of life in 2015) or NIS are beyond antiquated, insecure technologies that should only be exhibited in museums.
Setting up AD Authentication
With the prerequisites out of the way, you are ready to begin. For this section, I assume you already have a basic FreeNAS setup that is using local authentication (FreeNAS local users/passwords) and you are reconfiguring it to use Windows Active Directory. Starting this process is simply accomplished by navigating in the FreeNAS web GUI to Directory | Active Directory (Figure 2). Simply put in your domain, AD administrator account and AD administrator password. When it finalizes, you will see a success message flash at the top of the FreeNAS screen.
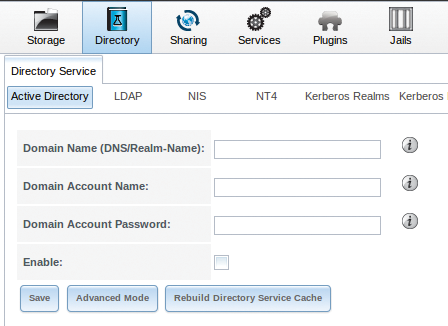
Generally, you will be fine using the default option (non-advanced mode), but quite a few options are customizable by clicking the Advanced Mode button [3]. Once you have set up your FreeNAS box to use AD, you can go to your volumes and change the permissions as desired under Storage | View Volumes. Simply select the volume you want to manage and then click the Change Permissions icon. From there, you will see the usual options for assigning permissions.
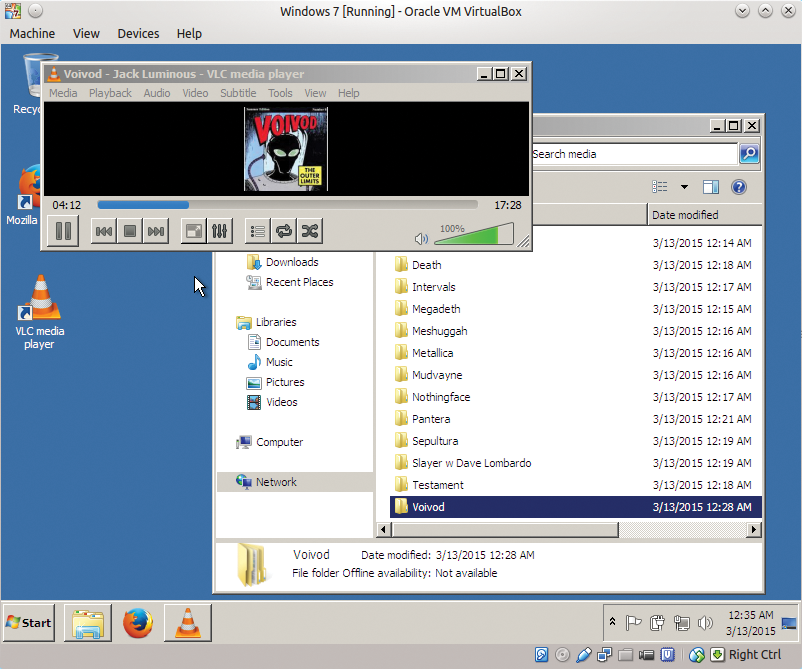
Now that you have set your FreeNAS server with Active Directory, you can use a Windows client to test it. As you see in Figure 3 on a Windows 7 client joined to the domain, I'm able to connect to the share and enjoy the music (metal specifically) that I have stored there. Give me a minute to rock out! \m/( )\m/
Snapshots
If you ever had to recover a deleted file or roll back to an older version, you'll love snapshot functionality. Once you set up snapshots, you can access files as they were from the point in time at which the snapshot was made. Previous snapshots can also be cloned and used to recover data from that snapshot in time. Snapshots can also be replicated (copied) to another remote system. With FreeNAS, you can do one-time snapshots or periodically scheduled them. In this case, I want to set up periodic or scheduled snapshots, so I go to the FreeNAS web interface and navigate to Storage | Volumes | Periodic Snapshot Tasks | Add Periodic Snapshot (Figure 4; Table 1).
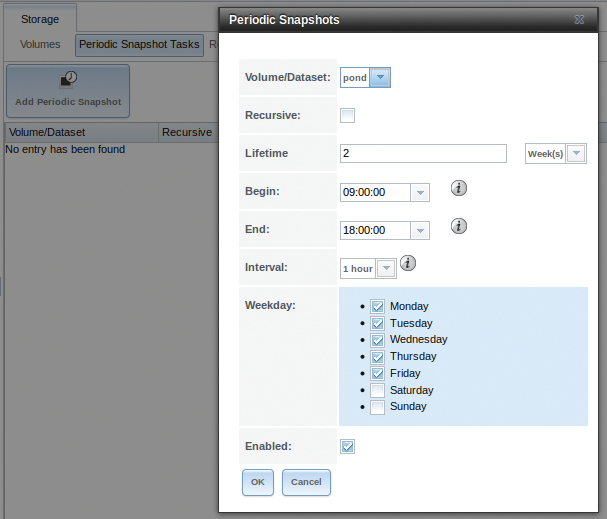
Tabelle 1: Periodic Snapshot Options
|
Setting |
Description |
|---|---|
|
Volume/Dataset |
Select an existing ZFS volume, dataset, or zvol. |
|
Recursive |
Check this box to take separate snapshots of the volume/dataset and each of its child datasets; if unchecked, only one snapshot is taken of the specified Volume/Dataset. |
|
Lifetime |
How long to keep the snapshot on this system; if the snapshot is replicated, it is not removed from the receiving system when the lifetime expires. |
|
Begin |
Do not create snapshots before this time. |
|
End |
Do not create snapshots after this time. |
|
Interval |
How often to take snapshots between Begin and End times. |
|
Weekday |
Which days of the week to take snapshots. |
|
Enabled |
Uncheck to disable the scheduled replication task without deleting it. |
Select the lifetime and frequency of the snapshots based on your particular needs to schedule a snapshot at your specified time. It is important to note that snapshots are not the same as backups. Although snapshots are very powerful, they don't replace backups and a full disaster recovery plan. Now that you have scheduled snapshots, you replicate them to an off-site system. This process enhances your ability to recover and restore your most valuable asset: your data.
Replication
For increased fault tolerance, you want to replicate your ZFS dataset or pool to another server. Replication occurs over a secure SSH tunnel, which is an additional security benefit. For the sake of the example, you will have two nodes:
- FreeNAS1 – The original FreeNAS server (PUSH)
- FreeNAS2 – Your FreeNAS Secondary/Backup Server (PULL)
When setting up replication [4], the original server on which you created your snapshot is always the push server (FreeNAS1) and the server receiving the snapshots is the pull server (FreeNAS2). In my configuration, I have two FreeNAS boxes, but you could just as easily replicate to another Linux/Unix server with ZFS. The push and pull servers must each have a ZFS pool, and the push server must have a periodic snapshot task. SSH should be running on the pull server.
You will be using key-based authentication, so you first need to set up the pull configuration on the FreeNAS box. To assure SSH is up and running, visit Services | Control Services and click SSH to the ON position.
Next, navigate to Storage | Replication Tasks | View Replication Tasks | View Public Key to set up key-based authorization. On the PULL (FreeNAS2) machine, copy the contents of this public key and navigate to Account | Users | View Users. Click the Modify User button of the user you will be using for replication and paste in the copied key (Figure 5).
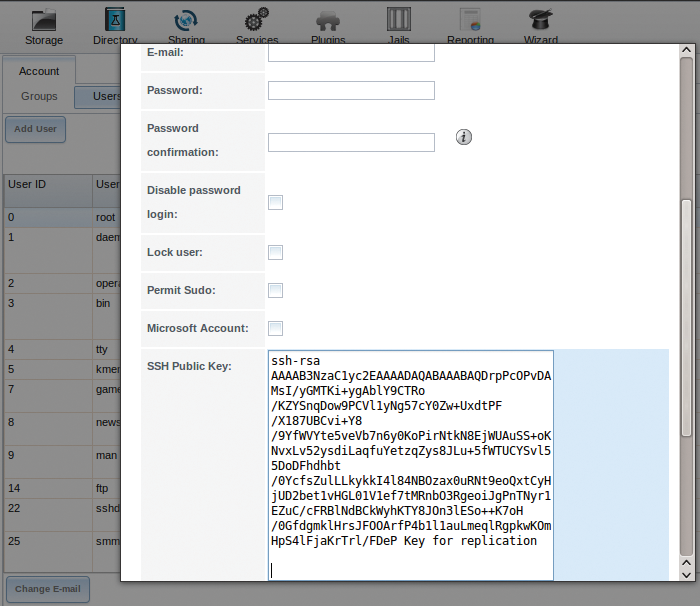
Before continuing, you should verify that your periodic snapshots are working by going to Storage | Replication Tasks | Add Replication Tasks. The Remote ZFS Volume/Dataset is the name of the ZFS filesystem on the remote side (the pull server), and the Remote hostname is the IP of the pull server. By default, replication occurs when a snapshot is created. Generally, you might want to schedule replication with the Begin and End times during non-peak working hours.
All other settings can accept the defaults unless your configuration requires something different. Now when you click SSH Key Scan, your push server will grab the SSH key for you. Finally, click OK: The screen should flash that the replication task was updated successfully.
Backup
Now that you have a share set up and your clients access it, you should plan some basic disaster recovery. A major part of this planning is having the proper backups in multiple places. In this case, you will set up both configuration and local data backups. Above and beyond that, I recommend you also do some form of encrypted offsite backup of your critical data either online, in the cloud, or at a secure storage facility.
FreeNAS natively supports many options for backup, including:
- Bacula via a plugin
- Almost any general backup software for a local backup to an external device
- Backup to the cloud with CrashPlan
- Backup to the cloud via any number of online backup SaaS services
Given the many options, you have a lot of choice as to how to configure for fault tolerance and disaster recovery. To make your life a bit easier – just in case you have to recover your FreeNAS box – you should always back up your configuration, ZFS layout, and data. In the web interface, choose System | Advanced | Backup.
You will see the backup window in Figure 6. Fill this in with the required information for the target server to which you will backing up. Once you are done, simply click Do backup. To verify that the backup has taken place, look at the server you backed up to and see if it is there. As you can see in Figure 7, the metal music backed up as planned.
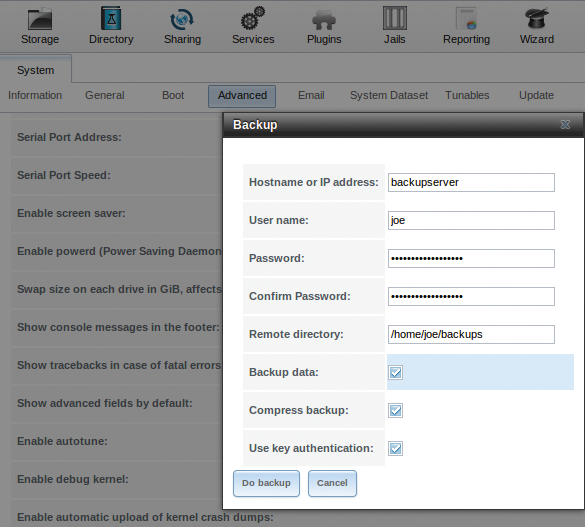
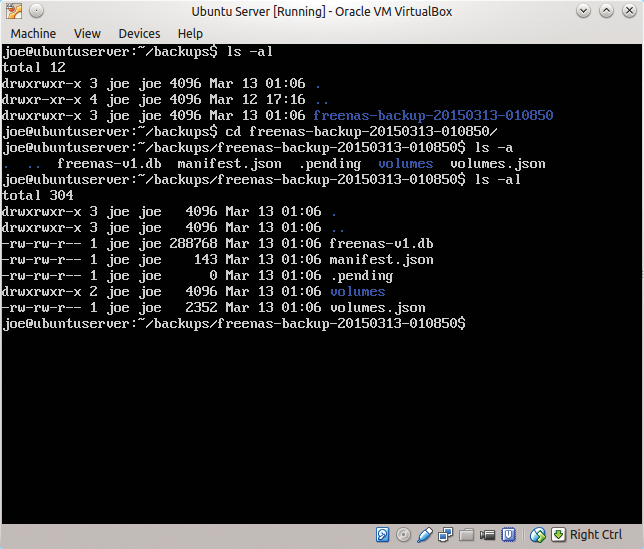
This backs up your FreeNAS configuration, ZFS layout, and (if you so choose) your data. It occurs over an encrypted SSH connection to another server. This other backup server only needs to have an SSH daemon running and sufficient storage to save the data from your FreeNAS box. I highly recommend you use key-based authentication rather than just passwords everywhere. To do so, place your public key of the root user in ~root/.ssh/authorized_keys.
If you want more fault tolerance in your FreeNAS install, you can mirror the boot device. This means that whatever storage you use for the install (compact flash, USB flash drive, SSD, or regular SATA hard drive as the boot device), you need two of them so the install is mirrored. However, always remember that this doesn't magically back up your FreeNAS configuration if both drives should fail. You should still plan on backing up your data [5].
CrashPlan
CrashPlan [6] is a offsite cloud-based backup solution. It is one of the many FreeNAS plugins. Thanks to the FreeBSD jail system, you are able to run CrashPlan right on your FreeNAS box. FreeBSD jails allow you to isolate and compartmentalize your system. Built on the chroot concept, jails are essentially OS-level virtualization that allows you create a separate instance. Jails are isolated from the host as a virtual instance but share the same kernel. For the CrashPlan configuration here, you will be creating a jail in which it runs.
Getting CrashPlan installed and configured takes a few steps, but I will go through them in detail. First, on the FreeNAS server, go to Plugins, choose CrashPlan, and click Install to download and install the CrashPlan application to your FreeNAS box (Figure 8).
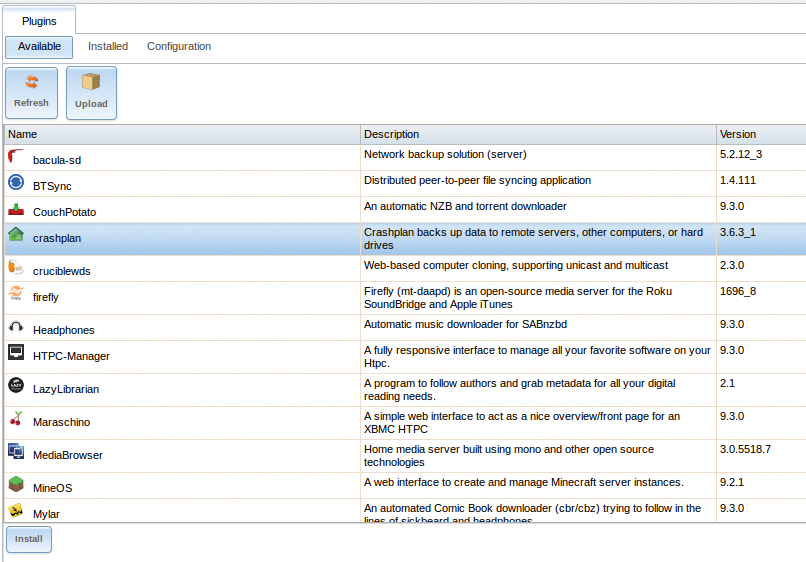
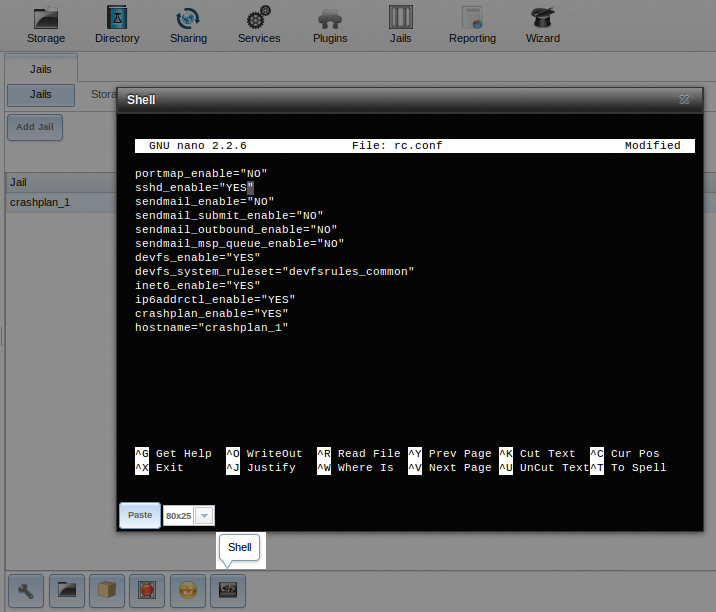
To configure the plugin, go to Jails | View Jails, then select your crashplan listed under Jail and click the Shell icon at the bottom of the screen (Figure 9). Edit /etc/rc.conf to enable SSHD by changing the sshd_enable line to "YES":
sshd_enable="YES"
Next you need to create a new user who is a member of the wheel group via the console with Account | Users | Add User. Simply follow the questions and make sure to specify this user as a member of the wheel group.
Now that you have created a user, you should copy your public key (from the desktop) to the CrashPlan jail:
ssh-copy-id crashplan@<ipaddressofjail>
Finally, create a tunnel to the CrashPlan jail with this SSH command:
ssh -L 4200:127.0.0.1:4243 crashplan@<ipaddressofjail> -N -v -v
To be assured this is running, you can check with
netstat -na | grep LISTEN | grep 42
You should see the CrashPlan daemon running.
A CrashPlan Client on the Desktop
The CrashPlan configuration will be "headless" on FreeNAS, and the client will be on one of the desktops. On your desktop machine (mine is Linux), install the CrashPlan client:
tar zxvf CrashPlan_3_7_0_Linux.tgz
Change into the CrashPlan install directory and run the install script:
./sudo .install.sh
Once the script completes, edit your local CrashPlan configuration file ui.properties. The file is located in /usr/local/crashplan/conf/ui.properties. Uncomment and change your port to 4200.
Next go back to your FreeNAS box and visit Plugins | CrashPlan. Enable the CrashPlan plugin by moving the switch from the OFF position to ON.
Connecting to a Headless CrashPlan Jail
Now that the CrashPlan client is installed on your desktop and configured on the FreeNAS server, you can connect to it. First create a tunnel to the CrashPlan jail with the following SSH command:
ssh -L 4200:127.0.0.1:4243 crashplan@<ipaddressofjail> -N -v -v
Now change to the directory where the CrashPlan client is installed and start up the client CrashPlanDesktop.
Configure a CrashPlan Backup Plan
This configuration does not provide a CrashPlan GUI on the FreeNAS box but, instead, lets the user run CrashPlan from another system (my Linux desktop in this case).
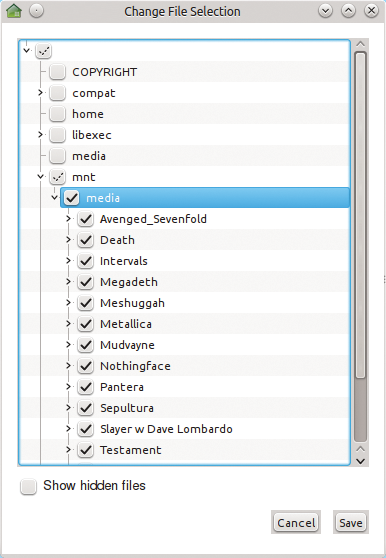
With the CrashPlan client up and running (Figure 10), you can configure your backups on your FreeNAS server. Simply select the files you would like to back up (Figure 11). Your CrashPlan client doesn't need to be running after you set up your backup plan.

Conclusion
I hope this exploration of FreeNAS has been both interesting and fun. More importantly, I hope this introduction gives you the options to build whatever you need.
Open source is a powerhouse of innovation, and FreeNAS is a good example. So explore, have fun, and let me know what you build with this impressive and flexible storage platform.
