Ticket Management with osTicket
Assistance
If you need a particularly flexible and easily expandable ticket system, OTRS is certainly a good choice, as long as you can spare the time to set it up. However, osTicket [1] is the system of choice wherever a streamlined ticket solution is required.
The open source environment is much easier to set up than OTRS and offers a variety of design customization options. osTicket offers excellent reporting and SLA support in addition to the basic ticket processing functions. Whereas OTRS can be operated with PostgreSQL, Oracle, and SQL server databases, osTicket is bound to a MySQL database.
Simple Basic Installation
Commissioning osTicket is no great challenge for an experienced administrator and can even be handled by less tech-savvy users. The system requirements are also quite manageable: You need a recent Apache installation, including MySQL Database Server 5.x, PHP 5.3 or higher, and the MySQLi extension. It is also possible to implement it on the Microsoft Internet Information Server (IIS), for which you will need PHP Manager [2]. If these conditions are met, you can begin the installation by unzipping the archive and copying the folder data from the Upload folder into a directory (e.g., /osticket or /support in the web server document root directory).
osTicket has an installer that you simply start using the URL http://<IP-address>/<ost-directory>/upload/. The installer must be able to read and write the osTicket configuration file, ost-config.php. The first step that the installer performs is to check the environment and provide you with the necessary guidance regarding which mandatory and optional components are missing. Depending on the environment, you will need the PHP IMAP module or the PHP XML extension in place.
The osTicket environment includes a sample configuration file ost-sampleconfig.php, which is located in the include subdirectory. Simply rename this to ost-config.php and then click Continue. The next step involves configuring the osTicket environment. You assign the ticket system a name, the default email address, and the default language in the system settings. The next configuration section deals with setting up the administrator, where you add the typical contact information.
Next, the installer asks you to specify the database data. You need to specify the table prefix in addition to the database server, the database, and the access credentials. You need to set up the database in advance, but this can be accomplished easily using, say, phpMyAdmin. Finally, click the Install button to complete the ticket environment basic setup.
Ideally, osTicket will show you a success message after the installation. Table 1 lists the default URLs to access osTicket functionality.
Tabelle 1: osTicket URLs
|
Function |
URL |
|---|---|
|
Installer |
http://<IP-address>/<ost-directory>/upload/ |
|
Ticket system |
http://<IP-address>/osticket/upload |
|
Admin and staff access |
http://<IP-address>/osticket/upload/scp/ |
|
Re-run installer |
http://<IP-address>/osticket/support/setup/ |
|
Email piping |
http://<IP-Address>/osticket/api/tickets.email |
Getting Started and Troubleshooting
Once the installation is successfully completed, you should verify it by logging on for the first time. If everything looks normal, adjust the permissions for the configuration file /include/ost-config.php and remove the write permissions. Also delete the setup osTicket directory so that potential attackers do not overwrite the current installation. osTicket is now fully up and running.
In the unlikely event of problems with the setup and configuration, you can use a simple trick: Enable Show Errors in the PHP file main.inc.php. Edit the section
ini_set('display_errors',0);
ini_set('display_startup_errors',0);
by changing it as follows:
ini_set('display_errors',1);
ini_set('display_startup_errors',1);
Error messages are then output directly in the browser window at run time or written to the server's error.log file. You should also check the dashboard and the mail server logfile for related entries. The system logs are output to the Home tab on the Dashboard.
Numerous Ticket Settings
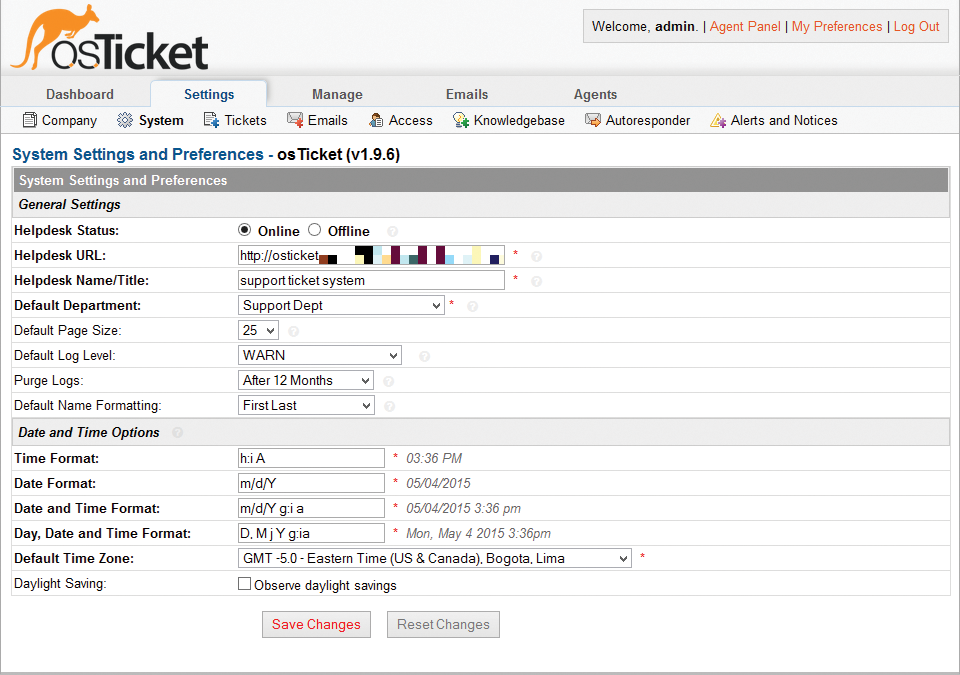
After successfully installing osTicket, you can start to set up the environment (Figure 1). This includes, for example, creating an operator profile, customizing ticket settings and options, creating users, and customizing email templates. Enabling and configuring the autoresponder and the notifications are among the administrative tasks.

Now you need to check the environment data via Dashboard | Information. Here you can immediately see whether all required PHP modules are available. Next, you need to customize the operator information, which you will find via the Settings | Company menu. Specify the company name, the website, and other contact-specific settings here. You can also customize various help desk pages like the online, offline, and thank-you pages. You can also include your company logo in these settings.
You can make a wide range of ticket-specific adjustments under Settings | Tickets. For example, you can determine whether the ticket ID is assigned sequentially or randomly. Now select the Default SLA plan, where you can determine how long a ticket can be left open before it is marked overdue. You can access the dialog for creating additional SLA plans by clicking on the question mark at the end of the selection menu. Only a 48-hour plan is created by default.
Data Exchange Interfaces
One essential element in the use of any help desk system is the ability to exchange files. Ticketing systems like osTicket therefore provide extensive configuration options for dealing with attachments. By default, the software lets you add attachments. You can limit the number of possible uploads per user and staff member, as well as the file sizes. In the Accepted File Types field, you can also specify the allowable file types explicitly. Below the various configuration tabs, you the two buttons Save Changes and Reset Changes let you save or roll back your changes.
Other essential settings are hidden in the Access submenu. Here you can determine, in particular, the validity period for staff passwords and whether resetting is allowed. To avoid the possibility of third parties misusing your ticketing system, you should enforce registration and login. Templates for authentication and user and staff registration are also available in the Access settings.
Processing tickets, and in particular providing responses, is much easier if you collect the most frequently asked questions and answers in a knowledge base. osTicket has such a system; however, you first need to enable it in Settings | Knowledgebase. The FAQs and the filter function and search form are then available in the customer or employee sections. In the general osTicket settings, you can make various adjustments to the auto-responder and notification configurations.
Filter Requests
Before you can use osTicket to respond to requests from employees or customers in a meaningful way, various organizational preparations must be made. You need to create Help topics that describe the effective approach to filing queries. If your help desk employs several staff, you can use ticket filters to distribute queries automatically.
The filtering mechanism helps you speed up query processing. A sophisticated set of rules can assign incoming requests that match (or do not match) specific criteria to specific employees, support teams, priorities, SLA plans, and previously created Help topics.
Creating a new filter is quite simple: Open the filter configuration in Manage | Ticket Filters and follow the Add New Filter link. Assign a name, the order of execution, and then the filter rules. Filters are processed in order according to an assigned value between 1 and 99.
Make sure the filter is Active in the Filter Status option. You can limit the application of a filter to certain email addresses, forms, and API keys as well. Thanks to filtering rules, you determine the criteria for processing, while defining appropriate follow-up steps as filter actions.
One essential, interactive element of the ticket environment is forms which, for example, let your customers describe their problems and send the results to the help desk team. A few forms already exist in a default installation, but you can generate more input pages in the Manage | Forms submenu.
Follow the Add New Custom Form link, assign a name, description, and the required form fields as a text box, drop-down menu, choice, and so on. The forms are available after you release them to your customers and employees, depending on the restrictions you have in place.
The Manage menu offers more customization options. For example, you can create custom pages and lists and feed specific help desk information to them. In principle, the functionality of the ticket system is expandable via plug-ins, which you copy to the /include/plugins/ directory. Unfortunately, the project documentation provides no information as to what these extensions look like and what functionality they add.
Email Configuration
osTicket supports all major channels of communication for creating tickets. Probably the most important of these is email; the number of email addresses in the system is not limited. Email addressed to the help desk system are converted to support tickets; they can then be managed, edited, and archived with the help of osTicket – this means that you have all your email support in a single, centralized system.
osTicket has a basic set of email templates that the autoresponder accesses and that can be used for instructions, warnings, and responses. In principle, the environment will accept email from various sources. In the current version, osTicket supports piping and polling of POP3 and IMAP accounts. Depending on the filters, the tickets are then forwarded to the appropriate departments or support employees.
Piping should be your preferred option. Although processing incoming email in real time is possible, various adjustments to the email server are required for this. Polling of POP3/IMAP accounts is likely to be the preferred method for small businesses with limited capacity. The Email Addresses section (Emails | Emails) is used to create the support address, including login and server information, and the email polling interval.
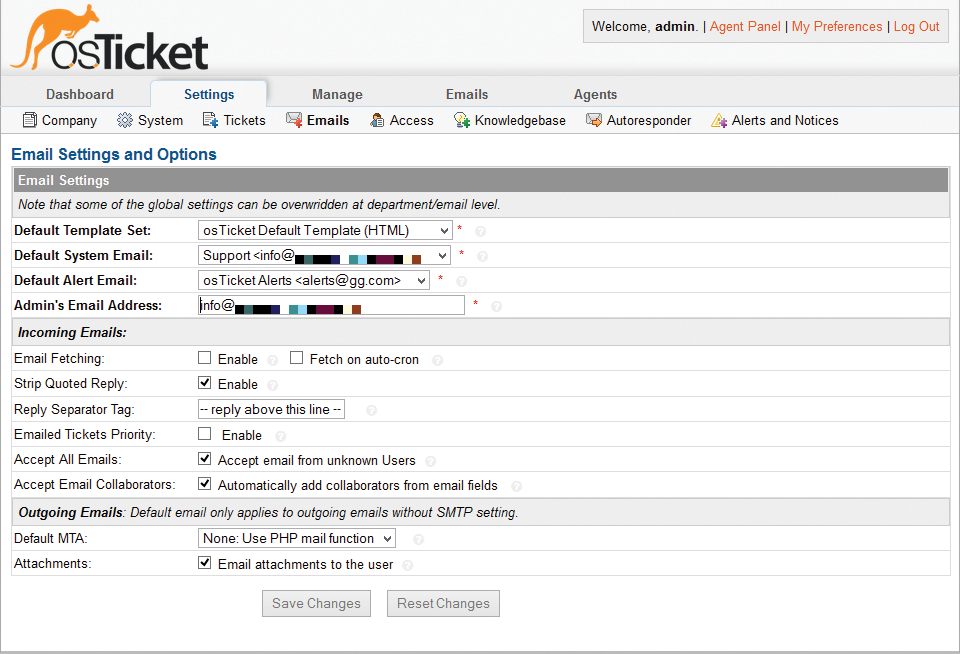
By default, osTicket uses the native PHP mail module for email (Figure 2). Because this delivery route can be problematic for spam filters, you will instead want to use SMTP-based delivery. You can create your own SMTP server configuration for each account in the Email Addresses section. If you do not manage the SMTP server itself, some specifics still need to be observed for the use of an external SMTP server, such as when to block requests. Various hosting services prevent the use of SMTP servers when the environment to be used resides on a different server.

If you have shell access to your hosting account, you can test the connection to the SMTP server remote quite simply:
telnet smtp.server.de 25
A blocked connection produces output like this:
Trying 192.168.1.100
telnet: connect to address 192.168.1.100: Connection refused
Depending on the output, you now know whether or not email delivery will work via the intended route.
Setting up Email Piping
If you want to process support requests in a timely manner, you should opt for email piping; this technology allows real-time processing of email. osTicket supports remote and local piping. This is an email delivery method in which email messages are used as input for a program (in this case, osTicket) instead of saving them in a mail box file. Because each mail server has its own email delivery procedures, it is difficult to give a general description of the use of this technology.
In most environments, osTicket operates on a hosted or dedicated server that also processes all email. This scenario is referred to as local piping. You need to set up aliases for forwarding; more specifically, a forwarding rule for each email address as in /<path/to/api/pipe>.php.
If your hosting provider provides you with something like the cPanel management environment, forwarding is enabled in the CPANEL | Email | Forwarders | Add Forwarder menu. Enter the forwarding domain and the path public_html/osTicket/api/pipe.php in the advanced options.
Problems with email delivery suggests several potential solutions. For example, you can update the php.ini as follows, and then restart the server:
display_errors Off
Or, you can update the configuration file exim.conf in the /etc/exim.conf directory as follows:
driver = pipe
return_output
driver = pipe
group = "${lookup{$domain}lsearch* {/etc/userdomains}{$value}}"
return_output
user = "${lookup{$domain}lsearch* {/etc/userdomains}{$value}}"
Replace return_output with return_fail_output.
To modify the alias configuration of a Qmail installation, edit .qmail-* for the domain and add a forwarding rule. The approach is similarly simple for Sendmail. You need to edit the alias file, modifying it accordingly.
Remote piping is useful if you run osTicket and the mail server on different computers. Piping is implemented as an HTTP post to the osTicket API. osTicket offers two scripts for this: automail.php and automail.pl. Their functionality is accessible via http://<IP-Address>/osticket/api/tickets.email. Before you can use remote piping, you must create a key for the remote system in Manage | API Keys.
User and Group Management
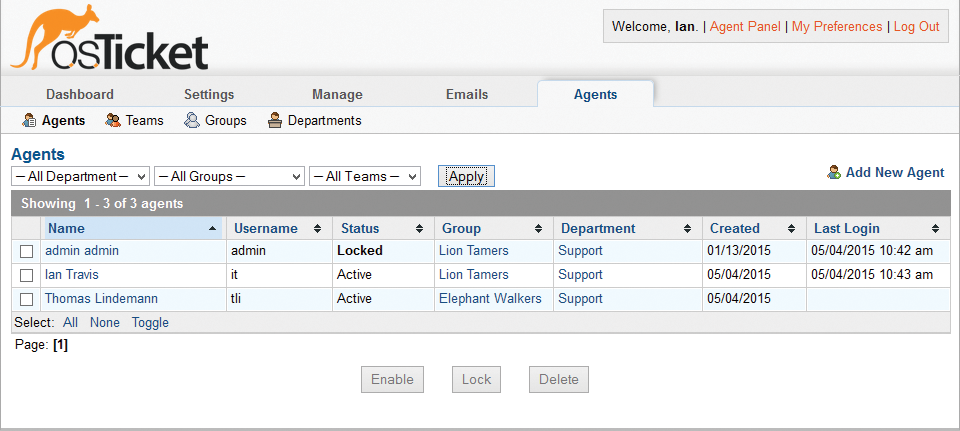
As a rule, a ticket system is used by several agents, and often even by various groups and departments. In an osTicket installation, you have set up the system administrator, but the help desk environment should be used by other employees. osTicket supports agents, teams, groups, and departments. The related management functions are available in the Agents tab (Figure 3).

To create more agents, open the Agents management section and follow the Add New Agent link. In the corresponding form you define the username, the typical contact information, and authentication method. In the account and status settings, you can define the account type, and thus whether define whether the user is an administrator or an agent.
The access privileges are defined by departmental and group assignments. In addition to the status (active/locked) you can assign the new agent to a Group and a Department. The team assignment is also handled in this dialog. Pressing Add Agent saves the entry.
Simple Team Management
Team management (Agents | Teams) is significantly easier. When you create a new team, you assign it a name and a status and define an optional team manager. Group management (Agents | Groups) is available as a flexible system for controlling permissions. After a basic installation, osTicket has three groups: Supervisors, Administrators, and Agents.To view and edit an existing group configuration, just click on the group name. In the group permissions, you can then edit the group's privileges and thus those of its members. For example, you can specify whether tickets can be created, edited, deleted, or assigned. The group configuration also grants access to any existing departments.
In department management (Agents | Departments), you will again see three predefined departments: Help, Support, and Sales. The configuration options are quite extensive. First, determine whether it is a public or internal department. Then, you can assign an SLA plan and a department head.
Checking the Ticket Allocation box ensures that the ticket assignment is restricted to the department members. Next, select the templates for outgoing email and determine when the autoresponder responds to incoming messages.
One major shortcoming of osTicket is certainly that the web interface does not let you import and export user data. If you want to create an extensive agent base in osTicket, you can only do so indirectly via the database manager. Another shortcoming of the project is the weak documentation.
Conclusions
osTicket is a simple but complete ticketing system that offers all the necessary help desk functions. Handling and administration is satisfactory, as long as you do not require interfaces to existing infrastructure programs. Also, no official applications for Android or iOS are available to access osTicket, although an app named osTmobile [3] can be had for $100. Ultimately, osTicket does what it should – no more, no less.
