
Setting up and using Azure Active Directory
Twin Service
Azure Active Directory is Microsoft's centralized identity system for services in the cloud. The directory is certainly no longer intended just for in-house Office 365 systems like Exchange Online, SharePoint Online, or Lync Online; it also aims to facilitate the use of cloud services from other manufacturers. In this article, I will show you how to set up the service and synchronize local user data.
Microsoft officially released Azure Active Directory (Azure AD) for production use in September 2014. Now that the service has been available as a preview for several months, Microsoft is offering a commercial version with support services for the online directory.
In this article, I describe how Azure AD is configured, demonstrate what the directory can do, describe how to integrate it into an existing Active Directory infrastructure, and show how powerful the system is in conjunction with well-known software-as-a-service (SaaS) offerings – all of which will provide the overall picture needed to understand Azure AD.
Azure AD should not be seen as a blend of domain controllers (DCs) to be migrated and executed in Azure. Instead, Azure AD provides advanced authentication and connection (federation) services (ADFS) for both the Microsoft online product range and for other manufacturers' online offerings.
Federation is an important buzzword: Azure AD can be used for single sign-on (SSO) solutions with cloud software, if so desired. Other SaaS offerings can be used on the Internet once Azure AD is authenticated for the online directory. The trick behind this is that Microsoft prepared Azure AD and various interfaces in such a way that this SSO feature works with a variety of SaaS offerings.
Currently there are more than 2,500 software offerings, so chances are high that the desired software supports Azure AD. A significant advantage for users within a company is that if someone is sitting at the computer in the office and is connected to the local network, it is possible to access an application (e.g., Salesforce) without logging in again on one of the systems. One SSO login already occurred when logging into the domain – the connection with Azure AD handles the others.
Azure AD's second focus is on identity and access management. Access to applications can be controlled using group membership or access via certain company devices – optionally using a self-service feature for users or an approval process controlled by managers or application owners.
It quickly becomes clear that Azure AD is not a service that offers virtualized domain controllers on the Internet – or even copies all the domain controllers in the enterprise. Instead, Azure AD is a cloud-based identity solution with which selected objects from the local Active Directory can be synchronized.
Three Editions of Azure AD
Microsoft distributes Azure AD in three license types: Free, Basic, and Premium. Users of Office 365 automatically receive the Free license, so they can use their Cloud Office in standard scenarios, including directory synchronization and multifactor authentication (MFA). With the commercial Basic version, users receive a service-level agreement from Microsoft that promises 99.9 percent availability. Additionally, there is group-based access to applications and options for customizing the portal and login logos. The Premium license delivers the full range of functions: It supplies the administrator comprehensive usage reports, allows configuration of all MFA settings and makes them available to users, and can provide even more self-service functions.
Those who want to map complex identity scenarios should take a closer look at the Premium version, because it contains licenses for Microsoft's Identity Manager. The number of connected SaaS applications is therefore unlimited, although the number of licenses and the associated functions can be mixed arbitrarily. If you do decide to choose Azure AD, you can run any number of users as free users, whereas only some of the users are equipped with Basic or Premium. Depending on the usage scenarios, this approach provides flexibility and saves costs.
Office 365 customers can test Azure AD for 90 days, and Microsoft allows the Free offer to be extended to up to 100 users. For testing purposes, you can set up an Office 365 trial subscription, and you can upgrade Azure AD to a Premium trial version.
Keeping Data Synchronized
The directory must be populated with user objects to use Azure AD, to handle group memberships and connect with SaaS providers. The online directory supports two types of users: synchronized users from Active Directory and users who only exist in the cloud (and who are also created and managed there).
You need to set up synchronization between Active Directory and Azure AD, because SSO is only possible with accounts that have been upgraded from the local Active Directory to the cloud. The use of SaaS offerings is also possible for cloud-only users. In that case, however, the users have to remember two passwords: one for the local domain and logging in to the PC and one for their account in Azure AD. Users who only reside in Azure AD can connect to SaaS offerings.
As well as user accounts, you can also synchronize contacts and group objects from Active Directory. Microsoft recommends the tailored Azure AD Sync (AADSync) [1] for the synchronization. The tool is based on the foundations of Microsoft's Identity Manager, which is already used in some companies for synchronizing directory objects between different systems. However, AADSync is intended for the use of Office 365 and Azure AD. The required objects and attributes from the local AD can be quickly synchronized with the cloud without prior knowledge.
First, you need to enable synchronization in the Azure Management Portal. To do this, select the desired domain under Active Directory and then select Directory Integration. There, you can set the slider for Directory Sync to Activated. Click Save to apply the settings. Further steps that are interesting for synchronization are listed at the bottom of the page.
You need a service account with read privileges for the local AD and a global administrator account in Azure AD to install the sync tools. One feature in Azure AD is the option for users in the cloud to change their passwords – this self-service requires more privileges in the local AD to be able to change local accounts there accordingly. To execute the AADSync install, you need local administrator rights on the target server. AADSync stores the objects for synchronization in a database. The installer comes with an SQL Express database for this.
The Matching Database
If you want to synchronize more than 100,000 objects, including users, computers, and contact objects, you will need a full-blown instance of SQL Server – SQL Server 2008 up to and including 2014 are possible. SQL Express reaches its limits with a database size of 10GB, which corresponds to about 100,000 objects. Microsoft only provides support for more than 100,000 objects if the data is stored on SQL Server. The requirements for the operating system, however, are quite moderate: All server systems as of Windows Server 2008 are supported. AADSync only needs .NET Framework Version 4.5 and PowerShell 3.
Installation in Four Steps
The installation comprises four steps. To begin, download and launch the MicrosoftAzureADConnectionTool.exe file. The installer unpacks all the data required for the configuration in the C:\Program Files\Microsoft Azure AD Connection Tool directory. The configuration wizard then launches automatically. You need to quit the wizard at this point to install AADSync with a SQL Server – Microsoft provides the command-line program DirectorySyncTool.exe in the AADSync directory for installing with SQL.
For this article, I used the wizard for the SQL Express version. After you have agreed to the license conditions on the welcome page, the wizard installs the SQL Express database and the synchronization service. Both steps are completed automatically after pressing Next on the welcome screen.
The next step involves telling the wizard the account with the global administrative privileges in Azure AD. The account is specified in the form of an email address (e.g., syncadmin@contoso.onmicrosoft.com). Next, define your local AD's service account, which has read access to the AD data. Also, add the AD forests to be synchronized. The tool is capable of synchronizing the identities of several forests connected by a trust.
In the subsequent third step, AADSync wants to know where users come from and how they log in. The case is clear if all users only exist once in all the connected forests (Figure 1). If users have multiple accounts in a multiforest environment, AADSync wants to merge these accounts so they only have to synchronize them once. The Exchange Resource forest is an example of several accounts for one user: Users who use Exchange in this trusted forest have a shadow account in the Exchange forest and an account for the computer application for AD. AADSync obviously does not aim to synchronize both accounts in the cloud, but instead merges the accounts logically and then syncs the work account with Azure AD.
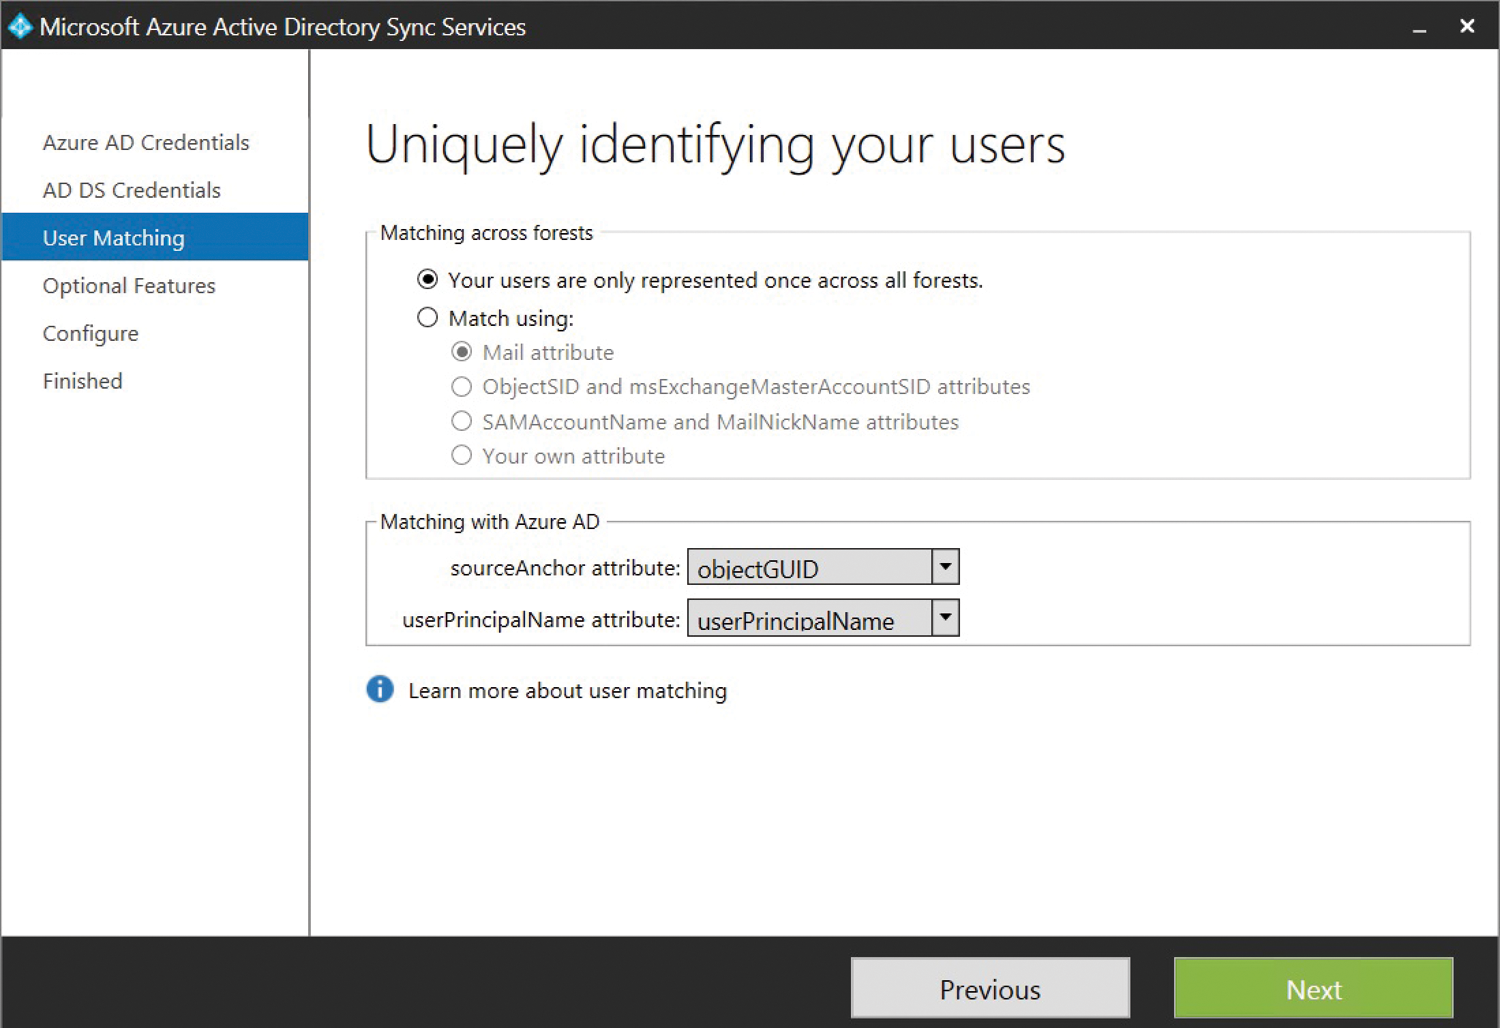
Next, you select the unique AD attribute for the sourceAnchor attribute; you can identify user accounts with this in the future. The default selection, objectGUID, is a good choice in a single forest, because this GUID does not change for a security principal as long as it does not leave the forest boundaries. However, this also makes life a little difficult in multiforest environments: You need an attribute that does not change when migrating an account so that AADSync still recognizes the user after the migration and can link the user with the cloud account. The employeeID attribute, which must not change when migrating, is a good candidate for this. In principle, however, any other attribute can be used for this purpose, but it must be unique and should not be modified over time (e.g., because of a username change).
Set the attribute that you would like users to enter for login to userPrincipalName (UPN), which you can select if the local Active Directory UPN can be routed and the domains belong to you. Otherwise, you need to select an attribute that meets these requirements. Typically, the mail attribute is a good candidate because it can be uniquely assigned to a user, has an email format, and uses a routable company domain. Ownership of this domain is checked later by Azure, which rules out cheating.
Assigning Privileges
In the fourth step (Optional Features), you can determine in AADSync what you want to allow in the Azure AD and local AD. You will need the Exchange hybrid deployment option if users' mailboxes are to be kept on a local Exchange server and in Office 365. You need to enable Password synchronization if users can log in to Azure AD without ADFS or another identity provider being available. This causes AADSync to synchronize the users' password hashes in the cloud.
A note in advance: Not all IT security staff think this synchronization is a good idea, which is why many companies prefer ADFS. The passwords and their hashes then remain in the local AD and the box for Password synchronization remains unchecked. You will need Password write-back if you want to allow users to reset their local AD passwords using Azure AD. Again, IT security would probably be happy to have a quick chat with you about allowing Azure AD to reset passwords in your local AD using AD service accounts.
If you do not have any other requirements, this is the end of the AADSync configuration. If you are aiming for more precise control of the synchronized attributes, check Azure AD app and attribute filtering. The wizard then opens two further steps for you, in which you can define your planned use cases in more detail. In this way, you can just synchronize the necessary attributes in Azure AD. The downside: If needs change and your users want to use further applications that require additional attributes, you need to re-run the wizard.
Finally, you can trigger directory synchronization in the Finished section by checking Synchronize now. AADSync then proceeds to synchronize all the common and chosen attributes of users, contacts, and groups with the cloud directory.
Synchronization takes place automatically if you selected Synchronize now in the final wizard step. Sync jobs are controlled as a scheduled task in Windows: Azure AD Sync Scheduler is the task that AADSync defines for this purpose. If you uncheck the Synchronize now box to make additional configurations, you will need to start the task manually later. The setup may create the task, but it also disables it. Right-clicking on the task and selecting Enable then starts the job.
After successful synchronization, you should find the synchronized user accounts in the Azure portal or in the Users section of the Office 365 portal. To make sure the synchronization worked correctly, you need the Synchronization Service, which you can launch in the Windows Modern UI or as miisclient.exe in the C:\Program Files\Microsoft Azure AD Sync\UIShell directory. Membership for one of the local ADSync groups is required for this action. You will thus want to add the Azure AD server administrators to the local ADSyncAdmins group, and the employees from operations to ADSyncOperations. Both user groups can then launch the tool.
Linking Services
You now need to establish a federation trust between the local infrastructure and Azure AD to enable SSO for users within the domain. The bridge connecting the two worlds will be ADFS. You cannot create a typical AD trust for the purpose of a forest trust, even if Azure AD and the local AD share a confusingly similar name. ADFS creates this trust for you: For each connection, Azure AD trusts your ADFS, which then delivers a token to your authenticated users who can, in turn, be evaluated by Azure AD and other web applications on the web.
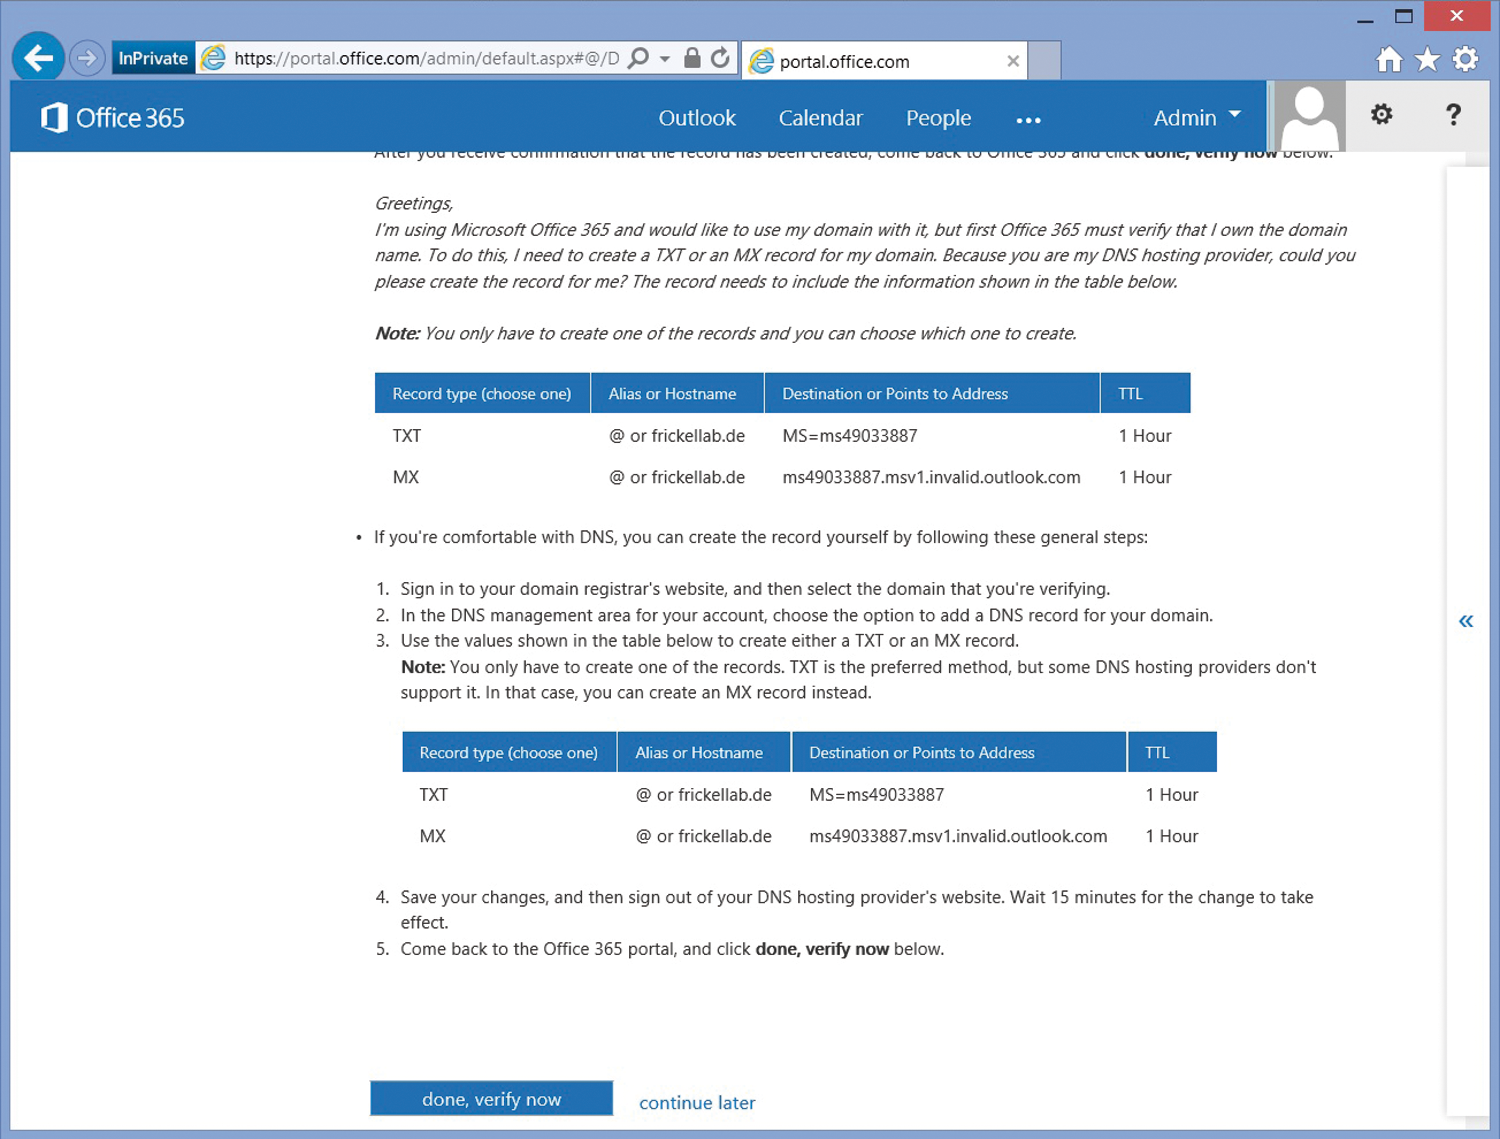
There are two prerequisites for federating with ADFS: a routable domain that has been verified in the Azure AD portal and a configured ADFS server that you link with Azure AD via PowerShell. The routable domain is verified by adding it as a domain to Azure AD. The portal then requires you to create a TXT or MX DNS record in the root of the DNS zone to check the domains' ownership (Figure 2). The check may take several hours depending on the service life of the zone records and is something you will want to do in advance. You can see the domains' status under Domains in the portal. It should be Verified.
If you already have an ADFS installation, you can use it for connecting with Azure AD. Connecting with Office 365 and Azure AD can be done painlessly from ADFS 2.0 and newer. New developments for ADFS in Windows Server 2012 R2 are, however, worth a closer look, such as the possibilities of the Workplace Join or the Extranet Lockout feature. Anyone who is contemplating a new ADFS instance for the project should use ADFS in Windows Server 2012 R2. Microsoft has simplified setting up the connection with Azure AD to the effect that the setup and configuration are handled completely via PowerShell.
Download the Azure Active Directory PowerShell module [2] if the ADFS installation is already running correctly. The Microsoft Online Services Sign-In wizard is also required for installing the module [3] – initiate this before the module installation. You can install both on any computer and do not have to include them on the ADFS server. Now there are no more obstacles to connecting and installing domains that were verified previously. Set up the connection with Azure AD using Connect-MSOLService, which will prompt you for the username and password for the subscription's administrator. Once connected, the domain verified using Get-MSOLDomain appears with a status of Verified (Figure 3). The following command then completes the federation between ADFS and Azure AD to secure SSO:
Convert-MSOLDomainToFederated -DomainName <domain>
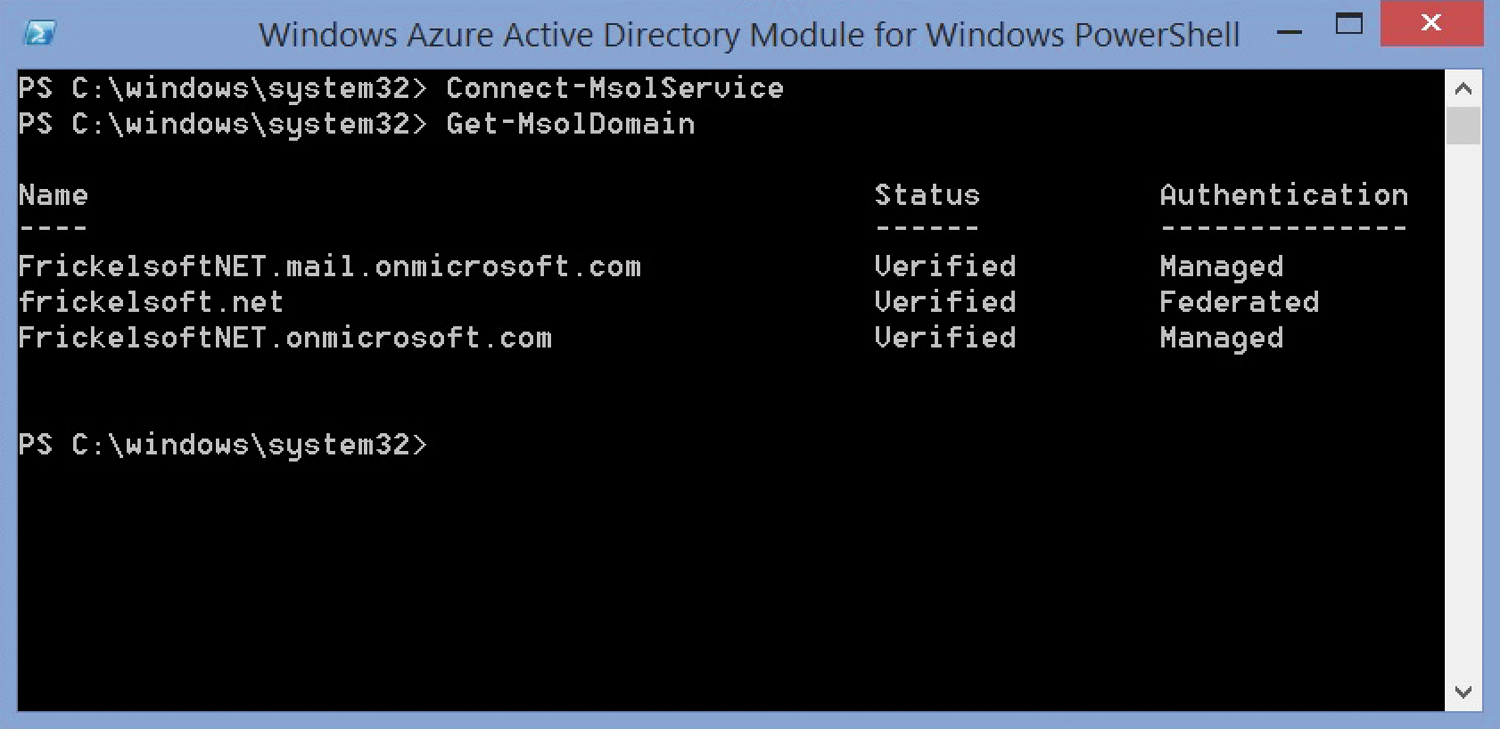
If multiple domains need to be connected, for example, to link more forests, include the -SupportMultipleDomain parameter at the end of the command. Each additional domain is then also added with Convert-MSOLDomainToFederated. SSO is immediately supported for the added domains, both in the PowerShell with Get-MSOLDomain and in ADFS, under Trust Relationships | Relying Party Trusts. The Microsoft Office 365 Identity Platform is available as the new relying party here.
You can check the associated Office 365 login by accessing the Office portal in your browser below https://portal.office.com and using a synchronized user account. After entering the user's UPN, the Office 365 login page will redirect the browser to ADFS. There, the user will be authenticated and finally allowed to access the Office 365 portal. If this login succeeds, the lion's share of the work is already complete: The connection has been made and the users have also been correctly synchronized from your local AD to the Azure AD.
Managing Users in Azure AD
Once the users have been synchronized with Azure AD, they can be managed in the cloud directory in two ways: using Azure Active Directory PowerShell or on the Office 365 or Azure web portals. It is important to understand that Azure AD has two types of users: Users that only exist in the cloud and synchronized users. With the latter, Azure AD logically assumes that the actual database comes from the local AD and therefore only allows administrators to perform a few changes to the cloud users. If you need to make extensive modifications, you should perform these in the local AD and then synchronize the changes.
Administration is quite easy with PowerShell: Once the Azure AD PowerShell module is connected with Azure via Connect-MSOLService, you can request data. Get-MSOLUser provides an overview of all the users in the cloud. Here, MSOL stands for Microsoft Online. Things becomes more specific if you ask PowerShell for a specific user. The UserPrincipalName (UPN) serves as the identifier here. It is advisable to pipe the results to the Format-List Cmdlet (Figure 4). This outputs all attributes available for a user in Azure AD. Many of them are well known in the local Active Directory, such as the title, phone number or address:
# Get-MSOLUser -UserPrincipalName jennifer@frickellab.de | fl
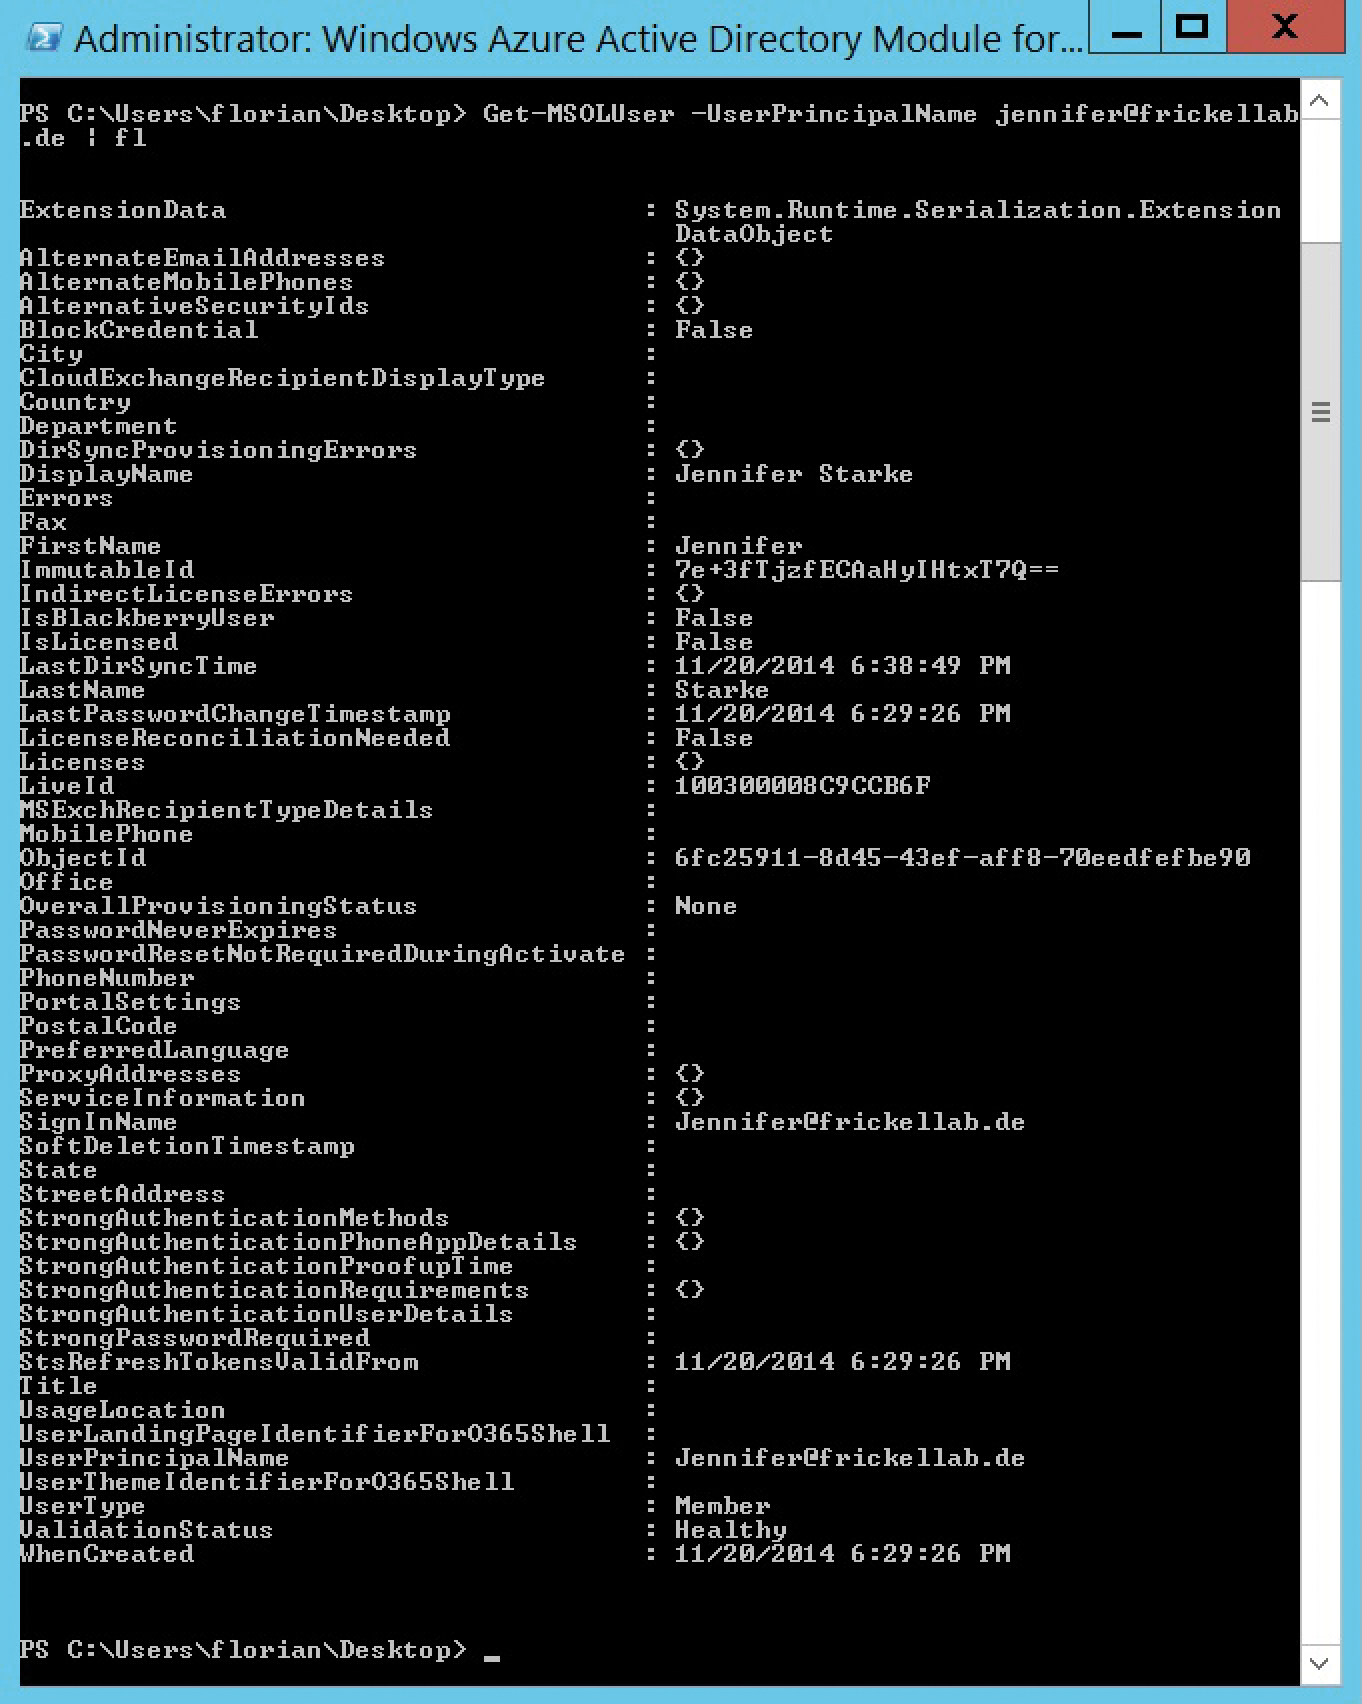
The UserPrincipalName is the UPN that Azure AD recognizes. Recognition occurs if the UPN from the Windows AD matches a domain that has been verified in Azure AD. Otherwise, Azure AD selects the tenant name as the UPN for unrecognized UPNs which then look a bit like this: jennifer@frickellab.onmicrosoft.com. For automatic recognition of Windows Active Directory UPNs, it is thus essential that the domains for these UPNs be registered and verified in Azure AD; otherwise, users also have to log in to the Azure or Office 365 portals with the longer tenant names.
Single Sign-On
Single sign-on is a powerful tool for managing local and online accounts. As an example, I'll describe how to use Azure AD to enable a single sign-on for Dropbox and Twitter via Microsoft's services.
I'll show you how to set up the sign-on for the ADFS – and thus to Azure AD; this should be enough to access all online services. Controlling access to the cloud services using groups is, of course, central to this capability. Once access to external online services works, I will look at the security reports in Azure in more detail and try to find out more about the potential risks: This is a feature that Azure AD offers in the Premium version. Then, I will set up another authentication level for administrative users using Azure multifactor authentication.
Creating Groups in Azure AD
Azure AD draws on well-known and proven methods to grant access privileges and control permissions for applications: Groups. Whereas Windows Active Directory generally distinguishes between security groups and distribution groups, and then breaks these groups down into different scopes for local, global, and domain local purposes, Azure AD just has plain old groups. If the security groups are covered by the Azure AD synchronization scope, they are synchronized by Azure AD – including group memberships. Group membership means all Windows AD user accounts and other nested groups – as long as the members are also within the synchronization scope.
As with user accounts, Azure AD distinguishes between groups that have been created in the local AD and cloud-based groups. Even the same rules apply: Groups from the local Windows AD can only be changed by synchronization from the Windows AD. Cloud-based groups, however, can be managed from the Azure management portal and the Office 365 portal. The Groups option in the left-hand menu of the Office portal dashboard takes you to the overview of known groups. First, navigate to Active Directory in the left-hand menu of the Azure portal; then, select the correct directory and Groups in the top menu. The Azure management portal is currently the more useful approach for modifying groups: The user interface clearly shows which groups can be changed and where they come from (Figure 5).

The groups are later used to access shared and federated applications in Azure AD. You will not typically want to share applications with individual users, but rather to groups. In this way, you can to control access via memberships. Depending on the corporate strategy and whether an identity management system is in place, you should consider whether you map application access control in Azure AD groups or Windows AD groups. I will be using specially created cloud groups in this example. The scenarios can similarly be implemented with groups from the local Windows AD – the difference lies in synchronization: Changes must be made in the Windows AD and then transferred to the cloud by AADSync, which may take some time.
Setting Up SaaS Offers
Microsoft is trying to make the process of setting up federation with cloud software from within Azure AD as easy as possible. Previously, offers such as Salesforce.com had to be federated with the local ADFS infrastructure to support SSO for users. Local federation required setting up manual synchronization of user account data for Salesforce.com, and you had to set up the certificates and SSO settings manually. In the process, Salesforce was established as a relying party in ADFS, and the configuration was monitored and maintained by the ADFS team. Azure AD now handles this task as a service. Federation is set up between Azure AD and the online offerings – the only relaying party you still have to maintain is the one between ADFS and Azure AD (shown in Figure 6 as a light green connection).
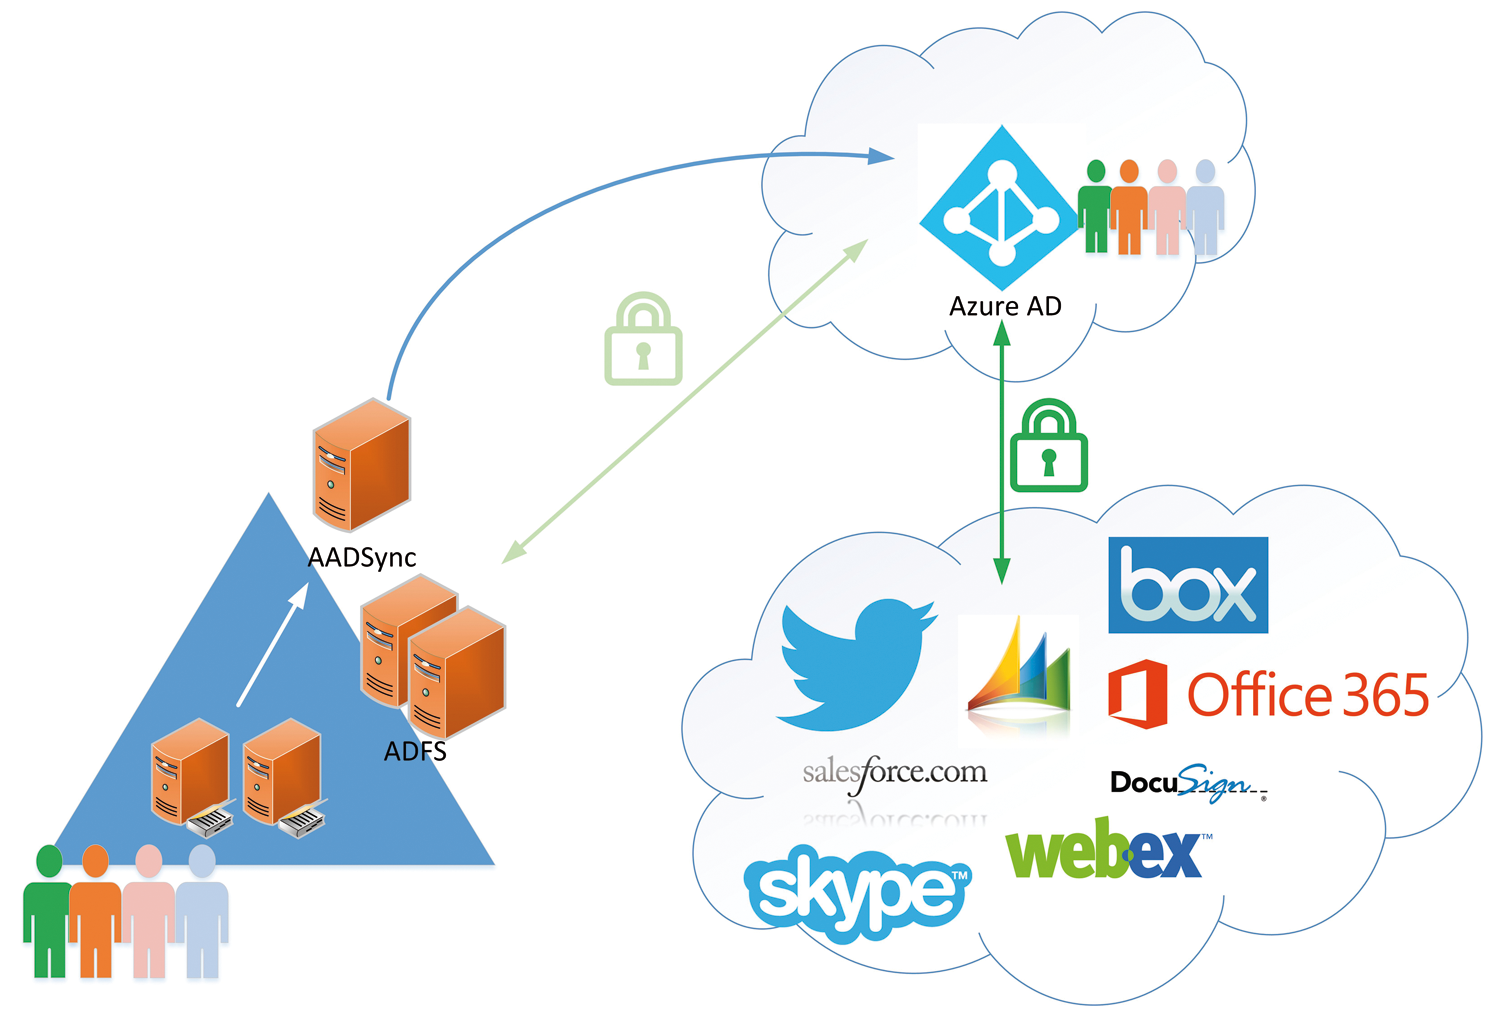
In this example, I'll show how to set up the Dropbox for Business service. To this end, you need a Dropbox for Business account. A trial version for 14 days will suffice, as long as the "for Business" version is used. For the time being, Dropbox requires you to provide your credit card details to extend the trial version after the 14 days – so you should remember to delete the account on time, if you do not want to continue using the service and just want to test it.
Once you are all sorted with Dropbox for Business, you can configure the first settings in the admin portal. Turn on Enable single sign-on by checking the box below Authentication. This lets you select additional options for fine-tuning. Then, click More about single sign-on below the checkbox to see further details about your Dropbox subscription.
The unique sign-in URL for your subscription assigned by Dropbox is what you are interested in here; in this example it is https://www.dropbox.com/sso/12018794. Save the URL to the clipboard before selecting the Required option for SSO settings. This forces the user to conduct SSO through the Azure AD – there are no passwords for Dropbox to store for your users. Do not worry; administrative users can still log in to Dropbox if the Azure AD or their local ADFS are unavailable at any point.
Adding an Online Service
Next, I'll address how to set up Dropbox SSO via the Azure AD portal. To this end, you'll need to log in to the Global Azure Management portal as a global administrator. You will see all the registered directories under Active Directory. Select your directory and then choose the Applications in the top menu. There you will find a list of all registered applications. If you use the directory for Office 365, Exchange Online and SharePoint Online will appear there as the first two applications. Clicking Add in the bottom menu will launch the wizard for new applications. Next, confirm to Azure AD that you want to continue to Add an application from the gallery.
The gallery is familiar with more than 2,400 applications, which are grouped into various categories. Type Dropbox as a search term in the top-right search field; Dropbox for Business will then be suggested. Clicking the confirmation button will create the basic framework for federation in your Azure AD. The Azure portal jumps to the application overview page. You can always return to this overview if you select the appropriate directory in the Azure portal via Active Directory and then Applications and click on the desired application. The following overview shows three steps that are required for the single sign-on relationship:
- Enable SSO.
- Enable automatic user provisioning for Dropbox.
- Grant permission for individual users to use Dropbox.
Click on step 1 (Configure single sign-on) to open the wizard. The connection between Dropbox and the Azure AD can be set up in three ways – all of them named SSO. Select Windows Azure AD Single Sign-On for purposes of this example and continue to the next step of the wizard. The other two options are for different scenarios.
The second option, Password Single Sign-On, allows Azure AD to store login data, which is sent transparently to the target application when a user logs on. I will use this option later with Twitter. The Existing Single Sign-On option takes you to a setup for federating with the local ADFS farm. Although this option also leads to a SSO relationship to Dropbox, you would lose some of the benefits of Azure AD: automatic user provisioning in the cloud application, monitoring of the federation relationship, and Azure AD as a central SSO interface.
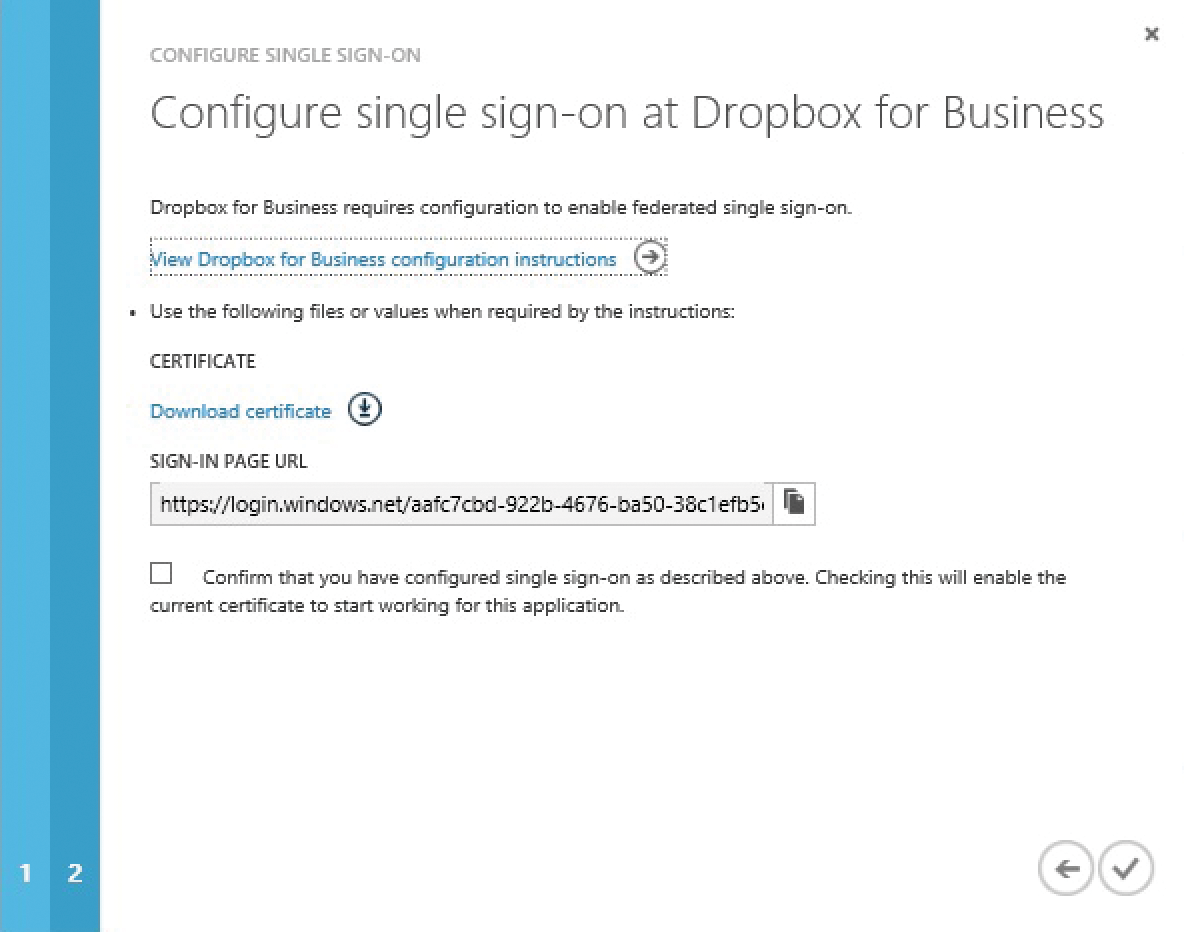
The second page of the wizard now requires the Dropbox sign-on URL. Here you can add the URL that you copied from the Dropbox administration page – Azure AD wants the complete URL: https://www.dropbox.com/sso/12018794. You receive two last, important pieces of information on page 3: the actual sign-in URL for Azure AD and a certificate used to create the federation relationship.
Next, copy the sign-in URL for Azure AD, which typically starts with https://login.windows.net into the clipboard (Figure 7). Then, download the certificate offered. I will be using both the URL and the certificate to set up Dropbox: Add the sign-in URL for Azure AD back in the Dropbox admin portal. Upload the certificate .cer file to Dropbox in the same step. This completes the configuration of Dropbox. At this point, you need to finish the wizard in Azure AD. Confirm the checkbox in the third step and finish the wizard. The checkbox instructs Azure AD to release the downloaded certificate for Dropbox. Otherwise, the certificate would remain "pending" and not be released.
The second step takes place below the Configure user provisioning item. The wizard lets you provision users in a single step. You are now granting Azure AD permission to create, modify, and delete users in Dropbox. Clicking Enable user provisioning will open a new Dropbox window that asks for the authorization from Azure AD. If you are no longer logged in to Dropbox, you will be prompted to log in again.
The third step is called Assign users: The button changes to the Users and Groups overview for the application. From here, the users and, possibly, the groups are enabled for the application. Apart from individual test users, you should only allow groups to use the application to keep things manageable.
The view in Azure Active Directory Premium is different from the normal view. The overview shows a filter option for users and groups if you have licensed Azure AD Premium (even as a trial). You can select users and groups and assign them to the application. You can only assign users if you do not have Azure AD Premium. If you do have Azure AD Premium but can still only see users in the overview, you need to assign your administrator a Premium license: Select your directory in the Active Directory section of the Azure portal and switch to Licenses in the top menu. You can assign a new license in the license overview via Assign. If you have a particularly large number of users in the directory, select the search filter in the top-right corner of the table by clicking on the magnifying glass icon.
Testing SSO
Azure AD provisions new users cyclically in federated applications. The newly assigned users should appear under Dropbox for Business after a maximum of 15 minutes (Figure 8). Provisioning is handled by Azure AD and ends with creating or deleting a user account in the respective application. Any further steps for creating the SSO feature are controlled by the SaaS application.
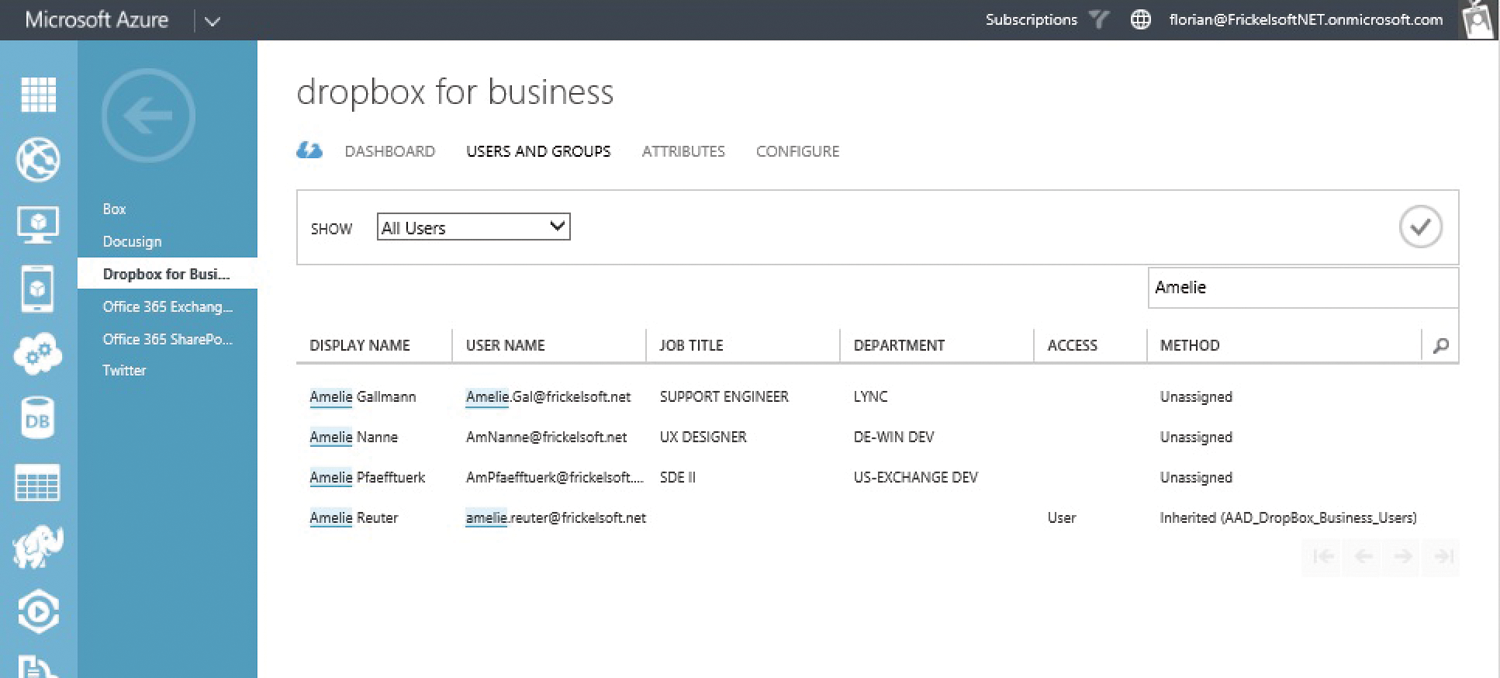
Provisioned users in Dropbox for Business will receive a Welcome email in which they need to enable their Dropbox account before SSO will start to work. The email contains the name of the company, the Dropbox project to which the user is invited, and a link for activation. Single sign-on is possible for users after activation. They must enter their username on the login screen and are then authenticated by ADFS. SSO thus works without users' needing to enter their password again.
Setting up Twitter for the Enterprise
Now I will show how to enable another web application for SSO: Twitter. Unlike Dropbox, a private account is not created for all authorized employees; instead, you need to give several employees access to a shared Twitter account. A Corporate Communications team, for example, needs access to the Twitter account to send tweets to readers. However, Twitter does not have a multiuser system that allows multiple users with different accounts to access the same Twitter channel. I will therefore be using one of the previously mentioned SSO variants: Password Single Sign-On.
The first steps for creating the application in Azure AD are identical to the Dropbox example: Instead of Dropbox, however, you create Twitter as a new application for the directory in the Azure Management portal. Select the Password Single Sign-On option for Configure single sign-on in the overview page. Azure AD then asks which login details it should use when assigning users for Twitter. The login details are stored securely in Azure AD and are off limits to outsiders – even the employees. Next, filter the newly created group AAD_Twitter_Access under Assign Users. Select the group and click Assign in the bottom menu. Azure AD then opens a web dialog when you click I want to enter Twitter credentials to be shared among all my group members. Then, add the username and password for the Twitter account.
This configuration offers several advantages: You can control access to the Twitter channel via membership in a security group. Additionally, you have secured the Twitter account so that none of your employees knows the password. They each log in with their own user account from Active Directory. If an employee leaves the company, you can update the group membership in AAD_Twitter_Access to change the access to the account – without having to change the Twitter account or the password.
Access via MyApps Portal
If employees want to access the Twitter channel, they cannot log in to Twitter themselves – after all, they do not know the password for the channel. Azure AD thus needs to provide a way to handle the login transparently. Part of the Azure offering is the MyApps portal [4], which employees can use to access the applications assigned to them (Figure 9). All applications are stored with a graphic, which then triggers a redirect to the appropriate application when clicked.
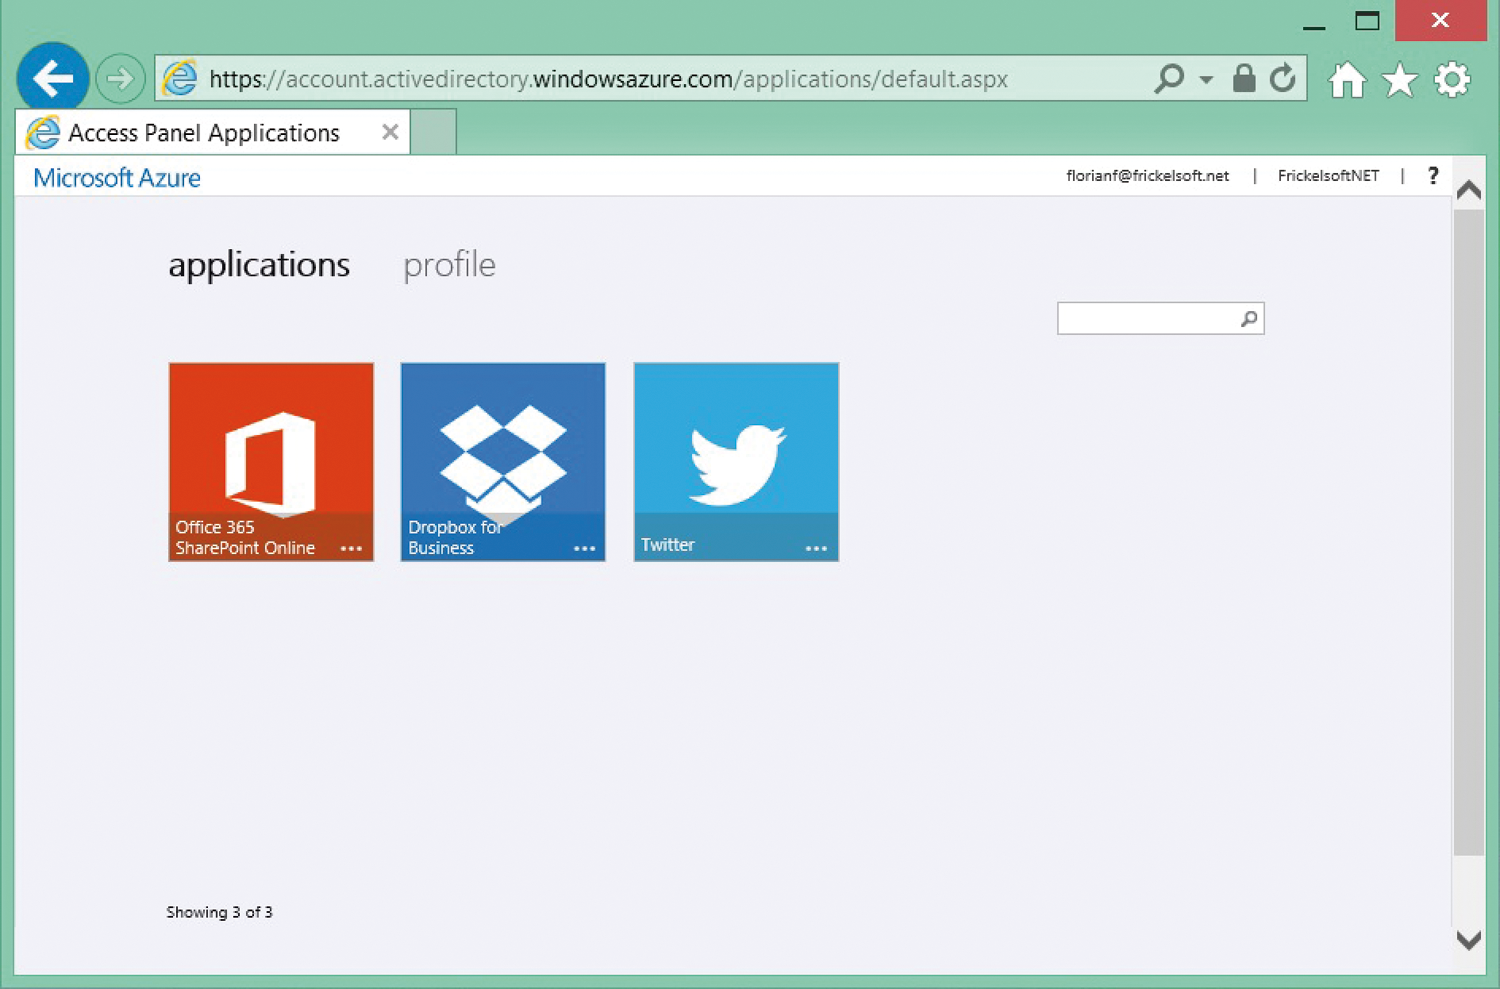
Login transparency is supported by a plugin for the browser, which feeds in the login credentials on accessing the application. Microsoft requests the installation of an MSI package for Internet Explorer when you first click on the application in the MyApps portal. Just installing the plugin is enough for Firefox. Once enabled, single sign-on works over and over for all applications with stored, protected passwords.
Users will find information about their user accounts in Azure AD under the profile tab. Other functions, such as changing AD passwords, are also available there if the Azure AD admin has enabled this.
Multifactor Authentication
Microsoft is currently expanding its online services to include multifactor authentication (MFA). This makes account theft difficult when accessing online resources and also secures access to local applications or to corporate VPNs upon request. Two new offers are particularly interesting for online subscribers: Office 365 customers can enable MFA for all users, as well as Azure and Azure AD customers for their administrative accounts – and for free. Administrator accounts can thus be protected even if Azure AD Premium licenses are scarce or if only an Office 365 subscription is available.
Enabling administrators takes place as follows: First, you enforce MFA for an administrative account. Second, you need to specify your preferences regarding the additional factor when next logging in: Phone, SMS, or unique code through an app, and a cellphone number that Azure MFA will use to make contact. MFA is then enabled for you as an administrator.
You can configure the MFA activation in the directory's user overview. After selecting any directory user, you can then select the Manage Multi-Factor Auth option with the padlock symbol. The portal then switches to the configuration page for MFA. The Enable option appears under Quick Steps when the desired user is selected. MFA is then activated here for the user. A further click on Enforce will enforce MFA.
Only at this point will the user be guided through the wizard upon next logging in. Administrators have to go through the setup once in Enforced mode before they can access the service again. The second factor is always invoked if the first password request and authentication through ADFS were successful.
The second factor is acknowledged via phone functions, such as a call or text message, or via the Multi-Factor Auth app for Windows Phone, iOS, and Android. Users can select their favorite method and configure it. A phone call or a text message are the options for the phone variant – a cellphone number is also stored. The free app can be configured for One-Time Password (OTP) or a push message that has to be accepted. The difference is that cellphone reception is not mandatory for OTP, but it is for the push message.
Checking Suspicious Activities
If the Azure AD administrator has a Premium license, several reporting options are available for reporting unusual or undesirable service usage. The reports are published in three categories and are available under Reports. The reports for atypical logins to the directory are particularly interesting. Azure AD generates an audit event if users log in to unknown devices or via untraceable connections.
All alarm bells should ring for simultaneous logins from different regions: An alert is generated if Azure AD discovers that a user is logging in from different regions, and the time between logins is not sufficient to travel from one region to another. A user cannot, for example, log in from Munich and then three hours later from New York. The travel time is significantly greater than the time between the logins and would, in this case, mean that an account is compromised or that a user account is being used by multiple individuals.
The Sign ins from possibly infected devices report compares the IP addresses of the users' devices with conspicuous IP addresses from the Internet. If users log in from computers that the Microsoft Security Research Center has recognized as infected through observations from the Internet, this will be listed in the report. Azure AD therefore incorporates information from various sources within these reports. Of course, actual, desired logins that were mistakenly marked as suspicious can also be behind these detected anomalies.
You can focus reports on different time periods and then, depending on the report, look more closely at the previous 30 days. Or, you can define a specific time period to compare – for example, July and December. All reports have a Download button in the bottom menu that lets you download the recorded activities as a .csv file. Microsoft promises to continue providing further reports in the future.
Conclusions
Azure AD is more than just Active Directory in the cloud. It is gradually becoming the central directory for authentication on many other SaaS offerings, well beyond the boundaries of Microsoft. Office 365 is far from the end of the line.
If you were careful when configuring the examples shown here, you will have seen the option for integrating self-created applications. This is where Microsoft sees the next big investment: Newly developed applications will not run permanently on an ordinary infrastructure but will instead be increasingly developed for and in the cloud. Interfaces and options for integrating with Azure AD are also available for this. Azure AD offers advantages over a local AD: It scales much better and is accessible from everywhere. In this article, I laid the foundations for further functions and defined a flexible approach for other potential scenarios.
