Analyzing large volumes of data with Apache Storm
In the Eye of the Storm
Huge amounts of data that are barely manageable are created in corporate environments every day. This data includes information from a variety of sources such as business metrics, network nodes, or social networking. Comprehensive real-time analysis and evaluation are required to ensure smooth operation and as a basis for business-critical decisions. A big data specialist such as Apache Storm is necessary to organize such amounts of data. In this article, I will walk you through the installation of a Storm cluster and touch on the subject of creating your own topologies.
Whether your company is in production or the service industry, the volumes of data that need to be processed keep growing from year to year. Today, many different sources deliver huge volumes of information to data centers and staff computers. Thus, the focus is on big data – a buzzword that seems to electrify the IT industry.
Big data concerns the economically meaningful production and use of relevant findings from qualitatively different and structurally highly diverse information. To make matters worse, this raw data is often subject to rapid change. Big data requires concepts, methods, technologies, IT architectures, and tools that companies can use to control this flood of information in a meaningful way.
Storm at a Glance
Storm was originally developed by Twitter and has been maintained under the aegis of the Apache Software Foundation since 2013. It is a scalable open source tool that focuses on real-time analysis of large amounts of data. Whereas Hadoop primarily relies on batch processing, Storm is a distributed, fault-tolerant system which – like Hadoop – specializes in processing very large amounts of data. However, the crucial difference lies in real-time processing.
Another feature is its high scalability: Storm uses Hadoop ZooKeeper for cluster coordination and is therefore highly scalable. Storm clusters are also easier to manage. Storm is designed so that all incoming information is processed. Topologies can, in principle, be defined in any programming language, although Storm typically uses Java.
A Storm environment usually consists of several components. A Storm cluster resembles a Hadoop cluster in many ways. Whereas MapReduce jobs are run in Hadoop, Storm uses the aforementioned topologies. Additionally, MapReduce operations are used by Hadoop for data consolidation; Storm again uses topologies. They are both very similar, except that MapReduce operations terminate on completion, whereas Storm constantly runs its topologies.
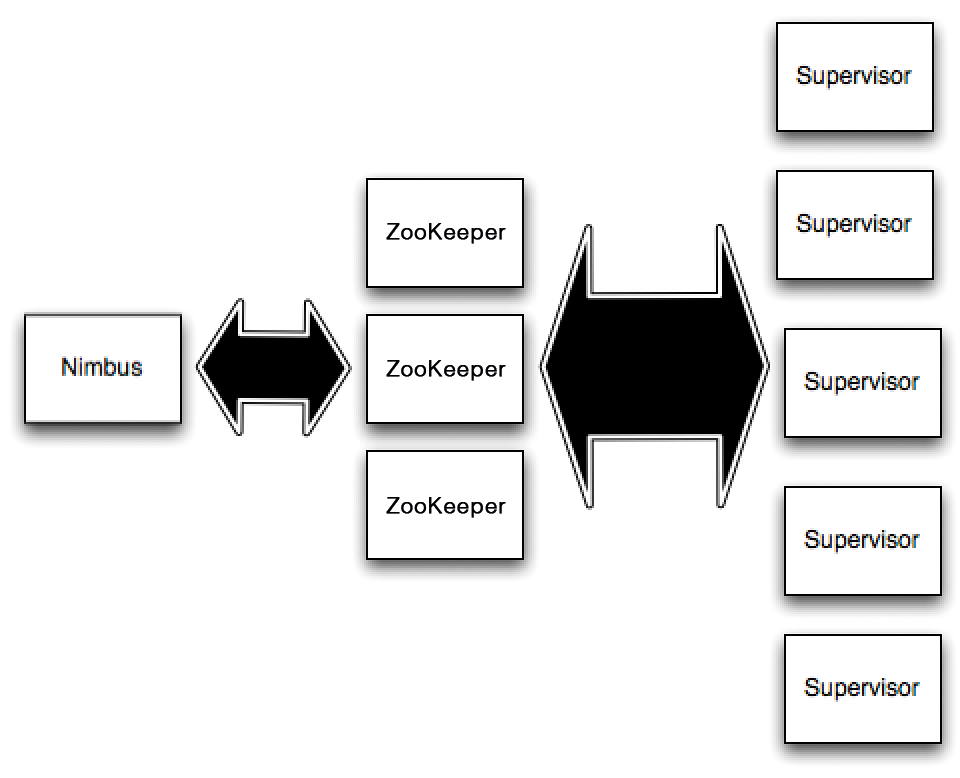
You will encounter two types of nodes in a Storm cluster: master and worker nodes (Figure 1). The Nimbus daemon, whose functionality is comparable to that of the JobTracker in the Hadoop environment, runs on the master node. Nimbus is responsible for distributing the code among the cluster nodes. It assigns tasks to the available nodes and monitors their accessibility and availability.

The supervisor daemon, which waits for work from Nimbus, runs on each worker node. Each worker process executes a topology subset. Conversely, this means that multiple worker processes (which are usually distributed over different computers) are responsible for executing a topology.
ZooKeeper is responsible for the liaison and coordination between Nimbus and the supervisor processes (Figure 2). The daemons are fail-fast systems and are therefore designed so that you can detect errors at an early stage and counter them. Because the daemon status information is managed in ZooKeeper, or alternatively on a local drive, they are extremely fail-safe. If the Nimbus or several supervisors fail, they are restarted automatically, as if nothing had happened.

Topologies and Streams
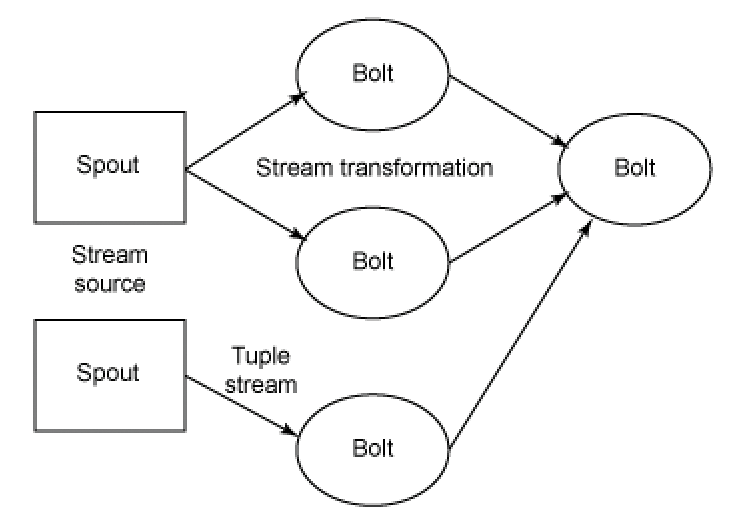
Distributed data processing is referred to as a topology in the Storm big data environment; it consists of streams, spouts, and bolts. Storm topologies are very similar to legacy batch mechanisms; however, unlike batch processing, they do not have a beginning and endpoint but instead keep running until they are finished.
The central data structure in Storm is the tuple, which – in simplified terms – consists of a list of key-value pairs. A stream consists of an unlimited number of tuples. The tuples are comparable to the events from the field of Complex Event Processing (CEP).
Spouts are the steam sources. You can understand them as adapters to the output sources, which convert the source data into tuples and then output these tuples as streams. Storm provides a simple API for implementing the spouts. Possible sources of data can include:
- Output of (network) sensors
- Social media feeds
- Click streams from web-based and mobile applications
- Application event logs
Because spouts do not typically use specific business logic, they can be used as often as you like in different topologies.
You can imagine topologies as a network of spouts and bolts. The bolts comprise the processing mechanism that receives the incoming streams, processes them, and then generates one or more output streams from them. Bolts can apply various actions to the incoming information. Typical functions can include:
- Filtering tuples
- Carrying out joins and aggregations
- Simple and complex calculations
- Reading and writing from/to databases
In principle, all processing steps are possible. Predefined topologies exist for typical processing steps; alternatively, adapting sample topologies is quite simple.
Setting Up Your Own Storm Cluster
Like Hadoop, Storm uses a typical master-slave environment but with slightly different semantics. In a classic master-slave system, the central server is usually fixed or set dynamically in the configuration. Storm uses a slightly different approach and is regarded as extremely fail-safe, thanks to the use of Apache ZooKeeper.
Storm is a Java-based environment, and all Storm demons are controlled by a Python file. Before actually installing Storm, you must first ensure that the necessary interpreters are correctly installed on the system concerned. You can also run the various Storm components on one system to familiarize yourself with them.
Storm was originally designed to run on Linux, but there are now also packages for Windows. Using an Ubuntu server is advisable if you want to evaluate Storm, because both Storm and the required components can be installed easily this way. If you are setting up a new Linux system, you should also select the OpenSSH server in the package selection.
The first step is the installation of Java components. The easiest way to obtain them is via the Apt package management system:
sudo apt-get update
sudo apt-get --yes install openjdk-6-jdk
To start, the simplest way is set up a single-node pseudo-cluster on which ZooKeeper and the different Storm components can be run side by side. Storm requires the use of ZooKeeper from version 3.3.x onward. You can install the latest version 3.4.6 using the following command:
sudo apt-get --yes install zookeeper=3.4.6 zookeeperd=3.4.6
This command sets up the ZooKeeper binaries and the service scripts for starting and stopping ZooKeeper.
Next, you can turn to the actual installation of Storm. You will find the current archive on the Internet [1]. Start with the Storm users and the associated group. You can create this as follows:
sudo groupadd storm
sudo useradd --gid storm --home /home/storm --create-home --shell /bin/bash storm
After downloading Storm, install the big data environment in the /usr/share directory and create a symlink to the /usr/share/storm directory. The advantage of this approach is that you can easily set up newer versions and only need to change a single symbolic link. Additionally, you can link the storm executables to /usr/bin/storm:
sudo wget <Download-URL>
sudo unzip -o apache-storm-0.9.2-incubating.zip -d /usr/share/
sudo ln -s /usr/share/apache-storm-0.9.2-incubating /usr/share/storm
sudo ln -s /usr/share/storm/bin/storm /usr/bin/storm
Storm writes its logfiles in the /usr/share/storm/logs directory by default instead of /var/log, the default log directory for most Unix variants. To change this, create a subdirectory for Storm in which the log data can be written. To do so, enter the following commands:
sudo mkdir /var/log/storm
sudo chown storm:storm /var/log/storm
sudo sed -i 's/${storm.home}\/logs/\/var\/log\/storm/g' /usr/share/storm/log4j/storm.log.properties
Finally, move the Storm configuration file to /etc/storm and create a symbolic link:
sudo mkdir /etc/storm
sudo chown storm:storm /etc/storm
sudo mv /usr/share/storm/conf/storm.yaml /etc/storm/
sudo ln -s /etc/storm/storm.yaml /usr/share/storm/conf/storm.yaml
This completes the installation of Storm, and you can now configure it and ensure the Storm daemon runs automatically.
Starting the Storm Environment
All Storm daemons are fast-fail systems – this means that they automatically stop when an unexpected error occurs. Thus, individual components in the environment can fail "safely" and then successfully restart without negatively affecting the entire system. Of course, this approach only works if the Storm daemons are also restarted immediately after a failure, which requires the use of various tools to guarantee reliable monitoring.
Most Linux systems, such as Debian and distributions based on it, have a supervisor component that specifically monitors daemons, keeps an eye on their status, and restarts them if necessary. In Ubuntu, you can install the supervisor using the following command:
sudo apt-get --yes install supervisor
This command installs and starts the supervisor service. Its main configuration file is saved in /etc/supervisor/supervisord.conf. The supervisord configuration file automatically includes all files that correspond to the pattern ".conf" in /etc/supervisord/conf.d/.
To keep the Storm configuration files under permanent control, place them in this directory. Next, create a configuration file for each daemon that is to be monitored by the supervisor component. The file will include the following data:
- Unique name for the service to be monitored.
- Execution command.
- Working directory in which the command is run.
- Autostart option which determines whether the service should be restarted.
- User to whom the service belongs.
Then create three configuration files to ensure that the Storm components are automatically started (and restarted) by the supervisor service: /etc/supervisord/conf.d/storm-nimbus.conf. Assign the following content to the configuration file:
[program:storm-nimbus]
command=storm nimbus
directory=/home/storm
autorestart=true
user=storm
The configuration file /etc/supervisord/conf.d/storm-supervisor.conf should look like this:
[program:storm-supervisor]
command=storm supervisor
directory=/home/storm
autorestart=true
user=storm
Finally create a configuration file /etc/supervisord/conf.d/storm-ui.conf for the Storm GUI:
[program:storm-ui]
command=storm ui
directory=/home/storm
autorestart=true
user=storm
You can now start the supervisor service and stop again if necessary:
sudo /etc/init.d/supervisor start
sudo /etc/init.d/supervisor stop
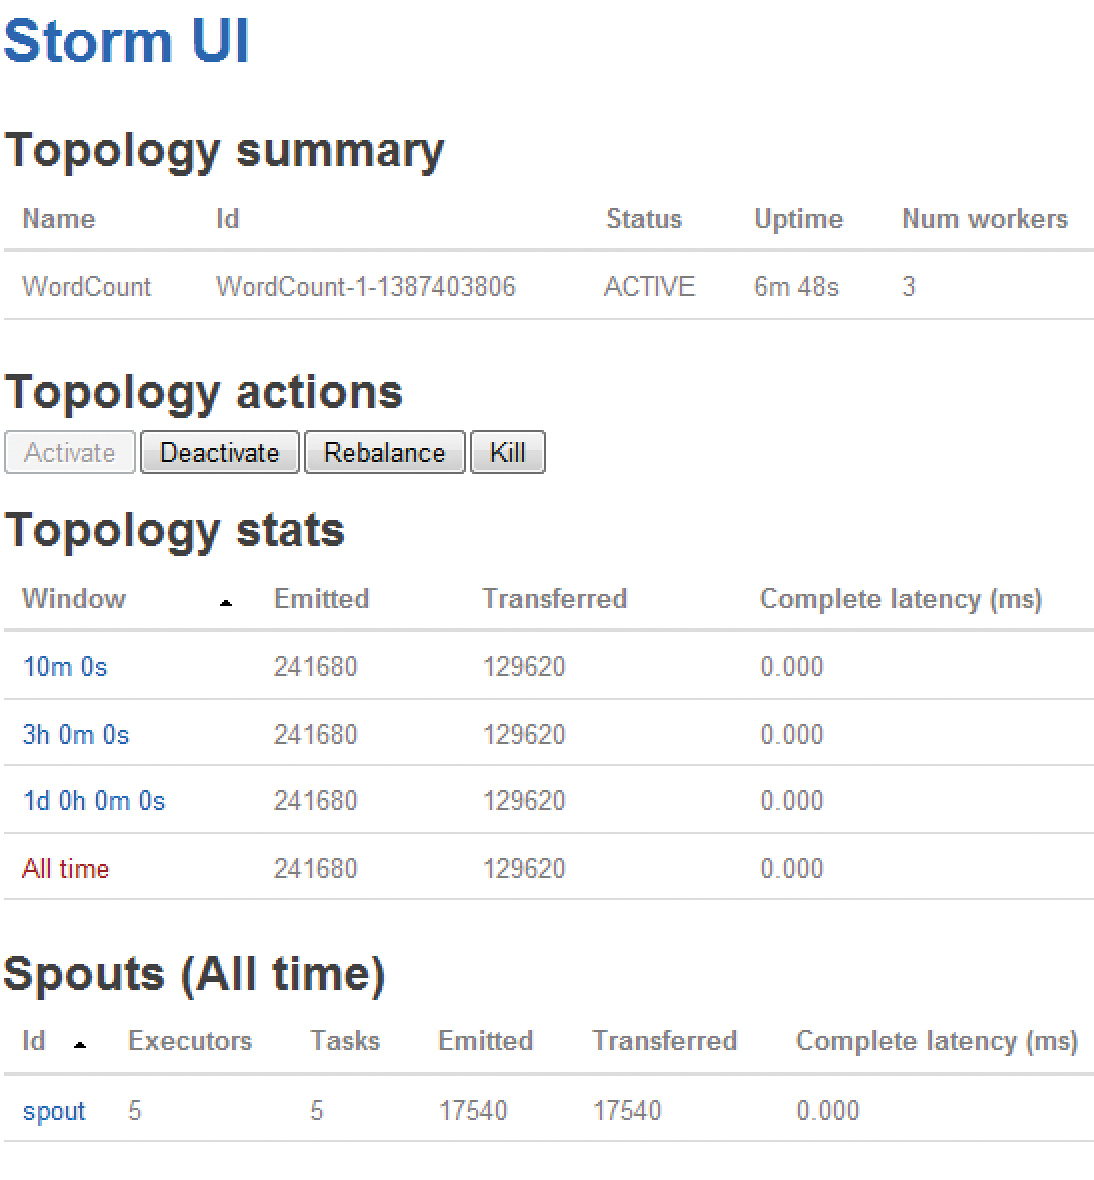
The supervisor service loads the new configurations and starts various Storm daemons. You can then verify the availability of the Storm services using the web GUI (Figure 3).

To do this, access the URL http://localhost:8080 using your browser. You can see from the simple web interface that Storm is executed; however, no topologies are currently running. If you are unable to access the GUI, you will find possible clues in the logfiles:
- Storm GUI:
/var/log/storm/ui.log - Nimbus:
/var/log/storm/nimbus.log - Supervisor:
/var/log/storm/supervisor.log
You now have an operable basic installation of Storm that you can refine according to your needs.
Adjustments to the Basic Configuration
The next step is modifying the basic configuration. The Storm configuration consists of various YAML properties. When the Storm daemon starts, it loads various default values and then the file storm.yaml. Listing 1 shows such a file with the necessary information.
Listing 1: Minimum storm-yaml File
01 # List of hosts in the ZooKeeper cluster
02 storm.zookeeper.servers:
03       - "localhost"
04 # Nimbus node host name
05 nimbus.host: "localhost"
06 # supervisor port
07 supervisor.slots.ports:
08       - 6700
09       - 6701
10       - 6702
11       - 6703
12 # Directory in which Nimbus and Supervisor store data
13 storm.local.dir: "/home/storm"
14 # Optional list of hosts which acts as a storm DRPC server
15 # drpc.servers:
16 #      - "localhost"
If you want to use a multihosting environment, you will need some additional settings. Using storm.zookeeper.servers lets you create a list of host names in the ZooKeeper cluster according to the scheme above. The designation localhost is okay for a pseudo-cluster. When setting up a real cluster, you will also need to define the Nimbus nodes with nimbus.host.
The Storm configuration uses a dot-separated naming convention for the different configuration categories, where the first keyword determines the respective category:
-
storm.*: General Storm settings -
nimbus.*: Nimbus configuration -
ui.*: Storm UI configuration -
drpc.*: DRPC server configuration -
supervisor.*: Supervisor configuration -
worker.*: Worker configuration -
zmq.*: ZeroMQ configuration -
topology.*: Topology configuration
The default Storm configuration is set in the defaults.yaml file. You can, of course, also make changes here that affect the whole Storm environment. You can, for example, change the web interface standard port 8080 using ui.port.
You can specify the JVM options that are added to the Java command line when starting the GUI using ui.childopts. You can also transfer the custom options to the supervisor daemon execution using supervisor.child-opts.
The execution of topologies is controlled using the "topology" configuration. Storm provides several customization options for this. Using
topology.message.timeout.secs
determines the maximum amount of time that the receipt of a tuple is allowed to last until the operation is regarded as having failed. The default value is 30 seconds, but a higher setting may make sense in a live environment.
The option topology.max.spout.pending, with 0 as the default configuration, passes tuples onto spouts as quickly as they can receive the information. Processing can be optimized by using a value other than 0. The two most important customizations for tuning the topology execution are available in topology.enable.message.timeout.
You can use the timeout configuration to determine whether tuple processing uses a timeout (true) or not (false). Before disabling the timeout functions, you should experiment with different second values until you have found the optimal performance.
Running Topologies
If you have not already done so, you can start the Storm environment after making any changes. To do this, you need to execute the three core components:
./storm nimbus./storm supervisor./storm ui
You have now created the right conditions for executing topologies. However, what is the best way to develop topologies? Nathan Marz provides different predefined scripts for download via GitHub [2] within the Storm starter package. These scripts are ideal for becoming acquainted with Storm.
The example in Listing 2 comes from this collection and implements a word count that consists of a bolt and a reduction transformation for other bolts.
Listing 2: Word Count Script for Storm
01 TopologyBuilder builder = new TopologyBuilder();
02
03 builder.setSpout("spout", new RandomSentenceSpout(), 5);
04
05 builder.setBolt("map", new SplitSentence(), 4).shuffleGrouping("spout");
06
07 builder.setBolt("reduce", new WordCount(), 8).fieldsGrouping("map", new Fields("word"));
08
09 Config conf = new Config();
10 conf.setDebug(true);
11
12 LocalCluster cluster = new LocalCluster();
13 cluster.submitTopology("word-count", conf, builder.createTopology());
14
15 Thread.sleep(10000);
16
17 cluster.shutdown();
This script begins with the declaration of a new topology that uses the TopologyBuilder category. Line 3 defines a spout with the name spout and uses the RandomSentenceSpout category. This category in turn outputs one of five sets from the output data. Line 5 defines the first bolt, specifically a split bolt, which applies the SplitSentence category to split the input stream and outputs individual words. The shuffleGrouping category ensures the random grouping of words.
Next, line 7 includes the definition of the last bolt, which serves as a reducing mechanism. The WordCount method implements the actual word count. Lines 9 and 10 include the creation and definition of a configuration object and the debugging mode. Lines 12 and 13 are responsible for the creation of a local cluster (in "local" mode) and the cluster name. Finally, Storm rests for the duration in second specified in line 15 and then shuts down with the shutdown command in line 17.
Conclusions
Apache Storm provides a big data solution for companies and meets even the highest demands. Although commissioning a big data cluster is quite easy to deal with, creating your own topologies means delving deeper into the subject. Storm, its interfaces, and API may be documented in great detail, but it is still missing a convenient (visual) tool for developing topologies.
