Application virtualization with Docker
Order in the System
Applications are no longer only developed and run on local machines. In the cloud era, this also takes place in virtual cloud environments. Such platform as a service (PaaS) environments offer many benefits. Scalability, high availability, consolidation, multitenancy, and portability are just a few requirements that can now be implemented even more easily in a cloud than on conventional bare metal systems.
However, classic virtual machines, regardless of the hypervisor used, no longer meet the above requirements. They have simply become too inflexible and are too much of a burden. Developers do not want to mess around with first installing an operating system, then configuring it, and then satisfying all the dependencies that are required to develop and operate an application.
Containers Celebrate a Comeback
Container technology has existed for a long time – just think of Solaris Zones, BSD Jails, or Parallels Virtuozzo; however, it has moved back into the spotlight in the past two years and is now rapidly gaining popularity. Containers keep a computer's resources isolated (e.g., memory, CPU, network and block storage).
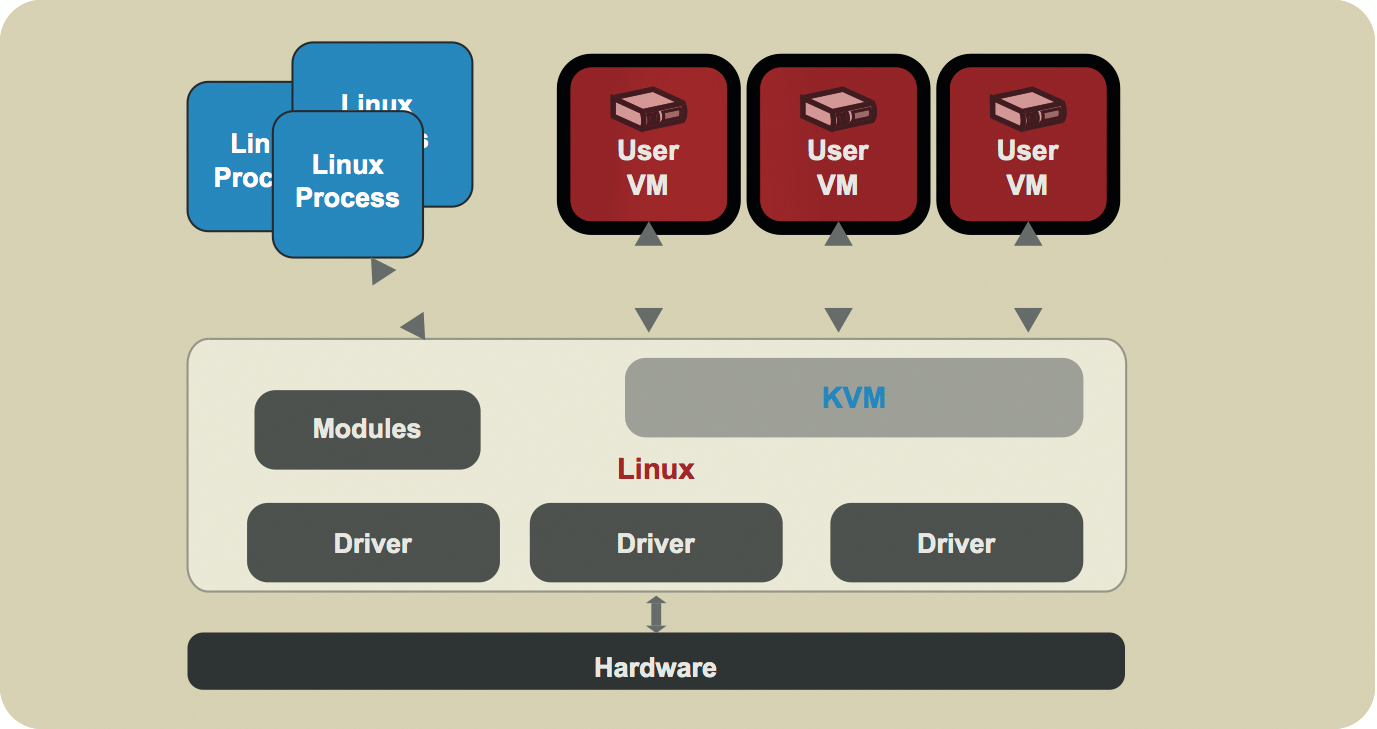
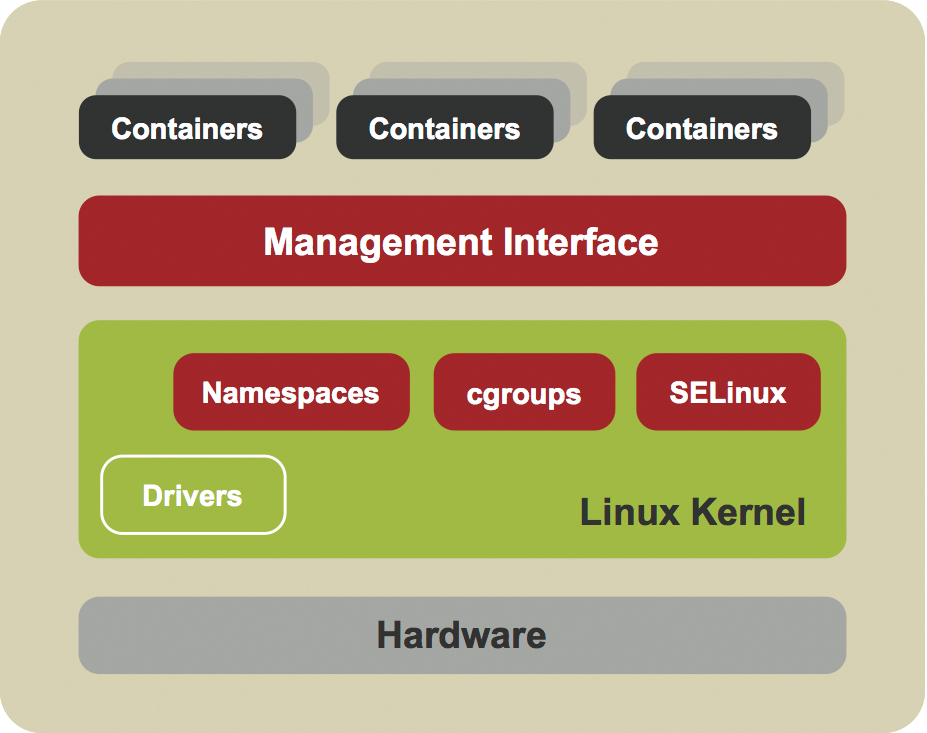
Applications run inside a container completely independent of one another, and each has its own view on the existing processes, filesystem, or network. Only the host system's kernel is shared between the individual containers, because most features in such an environment are provided by a variety of functions in the kernel. Because virtualization only takes place at the operating system level and no emulation of the hardware or a virtual machine is necessary, the container is available immediately, and it is not necessary to run through the BIOS or perform system initialization (Figures 1 and 2).


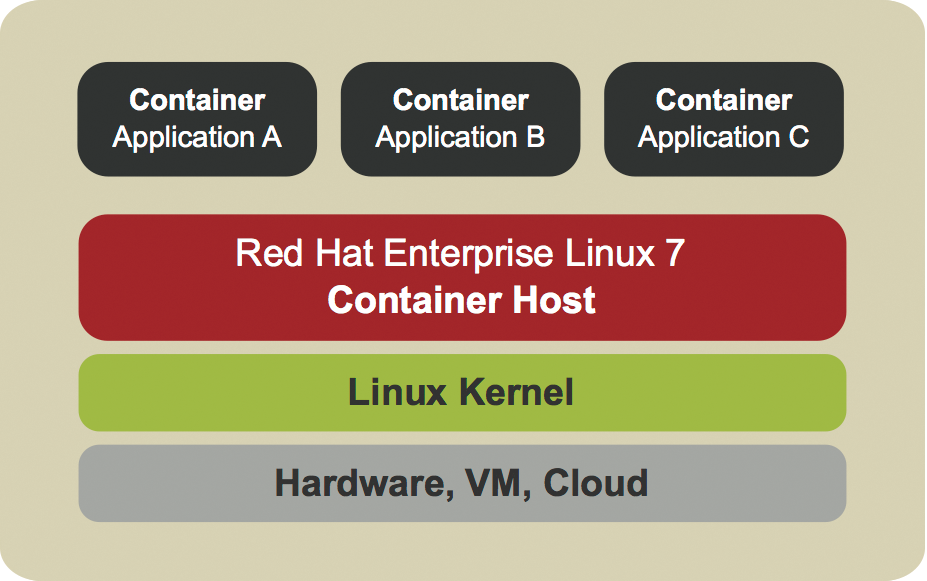
LXC (Linux Containers) provides a solution for Linux that relies on the kernel's container functions. LXC can provide both system containers (Figure 3) – that is, completely virtualized operating systems – and application containers (Figure 4) for virtualizing a particular application, including its run-time environment. However, LXC configuration is quite extensive, particularly if you need to provision application containers, and it requires much manual work, which is why the software never made a big breakthrough. However, this changed abruptly with the appearance of Docker.


Docker focuses on packaging applications in portable containers that can then be run in any environment. Part of the container is also a run-time environment, that is, the operating system, including the dependencies required by the application. These containers can then be easily transported between different hosts; thus, it's easy to make a complete environment, consisting of an operating system and an application, available within the shortest possible time. The annoying overhead – which still exists in virtual machines – is completely eliminated here.
Container 2.0 with Docker
Docker is a real shooting star. The first public release only arrived on the market in March 2013, but today it is supported by many well-known companies. It is, for example, possible to let Docker containers execute within an Amazon Elastic Beanstalk cloud or Google Kubernetes. Red Hat has made a standalone operating system available in the form of Project Atomic, which serves as a pure host system for Docker containers. Docker also supports Linux 7 in the new Red Hat Enterprise. The Google Kubernetes project, which many companies have now joined, tries to make Docker containers loadable on all private, public, and hybrid cloud solutions. Even Microsoft already provides support for Docker within the Azure platform.
The first Docker release used LXC as the default execution environment so it could use the Linux kernel's container API. However, since version 0.9 Docker has operated independently of LXC. The libcontainer library written in the programming language Go now communicates directly with the container API in the kernel for the necessary functions when operating a Docker container.
These functions essentially cover three basic components of the Linux kernel: namespaces, control groups (cgroups) and SELinux. Namespaces have the task of abstracting a global system resource and making it available as an isolated instance to a process within the namespaces. Cgroups are responsible for isolating system resources such as memory, CPU, or network resources for a group of processes and limiting and accounting for the use of these resources.
SELinux helps isolate containers from one another, making it impossible to access another container's resources. This is ensured by giving each container process its own security label; an SELinux policy defines which resources a process with a specific label can access. Docker uses the well-known SELinux sVirt implementation for this.
The Linux kernel distinguishes between the following namespaces:
- UTS (host and domain names): This makes it possible for each container to use its own host and domain name.
- IPC (interprocess communication): Containers use IPC mechanisms independently of one another.
- PIDs (process IDs): Each container uses a separate space for the process IDs. Processes can therefore have the same PID in different containers, even though they run on the same host system. Each container can, for example, contain a process with an ID of
1. - NS (filesystem mountpoints): Processes in different containers have an individual "view" of the filesystem and can thus access different objects. This functionality is comparable to the well-known Unix
chroot. - NET (network resources): Each container can have its own network device with its own IP address and routing table.
- USER (user and group IDs): Processes inside and outside a container can have user and group IDs that are independent of one another. This is useful because a process outside the container can therefore have a non-privileged ID while it runs as ID
0inside the container; thus, it has complete control of the container but not of the host system. However, user namespaces have only been available since kernel version 3.8 and are therefore not yet included in all Linux distributions.
Image-Based Containers
A Docker image is a static snapshot of a container configuration at any given time. The image can contain multiple layers, although they can usually only be read but not changed. An image is only given an additional writable layer in which changes can be made when a container is started. A Docker container usually consists of a platform image containing the run-time environment and further layers for the application and its dependencies.
The Dockerfile text file describes the exact structure of an image and is always used when you want to create a new image. Docker uses the overlay filesystem AuFS, which, however, is not included in the standard Linux kernel and therefore requires special support from the distribution as a storage back end. Instead, Docker can also work together with Btrfs. (Note that the filesystem does not support SELinux Labels and thus has to do without this protection; I expressly advises against this approach.) Because of all these problems, Red Hat uses its own Docker storage back end based on Device Mapper. A thin provisioning module (dm-thinp) is used here to create a new image from the individual layers of a Docker container.
Installing Docker
The following examples show how to install and run a Docker environment on Fedora 20. Docker version 1.2.0 is used; however, all of the examples also work without modification on other Red Hat-based distributions. You will find further guidance for other Linux versions on the Docker website [1].
First, install the package docker-io from the distribution's standard software repository and then enable the Docker service:
# yum -y install docker-io
# systemctl start docker
# systemctl enable docker
At this point, use:
# getenforce
to make sure the system is in SELinux enforcing mode
Enforcing
For a first test, start your first container with the command:
# docker run -i -t fedora /bin/bash
This activates a container based on the fedora image and starts the Bash shell in the container. The two options cause the container to be assigned a pseudo-terminal; you will have an interactive connection to the container. Because the fedora image is not yet present on the system, the Docker command-line tool establishes a connection to Docker Hub to download it from there.
Docker Hub is a central repository on which several different Docker images are available. Using docker search, you can search for specific images. If you use a proxy to connect to the Internet, first register it in the Systemd unit file for the Docker service (Listing 1) and then load the modified configuration:
# systemctl daemon-reload
After downloading the images, the Bash shell starts within the container and waits for your input. Access the ps command within the container and you will just see two processes: the Bash process with the PID 1 and the ps process. All other host system processes are not visible within the container, because it uses its own PID namespace.
Listing 1: Docker systemd
### You can define an HTTP proxy for the Docker service in the file /usr/lib/systemd/system/ docker.service.
[Unit]
Description=Docker Application Container Engine
Documentation=http://docs.docker.com
After=network.target docker.socket
Requires=docker.socket
[Service]
Type=notify
EnvironmentFile=-/etc/sysconfig/docker
ExecStart=/usr/bin/docker -d -H fd:// $OPTIONS
LimitNOFILE=1048576
LimitNPROC=1048576
Environment="HTTP_PROXY=http://proxy.example.com:80/" "NO_PROXY=localhost,127.0.0.0/8"
[Install]
Also=docker.socket
The same applies to the filesystem. Run ls, and you will see the container image's filesystem. The docker ps command displays all active containers on the host system (Listing 2).
Listing 2: Docker Containers Present
# docker ps
CONTAINER ID  **  **  **  **  ** IMAGE  **  **  **  **  ** ** ** COMMAND  **  **  **  **  ** CREATED  **  **  **  **  ** STATUS  **  **  **  **  ** PORTS  **  **  **  **  ** NAMES
314852f5a82e  **  **  **  **  ** **fedora:latest  **  ** "/bin/bash  **  **  **  **8 seconds ago  **  **  **Up 6 seconds  **  **  **  **  **  **  **  ** ** ** ** **ecstatic_turing
Along with a unique ID for the container, at this point, you will see the image used, the application running in the container, and the container's current status. It is only active as long as the application is running. If you log out of the shell within the container, the container also stops. A renewed call to docker ps confirms this.
This command supports a number of useful options. For example, docker ps **-a displays all previously started containers, regardless of their status. The -l option restricts the output to the last started container. You can wake up a stopped container at any time using docker start. The -a option immediately produces an interactive connection, and you are then, in this example, connected with the container's shell. If you want to delete a container as soon as it has been stopped, use the --rm option when starting the container (docker start --rm).
Memory Internals
The Device Mapper storage back end generates two files in /var/lib/docker/devicemapper/devicemapper by default: a 100GB data file and a 2GB metadata file. Both files are sparse files which therefore occupy much less space on the filesystem. The data file contains all your system's image data. Docker generates the block devices that are integrated when starting a container from these files using a loopback mount.
You will find the metadata for all containers in /var/lib/docker/containers. The config.json file contains information for a container in JSON format. If you start a container, Docker will use the previously integrated data file. If you enter
du -h /var/lib/docker/devicemapper/devicemapper/data
you will see how much disk space the file actually occupies on the filesystem. The more images you use, the greater the disk space required.
If the standard size of 100GB is no longer sufficient, you can define a new size for the data file in a separate systemd unit file for the Docker service. Copy the file /usr/lib/systemd/system/docker.service to /etc/systemd/system/docker.service and extend the "ExecStart=/usr/bin/docker" line to include the options
--storage-opt dm.loopdatasize=500GB
--storage-opt dm.loopmetadatasize=10GB
At this point, note that the use of loopback devices instead of only block devices definitely involves a performance hit. The data and metadata pools should therefore be on physical block devices in productive environments. The readme file [2] for the Device Mapper back end describes how you can perform such a configuration.
Web Server in Docker
The following example shows how to start a simple web server within a Docker container and make it accessible externally. To this end, first create the directory /opt/www on the host system and save the file index.html in this directory:
# mkdir /opt/www
# echo "Hello World..." > /opt/www/index.html
Then start a new container using the command:
# docker run -d -p 8080:8000 --name=webserver -w /opt -v /opt/www:/opt /bin/python -m SimpleHTTPServer 8000
A number of new features become apparent. You can see how to map a port within the container (here, 8000) on any host port. If you address the host on the mapped port (here, 8080), the request will be passed on to container port 8000. Furthermore, the container is assigned a fixed name in this example. The -w option sets the working directory for the container. You can make the host's volume available to the container using the -v option via a bind mount. In this case, roll out the host's previously generated directory /opt/www as /opt within the container.
Finally, start the Python interpreter within the container and access the web server module with network port 8000. The docker ps output now displays the container and points to the network port mappings. If you now run the
wget -nv -O -localhost:8080/index.html
command on the host, you will be presented with the web server's homepage within the container.
At this point, it is important to mention that Docker sets up a bridge device to the host by default and assigns it a private IP address on network 172.17.42.1/16. The network card of each container is associated with this bridge and is also assigned an IP from the private network. On the host, you can query this IP address using the command:
# docker inspect -f '{{.NetworkSettings.IPAddress}}' webserver
172.17.0.27
The docker inspect command is very useful for displaying information about a container: Run it with only the name of the container and without options. You can of course adjust the network configuration to suit your own environment. You will find more information about this online [3].
Creating Your Own Docker Image
We used the fedora image downloaded from Docker Hub up to this point in this workshop. You can now use this as a basis for your own image. You essentially have two choices to bind your changes to a container in a new image. Either you perform the changes interactively in a container and then commit them, or you create a Dockerfile in which you list all of the desired changes to an image and then initiate a build process. The first method does not scale particularly well and is only really suitable for initial testing or to create a new image quickly based on previously made changes; this is why only the Dockerfile-based version is presented here.
A Dockerfile must contain all the instructions necessary for creating a new image. This includes, for example, which basic image serves as a foundation, what additional software is needed, what the network port mappings should look like, and, of course, some meta-information, such as, who created this image. The man page for Dockerfile includes all permissible instructions. Take a quick look at these before creating more images.
Listing 3 shows a simple example of a Dockerfile that updates the existing Fedora image, installs a web server, and makes web server port 80 available to the outside world. Save the file under the name Dockerfile.
Listing 3: Dockerfile
### A Dockerfile for a simple web server based on the Fedora image.
# A Fedora image with an Apache web server on port 8080
# Version 1
# The fedora image serves as the base
FROM fedora
# Enter your name here
MAINTAINER Thorsten Scherf
# The image should include the last Fedora updates
RUN yum update -y
# Install the actual web server here
RUN yum install httpd -y
# Create a time index.html within the container this time
RUN bash -c 'echo "Hello again..." > /var/www/html/index.html'
# The web server port 80 should be accessible externally
EXPOSE 80
# Finally, the web server should start automatically
ENTRYPOINT [ "/usr/sbin/httpd" ]
CMD [ "-D", "FOREGROUND" ]
Start the build process using docker build. Make sure at this point that the command is accessed in the directory where you saved the Dockerfile (Listing 4).
Listing 4: Docker Build
# docker build -t fedora_httpd.
Uploading context 50.72 MB
Uploading context
Step 0 : FROM fedora
---> 7d3f07f8de5f
Step 1 : MAINTAINER Thorsten Scherf
---> Running in e352dfc45eb9
---> f66d1467b2c2
Removing intermediate container e352dfc45eb9
Step 2 : RUN yum update -y
---> Running in 259fb5959f4e
[...]
Step 3 : RUN yum install httpd -y
---> Running in 82dc46f6fc45
[...]
Step 4 : RUN bash -c 'echo "Hello again..." > /var/www/html/index.html'
---> Running in e1fdb6433117
---> d61972f4d053
Removing intermediate container e1fdb6433117
Step 5 : EXPOSE 80
---> Running in 435a7ee13c00
---> e480337fe56c
Removing intermediate container 435a7ee13c00
Step 6 : ENTRYPOINT [ "/usr/sbin/httpd" ]
---> Running in 505568685b0d
---> 852868a93e10
Removing intermediate container 505568685b0d
Step 7 : CMD [ "-D", "FOREGROUND" ]
---> Running in cd770f7d3a7f
---> 2cad8f94feb9
Removing intermediate container cd770f7d3a7f
Successfully built 2cad8f94feb9
You can now see how Docker executes the individual instructions from the Dockerfile and how each instruction results in a new temporary container. This is committed and then removed again. The final result is a new image consisting of a whole array of new layers. If you access Docker images, you will see a second image called fedora_httpd as well as the familiar fedora image. This is the name that you defined early on in the build process.
If you want to start a new container based on the image just created, call Docker as follows:
# docker run -d --name="www1" -P fedora_httpd -n "fedora_webserver"
The new option -P ensures that Docker binds the container's web server port to a random high network port on the host. To discover this port, again check the output from docker ps. Alternatively, you can also use the following call to figure out the network mappings used here:
# docker inspect -f '{{.Network-Settings.Ports}}' www1
map[80/tcp:[map[HostIp:0.0.0.0 HostPort:49154]]]
If you want to map to a static port instead, you can use the option -p 8080:80 when accessing docker run. Web server port 80 is tied to the host's port 8080 here. Run wget again to check that the web server is functioning correctly:
# wget -nv -O - localhost:49154
Hello again...
If everything works, you have succeeded in creating and testing your first Docker image. You can now export the successfully tested image, copy it to another host, and import it there. This portability is one of Docker's biggest advantages. You can export, for example, using the following command:
# docker save fedora_httpd > fedora_httpd.tar
Once the archive has been copied to the target host, you can import it there and assign a new name, if desired:
# cat fedora_httpd.tar | docker import - tscherf/fedora_httpd
This image is now available on an additional host and can immediately be used here. It is no longer possible to adapt the environment for another purpose. If you now create a new container based on the new image, the application runs on the second host in exactly the same way as on the host on which you tested the image. Incidentally, you can remove images you no longer require using docker rmi image. Just make sure that no containers use the image you are deleting.
Conclusions
After working your way through this Docker example, you should be able to install and configure a Docker environment. You can download existing images from the central Docker Hub. You should know how to start an image in a container and how to make it accessible externally. You can now also adapt existing images to suit your own environment and generate new images from them again. One interesting question is how to make self-generated images available on the central Docker Hub and how to create a connection between different containers using links. This is particularly interesting if, for example, you have a container running with a web server that needs to communicate with a database in another container over a secure connection. The Docker website [4] provides useful information on this topic.
