Setting up Google Apps for Work
The new office
Google's collection of workplace applications, known as Apps for Work, is a completely browser-based suite containing various office applications and a videoconferencing system, along with well-known email function and online store. The aim of this product offering is to give people the opportunity to collaborate on projects, no matter where they are, and to exchange information as if they were sitting in the same office.
In this article, I show how to set up Google Apps for Work and how to configure them optimally for company use. In doing so, I will discuss browser-based administration and the available iOS and Android apps. (See the "Features" box for more details before getting started.)
You can start the Google Apps for Work registration process [1] by clicking the Get started button and then specifying your name, business email address and some other details. After you click Next, the wizard will ask whether you want to use an existing domain name or register a new domain. If you already have a domain name, enter it in the Your own domain field and then click Next.
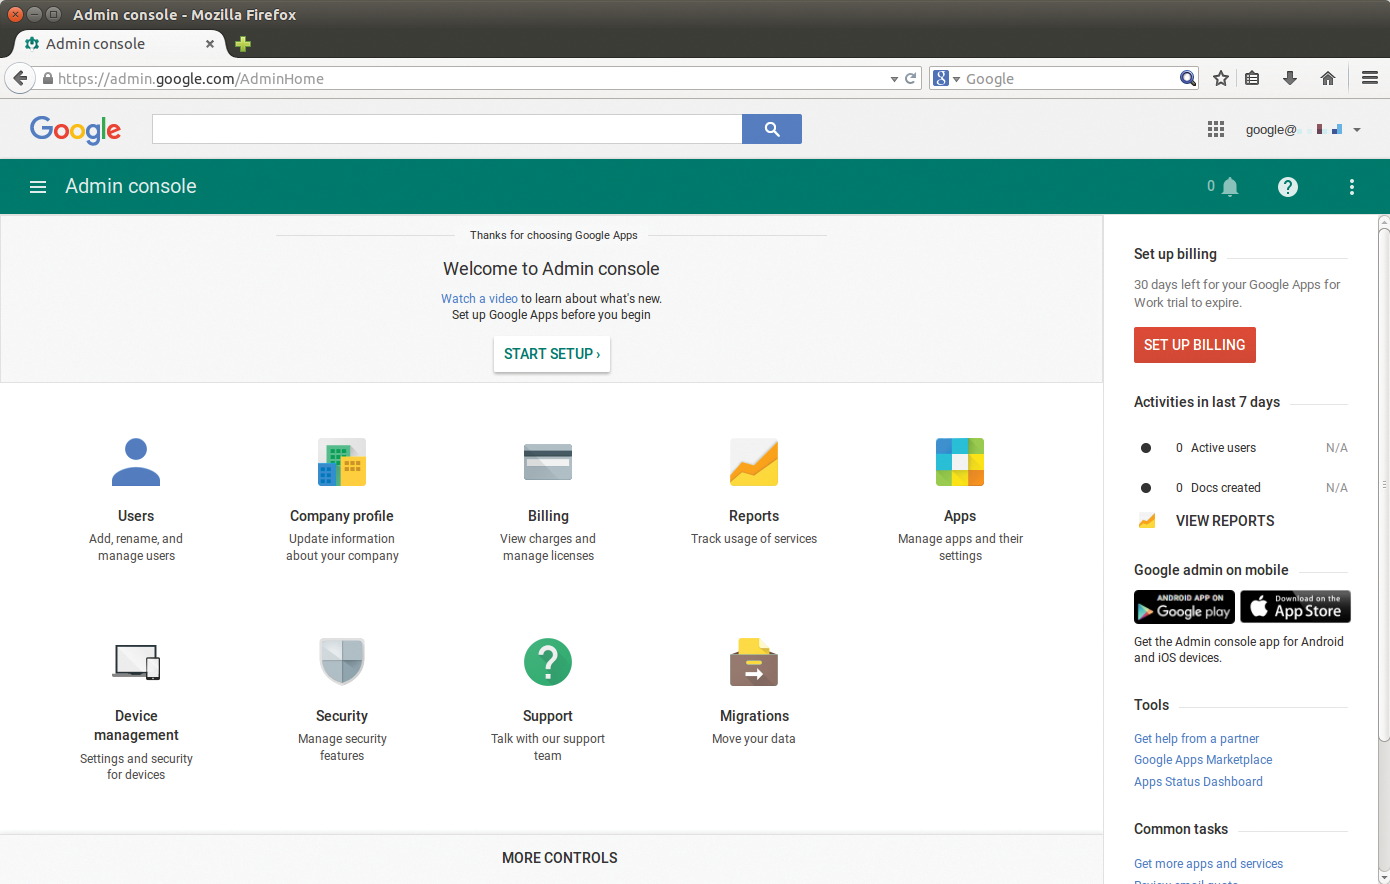
The next step is to create a Google Apps account with name@domain.tld; then, you can enter a password and indicate an alternative email address. The registration wizard will then guide you to the Admin console, which was renewed at the start of the year (Figure 1). In the future, you can log on directly to the console via https://admin.google.com. The service costs depend on the functions and storage space used and are $5-$10 per user per month.

You will see a few menu items in the Admin console; clicking More Controls in the footer will show more. Depending on which options you use most often, you can drag these icons from the footer to the dashboard or place less frequently used items in the footer area by dragging and dropping.
Domain Verification
The setup wizard will guide you through the first few steps. The central functions are email and the associated user management. User management needs its own Internet domain, which you have to confirm first. Just click on the Verify domain button. You now have various ways to identify yourself as the domain owner: incorporating a Google verification line in your website's source code or copying an HTML file into the domain website's root directory. You might already be familiar with this type of check from setting up Google Analytics.
If you only use the Internet domain as an email domain, or if you don't have web hosting access for some other reason, you will need access to the name server to perform a supplementary CNAME or TXT host record entry there. Google will check the confirmation after the wizard has guided you through the confirmation process. Then, you can continue setting up user accounts.
New Users via CSV Import
Even if you want to migrate email accounts from an existing mail server later, you need to set up the corresponding users first. Just click Add more users in the setup wizard and select whether you want to add a user manually, create several users at once, or invite a new user. I will describe the first two options because, in my experience, they are the most common.
Click Add a user manually and then Continue. Enter the first name, last name, and email address in the next dialog. If necessary, you can include a secondary email address, telephone numbers, and postal addresses via the Additional information link. Click Create new user to complete the process. The dialog that opens next displays the temporary password and the URL for logging on. You can send this information via email.
To set up multiple users at the same time, click Add more users again, and this time select Add several users at once and then Continue. The following dialog gives you the option to download a sample table in CSV format and, if necessary, to enter existing users. Download this table, edit it, add new users, and upload the updated CSV file. You have the option to deactivate or activate the Require a password change when new or updated users sign in instruction. Then, confirm by pressing Upload and continue. If there is a syntax error with the file, the dialog will show this. Otherwise, it closes automatically.
If you have your own LDAP directory server, Google Apps provides the Directory Sync tool, which you can use to import users and groups automatically into the Google Admin control panel. From there, you can use them in the system.
Setting Up Gmail
To receive email via Apps for Work, the next step is to set up Gmail or configure the Internet domain. Just click Set up Gmail in the wizard and this will take you to the process for setting up the domain and forwarding email. The instructions here describe how to change the mail server into a Google server using the MX records from your domain. This is needed so that the Google mail server will process your users' email and make them available via Apps for Work in the future.
You will need to access your Internet domain's domain name service (DNS) for this. For the switch to take place smoothly, it is helpful to change the domain SOA level to Quick updates a few days before. This ensures that the DNS server implements the changes promptly and, above all, that other name servers query them at very short intervals.
Clicking Set up email service will take you to a step-by-step guide of how to make the required settings. Once you have followed these steps, Google will check whether the DNS server is providing the settings properly. This check can take up to an hour. The Google mail server then receives email for users in the system.
Migrating Existing Email Accounts
At this point, I'll describe migrating email accounts, because most companies already use another email service. Click Migrations for an overview of the migration sources. The options there are Gmail, GoDaddy, another Google Apps account, Exchange Server 2003 to 2013, and Office 365. Select IMAP server for accounts for which Google doesn't offer a specific migration agent. You don't need an additional client on the source system with all sources.
Then, define the connection protocol. If the automatic detection doesn't work, select manually from the Exchange Web Services (EWS) or IMAP. Next, enter your email server's login credentials. Depending on which option you chose for Where are you migrating from?, this data is either the mailbox access data or – with Exchange and Office 365 – the Admin login data. It will take some time until Google migrates the data into Apps for Work and will depend on the amount of data and the connection to the existing mail server.
The service can currently transmit email messages, labels, and folders to Google Apps for data migration, but no calendar or contact data. The Google Apps Migration for Microsoft Exchange (GAMME) client must be installed locally for this. Naturally, this is possible with a separate Exchange Server but not with Office 365 and IMAP accounts.
Custom Settings
Next, I'll look at security. To get started, click on the Security icon. Enable SSL and make sure that the system always switches to an encrypted connection if a user logs on to the Apps service. Here you can also define the password length and activate a second layer of security (known as two-step authentication) for logging on if desired. If this method is implemented, users log on using a confirmation code (provided by Google) in addition to their username and password. This approach may be a pain for many users, but it is very secure process for companies to ensure that nobody accesses company data without authorization.
Switch to the Company profile menu item on the dashboard. Here you can enter the various master data for the business, the time zone, and support. You can also determine whether your users are allowed immediate or delayed access to new features of Google Apps. A delay may be useful if you want to get an impression of the new possibilities yourself first or want to train the support. This is also the case with completely new apps. You can specify whether users are automatically allowed to use new apps or whether you have to share them first.
In Personalization, you can store the custom company logo, which can be seen (instead of the Google lettering) in all products and sites in the future. In Custom URLs, you still have the option to switch the URLs from Google Gmail, Calendar, Drive, and Sites to a custom URL for your domain. This is how, for example, to set up the http://gmail.domain.tld URL for https://mail.google.com/a/domain.tld. Note that you cannot switch to SSL for your own domain because there is no way to set your own SSL certificate for the URLs.
Simple User Management
In line with the current trend of working on a tablet or smartphone, there is the Google Admin console app in the Apple Store and Android Store. Don't expect too much from it at this point, however, because it currently only provides user management.
Install the app and log in using your Admin username and password. You will then see Add new user and Add new group on the dashboard. Alternatively, you can go to User on the left menu to reset the password or edit information.
Specifying Permitted Apps
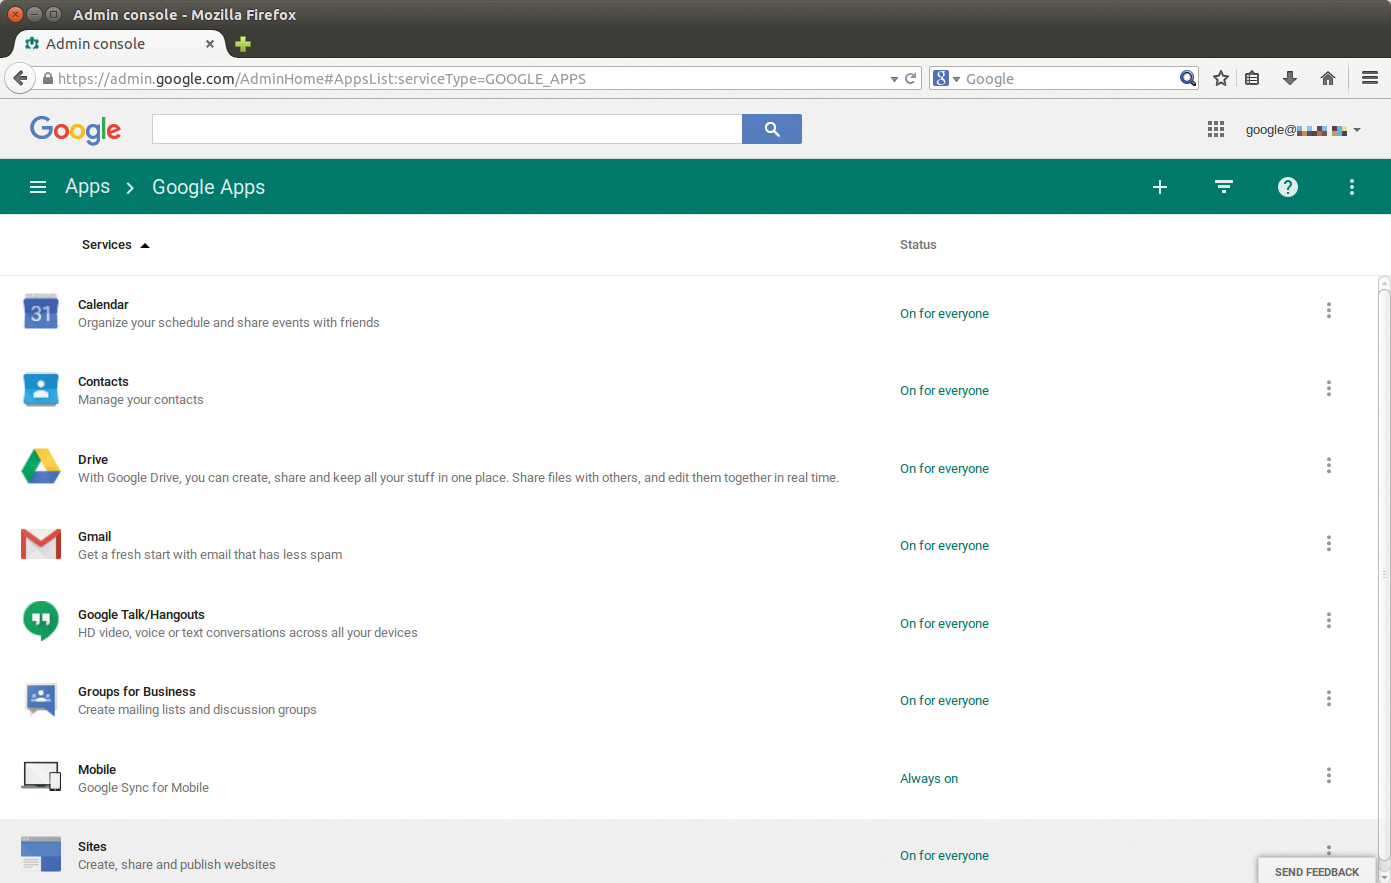
Once the users are added, accounts are migrated, and custom settings are determined, you can turn to the apps and their settings. Google currently offers seven apps and 14 additional services. You can expand this selection if required with apps from the Marketplace.
First, however, you need to determine which apps users can use with what limitations in the future (Figure 2). Drive, Gmail, Google Talk/Hangouts, Calendar, Contacts, Mobile, and Sites are all in Google's product range. You can see the uses and purpose of all the apps on the app overview page. Each app has different settings and is enabled by default for each user. You can adapt the apps to your needs using the apps setup wizard.

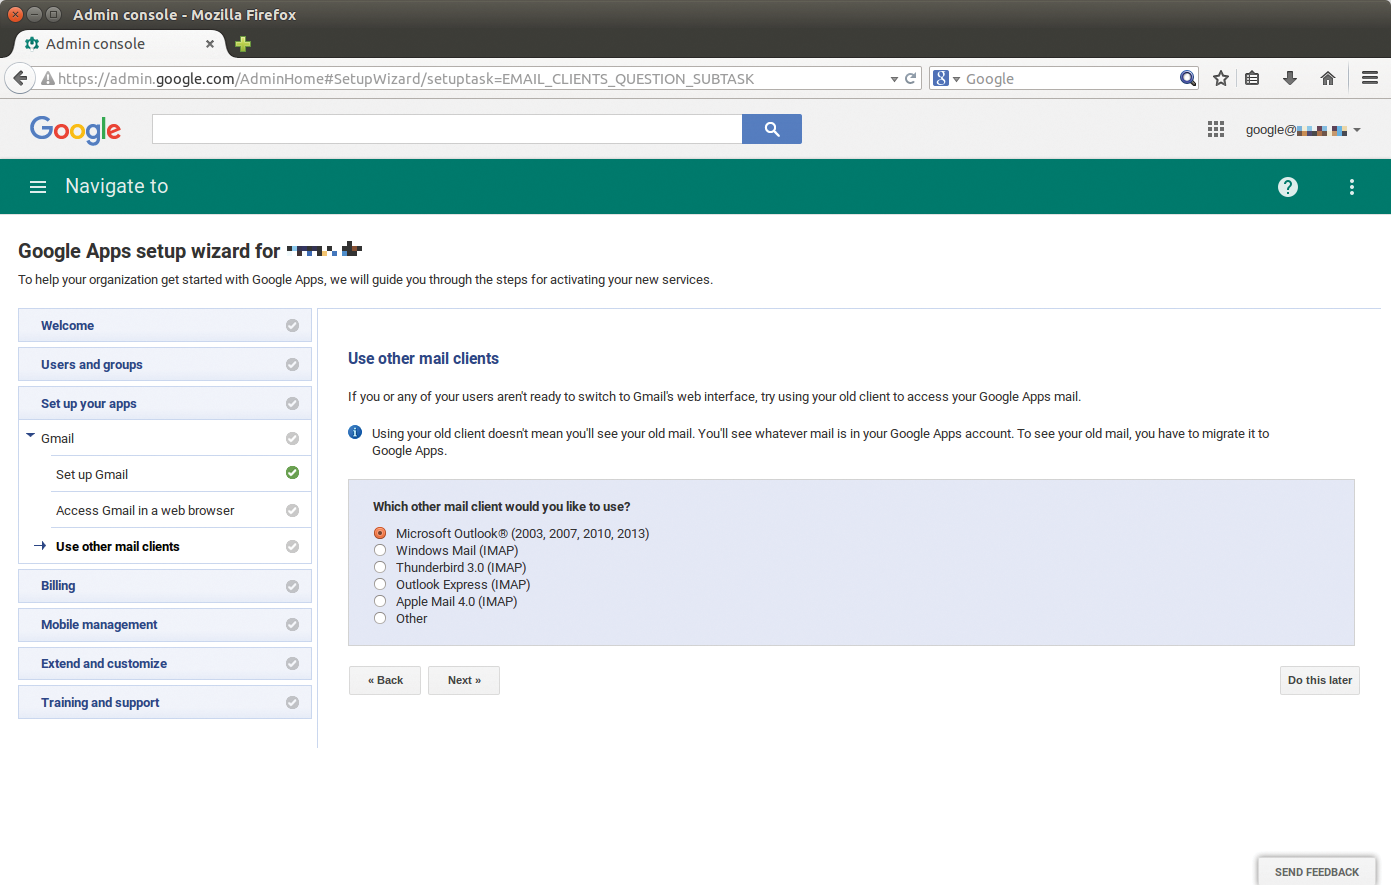
Open the wizard by clicking Setup at the top right of the menu. Next, open Set up your apps in the left menu and determine which of the four wizards you want to use for Gmail, Drive and Docs, and Calendar. Click all apps, for example, and then the Next button. You will receive individual steps that you can either execute directly or skip and do later. In Gmail, you also have the option to Run a pilot program at this point, which involves testing Gmail with several users without switching the complete domain. You can also allow the further use of email clients such as Outlook so that users don't have to change their usual office environment (Figure 3).

Limited Access Control
To set up apps' permissions for users, switch to Apps | Google Apps and select the app for which you want to restrict access. Unfortunately, it isn't possible to completely enable or disable the app for the organization at this point. Granular access permissions for users or groups are not provided.
You can completely enable or disable the app for your organization in Authorization. Depending on the app, it is also possible to restrict usage. With Drive, for example, you can determine whether your organization's users are allow to share things with people who are not members of the organization. Or, you can determine which user email address the system shows to other users for the Contacts app.
Additional Google Services
To set up the free Google services centrally within the company, you use Apps | Additional Google services. You will receive a list of, currently, 14 other services. Google Analytics and Google Groups, for example, are of interest to a company. You can disable access with your company ID to other services such as Picasa or Blogger at this point. Just select one of the services and click Off on the right in the menu.
Google Marketplace makes more applications available to users. This is also a well-known marketplace from Android, which third parties use to offer additional applications. Just switch to Marketplace apps under Apps and click the + symbol at the top right. The Marketplace opens, and you can filter the range of products by category. Click an app and then the Install app button. Next, confirm the installation and the rights to be granted with Accept. The app will be available shortly afterward as a Marketplace app. Here (to the right of the app), you also can share the app either with everyone or no one within your organization. Most apps still require an account or other settings from the app provider, and additional charges may apply.
Working with Google Apps
To use Apps for Work, you need to log on to your company portal. After logging on for the first time, you need to accept the Terms of Use and Privacy Policy. Depending on what link you used to log in (whether Mail, Docs, Drive, or another), you will see the selected app in the browser window. If you want to switch to another application (e.g., from Mail to Docs), you will find a symbol with nine squares at the top right, to the left of your name. Click this, and you get a list of the allowed apps. Select Google Docs, for example, to get to the Office application. Here you can create a new document, enter a title, and start working.
If you want to discuss your text with a colleague, go to File and Share, enter your colleague's name, and confirm by pressing Done. If the colleague also has Docs open, he or she will now see the shared document and can open it. Depending on what permission are granted, you can edit the document together and see changes made by your colleague in real time.
Conclusions
Google Apps for Work can be managed centrally and are to be operated consistently. Importing users via CSV file and connecting to an existing LDAP directory makes setup and continued administration easier. It is also possible to log on to the connected network thanks to the support of OpenID. Google Apps can access data on the local network using the secure data connector, and integration in an existing network succeeds very well.
Anyone who has no qualms about trusting Google with their company data and doesn't want to provide their own infrastructure for helping employees work in collaboration should definitely take a good look at Google Apps for Work.
