Develop your own scripts for Nmap
The Scribe
For years, Nmap [1] has been essential to system administrators. There are virtually no alternatives to the classic tool for penetration testing. Out of the box, this tool already gives you more than 100 standard scripts. However, Nmap offers more than just the ability to run predefined scripts.
The Nmap Scripting Engine (NSE) gives you what is potentially the most powerful and flexible feature of all: the ability to run your own scripts and thus automate various scanning and analysis tasks. The scripts are based on the Lua programming language [2], which is easy to learn and perfect for developing test scripts. Nmap executes these scripts in parallel at a high speed and with great efficiency.
Nmap's core functions are network, version, and vulnerability analysis. NSE takes scanning with Nmap to the next level. For example, you can use the scan engine to identify SQL injection vulnerabilities and potential brute force attack vectors. With the help of NSE, you can create your own test scripts and modify existing ones. To help you keep track, the developers have divided the scripts into various categories. You need to be familiar with these to be able to assign your scripts correctly via the header configuration. Based on the category name, you can see the field of application. Table 1 summarizes the various types.
Tabelle 1: Script Categories
|
Category |
Description |
|---|---|
|
auth |
These scripts handle authentication data and attempt to work around the authentication on the target system. Examples include |
|
broadcast |
Scripts in this category output broadcasts to identify any previously unidentified hosts on the local network. The |
|
brute |
Scripts of this type execute brute force attacks to retrieve the target system's access credentials. Nmap has dozens of such scripts for various protocols, for example, |
|
default |
These are standard scripts that are used if you run Nmap with the |
|
discovery |
These scripts actively attempt to discover more about the network by, for example, querying public registers, SNMP-capable devices, directory services, etc. Examples include |
|
dos |
Scripts from this category can cause denial of service attacks. The reason for this is typically testing for vulnerabilities. The service crashing is more of an undesirable side effect than the objective. |
|
exploit |
These scripts target vulnerabilities. |
|
external |
The scripts in this group send data to external databases and network services. For example, Nmap can query a whois server for more details about the target system. |
|
fuzzer |
These scripts send unexpected or random fields in each packet transmitted to the target system. This technique can be used to identify unexpected or unknown vulnerabilities of the targets. An example of this is |
|
intrusive |
These scripts cannot be assigned to the safe category because the risk of the target system crashing is fairly high. The reasons include the use of considerable resources or exploiting existing vulnerabilities. If you cannot assign your own scripts to a specific category, you should at least classify them as safe or intrusive. |
|
malware |
These scripts are used to discover whether the target system is already infected with malware or backdoors. Examples include |
|
safe |
These scripts are considered to be safe and will not cause damage to the targets. However, they can use considerable network bandwidth or other resources. Examples include |
|
version |
These script types are extensions of the version detection types, however, they cannot be selected explicitly. They only run if you enable version detection with the |
|
vuln |
The last script type tests for specific known vulnerabilities. However, reports are only output if vulnerabilities are actually found. |
Variable Applications
Nmap's core functionality is and will always be scanning network components. The version identification system can distinguish between thousands of different services. To do this, the scanner relies on tests and a match system that also supports the use of regular expressions. Nmap reliably identifies SNMP services and discovers brute force vulnerabilities. Both options can be easily exploited with NSE and matching test scripts.
For administrators, identifying existing and new vulnerabilities in the IT infrastructure is an essential task. It is a matter of getting there before others do. Although Nmap is not a security scanner like Nessus or OpenVAS, thanks to the scripting engine, you can perform simple vulnerability tests. Currently, Nmap has several scripts for this, and the developers are planning to add more.
Nmap and NSE are also useful for detecting backdoors. Hackers and worms typically leave a backdoor after an attack to ensure easy access to the system on next contact. Nmap scripts can identify these – not all, but a large number. NSE can also be used to identify complex worms and backdoors.
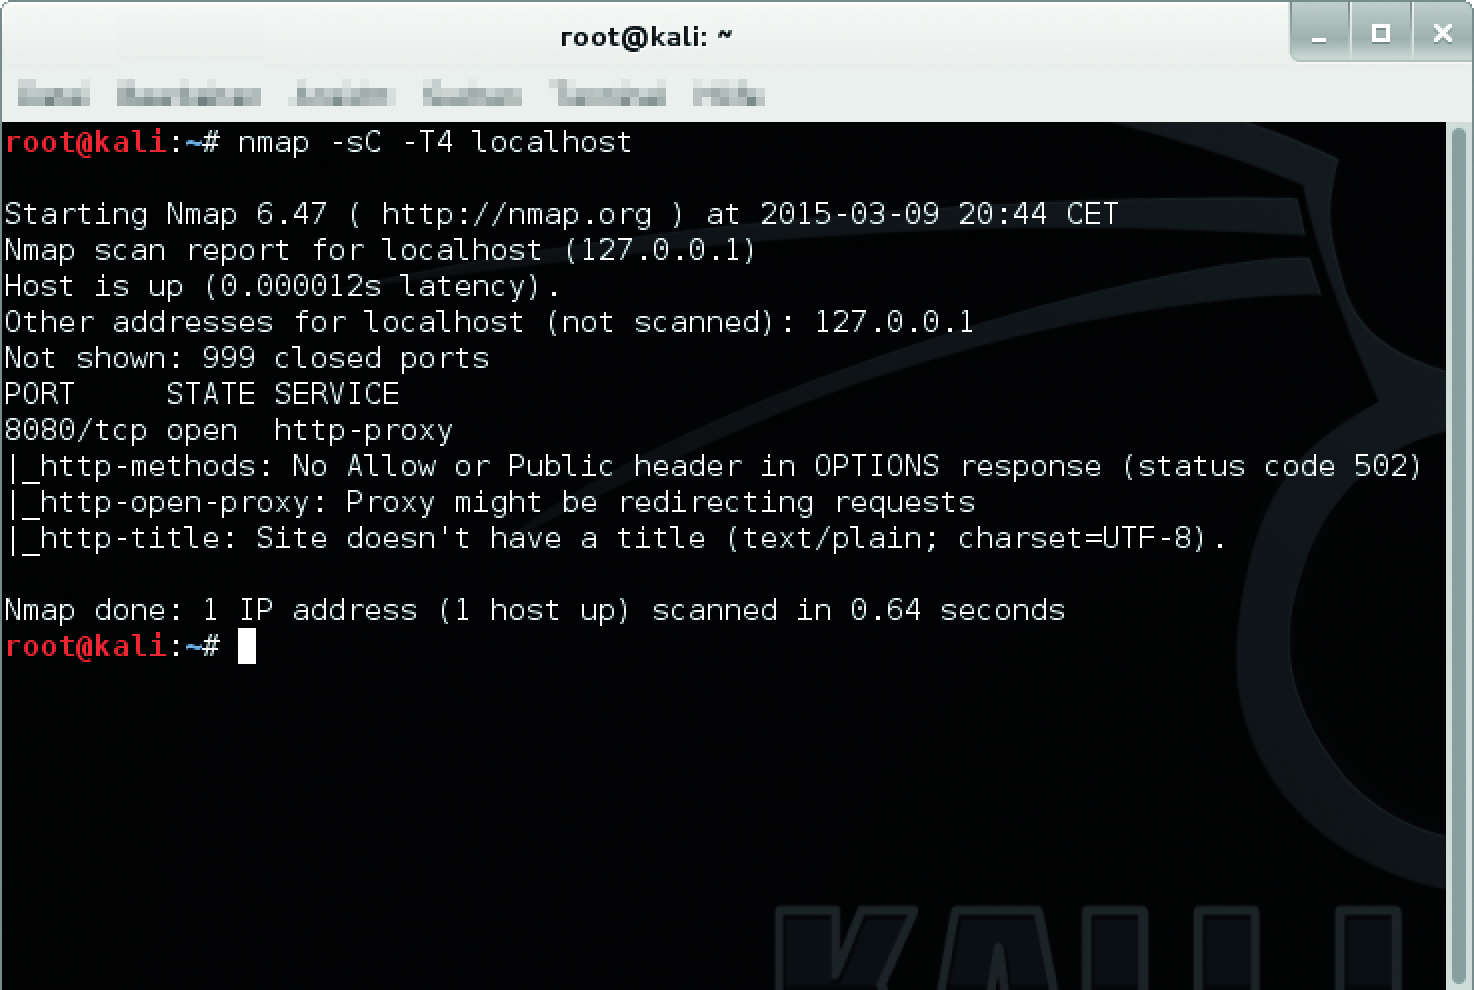
With NSE as a general scripting environment, you can of course also exploit any vulnerabilities you identify. The ability to run exploit scripts is particularly useful for pen testing. However, the developers are not planning to convert Nmap into a full-fledged exploitation framework like Metasploit. That said, it is good to know that you could also use Nmap in combination with NSE for this job. To get started developing your own Nmap scripts, you first need to enable the engine. If you have Nmap in place, this is easily done: Just use the -sC option. The results of the script execution are integrated into Nmap.
Getting Started with NSE
NSE scripts use the file suffix NSE and reside in a default Nmap installation below the /usr/share/nmap/scripts/ directory. To execute a specific NSE script, use the following syntax:
nmap --script scriptname.nse targethost
If you want to run a script and state the path, use the following command to do so:
nmap --script /path/to/scriptScriptname.nse targethost
After creating your first scripts, you will probably not want to launch them publicly, but first test whether they actually perform the desired actions. Nmap provides a dedicated test server in the scanme.nmap.org domain for this purpose. Use the following command for your first evaluations:
nmap --script /path/userdefined NSE-script.nse scanme.nmap.org
When taking your first steps, it also makes sense to enable debugging. Use the -d, supplemented with a value between 1 and 9, to do so. The higher the debug value, the more verbose the output. For example:
nmap -sV --script exploit -d3 targethost
NSE scripts have a clear-cut structure. This becomes most clear when you take a look at an existing script. The scripts not only define the tests to perform but also the output. Nmap and NSE define four different script types, which are characterized by different execution rules:
- prerule
- postrule
- portrule
- hostrule
Prerule scripts are executed before the scan. They can be used, for example, to collect service information. Some of these script types also define new targets, which are then analyzed by follow-up scripts.
The targets-sniffer.nse script, for example, uses prerule to check whether Nmap is running in privileged mode and the scanner can correctly identify the network interface:
prerule = function()
return nmap.is_privileged() and
(stdnse.get_script_args("targets-sniffer.iface") or
nmap.get_interface())
Postrule scripts are executed after Nmap has scanned all the targets. It makes sense to use this for formatting and presenting Nmap output. One of the most popular Postrule scripts is ssh-hostkey. It opens a connection to an SSH server, then reads and outputs the public key. The rule is defined as follows:
postrule = function() return (nmap.registry.sshhostkey ~= nil) end
Service scripts contain the portrule function, which attempts to find out which services are running on the target host and with which ports. Nmap has more than 15 scripts for testing HTTP services on web servers. If a web server with various ports is running on a target, the script runs multiple times – once per port.
The fourth script type is the host script. This type is typically used after Nmap has run discovery, port, version, or operating system scans. The hostrule function is applied here. An example is whois, which identifies the owner of a target system, or path-mtu, which discovers the maximum IP packet size accepted by a host.
Scan Phases
The scanning actions that Nmap performs are broken down into various phases. You need to be familiar with these so you will know the order in which the scanner typically performs which actions and which steps you can omit if needed:
- Phase one is pre-scanning. It only runs if you use the
-sCor--scriptoptions. This is an attempt to use NSE scripts to discover more information about the target (Figure 1).

- In phase two, Nmap resolves the target's hostnames, to be able to continue working with the IP addresses.
- In phase three, Nmap then discovers whether the target(s) are accessible. It uses various discovery techniques to do this. You can omit this phase using the
-Pnoption. - Phase four involves reverse DNS resolution. Nmap performs a reverse lookup here to discover the hostnames of the targets. You can enforce this phase with the
-Roption and skip it with-n. - Phase five is port scanning – the classic task. In this phase, Nmap discovers the status of the ports to analyze. You can also omit this phase by stipulating the
-snoption. - Phase six is advanced version detection for the open ports found. This phase is only performed if you stipulate the
-sVargument when running Nmap. - In phase seven, Nmap attempts to identify the operating system run on the target hosts. This test only occurs if you use the
-Ooption. - Nmap scans can cycle through three more phases, with phase eight being the traceroute phase in which the port scanner determines the route to the hosts. This phase is enabled by the
--tracerouteoption. - NSE scripts are finally used in phase nine. The output is generated here on the basis of the output configuration defined in the script. Nmap formats the acquired information and outputs it.
- The tenth or final phase is known as post-scanning. Here the post-scans defined in the NSE script are executed. If no more tests are defined, this phase is omitted.
Discovering Open Ports
What precisely can you do with NSE scripts and how can the tasks be implemented in concrete terms? The first part of this question is easy to answer; the second part is more difficult. You can use your Nmap scripts to collect information about target systems, discover extended data and hidden data, perform brute force to gain access to systems, and check targets for potential vulnerabilities.
Basic Lua skills are required for developing NSE scripts. Additionally, Nmap relies on the NSE API and the powerful NSE library. However, because Lua is easy to read and understand, I'll look at the basic framework of a simple NSE script, which I will call http-vuln-check.nse and which outputs Hello World! when it finds an open port (Listing 1). The script will test a web application for vulnerabilities. Lines starting with two dashes (--) are comments.
Listing 1: Hello World!
-- Header --
-- Rule --
portrule = function(host, port)
return port.protocol == "tcp"
and port.number == 80
and port.state == "open"
end
-- Action --
action = function(host, port)
return "Hello World!"
end
The previous script consists of three sections. In the Header, you store a variety of metadata on the script function, the objective, the author, and the category. The Rule section is where you define the conditions required to run the script. This script must contain at least one of the functions described above: portrule, hostrule, prerule, or postrule.
Most scripts use at least the portrule function. In the example here, the portrule function relies on the Nmap API to test TCP port 80.
The Action section defines the script's logic, which is very simple in this case: If the script finds an open TCP port 80, it outputs the message Hello World!.
To test the script on a local web server, run the following command:
# nmap --script /path/http-vuln-check local targetlhost -p 22,80,443
The output should look something like Listing 2.
Listing 2: Sample Output
Starting Nmap 6.47 (http://nmap.org) at 2015-03-12:00:00 CET
Nmap scan report for targethost (192.168.1.100)
Host is up (0.023s latency).
rDNS record for 192.168.1.100: localhost
PORT STATE SERVICE
22/tcp filtered ssh
80/tcp open http
|_http-vuln-check: Hello World!
443/tcp open https
Nmap done: 1 IP address (1 host up) scanned in 0.23 seconds
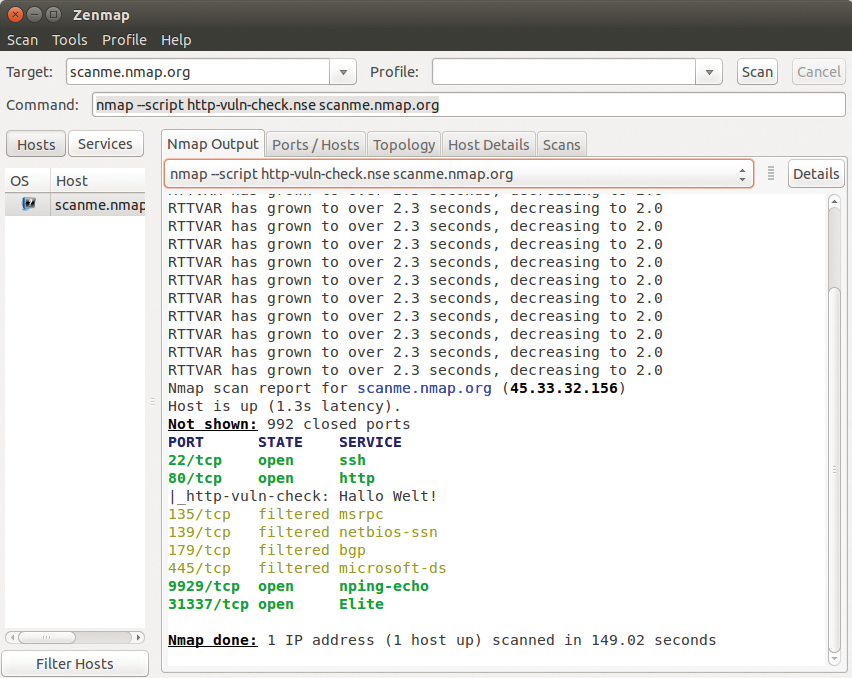
If you use Zenmap, the Nmap GUI for scanning (see the box called "Kali Linux Toolbox"), the scan results will be displayed in the Nmap Output tab (Figure 2). If you run Nmap at the command line, you will see typical console output.


What makes NSE so powerful and versatile is the use of libraries, which you can easily integrate into your scripts. One of the most commonly used libraries is shortport.http, which executes short portrule functions. The modified script configuration looks like Listing 3.
Listing 3: Modified Script Configuration
-- Header --
local shortport = require "shortport"
-- Rule --
portrule = shortport.http
-- Action --
action = function(host, port)
      return "Hello World!"
end
The direct comparison between the two script configurations shows that the NSE code can be vastly simplified thanks to the shortport library. Because the shortport.http library checks all the typical HTTP ports (80, 443, 631, 7080, 8080, 8088, 5800, 3872, 8180, 8000) and the various services (http, https, ipp, http-proxy, etc.), you see far more information about the target system.
Final Polishing
Often, the objective of a script is to discover more about services and vulnerabilities of a target. To do this, you need to extend the basic script slightly. To check the vulnerability of a web application, I will attempt to download a web page and evaluate the web server's response (Listing 4).
Listing 4: Checking for Vulnerabilities
-- Header --
local shortport = require "shortport"
local http = require "http"
-- Rule --
portrule = shortport.http
-- Action --
action = function(host, port)
      local uri = "/index.html"
      local response = http.get(host, port, uri)
      return response.status
end
The previous example relies on the http [3] library. You could continue refining the script and only generate output if HTTP code 200 is returned.
The next step is usually to identify specific vulnerabilities. Again, this is typically easier than you might think; all you need to do in most cases is identify the service version. In this example, you can turn to the string library and modify the script header as follows:
local string = require "string"
To allow third parties to use your script, you need to do some polishing of the header. It can contain a variety of details. In combination with the @ sign, you can include details of usage (@usage) and output (@output) in the header. Listing 5 shows an example of a simple header.
Listing 5: Header Example
-- Header --
description = [[Example to introduce developing your own Nmap scripts]]
---
-- @usage
-- nmap --script http-vuln-check target_host
-- @output
-- PORT STATE SERVICE
-- 80/tcp open http
-- |_http-vuln-check: Vulnerable
author = "holger reibold"
license = "like nmap"
categories = {"default", "safe"}
local shortport = require "shortport"
After reaching this point, you will probably be interested in how to delve more deeply into the development of NSE scripts. The best approach is to study the NSE library, where you will find a huge amount of input for analyzing services other than HTTP. Nmap has more interesting opportunities to offer – for example, parallel scanning of various hosts.
Conclusions
Nmap is a top-ranked port scanner that is well equipped to analyze typical network components in the standard configuration. In combination with NSE and the comprehensive libraries, the scanner can easily be tuned for handling your required tasks, which means Nmap is still unrivaled.
